JUnit is one of the most popular unit testing frameworks in the Java ecosystem. The JUnit 5 version (also known as Jupiter) contains many exciting innovations, including support for new features in Java 8 and above. However, many developers still prefer to use the JUnit 4 framework since certain features like parallel execution with JUnit 5 are still in the experimental phase.
Barring a few minor things aside, JUnit 5 still represents a major step forward in test framework evolution as it provides advanced annotations that let you test reactive applications. As per my experience, JUnit 5 is the best JUnit version yet. The new framework also brings in an extensible architecture and a brand-new extension model that makes it super easy to implement custom features.

In this JUnit Tutorial, we deep dive into JUnit 5 extensions – one of the major features of the JUnit 5 framework.
What’s so great about JUnit 5?
If you have used the JUnit 4 framework, you would agree that there are reduced (or minimal) possibilities of extending or customizing the JUnit 4 framework. This is one of the biggest bottlenecks in that version of the JUnit framework. In JUnit 4, extensions like Runners can be created by simply annotating the test class with @RunWith(MyRunner.class) so that JUnit can use them.
The downside of this approach is that you use only one Runner for a test class. This makes it difficult to compose with multiple runners. However, the shortcomings posed by Runners with JUnit 4 can be overcome using the below options:
- JUnit 4 uses the Rules in addition to Runners that provides you a flexible solution to add or redefine the behavior of each test method.
- Rules can be created to annotate fields of the test class. However, Rules suffers from a constancy problem. In simple terms, Rules can only be executed before and after a test is run but can’t be implemented within the test.

So, how does the JUnit 5 framework solve this lingering problem of JUnit 4? JUnit 5 offers an extension mechanism that opens third-party tools or APIs through the extension model. It consists of a single and coherent concept of Extension APIs to overcome the limitations of competing JUnit 4’s extension points (i.e., Runner, TestRule, and MethodRule).https://www.lambdatest.com/webinar/how-digital-transformation-is-catalyzing-changes-in-automation-testing?utm_source=WebinarCTA
Now that we have covered a gist about JUnit 5 Extensions, here are the immediate set of questions that pops up for Java developers:
- Why should we use extensions?
- How much effort is involved in coming with JUnit 5 extensions?
- Is the extension model better than the “Programming Model”?
Here is what is mentioned in JUnit 5’s core principles:
It’s better to enable new functionality by creating or augmenting an extension point rather than adding the functionality as a core feature.
Read – How to execute JUnit 4 tests with JUnit 5 [Tutorial]
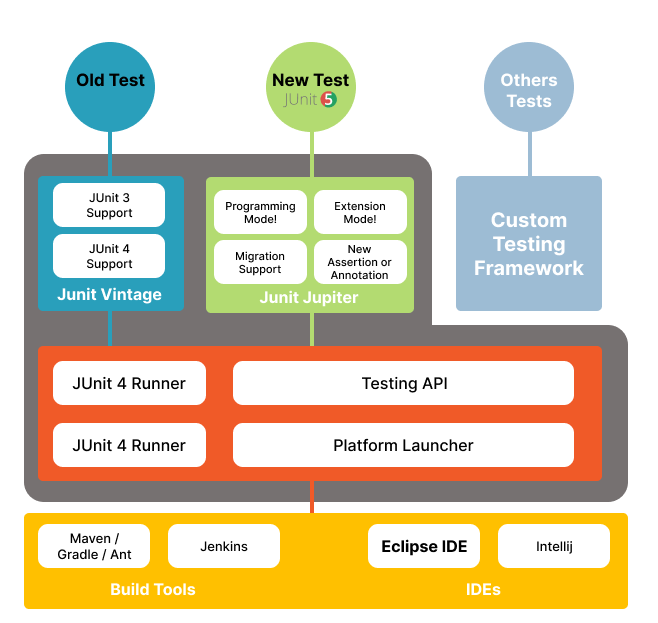
JUnit 5 Architecture
The previous versions of the JUnit framework (i.e., till JUnit 4) were delivered in a single jar. However, JUnit 5 is architecturally different from the earlier JUnit versions. Therefore, JUnit 5 is delivered in different modules to meet the new architecture that separates API, Execution engine, Execution, and Integration.
JUnit 5 can only be used with Java versions greater than or equal to 8. Here are the three modules that make up the JUnit 5 framework:
- JUnit Platform: Provides an API for tools to discover and run tests. It defines an interface between JUnit and customers who want to run the tests from IDEs, build tools, or console.
- JUnit Jupiter: Provides an annotation-based API to write JUnit 5 unit tests, along with a test engine that lets you run them.
- JUnit Vintage: Offers a test engine to run JUnit 3 and JUnit 4 tests, thereby ensuring backward compatibility (with earlier versions of the JUnit framework).
The goal of this architecture is to separate the responsibilities of testing, execution, and extensions. It also facilitates the integration of other test frameworks with the JUnit framework.
Programming Model Vs. Extension Model
If you are a QA engineer who writes tests on a regular basis, you are sure to use the programming model. On the other hand, the Extension model provides several interfaces as extension APIs that can be implemented by extension providers (developers or tool vendors) to extend the core functionality of JUnit 5.

JUnit 5 Architecture
As seen in the JUnit 5 architecture shown above, the extension model is a part of the Jupiter module that lets you extend the core features of JUnit 5 through flexible and powerful extensions. In addition, the JUnit 5 extension overcomes the limitations of the JUnit 4 extension by replacing Runners and Rules, its competing extension mechanisms. Finally, since JUnit 5 provides backward compatibility, you can still run JUnit 4 tests with JUnit 5.
The extension model of JUnit Jupiter is exposed through a small interface in org.junit.jupiter.api.extension package that can be used by developers or extension providers.
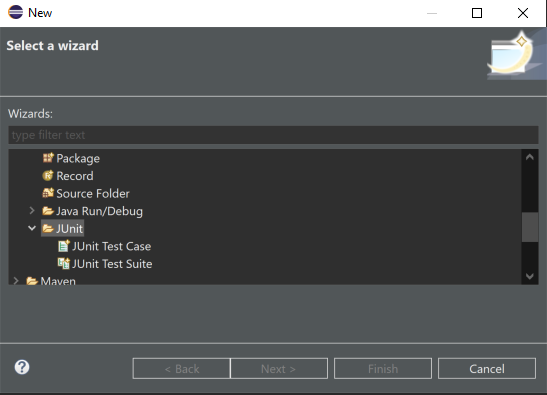
Now that we have covered the essentials of JUnit 5 Extensions let’s get our hands dirty with code that illustrates a JUnit 5 extension example. For doing so, let’s create a Java project with three test cases in a Java class using the Eclipse IDE:

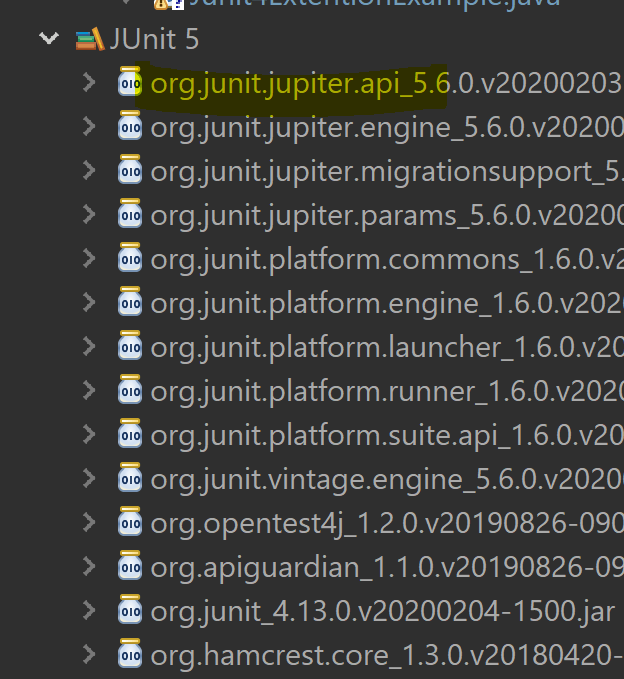
In case you are familiar with other Java IDE (apart from Eclipse), you can check our detailed blog that deep-dives into How to run JUnit from the Eclipse IDE. After adding the JUnit 5 library to the build path (or adding dependencies for the Maven project), we see that the JUnit 5 extension is in the org.junit.jupiter.api in the org.junit.jupiter.api.extension package as shown below:
Here is a sample Java implementation that showcases a simple JUnit 5 extension example:
class FirstTestCase {

    @BeforeAll
    static void setUpBeforeClass() throws Exception {
    }
    @AfterAll
    static void tearDownAfterClass() throws Exception {
    }
    @BeforeEach
    void setUp() throws Exception {
    }
    @AfterEach
    void tearDown() throws Exception {
    }
    @Test
    void test() {
        fail("Not yet implemented");
    }
}
As seen in the above implementation, we have used JUnit annotations related to the test execution lifecycle, which we will discuss at a later point in time.

LambdaTest has come up with free JUnit certification for Java developers that would help accelerate your career in Java development and testing. A short glimpse of the JUnit certification from LambdaTest:
How to register JUnit 5 extensions
Extension registration in JUnit 5 is done to register one or more extensions via Java’s ServiceLoader mechanism. There are three ways of registering extensions: Declaratively, Programmatically, and Automatically.
Registration of one or more extensions can be done using annotations on the test interface, test class (or its field), or test method depending on the type of registration:
public class WebServerDemo {
    @RegisterExtension
    static WebServerExtension server = WebServerExtension.builder()
                                        .enableSecurity(false)
                                        .build();

    @Test
    void getProductList() {
    WebClient webClient = new WebClient();
    String serverUrl = server.getServerUrl();
     // Use WebClient to connect to web server using serverUrl and verify response
    assertEquals(200, webClient.get(serverUrl + "/products").getResponseStatus());
     }
}
- Automatic registration: We can use java.util.ServiceLoader to auto-detect and register third-party extensions.
JUnit 5 Conditional Test Execution With Annotations
For starters, conditional test execution allows test cases to be run (enabled) or skipped (disabled) based on certain conditions via the org.junit.jupiter.api.condition API. Let’s look at how annotations of the condition package can be used for realizing conditional test execution in JUnit 5.
1. Operating System Conditions
Operating system conditions can be used with @EnabledOnOs and @DisabledOnOs annotations. The conditions help in running the JUnit 5 test on a particular platform (or operating system).
public class OsConditionalTest {

  @Test
  @EnabledOnOs(OS.MAC)
  void runOnlyOnMacOs() {
      System.out.println("Run the batch job only on MAC OS");
  }
  @Test
  @EnabledOnOs({ OS.LINUX, OS.MAC })
  void runOnlyOnLinuxOrMac() {
    System.out.println("Run the batch job only on LINUX or MAC OS");
  }
  @Test
  @DisabledOnOs(OS.WINDOWS)
  void notRunOnWindows() {
    System.out.println("Not run the batch job on WINDOWS OS");
  }

  @Test
  @EnabledOnOs({ OS.WINDOWS })
  void runOnlyOnWindows() {
    System.out.println("Run the batch job only on WINDOWS OS");
  }

  @Test
    @DisabledOnOs({OS.AIX, OS.LINUX, OS.SOLARIS})
    void notRunOnAIXorLinuxOrSolaris() {
        System.out.println("Not run the batch job on AIX or LINUX or SOLARIS");
    }
}
2. Java Runtime Environment Conditions
Test cases can be run under certain conditions related to JRE (Java Runtime Environment) or on a certain range of the JRE version’s range using @EnabledOnJre, @DisabledOnJre, and @EnabledForJreRange annotations.
public class JreConditionalTest {

      @Test
      @EnabledOnJre(JRE.JAVA_8)
      void runOnlyOnJava8() {
          System.out.println("Run the compatibility test only on JRE 8");
      }
      @Test
      @EnabledOnJre({JRE.JAVA_13, JRE.JAVA_14})
      void runOnlyOnJava13OrJava14() {
        System.out.println("Run the compatibility test only on JRE 13 and JRE 14");
      }
      @Test
      @DisabledOnJre(JRE.JAVA_13)
      void notRunOnJava13() {
        System.out.println("not run the compatibility test on JRE 13");
      }

      @Test
      @EnabledOnJre(JRE.JAVA_11)
      void runOnlyOnJava11() {
        System.out.println("Run the compatibility test only on JRE 11");
      }

      @Test
      @DisabledOnJre({JRE.JAVA_10, JRE.JAVA_11})
        void notRunOnJava10andJava11() {
        System.out.println("not Run the compatibility test on JRE 10 and JRE 11");
        }
}
3. System Property Conditions
Test cases can be enabled or disabled based on the system property using the @EnabledIfSystemProperty and/or @DisabledIfSystemProperty annotations.
public class SystemPropertyConditionalTest {
    @Disabled
    @Test
    void printSystemProperties() {
      //remove @Disabled to see System properties
      System.getProperties().forEach((key, value) -> System.out.println(key+" - "+value));
    }
    @Test
    @EnabledIfSystemProperty(named = "java.vm.vendor", matches = "Oracle.*")
    void runOnlyOnOracleJDK() {
      System.out.println("Run this only on Oracle JDK");
    }
    @Test
    @EnabledIfSystemProperty(named = "os.arch", matches = ".*32.*")
    void runOnlyOn32bitOS() {
      System.out.println("Run this on only on 32 bit OS");
    }

    @Test
    @DisabledIfSystemProperty(named = "os.version", matches = ".*10.*")
    void notRunOnlyOnWindows10() {
      System.out.println("not run this only on windows 10 version");
    }

    @Test
    @EnabledIfSystemProperty(named = "os.version", matches = ".*10.*")
    void runOnlyOnWindows10() {
      System.out.println("Run this only on WINDOWS OS 10 version");
    }
}
4. Environment Variable Conditions
JUnit 5 test cases can be enabled or disabled based on the condition (or value) of the environment variables. This can be done using @EnabledIfEnvironmentVariable and @DisabledIfEnvironmentVariable annotations in the JUnit 5 framework.
public class EnvironmentVariableConditionalTest {
    @Disabled
    @Test
    void printSystemProperties() {
      // Remove @Disabled to see environment properties
      System.getenv().forEach((key, value) -> System.out.println(key+" - "+value));
    }
    @Test
    @EnabledIfEnvironmentVariable(named = "COMPUTERNAME", matches = "sysname")
    void runOnlyOnPerticularMachine() {
      System.out.println("Run this only on particular server");
    }
    @Test
    @DisabledIfEnvironmentVariable(named = "PROCESSOR_ARCHITECTURE", matches = ".*32.*")
    void noRrunOn32bitOS() {
      System.out.println("Not run this on 32 bit OS");
    }

    @Test
    @EnabledIfEnvironmentVariable(named = "USERNAME", matches = "username")
    void runOnlyForParticularUser() {
      System.out.println("run this only for particular user in system");
    }
}
5. Custom Conditions
Custom conditions can be set to enable or disable test cases via the ExecutionCondition extension API. Here are the two ways through which you can implement test cases that run under particular (custom) conditions:
@ExtendWith(EnvironmentExecutionCondition.class)
@Retention(RUNTIME)
public @interface Environment {
    String[] enabledFor();
}
public class EnvironmentExecutionCondition implements ExecutionCondition{

    @Override
    public ConditionEvaluationResult evaluateExecutionCondition(ExtensionContext context){
        String activeEnvironment = System.getProperty("environment");
        if(activeEnvironment == null) {
            return ConditionEvaluationResult.disabled("There is no active environment");
        }
        Set<String> enabledEnvironments = getEnabledEnvironment(context);
        return enabledEnvironments.contains(activeEnvironment)
            ? ConditionEvaluationResult.enabled("active environment is enabled")
            : ConditionEvaluationResult.disabled("active environment is not enabled");
    }

    private Set<String> getEnabledEnvironment(ExtensionContext context) {
        Set<String> enabledEnvironments = new HashSet<>();
      context.getElement().ifPresent(element ->
 AnnotationSupport.findAnnotation(element, Environment.class)
                .map(Environment::enabledFor)
                .ifPresent(array -> enabledEnvironments.addAll(Arrays.asList(array)))
                );
        return enabledEnvironments;
    }
}
When running tests in the Dev or QA environment, the “add” test will be active and executed, whereas the tests will not run if you are in the Prod environment.
To execute the tests in a given environment, run the appropriate command on VM arguments under the “run configurations” parameter:
- Development environment: -ea -Denvironment=Dev
- QA environment: -ea -Denvironment=QA
- Prod (or Live) environment: -ea -Denvironment=live
Read – How To Run Junit Tests From The Command Line
How to create JUnit 5 extensions by implementing TestInstanceFactory
We can create JUnit 5 extensions by implementing the TestInstanceFactory API for creating test class instances. These should run before the execution of each test method.
The created test instance can then be acquired from a dependency injection framework or by invoking a static factory method to create it.
The following JUnit 5 extension example demonstrates the use of test instance factories on outer and inner classes:
@ExtendWith(CustomTestInstanceFactory.class)
public class OuterTest {

    @Test
    void outer() {
    }


    @Nested
    // @ExtendWith(CustomTestInstanceFactory.class)
    class Inner {

        @Test
        void inner() {
        }

        @Nested
        // @ExtendWith(CustomTestInstanceFactory.class)
        class InnerInner {

            @Test
            void innerInner() {
            }
        }
    }
}
import static org.junit.platform.commons.util.ReflectionUtils.newInstance;

public class CustomTestInstanceFactory implements TestInstanceFactory{

    public Object createTestInstance(TestInstanceFactoryContext factoryContext, ExtensionContext extensionContext)
            throws TestInstantiationException {

        try {
            Optional<Object> outerInstance = factoryContext.getOuterInstance();
            Class<?> testClass = factoryContext.getTestClass();
            if (outerInstance.isPresent()) {
                System.out.println("createTestInstance() called for inner class: "
                                     + testClass.getSimpleName());
                 return newInstance(testClass, outerInstance.get());
            }
            else {
                System.out.println("createTestInstance() called for outer class: "
                                      + testClass.getSimpleName());
                 return newInstance(testClass);
            }
        }
        catch (Exception e) {
            throw new TestInstantiationException(e.getMessage(), e);
        }

    }
}
How to test lifecycle callbacks in JUnit 5
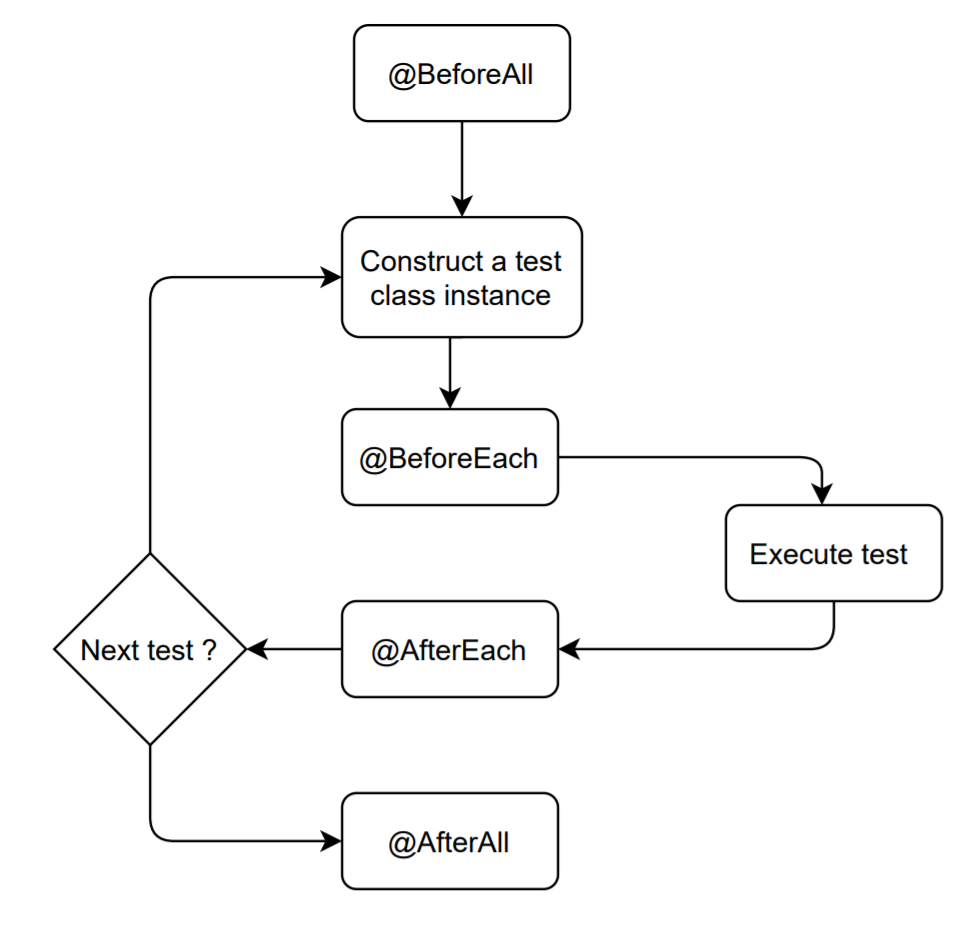
Lifecycle callbacks are functions that are automatically executed before or after certain model methods. For example, you can use lifecycle callbacks to automatically compute the value of a ‘full name’ attribute before creating or updating a user record.
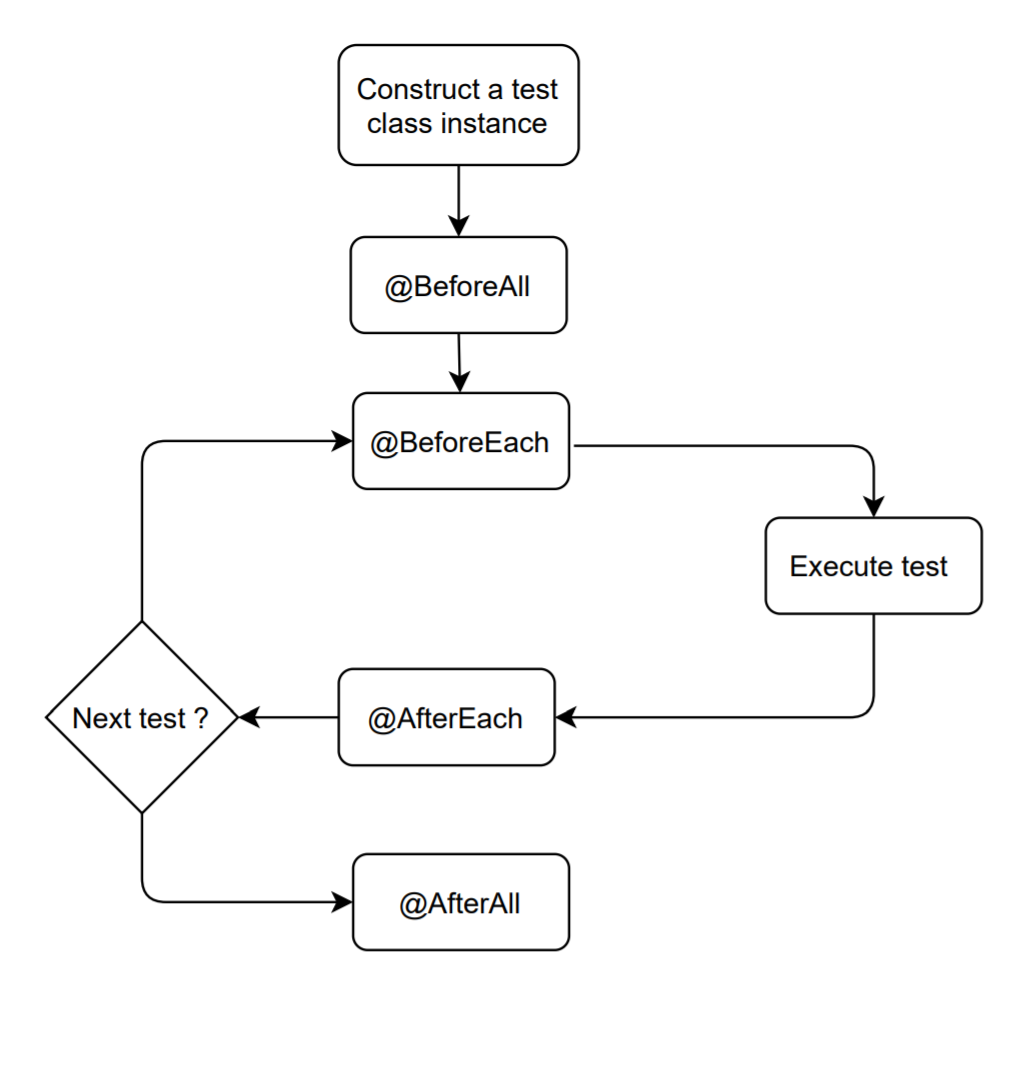
Lifecycle methods and Test instance lifecycle
In the primary test instance lifecycle, JUnit 5 defines class and method’s lifecycle driven by the following annotations:
- @BeforeAll
- @BeforeEach
- @AfterEach
- @AfterAll
Methods annotated with @BeforeAll and @AfterAll should be executed before and after all test methods in the class. On the other hand, methods annotated by @BeforeEach and @AfterEach should be executed respectively before and after each test method.
JUnit creates a new instance for the test class before running each test in the test instance lifecycle. This behavior aims to run each test separately and thus avoid the side effects of running other tests.
class TestInstanceLifecycle {

    public TestInstanceLifecycle() {
        super();
        System.out.println("test instance Constructor");
    }

    @BeforeAll
    static void setUpBeforeClass() throws Exception {
        System.out.println("@BeforeAll : Before the entire test fixture");
    }

    @AfterAll
    static void tearDownAfterClass() throws Exception {
         System.out.println("@AfterAll : After the entire test fixture");
    }
    @BeforeEach
    void setUp() throws Exception {
         System.out.println("@BeforeEach : Before each test");
    }
    @AfterEach
    void tearDown() throws Exception {
        System.out.println("@AfterEach : After each test");
    }
    @Test
    void firstTest() {
        System.out.println("First test");
    }
    @Test
    void secondTest() {
        System.out.println("Second test");
    }

}
The above execution gives the following result:
@BeforeAll: Before the entire test fixture
test instance Constructor
   @BeforeEach: Before each test
 First test
   @AfterEach: After each test
            test instance Constructor
    @BeforeEach: Before each test
 Second test
    @AfterEach: After each test
@AfterAll: After the entire test fixture
From the test execution result, the default behavior is the ‘Per Method Lifecycle’:
The default behavior of the test life cycle can be changed using the @org.junit.jupiter.api.TestInstance API, which allows the change of the default lifecycle (for a test class or a test method). This can be done by adding @TestInstance(TestInstance.Lifecycle.PER_CLASS) annotation to the test class.
Here is the updated execution result after the modification of default behavior (of the test life cycle):
test instance Constructor
@BeforeAll: Before the entire test fixture
@BeforeEach: Before each test
 First test
@AfterEach: After each test
@BeforeEach: Before each test
 Second test
@AfterEach: After each test
@AfterAll: After the entire test fixture
From the test execution result, the modified behavior gives the ‘Per Class Lifecycle’:
JUnit 5 Extension Lifecycle
In addition to the per class and per method lifecycle, JUnit 5 Jupiter offers different interfaces that define APIs for extending tests at various points in the execution lifecycle. JUnit 5, therefore, calls extensions callbacks to implement the behavior.
The APIs are a part of the org.junit.jupiter.api.extension package. Here are the APIs that define the extension lifecycle:
- AfterAllCallback
- AfterEachCallback
- BeforeAllCallback
- BeforeEachCallback
We can create an extension applied to a test class by implementing the BeforeAllCallback, AfterAllCallback, BeforeEachCallback, and AfterEachCallback interfaces.
public class ExtensionCallbackLifecycle implements BeforeAllCallback, AfterAllCallback,
BeforeEachCallback, AfterEachCallback {

    @Override
    public void afterEach(ExtensionContext context) throws Exception {
        System.out.println("After Each from AfterEachCallback Extension");
    }

    @Override
    public void beforeEach(ExtensionContext context) throws Exception {
        System.out.println("Before Each from BeforeEachCallback Extension");
    }

    @Override
    public void afterAll(ExtensionContext context) throws Exception {
        System.out.println("After All from AfterAllCallback Extension");
    }

    @Override
    public void beforeAll(ExtensionContext context) throws Exception {
        System.out.println("Before All from BeforeAllCallback Extension");
    }

}
Here is how to apply the said extension point to a test class:
@ExtendWith(ExtensionCallbackLifecycle.class)
public class ExtensionLifecycleTest {

    public ExtensionLifecycleTest() {
            super();
           System.out.println("Test instance constructor");
    }
    @BeforeEach
    void beforeEachTest() {
        System.out.println("Before each test");
     }

    @AfterEach
    void afterEachTest() {
        System.out.println("After each test");
     }

    @Test
    void firstTest() {
        System.out.println("First test");
    }

    @Test
    void secondTest() {
        System.out.println("Second test");
    }
}
Here is the execution result:
Before All from BeforeAllCallback Extension
Test instance constructor
Before Each from BeforeEachCallback Extension
Before each test
First test
After each test
After Each from AfterEachCallback Extension
Test instance constructor
Before Each from BeforeEachCallback Extension
Before each test
Second test
After each test
After Each from AfterEachCallback Extension
After All, from AfterAllCallback Extension
Test instance post-processing in JUnit 5
The Juniper extensions model provides the ability to post-process test instances after creating test instances by implementing the TestInstancePostProcessor interface. As per the test instance factory, it can invoke the initialization method on the test instance by using, for example, injection dependencies into the instance to use the test instance post-procession.
To illustrate this, We take the case of a logging system from the log4j API, which executes and writes logs after each test execution. Let’s check further details in this JUnit 5 exception example:
public class LoggingPostProcessExtension implements TestInstancePostProcessor{

  @Override
  public void postProcessTestInstance(Object testInstance, ExtensionContext context) throws Exception {
        Logger logger = LogManager.getLogger(testInstance.getClass()
                                                         .getName());
System.out.println("Test instance Post-          Process Extension called on :"+ testInstance.getClass().getName());
        testInstance.getClass()
                    .getMethod("createLogger", Logger.class)
                    .invoke(testInstance, logger);
    }
}
public class ArithmeticTest {
    private int result = 5;


    @ExtendWith(LoggingPostProcessExtension.class)
    @Test
    void test_Divide() {
      result = Calculate.divide(result, 5);
      System.out.println("test_Divide(5,5) => "+ result);
      Assertions.assertEquals(1, result);
    }
Test Instance Pre-destroy Callback in JUnit 5
The extension model also defines the API for extensions that need to be processed between the test instances and their final destruction. For example, the test instance pre-destroy callback is commonly used in cases like dependencies injection cleanup after their usage in a test instance.
public class DisplayPredestroyedInstances implements  TestInstancePreDestroyCallback{

    @Override
    public void preDestroyTestInstance(ExtensionContext ctx) throws Exception {

          List<Object> destroyedInstances =
                    new ArrayList<>(context.getRequiredTestInstances().getAllInstances());
            for (Optional<ExtensionContext> current = context.getParent();
                    current.isPresent();
                    current = current.get().getParent()) {
                current.get().getTestInstances()
                             .map(TestInstances::getAllInstances)
                             .ifPresent(destroyedInstances::removeAll);
            }
            Collections.reverse(destroyedInstances);
            destroyedInstances.forEach(testInstance ->
            System.out.println("preDestroy: " + testInstance));
    }
}
public class ArithmeticTest {

    private int result = 5;
      @ExtendWith(DisplayPredestroyedInstances.class)
      @Test
      void test_Multiply() {
        result = Calculate.multiple(result, 5);
        System.out.println("test_Multiply(5,5) => "+ result);
        Assertions.assertEquals(25, result);
      }
}
Parameter Resolution in JUnit 5
Most of the test methods don’t have parameters. We use the ParameterResolver interface when using parameters, which defines the API org.junit.jupiter.api.extension.ParameterResolver for extensions. It provides the functionality to resolve parameters at runtime dynamically.
The following constructors and annotated methods of a test class can then have one or more parameters:
- @Test
- @TestFactory
- @BeforeEach
- @AfterEach
- @BeforeAll
- @AfterAll
The parameter resolution can be made through name, type, annotation, or a combination of the same. JUnit 5 implements dependency injection using parameters for constructors and methods of test classes to make this possible.
These parameters must be resolved at runtime by an instance of the ParameterResolver type that needs to be registered previously.
By default, JUnit 5 automatically registers ParameterResolver using the three-built-in resolvers:
- TestInfoParameterResolver: Used to resolve, inject an instance of type TestInfo, and obtain information about the test whose execution is in progress.
- RepetitionInfoParameterResolver: Used to inject an instance of type RepetitionInfo only for repeated tests.
- TestReporterParameterResolver: Used to inject an instance of type TestReporter by allowing it to add useful information to the test report.
In case you are using JUnit 4, you can check out our detailed blog that deep dives into Parameterization in JUnit for Selenium Automation.
public class BuiltInParamResolver {
    @Test
    @DisplayName("TestInfo Param Resolver")
    void firstTestCase(TestInfo testInfo) {
        assertEquals("TestInfo Param Resolver", testInfo.getDisplayName());
        System.out.println("TestInfo executed !");
    }

     @RepeatedTest(3)
     @DisplayName("RepetitionInfo Param Resolver")
      void test_repeted(RepetitionInfo repetitionInfo) {
        System.out.println("start test_repeted : "+repetitionInfo.getCurrentRepetition());
        assertEquals(9, Calculate.add(5, 4));
      }

    @Test
    @DisplayName("Testreport Param Resolver")
    void testReport(TestReporter testReporter) {
       testReporter.publishEntry("test reporter with single value : "+Calculate.add(4, 3));
        assertEquals(7, Calculate.add(4, 3));
    }
}
Exception Handling in JUnit 5
The TestExecutionExceptionHandler interface defines the API that implements extensions that let you fully customize the behavior of a test case when an exception is thrown.
In continuation to the earlier JUnit 5 extension example, we have used the ArithmeticException on the divide test case to create a test class as shown below:
public class ArithmeticTest {

    private int result = 5;

    @ExtendWith(DivideExceptionHandler.class)
    @Test
    void test_Divide_by_zero() {
      result = Calculate.divide(result, 0);
      System.out.println("test_Divide(5,0) => "+ result);
    }
}
It is extended to an exception handler class for handling the exception that is thrown by the divide operation (when handling with the division by zero):
public class DivideExceptionHandler implements TestExecutionExceptionHandler{

    @Override
    public void handleTestExecutionException(ExtensionContext ctx, Throwable throwable)
throws Throwable {
         // handle exception
        System.out.println("operation not allowed for division");
    }
}
It is possible to use the traditional method of throwing an exception (using try…catch, Rules, etc.) or through annotations by implementing the TestExecutionExceptionHandler interface.
Read – Mastering Selenium Testing With JUnit Asserts
Third-party Framework Extensions in JUnit 5
The principle behind JUnit is to provide an easily extensible basic framework that allows users to act faster than API developers. This feature makes it possible to build APIs that serve as a basis for third-party libraries.
Though JUnit 5 has a number of third-party extensions, we will cover the following extensions as they are widely used by the developer community:
- MockitoExtension
- Selenium-Jupiter
- Spring TestContext: SpringExtension for Jupiter
1. MockitoExtension
JUnit 5 is best suited for running unit tests. However, when performing integration testing between modules (or interdependent resources) and interaction verification, stubs or mocks are used to simulate (or represent) the dependent or unavailable resources. Mockito is a framework that allows the creation of mock objects for integration testing.
Here are the major ways in which you can use MockitoExtension:
- Manual approach
- Using annotations
- Using JUnit 5 extensions that are available in the mockito-junit-jupiter artifact (Most preferred option)
<dependency>
    <groupId>org.mockito</groupId>
    <artifactId>mockito-junit-jupiter</artifactId>
    <version>2.23.4</version>
    <scope>test</scope>
</dependency>
The use of the Mockito extension can be seen by applying the extension by adding @ExtendWith to the test class and annotating the simulated fields with @Mock.
For example, if we need to test the class SERVICE and mock the database, we need to use the following code:
public class Database {
    public boolean isAvailable() {
        // TODO implement the access to the database
        return false;
    }
    public int getUniqueId() {
        return 42;
    }
}
public class Service {
        private Database database;
        public Service(Database database) {
            this.database = database;
        }
        public boolean query(String query) {
            return database.isAvailable();
        }
        @Override
        public String toString() {
            return "Using database with id: " + String.valueOf(database.getUniqueId());
        }
}
The test class then will look like this:
@ExtendWith(MockitoExtension.class)
public class ServiceTest {
        @Mock
        Database databaseMock;

        @Test
        public void testQuery () {
            assertNotNull(databaseMock);
            when(databaseMock.isAvailable())
     .thenReturn(true);
            Service t = new Service(databaseMock);
            boolean check = t.query("* from t");
            assertTrue(check);
        }
}
2. Selenium-Jupiter
By combining the strength of Selenium, the most popular web browser testing framework, and the power of JUnit 5, selenium-jupiter allows creating Selenium tests using local and/or remote browsers. With this, you can run different types of tests for verifying the functionality of web and mobile applications. In addition, the selenium-jupiter extension can be used for Selenium automation testing.
Perform Selenium Automation Testing On Cloud With JUnit Framework.
The following dependency should be used for Maven Projects:
</dependency>
 <!-- https://mvnrepository.com/artifact/io.github.bonigarcia/selenium-jupiter -->
 <dependency>
     <groupId>io.github.bonigarcia</groupId>
     <artifactId>selenium-jupiter</artifactId>
     <version>3.4.0</version>
</dependency>
Selenium-Jupiter can be used by simply using the @ExtendWith annotation on the SeleniumJupiter interface for performing cross browser compatibility testing. Here is a sample demonstration:
@ExtendWith(SeleniumJupiter.class)
public class CrossBrowserTest {
    @Test
    void testWithOneChrome(ChromeDriver chromeDriver) {
        // Use Chrome in this test
        chromeDriver.get("https://bonigarcia.github.io/selenium-jupiter/");
        Assertions.assertEquals(chromeDriver.getTitle(),
                "Selenium-Jupiter: JUnit 5 extension for Selenium");
    }

    @Test
    void testWithFirefox(FirefoxDriver firefoxDriver) {
        // Use Firefox in this test
        firefoxDriver.get("https://bonigarcia.github.io/selenium-jupiter/");
        Assertions.assertEquals(firefoxDriver.getTitle(),
                "Selenium-Jupiter: JUnit 5 extension for Selenium");
    }

    @Test
    void testWithChromeAndFirefox(ChromeDriver chromeDriver,
            FirefoxDriver firefoxDriver) {
        // Use Chrome and Firefox in this test
        chromeDriver.get("http://www.seleniumhq.org/");
        firefoxDriver.get("http://junit.org/junit5/");
        Assertions.assertEquals(chromeDriver.getTitle(), "SeleniumHQ Browser Automation");
        Assertions.assertEquals(firefoxDriver.getTitle(), "JUnit 5");
    }
}
Read – Automated Testing With JUnit And Selenium For Browser Compatibility
How to use Selenium-Jupiter for Selenium Automation Testing
Selenium-Jupiter supports testing remote web browsers on a Selenium Grid through the combination of DriverCapabilities & RemoteWebDriver. You can also perform parallel testing in Selenium by running tests on different browser & platform combinations using LambdaTest.
@ExtendWith(SeleniumJupiter.class)
public class RemoteBrowserJupiterTest<WebDriver> {
    @DriverUrl
    String url = "http://localhost:4444/wd/hub";

    @BeforeAll
    static void setup() throws Exception {
        // Start hub
        GridLauncherV3.main(new String[] { "-role", "hub", "-port", "4444" });

        // Register Chrome in hub
        WebDriverManager.chromedriver().setup();
        GridLauncherV3.main(new String[] { "-role", "node", "-hub",
                "http://localhost:4444/grid/register", "-browser",
                "browserName=chrome", "-port", "5555" });

        // Register Firefox in hub
        WebDriverManager.firefoxdriver().setup();
        GridLauncherV3.main(new String[] { "-role", "node", "-hub",
                "http://localhost:4444/grid/register", "-browser",
                "browserName=firefox", "-port", "5556" });
    }
    @Test
    void testWithRemoteChrome(
            @DriverUrl("http://localhost:4444/wd/hub")
            @DriverCapabilities("browserName=chrome") RemoteWebDriver driver) {
        exercise(driver);
    }

    @Test
    void testWithRemoteFirefox(
                @DriverUrl("http://localhost:4444/wd/hub")
                @DriverCapabilities("browserName=firefox") RemoteWebDriver driver) {
        exercise(driver);
    }

    void exercise(WebDriver driver) {
        driver.get("https://bonigarcia.github.io/selenium-jupiter/");
        Assertions.assertEquals(driver.getTitle(),
                "Selenium-Jupiter: JUnit 5 extension for Selenium");
    }
How to use Selenium-Jupiter for Mobile Device Testing
To create an instance of ApiumDriver to drive mobile devices, the annotation DriverCapabilities. Selenium-Jupiter will automatically start an instance of the Appium server.
@ExtendWith(SeleniumJupiter.class)
public class AppiumJupiterTest {
        @DriverUrl
        String url = "http://localhost:4723/wd/hub";

        @DriverCapabilities
        DesiredCapabilities capabilities = new DesiredCapabilities();
        {
            capabilities.setCapability("browserName", "chrome");
            capabilities.setCapability("deviceName", "Samsung Galaxy S6");
        }

        @Test
        void testWithAndroid(AppiumDriver<WebElement> driver) {
            driver.get("https://bonigarcia.github.io/selenium-jupiter/");
            Assertions.assertEquals(driver.getTitle(),
                    "JUnit 5 extension for Selenium");
        }
}
How to use Selenium-Jupiter to perform Selenium Automation testing on Cloud Grid
Selenium-Jupiter lets you run Selenium automation tests on a cloud-based cross browser testing platform like LambdaTest. The major benefits of cloud testing are improved browser coverage, elimination of environment-related schedule delays, improved product quality, and reduced Total Cost of Ownership (TCO). Check out our cloud testing tutorial covering the innumerable benefits of migrating tests to a cloud Selenium Grid like LambdaTest.
After you create an account on LamdaTest, note the username & access from the LambdaTest profile section. These credentials are required for accessing the cloud grid. Then, you can generate the desired capabilities using the LambdaTest Capabilities Generator.
Shown below is an example of running JUnit 5 test on the LambdaTest Grid:
@ExtendWith(SeleniumJupiter.class)
public class LambdaTestSeleniumJupiter {
    public RemoteWebDriver driver = null;
    String username = "mukendik";
    String accessKey = "mP7l3gCMXcLmwy7alMb6rAuqAOKcAAXMCklWlHLWbi8XhY0JWd";

    {
        DesiredCapabilities capabilities = new DesiredCapabilities();
        capabilities.setCapability("platform", "Windows 7"); // MacOS Catalina Windows 10
        capabilities.setCapability("browserName", "Chrome");
        capabilities.setCapability("version", "91.0"); // If this cap isn't specified, it will just get the any available one
        capabilities.setCapability("resolution","1024x768");
        capabilities.setCapability("build", "Selenium jupiter");
        capabilities.setCapability("name", "LambdaTest selenium jupiter");
        capabilities.setCapability("network", true); // To enable network logs
        capabilities.setCapability("visual", true); // To enable step by step screenshot
        capabilities.setCapability("video", true); // To enable video recording
        capabilities.setCapability("console", true); // To capture console logs

        try {
            driver= new RemoteWebDriver(new URL("https://"+username+":"+accessKey+
                                  "@hub.lambdatest.com/wd/hub"), capabilities);
        } catch (MalformedURLException e) {
            System.out.println("Invalid grid URL");
        }
    }
    @Test
    public void testWithLambdaTest() throws Exception {
                try {
                    driver.get("https://lambdatest.github.io/sample-todo-app/");
                    driver.findElement(By.name("li1")).click();
                    driver.findElement(By.name("li2")).click();
                    driver.findElement(By.id("sampletodotext")).clear();
                    driver.findElement(By.id("sampletodotext"))
                          .sendKeys("Hey, Let's add it to list");
                    driver.findElement(By.id("addbutton")).click();
                    driver.quit();
                } catch (Exception e) {
                    System.out.println(e.getMessage());
                }
    }
}
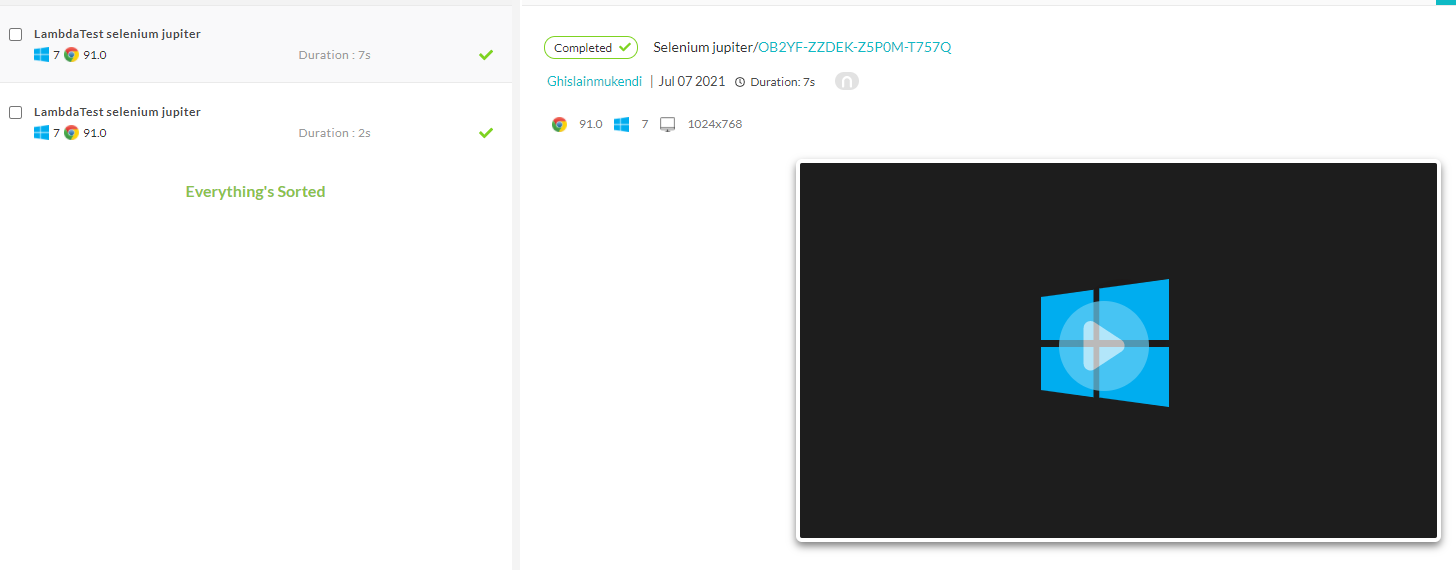
Here is the execution snapshot that indicates that the test execution was successful.
3. Spring TestContext: SpringExtension for Jupiter
Introduced in Spring 5, Spring TestContext is a Spring framework that offers full integration with the JUnit 5 Jupiter programming model. It can be found in the org.springframework.test.context.junit.jupiter.SpringExtension package.
It can be used by simply annotating the JUnit Jupiter test class with any one of the following annotations:
- @ExtendWith(SpringExtension.class)
- @SpringJunitConfig(TestConfig.class)
- @SpringJUnitWebConfig(TestConfig.class)
Shown below is a JUnit 5 Extension Example that demonstrates the usage of Spring TestContext:
//Instructs JUnit Jupiter to extend the test with Spring support.
@ExtendWith(SpringExtension.class)
//Instructs Spring to load an ApplicationContext from AppConfig.class
@ContextConfiguration(classes = AppConfig.class)
public class SpringExtensionTest {

    @Autowired
    private MyService myService;

    @BeforeAll
    static void initAll() {
        System.out.println("---Inside initAll---");
    }

    @BeforeEach
    void init(TestInfo testInfo) {
        System.out.println("Start..." + testInfo.getDisplayName());
    }

    @Test
    public void messageTest() {
        String msg = myService.getMessage();
        assertEquals("Hello World!", msg);
    }

    @Test
    public void multiplyNumTest() {
        int val = myService.multiplyNum(5, 10);
        assertEquals(50, val);
    }

    @Test
    public void idAvailabilityTest() {
        boolean val = myService.isIdAvailable(100);
        Assertions.assertTrue(val);
    }

    @AfterEach
    void tearDown(TestInfo testInfo) {
        System.out.println("Finished..." + testInfo.getDisplayName());
    }

    @AfterAll
    static void tearDownAll() {
        System.out.println("---Inside tearDownAll---");
    }

}

@Configuration
@ComponentScan("com.concretepage")
public class AppConfig {

}

@Service
public class MyService {

    public String getMessage() {
        return "Hello World!";
    }

     public int multiplyNum(int num1, int num2) {
            return num1 * num2;
        }

    public boolean isIdAvailable(long id) {
        if (id == 100) {
            return true;
        }
        return false;
    }
}

public class SpringProfileDemo {

    public static void main(String[] args) {

        AnnotationConfigApplicationContext ctx = new AnnotationConfigApplicationContext();
        ctx.scan("com.concretepage");
        ctx.refresh();
        MyService myService = ctx.getBean(MyService.class);
        System.out.println(myService.getMessage());

    }
}

Conclusion and recommendations
The JUnit 5 extension model built into Jupiter has solved inherent problems in JUnit 4 extension points. The model implements multiple built-in extension points and allows their customization and grouped use. This allows extension developers to implement interfaces in one of the existing ones to incorporate extra capabilities for JUnit 5.
JUnit 5 extensions allow enhancing and extending JUnit capabilities. However, some frameworks also have fully integrated and adapted JUnit extension points allowing their reuse, making the Jupiter extension model more powerful, and simplifying tests according to the environments and situations. Therefore, it is strongly recommended to use the extension points, whether integrated or customized, to make the tests more reliable.

This article does not exhaustively present all the extension points integrated with JUnit 5 or even all the extensions of third-party libraries. Therefore, if you are interested in an extension point or a third-party extension framework that is not shown here, you can let us know to complete this guide according to the readers’ interests.
We can also develop a little more in detail those which do not seem clear to you in this guide. We are also interested in your feedback on using JUnit Jupiter extension points in your respective projects. The source code of the above examples can be found on GitHub.
Published on Java Code Geeks with permission by LambdaTest, partner at our JCG program. See the original article here: A Comprehensive Guide On JUnit 5 Extensions Opinions expressed by Java Code Geeks contributors are their own. |
