Welcome readers, in this tutorial, we will learn the basic concepts to host an angular application on the firebase platform.
1. Introduction
- Angular is a TypeScript-based open-source framework that helps developers build single page applications
- Offers Object-oriented features and supports the dynamic loading of the pages
- Supports Two-way data-binding, Property (
[]), and Event (()) binding techniques - Supports command-line-interface to easily initiate and manage the angular projects from the command line
1.1 Firebase
- Firebase is a simple and user-friendly mobile and web application development platform developed by Google
- Supports the NoSQL cloud database which provides a mechanism for the storage and retrieval of data
- It offers,
- Real-time synchronization of data meaning every change is automatically updated to the connected clients
- Scalability across multiple databases
- Different authentication techniques such as anonymous, password, or social
- Application deployment on the firebase servers
- Storing the documents in the json format
Now open the visual studio code and let us see how to implement this tutorial in angular and host it on a firebase platform.
2. Angular 6 Firebase Hosting Example
Here is a systematic guide for implementing this tutorial.
2.1 Tools Used
We are using Visual Studio Code, and Node Terminal to compile and execute the angular code on a browser. In addition, we will also require a Firebase account to host our application.
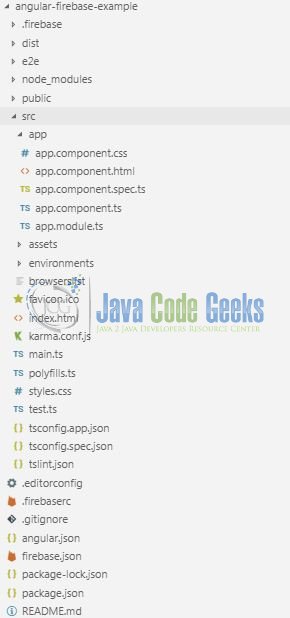
2.2 Project Structure
In case you are confused about where you should create the corresponding files or folder, let us review the project structure of the angular application.
3. Creating Angular application
Follow the below steps to initiate a new Angular application and run it on your local system.
3.1 Using Angular CLI to Create project
Run the following command in the NPM console to create a new angular project.
> ng new angular-firebase-example
A folder with the name angular-firebase-example will be created and the initial project structure is created as shown in Fig. 1. Developers can make the required changes and have completed that they can enter the project directory.
> cd angular-firebase-example
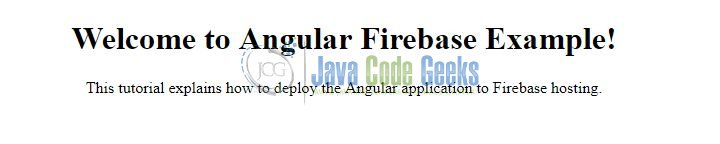
And test if the application is working or not.
> ng serve -o
This command will start the server and make the application available at the localhost url (i.e. http://localhost:4200). Open your favorite browser and hit the angular application url to display the welcome page of the application as shown in Fig. 2.
3.2 Build the Angular application for Production
To deploy the application on the production environment, developers need to build the application. They can use the following command to ask the Angular CLI to start the production build.
> ng build --prod
The result of this command is available in the dist folder inside the project directory. This command optimizes, bundles, and minifies the application code and the contents of this folder are later used in the production deployment.
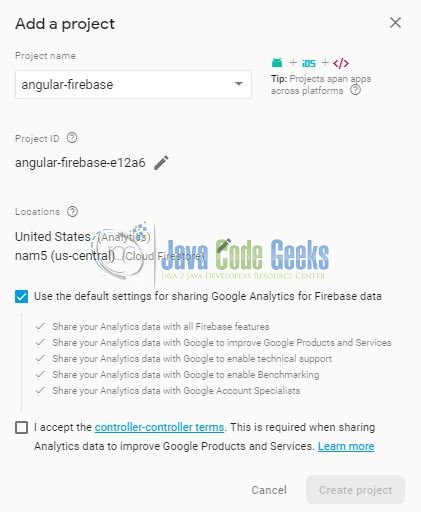
3.3 Create a Firebase project & Install Firebase CLI
At this step, we have our angular application ready & deployed on the localhost system. To proceed with the Firebase hosting, developers need to open the Firebase console and create a new Firebase project as shown in Fig. 3.
To deploy the localhost angular application to the Firebase Hosting Service developers will first need to install the Firebase Command-Line-Interface. Navigate to the project directory and execute the following command.
> npm install -g firebase-tools
This command will install the firebase CLI to log in and deploy the application to firebase.
3.4 Authentication to Firebase Console
To proceed with deployment, developers will use the following command to log in to firebase.
> firebase login
If the developer has not already logged in, executing this command will open the browser and ask for authentication. Login with your credentials and after successful validation the following success message as shown in Fig. 4 will appear on the command line.

If the developer is already logged in the following message as shown in Fig. 4(a) will appear on the command line.

After successful authentication developers can again use the firebase commands to initialize the project deployment.
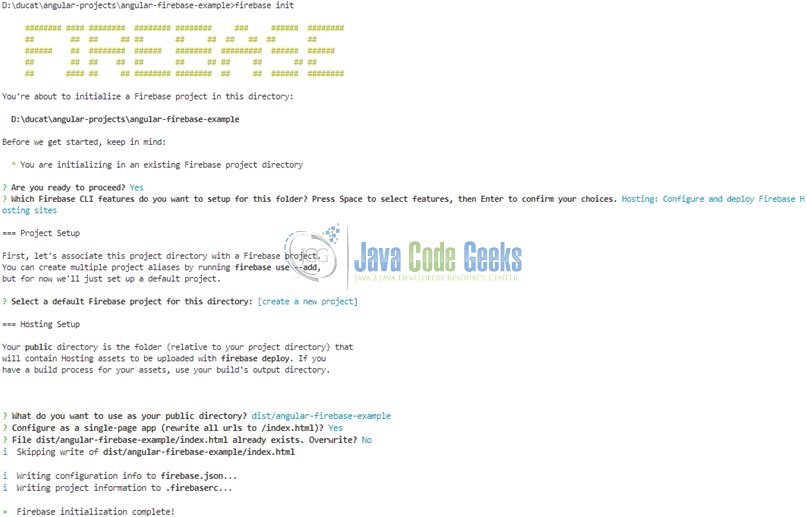
3.5 Deploying to Firebase
To initialize the project setup on Firebase hosting service developers will need to execute the following command.
> firebase init
This command will trigger the project setup and stores all the settings in a local firebase.json file. The command will ask the following questions for an effective project set-up i.e.
- What Firebase CLI features do you want to set up for this folder?: Developers need to select their appropriate requirement. In our case, we have selected the Hosting service
- Select a default Firebase project for this directory: Choose [create a new project]
- What do you want to use as your public directory?: Developers need to choose the build (i.e. dist) folder their angular application
- Configure as a single-page app (rewrite all urls to /index.html)?: Answer this as ‘yes’
Having answered all the questions (as shown in Fig. 5), the application is now ready for being deployed to Firebase. This project configuration will be stored in the firebase.json file and will be used to perform the deployment.
3.6 Hosting Set-up
In this step, we will pick up the project for deployment. To proceed developers will need to execute the following command.
> firebase use --add
And answer the following of questions i.e.
- Which project do you want to add?: Enter the project name you created in Step 3.3. In our case, the project name is:
angular-firebase-7b663 - What alias do you want to use for this project?: Developers can use any name for easy reference
If everything goes well the following screen will be displayed as shown in Fig. 6.

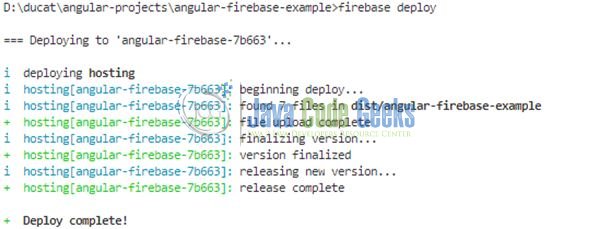
3.7 Application Deployment
Following deploy command is used by the developers to start the deployment process.
> firebase deploy
Firebase will deploy the application and provide a url to access the application online as shown in Fig. 7.
4. Project Demo
Open your favorite browser and hit the shared url to display the welcome page of the application.

The user should see the same result in the browser as when the application was running on the localhost environment. That is all for this tutorial and I hope the article served you whatever you were looking for. Happy Learning and do not forget to share!
5. Conclusion
In this section, developers learned how to create a simple Angular application and deploy the same on Firebase using the firebase hosting services. Developers can download the sample application as an Eclipse project in the Downloads section.
6. Download the Eclipse Project
This was a tutorial of Angular 6 Firebase Hosting.
You can download the full source code of this example here: Angular Firebase Hosting Example

is not a need to edit environment.ts ???