Welcome readers, in this tutorial, we will perform the CRUD Operations in Firebase through an angular application.
1. Introduction
- Angular is a Typescript-based open-source framework that helps developers build single-page applications
- Offers Object-oriented features and supports the dynamic loading of the pages
- Supports Two-way data binding, Property (
[]), and Event (()) binding techniques - Supports command-line-interface to easily initiate and manage the angular projects from the command line
1.1 What is Firebase?
- It is a Backend-As-A-Service that helps developers to write high-quality applications
- If offers: Authentication, Database, Hosting, Real-time data synchronization, and automatic update notifications
- And many more. . . . .
Now open the visual studio code and let us see how to implement this tutorial in the angular framework.
2. Basic Firebase CRUD Operations in Angular
Here is a systematic guide for implementing this tutorial.
2.1 Tools Used
We are using Visual Studio Code and Node Terminal to compile and execute the angular code on a browser.
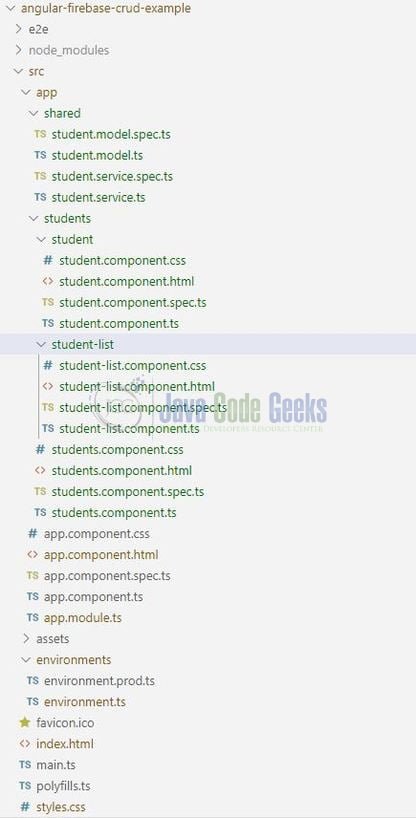
2.2 Project Structure
In case you are confused about where you should create the corresponding files or folder, let us review the project structure of the angular application.
3. Creating a Firebase Project
Developers can refer this link till Fig. 4 to set-up the firebase project. Once the project is set-up they need to navigate to the Database tab (i.e. Project Overview -> Develop -> Database). Create a new Firestore database (Cloud-Firestore) and select the test mode for practice purposes.

4. Creating an Angular Application
Run the ng new angular-firebase-crud-example command in the npm console to create a new angular project. Once the new project is created, execute the following commands in the npm console to install and save angular-firebase dependency required for this example.
1 | npm install firebase @angular/fire --save |
4.1 Adding Firebase Configuration to Environment File
Let us add the Firebase configuration information to the application’s src/environments/environment.ts file. In this file, we’ll specify the Firebase API and the project credentials to the environment variable.
environment.ts
01 02 03 04 05 06 07 08 09 10 11 12 | export const environment = { production: false, firebaseConfig: { apiKey: "", authDomain: "", databaseURL: "", projectId: "", storageBucket: "", messagingSenderId: "", appId: "" }}; |
Note: Developers can find these values in the firebase console if developers click on Add Firebase to the web app icon.
4.2 Injecting Angular Firebase Module
Import and inject the Angular Firebase module in the src/app/app.module.ts file. In this file, we’ll also import the application’s environment file. Add the following code to the file.
app.module.ts
01 02 03 04 05 06 07 08 09 10 11 12 13 14 | // Configure firebase.import { AngularFireModule } from '@angular/fire';import { AngularFirestoreModule } from '@angular/fire/firestore';// Importing the environment config file for the firebase configuration.import { environment } from 'src/environments/environment';… imports: [ BrowserModule, AngularFireModule.initializeApp(environment.firebaseConfig), AngularFirestoreModule,… |
4.3 Creating a Student Model
Let us create a Student model class to map the attributes of a student. We will create the model class by using the following Angular CLI command i.e. ng generate model shared/student.
student.model.ts
1 2 3 4 5 6 7 | export class Student { id: string; fullName: string; rollNo: string; branchName: string; guardianPhoneNo: string;} |
4.4 Creating Student Service
Let us create a Student service that interacts with the Angular Firestore to fetch the information of all students. We will create the service class by using the following Angular CLI command i.e. ng generate service shared/student.
Note: The above command will automatically create an entry for this file in the app.module.ts.
student.service.ts
01 02 03 04 05 06 07 08 09 10 11 12 13 14 15 16 17 18 19 20 21 22 23 24 25 | import { Injectable } from '@angular/core';import { Student } from '../shared/student.model';import { AngularFirestore } from '@angular/fire/firestore';@Injectable({ providedIn: 'root'})export class StudentService { constructor(private fireStore: AngularFirestore) { } // Student form data. formData: Student; // Fetch all students information. getAllStudents() { // valueChanges() function returns the observable containing the student details expect the id of the document. // snapshotChanges() function returns the observable containing the student details and the id of the document (i.e. the metadata). return this.fireStore.collection('students').snapshotChanges(); // We will use the id in order to perform the update or delete operation. }} |
4.5 Creating Students Component
Students component is a central place to hold the student and student-list component. We can create the student’s component by using the following Angular CLI command i.e. ng generate component students.
Note: The above command will automatically create an entry for this file in the app.module.ts.
4.5.1 Creating a Student Component
The student component maintains the CREATE and UPDATE operation for the students. We can create the student component by using the following Angular CLI command i.e. ng generate component students/student.
Note: The above command will automatically create an entry for this file in the app.module.ts.
4.5.1.1 Student Form
Add the following code to the student.component.html file. Please remember to include the FormsModule in app.module.ts file as this component will contain an interactive form.
student.component.html
01 02 03 04 05 06 07 08 09 10 11 12 13 14 15 16 17 18 19 20 21 22 23 24 25 26 27 28 29 30 31 32 33 | <h1 class="display-5 text-center">Student Registration</h1><div> </div><form #form="ngForm" autocomplete="off" (submit)="onSubmit(form)"> <input type="hidden" name="id" #id="ngModel" [(ngModel)]="service.formData.id"> <div class="form-group"> <input name="fullName" #fullName="ngModel" [(ngModel)]="service.formData.fullName" class="form-control" placeholder="Full name" required> <div *ngIf="fullName.invalid && fullName.touched" class="validation-error">Student name is required.</div> </div> <div class="form-group"> <input name="branchName" #branchName="ngModel" [(ngModel)]="service.formData.branchName" class="form-control" placeholder="Branch name"> </div> <div class="form-row"> <div class="form-group col-md-6"> <input name="rollNo" #rollNo="ngModel" [(ngModel)]="service.formData.rollNo" class="form-control" placeholder="Roll number"> </div> <div class="form-group col-md-6"> <input name="guardianPhoneNo" #guardianPhoneNo="ngModel" [(ngModel)]="service.formData.guardianPhoneNo" class="form-control" placeholder="Guardian phone number"> </div> </div> <div class="form-group"> <button type="submit" [disabled]="form.invalid" class="btn btn-lg btn-block btn btn-outline-success">Submit</button> </div></form><div class="error" *ngIf="message"> <h5 class="text-success">{{ message }}</h5></div> |
4.5.1.2 Student Component
Add the following code to the student.component.ts file to perform the CREATE and UPDATE operations in a Firebase database.
student.component.ts
01 02 03 04 05 06 07 08 09 10 11 12 13 14 15 16 17 18 19 20 21 22 23 24 25 26 27 28 29 30 31 32 33 34 35 36 37 38 39 40 41 42 43 44 45 46 47 48 49 50 51 52 53 54 55 56 57 | import { Component, OnInit } from '@angular/core';import { StudentService } from 'src/app/shared/student.service';import { NgForm } from '@angular/forms';import { AngularFirestore } from '@angular/fire/firestore';@Component({ selector: 'app-student', templateUrl: './student.component.html', styleUrls: ['./student.component.css']})export class StudentComponent implements OnInit { message: string; constructor(private service: StudentService, private fireStore: AngularFirestore) { } ngOnInit() { this.resetForm(); } resetForm(form?: NgForm) { if (form != null) { form.resetForm(); } this.service.formData = { id: null, fullName: '', branchName: '', rollNo: '', guardianPhoneNo: '' } } onSubmit(form: NgForm) { // Reset the message value. this.message = ''; // Making the copy of the form and assigning it to the studentData. let studentData = Object.assign({}, form.value); // To avoid messing up the document id and just update the other details of the student. We will remove the 'property' from the student data. delete studentData.id; // Does the insert operation. if (form.value.id == null) { this.fireStore.collection('students').add(studentData); this.message = studentData.fullName + ' information is successfully saved!'; } else { // Does the update operation for the selected student. // The 'studentData' object has the updated details of the student. this.fireStore.doc('students/' + form.value.id).update(studentData); this.message = 'Student successfully updated!'; } // Reset the form if the operation is successful. this.resetForm(form); }} |
4.5.2 Creating a Student List Component
Student List component maintains the student’s view and deleting the student’s information. We can create the student component by using the following Angular CLI command i.e. ng generate component students/student-list.
Note: The above command will automatically create an entry for this file in the app.module.ts.
4.5.2.1 Student’s List View Page
Add the following code to the student.component.html file. Please remember to include the FormsModule in app.module.ts file as this component will contain an interactive form.
student.component.html
01 02 03 04 05 06 07 08 09 10 11 12 13 14 15 16 17 18 19 20 21 22 23 24 25 26 27 | <h1 class="display-5 text-center">Student Details</h1><div> </div><table class="table table-hover student-details-table-width"> <thead align="center"> <th>Roll No.</th> <th>Name</th> <th>Branch Name</th> <th>Guardian Phone No.</th> <th>Edit?</th> <th>Delete?</th> </thead> <tbody align="center"> <tr *ngFor="let studentInfo of studentList"> <td>{{studentInfo.rollNo}}<span>.</span></td> <td>{{studentInfo.fullName}}</td> <td>{{studentInfo.branchName}}</td> <td>{{studentInfo.guardianPhoneNo}}</td> <td><a class="btn text-warning" (click)="onEdit(studentInfo)"><i class="fa fa-edit" title="Edit"></i></a></td> <td><a class="btn text-danger" (click)="onDelete(studentInfo)"><i class="fa fa-trash" title="Delete"></i></a></td> </tr> </tbody></table><div class="error" *ngIf="deleteMessage"> <h5 class="text-dark">{{ deleteMessage }}</h5></div> |
4.5.2.2 Student Component
Add the following code to the student-list.component.ts file to perform the READ and DELETE operations in a Firebase database.
student-list.component.ts
01 02 03 04 05 06 07 08 09 10 11 12 13 14 15 16 17 18 19 20 21 22 23 24 25 26 27 28 29 30 31 32 33 34 35 36 37 38 39 | import { Component, OnInit } from '@angular/core';import { StudentService } from 'src/app/shared/student.service';import { Student } from 'src/app/shared/student.model';import { AngularFirestore } from '@angular/fire/firestore';@Component({ selector: 'app-student-list', templateUrl: './student-list.component.html', styleUrls: ['./student-list.component.css']})export class StudentListComponent implements OnInit { deleteMessage: string; studentList: Student[]; constructor(private service: StudentService, private fireStore: AngularFirestore) { } ngOnInit() { this.service.getAllStudents().subscribe(response => { this.studentList = response.map(document => { return { id: document.payload.doc.id, ...document.payload.doc.data() as {} // Attention - Require typescript version >3 to work!! } as Student; }) // Sorting the student-list in ascending order. this.studentList = this.studentList.sort((obj1, obj2) => (obj1 as any).rollNo - (obj2 as any).rollNo); }); } onEdit(student: Student) { this.service.formData = Object.assign({}, student); } onDelete(student: Student) { this.fireStore.doc('students/' + student.id).delete(); this.deleteMessage = student.fullName + ' information is successfully deleted!'; }} |
4.6 Templates Inclusion for View
In order to view the application’s data on startup, we will need to modify the application design from default to custom. For that –
We will need to update the students.component.html to include the student and student-list components i.e.
students.component.html
1 2 3 4 5 6 7 8 | <div class="row"> <div class="col-md-5"> <app-student></app-student> </div> <div class="col-md-7"> <app-student-list></app-student-list> </div></div> |
Secondly, we will include the students component in the app.component.html file i.e.
app.component.html
01 02 03 04 05 06 07 08 09 10 11 12 13 14 15 | <div> </div><div class="text-center"> <h1 class="display-5 text-info"><i>Firebase CRUD operations via Angular</i></h1> <small> <i class="fa fa-copyright"></i><span class="ml-1"></span> </small></div><br /><div class="container"> <!--including the students’ component into the application's parent module.--> <app-students></app-students></div> |
And done! We have created a simple page application that will perform the CRUD operations in the Firebase database.
5. Run the Application
As we are ready with all the changes, let us compile and run the angular application with ng serve command. Once the projects are successfully compiled and deployed, open the browser to test it.
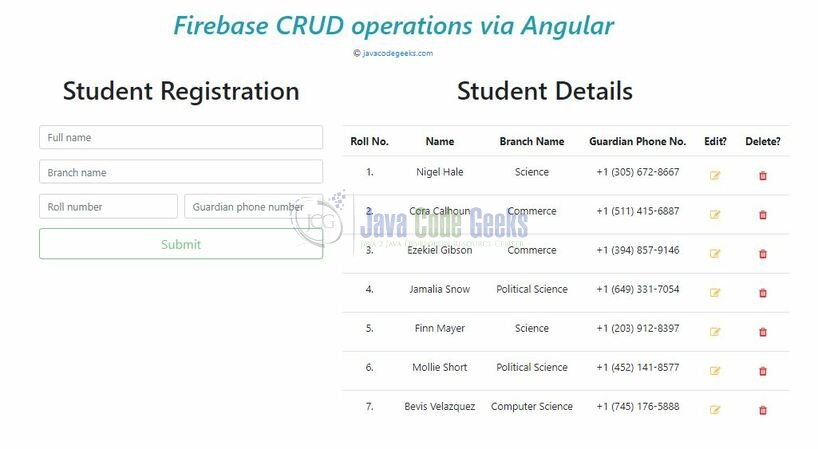
6. Project Demo
Open your favorite browser and hit the angular application URL (http://localhost:4200/) to display the welcome page of the application that shows the student form and the same student’s list.
That is all for this tutorial and I hope the article served you whatever you were expecting. Happy Learning and do not forget to share!
7. Conclusion
In this section, we learned how to perform CRUD operations in Firebase. Developers can download the sample application as an Eclipse project in the Downloads section.
8. Download the Angular Project
This was a tutorial of Basic Firebase CRUD Operations in Angular.
You can download the full source code of this example here: Basic Firebase CRUD Operations in Angular

thanks. It helps me
Thanks for the post. It helps me alot. Just one issue in the code.
In student-list.component.ts
constructor(public service: StudentService, private fireStore: AngularFirestore) { }
StudentService should be public. Else it give compilation error.