Firebase Authentication with Angular
Welcome readers, in this tutorial, we will implement Email/Password Authentication via Firebase in an angular application.
1. Introduction
- Angular is a Typescript-based open-source framework that helps developers build single-page applications
- Offers Object-oriented features and supports the dynamic loading of the pages
- Supports Two-way data binding, Property (
[]), and Event (()) binding techniques - Supports command-line-interface to easily initiate and manage the angular projects from the command line
1.1 What is Firebase?
- It is a Backend-As-A-Service that helps developers to write a high-quality applications
- If offers: Authentication, Database, Hosting, Real-time data synchronization and automatic update notifications
- And many more. . . . .
Now open the visual studio code and let us see how to implement this tutorial in the angular framework.
2. Firebase Authentication with Angular
Here is a systematic guide for implementing this tutorial.
2.1 Tools Used
We are using Visual Studio Code and Node Terminal to compile and execute the angular code on a browser.
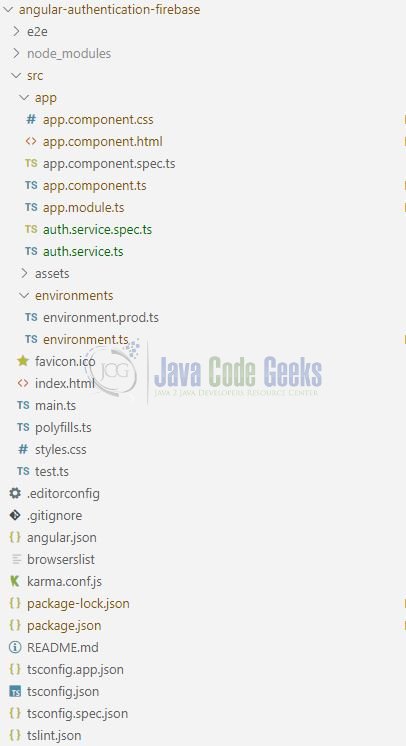
2.2 Project Structure
In case you are confused about where you should create the corresponding files or folder, let us review the project structure of the angular application.

3. Creating a Firebase Project
If developers already know how to set up a project in firebase, they can skip reading this section. If not, they simply need to login to Firebase console and click on Create a Project button.

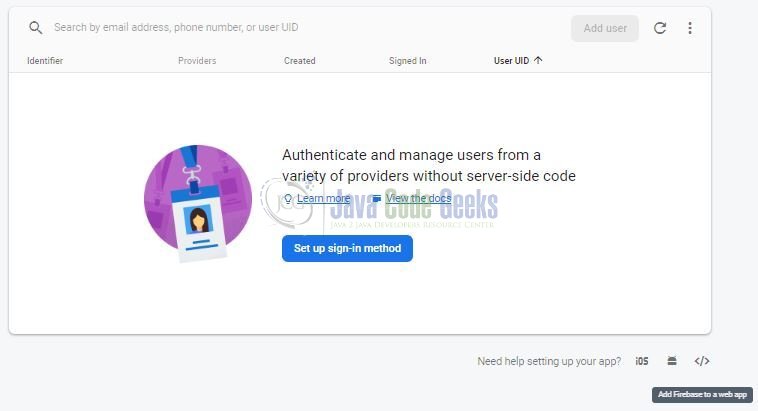
Once the project is created, click on the project’s administrator dashboard. On the dashboard, go to Develop -> Authentication, click on Add Firebase to a web app button.

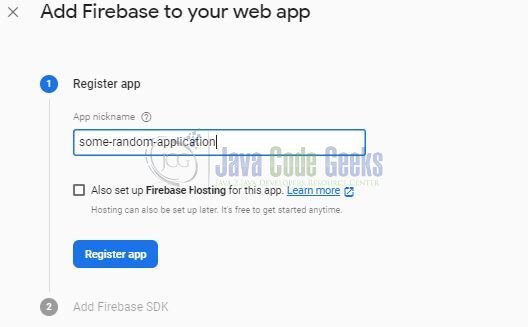
A popup will be opened and enter the details. Click on the Register app button to generate the Firebase SDK information that contains the firebase configuration.

Copy this information to the clipboard and we will use this information later while installing the Firebase SDK from npm.
Sample SDK information
// Your web app's Firebase configuration.
var firebaseConfig = {
  apiKey: "<some_api_key>",
  authDomain: "<some_auth_domain_url>",
  databaseURL: "<some_database_url>",
  projectId: "<some_project_id>",
  storageBucket: "<some_storage_bucket>",
  messagingSenderId: "<some_messaging_sender_id>",
  appId: "<some_application_id>"
};
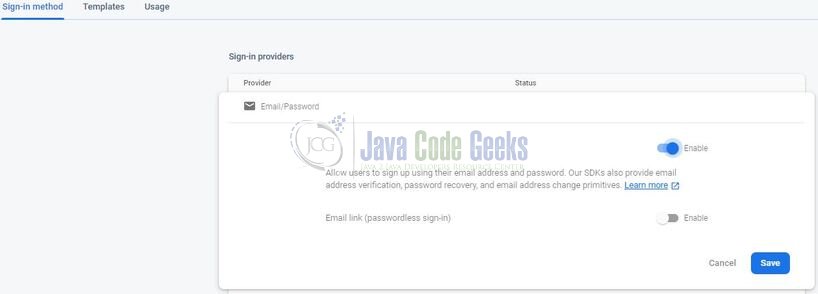
Next, we’ll enable the Email authentication for the project. On the dashboard, go to the Develop -> Authentication, click on the Sign-in method button. Click on “Email/Password” and then on Enable.

And voila you are done setting up the minimal configuration required to implement this tutorial. Let us move ahead and start creating the angular application for this tutorial.
4. Creating Angular application
Run the ng new angular-authentication-firebase command in the npm console to create a new angular project. Once the new project is created, execute the following commands in the npm console to install and save angular-firebase dependency required for this example.
npm install firebase angularfire2 --save
4.1 Adding Firebase configuration to Environment file
Let us add the Firebase configuration information to the application’s src/environments/environment.ts file. In this file, we’ll specify the Firebase API and project credentials to the environment variable.
environment.ts
export const environment = {
  production: false,
  firebase: {
    apiKey: "",
    authDomain: "",
    databaseURL: "",
    projectId: "",
    storageBucket: "",
    messagingSenderId: "",
    appId: ""
  }
};
Note: Developers can find these values in the firebase console if developers click on Add Firebase to the web app.
4.2 Injecting Angular Firebase module
Import and inject the Angular Firebase module in the src/app/app.module.ts file. In this file, we’ll also import the application’s environment file. Add the following code to the file.
app.module.ts
import { BrowserModule } from '@angular/platform-browser';
import { NgModule } from '@angular/core';
import { AppComponent } from './app.component';
import { FormsModule } from '@angular/forms';

// Importing the application’s environment file.
import { environment } from '../environments/environment';

// Angular Firebase module changes.
import { AngularFireModule } from 'angularfire2';
import { AngularFireAuthModule } from 'angularfire2/auth';

// Authentication service.
import { AuthService } from '../app/auth.service';

@NgModule({
  declarations: [
    AppComponent
  ],
  imports: [
    BrowserModule,
    FormsModule,
    AngularFireModule.initializeApp(environment.firebase),
    AngularFireAuthModule
  ],
  providers: [AuthService],
  bootstrap: [AppComponent]
})

export class AppModule { }
4.3 Creating an Authentication Service
Authentication service is a central place that maintains the login, logout and sign-up functionality for the users. We can create the authentication service by using the following Angular CLI command i.e. ng generate service auth. Add the following code to the file that consumes the AngularFireAuth object to interact with Firebase.
Note: Since the AngularFireAuth.auth method return promises, so we’ll use then and catch to handle success and error scenario respectively.
auth.service.ts
import { Injectable } from '@angular/core';

import { AngularFireAuth } from 'angularfire2/auth';
import * as firebase from 'firebase/app';

// For try-catch mechanism.
import { Observable } from 'rxjs/internal/Observable';

@Injectable({
  providedIn: 'root'
})

export class AuthService {

  user: Observable<firebase.User>;
  err: String;

  constructor(private firebaseAuth: AngularFireAuth) {
    this.user = firebaseAuth.authState;
  }

  // To sign up a new user.
  signup(emailAddress: string, password: string) {
    this.firebaseAuth
      .auth
      .createUserWithEmailAndPassword(emailAddress, password)
      .then(value => {
        console.log('Success! User is successfully registered.', value.user.email);
      })
      .catch(error => {
        this.err = error.message;
        console.log('Something went wrong:', error);
      });
  }

  // To login a valid user.
  login(emailAddress: string, password: string) {
    this.firebaseAuth
      .auth
      .signInWithEmailAndPassword(emailAddress, password)
      .then(value => {
        console.log('User successfully logged in!');
      })
      .catch(error => {
        this.err = error.message;
        console.log('Something went wrong:', error);
      });
  }

  // To logout an authenticated user.
  logout() {
    this.firebaseAuth
      .auth
      .signOut();
  }
}
4.4 Creating Component class
As the authentication service is in place now, we’ll create the component class that allows for login, log out and sign-up facilities.
app.component.ts
import { Component } from '@angular/core';
import { AuthService } from './auth.service';

@Component({
  selector: 'app-root',
  templateUrl: './app.component.html',
  styleUrls: ['./app.component.css']
})

export class AppComponent {
  title = '"Angular Authentication via Firebase"';

  emailAddress: string;
  password: string;

  constructor(public authService: AuthService) { }

  signup() {
    this.authService.signup(this.emailAddress, this.password);
    this.emailAddress = this.password = '';
  }

  login() {
    this.authService.login(this.emailAddress, this.password);
    this.emailAddress = this.password = '';
  }

  logout() {
    console.log('User is successfully logged out.')
    this.authService.logout();
  }
}
4.5 Creating a Component template
The authentication template is an easy pee and uses the async pipe on the Auth Service to check if there is a logged-in user or not.
app.component.html
<!DOCTYPE>
<html>

<head>
  <meta name="viewport" content="width=device-width, initial-scale=1">
  <link href="https://www.javacodegeeks.com/wp-content/litespeed/localres/aHR0cHM6Ly9tYXhjZG4uYm9vdHN0cmFwY2RuLmNvbS8=bootstrap/3.3.5/css/bootstrap.min.css" rel="stylesheet" />
</head>

<body>

  <div class="container">
    <div class="row">
      <h2 style="text-align:center"><i>{{ title }}</i></h2>
      <div class="col" *ngIf="!(authService.user | async)">
        <input type="text" [(ngModel)]="emailAddress" placeholder="Enter email . . . ." required>
        <input type="password" [(ngModel)]="password" placeholder="Enter password . . . ." required>
        <button (click)="login()" [disabled]="!emailAddress || !password" class="btn btn-success btn-md">
          Login
        </button>
        <button (click)="signup()" [disabled]="!emailAddress || !password" class="spacing btn btn-primary btn-md">
          Signup
        </button>
      </div>

      <div class="success" *ngIf="authService.user | async">
        <h3>Welcome <i>{{ (authService.user | async)?.email }}</i>!</h3>
        <button (click)="logout()" class="btn btn-success btn-md">
          Logout
        </button>
      </div>
    </div>

    <div class="error" *ngIf="authService.err">
      <h5 class="text-danger">{{ authService.err }}</h5>
    </div>
  </div>

</body>

</html>
And done! We have created a simple authentication application that authenticates the users via Firebase.
5. Run the Application
As we are ready with all the changes, let us compile and run the angular application with ng serve command. Once the projects are successfully compiled and deployed, open the browser to test it.
6. Project Demo
Open your favorite browser and hit the angular application URL (http://localhost:4200/) to display the index page of the application.

Users can enter the new user details or the valid credentials to either sign-up or login to the application. On successful login, the welcome page is displayed.

On invalid user details, the error message is shown to the user.

On sign-out, the user is logged out of the application. That is all for this tutorial and I hope the article served you whatever you were expecting. Happy Learning and do not forget to share!
7. Conclusion
In this section, we learned how to authentication an angular application via firebase. Developers can download the sample application as an Eclipse project in the Downloads section.
8. Download the Eclipse Project
This was a tutorial of implementing Firebase Authentication with Angular.
You can download the full source code of this example here: Firebase Authentication with Angular


