1. Introduction
Amazon Rekognition is an Amazon Web Service (AWS) that provides image and video analysis services. You can provide an image or video and the service will detect objects, people and scenes. Detected faces can also be matched against a set of known faces. This allows to implement use cases like user verification, people counting or public safety.
The service is based on Amazon’s deep learning technology that is also used in other services. To use the service no knowledge about the underlying technologies is necessary, one can simply invoke the existing API and process the results of the invocations.
Table Of Contents
There are two different API sets: One for analyzing images and one for the video analysis. Both perform object detection and recognition that can be used by your applications. For example, you can develop an application that allows users to search their photo collection by faces or certain objects. You would therefore let your application send the image or video data to Amazon Rekognition and let it return metadata about the uploaded material. Your application manages a database with this metadata and lets the user search in it.
The video API lets you track persons within a stored video or within a video stream that comes from a live camera. This way you can be informed if a known person has been detected on the stored video or in front of a live camera.
2. Basics
Before getting started, we have to learn a few concepts about image detection and recognition.
A label can refer to different items in an image or video:
- Object: flower, tree, table, etc.
- Event: wedding, birthday party, etc.
- Concept: landscape, evening, nature, etc.
- Activity: getting out of a car, etc.
Amazon Rekognition has a dedicated operation that returns all the detected labels on an image or video.
The Rekognition service also returns faces it has detected on an image or within a video together with landmark information such as the eye positions and detected emotions. You can enroll persons into a collection and let Amazon search for these persons on submitted images. The latter feature is known as “Face Search”.
On videos a person can be tracked through the different frames. The service provides information about the face and in-frame location of the detection.
As a special feature, Amazon Rekognition can also recognize thousands of celebrities in images and videos. Tracking information tells you in which parts of a film a certain actor appears.
An interesting option is to detect text in images and convert it to machine-readable text. This allows you to detect car license plate numbers in images or to develop applications that help impaired persons to recognize street signs or menu cards in a restaurant.
Last but not least, the Amazon Rekognition Service also helps to detect unsafe content, like nudity, swimwear or underwear on images and videos.
The API for image analysis is synchronous and takes a JSON document as input and returns a JSON response. Images can be a jpeg or png file that is either provided within an Amazon S3 bucket or a byte64 encoded image.
As the video analysis takes more time, the video API is asynchronous. This means that you start the processing by providing a video via an Amazon S3 bucket and the backend informs you about the results by sending a message to a SNS topic. Amazon SNS is a messaging service for notifications using a publish/subscribe paradigm.
If you want to analyze streamed video content, the video is provided via Amazon Kinesis and the backend informs you about recognitions through a stream processor that you must implement.
To search for faces, you must create a collection with faces that you want to detect. As these faces are stored within the Amazon Rekognition service, operations on these collections are also known as “storage operations”. In contrast to these “storage operations”, “non-storage operations” can be called without storing any information on Amazon servers. These “non-storage operations” encompass operation to detect labels and faces, to recognize celebrities or to detect text.
“Storage operations” store information about the detected faces inside the Amazon Rekognition service. This information is also know as templates. A template that has been computed by a specific version of the deep learning algorithm might not be compatible with a new version. Hence, the template must be computed once again with the same image data using the new version of the algorithm. A “model version”, as Amazon names it, is related to a collection with faces. As there is no option to upgrade an existing collection to a new “model version”, you must create a new collection (for the new “model version”) and add all the images once again. Otherwise you might run into compatibility issues over time.
3. Project setup
In this tutorial we are going to use Java as programming language and maven as build tool. We will create a small sample application that demonstrates the basic features of Amazon Rekognition.
It requires that you have installed Java >= 1.8 and Maven >= 3.0.
As a first step we will create a simple maven project on the command line:
mvn archetype:generate -DgroupId=com.javacodegeeks.aws -DartifactId=rekognition -DarchetypeArtifactId=maven-archetype-quickstart -DinteractiveMode=false
This command will create the following structure in the file system:
|-- src
|   |-- main
|   |   `-- java
|   |       `-- com
|   |           `-- javacodegeeks
|   |                `-- aws
|   `-- test
|   |   `-- java
|   |       `-- com
|   |           `-- javacodegeeks
|   |                `-- aws
`-- pom.xml
The pom.xml defines the libraries we are going to use as dependencies:
<properties>
    <aws.version>1.11.401</aws.version>
</properties>

<dependencies>
    <dependency>
        <groupId>com.amazonaws</groupId>
        <artifactId>aws-java-sdk-rekognition</artifactId>
        <version>${aws.version}</version>
    </dependency>
    <dependency>
        <groupId>com.amazonaws</groupId>
        <artifactId>aws-java-sdk-core</artifactId>
        <version>${aws.version}</version>
    </dependency>
</dependencies>
The artifact aws-java-sdk-rekognition contains a ready-to-use Java API for the Amazon Rekognition web service, while the artifact aws-java-sdk-core contains code that is used by a larger set of Amazon AWS SDKs. As aws-java-sdk-core is a transitive dependency of aws-java-sdk-rekognition; hence, you can also leave it out, as maven will fetch it automatically.
The outcome of our maven artifact should be a jar file that contains all dependencies, such that we can easily execute it on the command line. Therefore we add the maven-assembly-plugin to our build and tell it which class contains the main() method we want to execute:
<build>
        <plugins>
            <plugin>
                <artifactId>maven-assembly-plugin</artifactId>
                <configuration>
                    <archive>
                        <manifest>
                            <mainClass>com.javacodegeeks.aws.App</mainClass>
                        </manifest>
                    </archive>
                    <descriptorRefs>
                        <descriptorRef>jar-with-dependencies</descriptorRef>
                    </descriptorRefs>
                </configuration>
                <executions>
                    <execution>
                        <id>make-assembly</id>
                        <phase>package</phase>
                        <goals>
                            <goal>single</goal>
                        </goals>
                    </execution>
                </executions>
            </plugin>
        </plugins>
    </build>
As the class com.javacodegeeks.aws.App has been created by the maven archetype plugin before, we can now build the module:
mvn clean package
After the successful build, we can start the application by:
java -jar target\rekognition-1.0-SNAPSHOT-jar-with-dependencies.jar
Now that we have a running build, we have to create an Amazon AWS account. Therefore, open https://aws.amazon.com/, choose “Create an AWS Account” and follow the instructions. As part of this sign-up, you will receive a phone call and enter a PIN using the phone’s keypad.
Once you have access to your AWS account, you should create a user that has permissions to access the Amazon Rekognition API. How to do this is explained for example here.
At the end of the two steps before you should have an AWS access key with an ID and a secret. These credentials can be stored in an AWS credentials profile file on your local system:
- On Linux, macOS or Unix: ~/.aws/credentials
- On Windows: C:\Users\USERNAME\.aws\credentials (where USERNAME is your username)
The file contains the following lines:
aws_access_key_id =
aws_secret_access_key =
Substitute the placeholders on the right side with the actual values of your account.
Additionally you can also set the default AWS region you are using in an AWS config file:
- On Linux, macOS or Unix: ~/.aws/config
- On Windows: C:\Users\USERNAME\.aws\config (where USERNAME is your username)
The config file has the following content:
region =
Substitute the placeholder on the right side with your AWS region (e.g. us-east-1 or eu-west-1).
4. Image Operations
In this chapter, we will take a closer look at the available image operations.
4.1 Detect Labels
As a starting point, we let Amazon Rekognition detect labels on a provided image.
Therefore, we extend the App class with the main() method by some simple code that invokes our new class DetectLabels through a command line argument:
public class App {

    public static void main(String[] args) {
    if (args.length == 0) {
        System.err.println("Please provide at least one argument.");
        return;
    }
    switch (args[0]) {
    case "detect-labels":
        DetectLabels detectLabels = new DetectLabels();
        detectLabels.run(args);
        break;
    default:
        System.err.println("Unknown argument: " + args[0]);
        return;
    }
    }
}
In the next step, we create a simple factory class that instantiates a AmazonRekognition object. This instance provides access to all the API methods of Amazon Rekognition:
public class ClientFactory {

    public static AmazonRekognition createClient() {
    ClientConfiguration clientConfig = new ClientConfiguration();
    clientConfig.setConnectionTimeout(30000);
    clientConfig.setRequestTimeout(60000);
    clientConfig.setProtocol(Protocol.HTTPS);

    AWSCredentialsProvider credentialsProvider = new ProfileCredentialsProvider();

    return AmazonRekognitionClientBuilder
        .standard()
        .withClientConfiguration(clientConfig)
        .withCredentials(credentialsProvider)
        .withRegion("eu-west-1")
        .build();
    }
}
The Amazon AWS SDK uses the builder pattern to let us create an appropriate configuration. The method standard() initializes all options to default values. After that we provide a specific client configuration. This should demonstrate how to adjust for example the connection timeout and request timeout. Beyond that we also set HTTPS as transport protocol. There are lots of other options that can be set for the client.
As we have created a credentials file before, we can use a ProfileCredentialsProvider to pass our AWS credentials to the applications. This will let the code inspect the credentials file and take the credentials from there.
Providing the region in the code can be omitted, as we have stored this information inside the config file. Here it only shows that we have full control over all options using the builder API.
After we have implemented code to create an Amazon Rekognition client, we can take a closer look at how to detect labels on a provided image:
public class DetectLabels {
public void run(String[] args) {
if (args.length < 2) {
System.err.println("Please provide an image.");
return;
}
String imgPath = args[1];
byte[] bytes;
try {
bytes = Files.readAllBytes(Paths.get(imgPath));
} catch (IOException e) {
System.err.println("Failed to load image: " + e.getMessage());
return;
}
ByteBuffer byteBuffer = ByteBuffer.wrap(bytes);
AmazonRekognition rekognition = ClientFactory.createClient();
DetectLabelsRequest request = new DetectLabelsRequest()
.withImage(new Image().withBytes(byteBuffer))
.withMaxLabels(10);
DetectLabelsResult result = rekognition.detectLabels(request);
ListThe String array we pass into the run() method is filled with the arguments from the command line. The first argument was used to invoke the DetectLabels class (see the App class) above; hence, we can use the second argument to provide an image. The application is then invoked with two arguments:
java -jar target/rekognition-1.0-SNAPSHOT-jar-with-dependencies.jar detect-labels img/work.jpg
While the first lines check for the presence of the command line argument, the following lines read the contents of the image file into a byte array and wrap it into a ByteBuffer. Then its time to create a client for the Amazon Rekognition API and an instance of DetectLabelsRequest. This request object is filled with the byte buffer and the instruction to not return more than 10 labels. Finally, this request is passed to the detectLabels() method of the client and the returned labels are printed on the console.
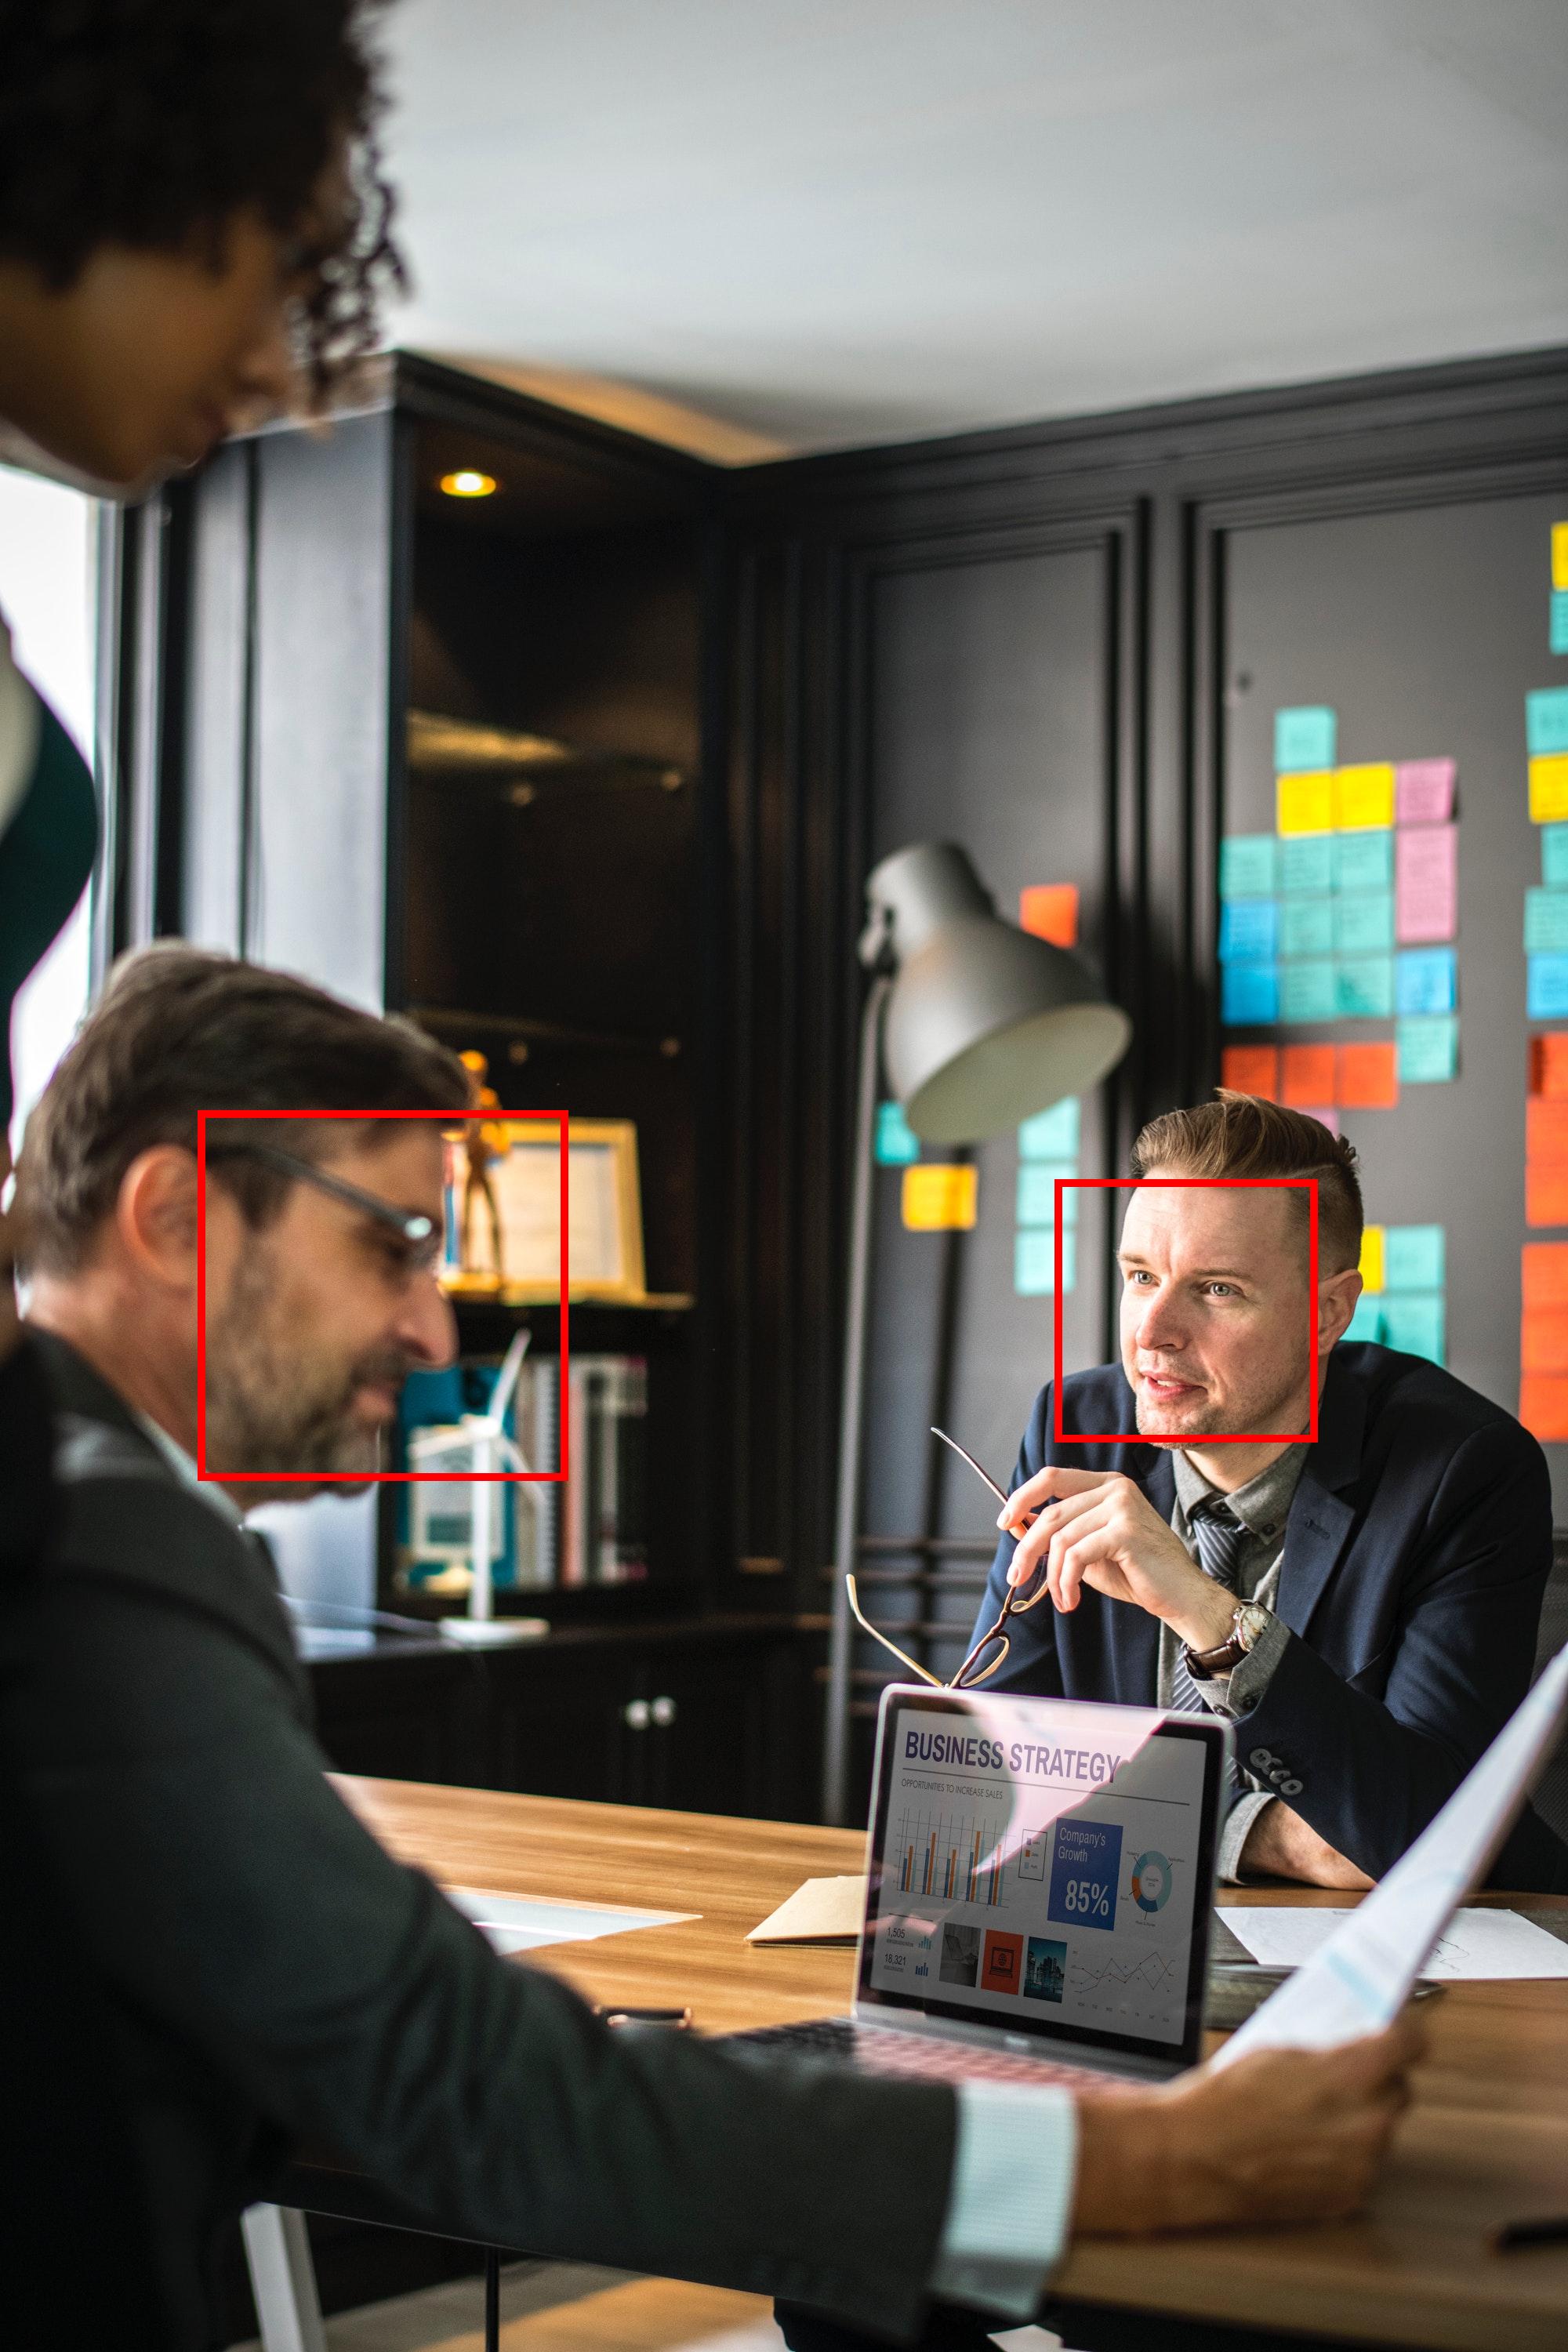
We are using the following sample image:

The output looks for the sample image like this:
Human: 99.18134
People: 99.18133
Person: 99.18134
Computer: 74.21879
Electronics: 74.21879
Laptop: 74.21879
Pc: 74.21879
Art: 71.1518
Modern Art: 71.1518
Afro Hairstyle: 70.530525
We can see that Amazon Rekognition is sure that there are humans on the image, that there is a computer/laptop and modern art. It even detected the “Afro Hairstyle” at the upper left part of the image.
If you like, you can now extend the application and store these labels in a database and let the user search them. For a larger image collection, you would then have a simple way to index your images not only by filename and metadata inside the image but also by its content.
4.2 Detect Faces
Amazon Rekognition cannot only detect labels but also faces. In this section, we explore this feature in more detail.
First, we extend the main class App by accepting another argument on the command line:
case "detect-faces":
    DetectFaces detectFaces = new DetectFaces();
    detectFaces.run(args);
    break;
The method run(String[]) of the new class DetectFaces looks like this:
public void run(String[] args) {

    if (args.length < 2) {
        System.err.println("Please provide an image.");
        return;
    }

    String imgPath = args[1];
    byte[] bytes;
    try {
        bytes = Files.readAllBytes(Paths.get(imgPath));
    } catch (IOException e) {
        System.err.println("Failed to load image: " + e.getMessage());
        return;
    }
    ByteBuffer byteBuffer = ByteBuffer.wrap(bytes);

    AmazonRekognition rekognition = ClientFactory.createClient();

    DetectFacesRequest request = new DetectFacesRequest()
            .withImage(new Image().withBytes(byteBuffer))
            .withAttributes(Attribute.ALL);
    DetectFacesResult result = rekognition.detectFaces(request);

    String orientationCorrection = result.getOrientationCorrection();
    System.out.println("Orientation correction: " + orientationCorrection);

    List faceDetails = result.getFaceDetails();
    for (FaceDetail faceDetail : faceDetails) {

        printFaceDetails(faceDetail);
    }
}
It extracts the filename of the image from the second command line parameter and reads all bytes into an array. This way the application can be called the following way:
java -jar target/rekognition-1.0-SNAPSHOT-jar-with-dependencies.jar detect-faces img/work.jpg
The method printFaceDetails() outputs all the available information about a face detection:
private void printFaceDetails(FaceDetail faceDetail) {
    System.out.println("###############");

    AgeRange ageRange = faceDetail.getAgeRange();
    System.out.println("Age range: " + ageRange.getLow() + "-" + ageRange.getHigh());

    Beard beard = faceDetail.getBeard();
    System.out.println("Beard: " + beard.getValue() + "; confidence=" + beard.getConfidence());

    BoundingBox bb = faceDetail.getBoundingBox();
    System.out.println("BoundingBox: left=" + bb.getLeft() +
            ", top=" + bb.getTop() + ", width=" + bb.getWidth() +
            ", height=" + bb.getHeight());

    Float confidence = faceDetail.getConfidence();
    System.out.println("Confidence: " + confidence);

    List emotions = faceDetail.getEmotions();
    for (Emotion emotion : emotions) {
        System.out.println("Emotion: " + emotion.getType() +
                "; confidence=" + emotion.getConfidence());
    }

    Eyeglasses eyeglasses = faceDetail.getEyeglasses();
    System.out.println("Eyeglasses: " + eyeglasses.getValue() +
            "; confidence=" + eyeglasses.getConfidence());

    EyeOpen eyesOpen = faceDetail.getEyesOpen();
    System.out.println("EyeOpen: " + eyesOpen.getValue() +
            "; confidence=" + eyesOpen.getConfidence());

    Gender gender = faceDetail.getGender();
    System.out.println("Gender: " + gender.getValue() +
            "; confidence=" + gender.getConfidence());

    List landmarks = faceDetail.getLandmarks();
    for (Landmark lm : landmarks) {
        System.out.println("Landmark: " + lm.getType()
            + ", x=" + lm.getX() + "; y=" + lm.getY());
    }

    MouthOpen mouthOpen = faceDetail.getMouthOpen();
    System.out.println("MouthOpen: " + mouthOpen.getValue() +
            "; confidence=" + mouthOpen.getConfidence());

    Mustache mustache = faceDetail.getMustache();
    System.out.println("Mustache: " + mustache.getValue() +
            "; confidence=" + mustache.getConfidence());

    Pose pose = faceDetail.getPose();
    System.out.println("Pose: pitch=" + pose.getPitch() +
            "; roll=" + pose.getRoll() + "; yaw" + pose.getYaw());

    ImageQuality quality = faceDetail.getQuality();
    System.out.println("Quality: brightness=" +
            quality.getBrightness() + "; sharpness=" + quality.getSharpness());

    Smile smile = faceDetail.getSmile();
    System.out.println("Smile: " + smile.getValue() +
            "; confidence=" + smile.getConfidence());

    Sunglasses sunglasses = faceDetail.getSunglasses();
    System.out.println("Sunglasses=" + sunglasses.getValue() +
            "; confidence=" + sunglasses.getConfidence());

    System.out.println("###############");
}
The information encompasses:
- Bounding Box:: The box that surrounds the face.
- Confidence:: The confidence that the box contains a face.
- Facial landmarks:: A list of landmarks, each landmark such as left eye, right eye and mouth describes the x and y coordinates.
- Facial attributes:: Additional attributes that describe the face (like gender, beard, etc.). For most attributes the confidence value indicates how sure Amazon Rekognition is about that attribute.
- Quality:: The brightness and sharpness of the face.
- Pose:: The pose describes the rotation of the face inside the image.
- Emotions:: A set of detected emotions.
The example code above uses the method withAttributes() to tell Amazon Rekognition to return all available facial attributes. If you omit this parameter, the service would only return BoundingBox,
Confidence, Pose, Quality and landmarks.
Please also note the output of the orientation correction. If this value is not null, it is an indicator if the images needs to be rotated. In this case, you will not only have to rotate the image itself but also the returned bounding boxes and landmarks. In case this value is null, you must extract the picture’s orientation from its Exif metadata. Amazon Rekognition evaluates this value internally but does not return it via the API.
Running the example code with the sample image from the last section above yields the following results (shortened):
Orientation correction: ROTATE_0
###############
Age range: 35-52
Beard: false; confidence=63.299633
BoundingBox: left=0.67542213, top=0.503125, width=0.16322702, height=0.10875
Confidence: 99.99996
Emotion: HAPPY; confidence=33.592426
Emotion: CONFUSED; confidence=3.7694752
Emotion: ANGRY; confidence=3.3934474
Eyeglasses: false; confidence=99.92778
EyeOpen: true; confidence=99.999115
Gender: Male; confidence=99.92852
Landmark: eyeLeft, x=0.72928935; y=0.54335195
Landmark: eyeRight, x=0.77855927; y=0.5483551
Landmark: nose, x=0.7247987; y=0.56508356
Landmark: mouthLeft, x=0.72980136; y=0.58450377
Landmark: mouthRight, x=0.7671486; y=0.58911216
Landmark: leftPupil, x=0.73123896; y=0.54353833
Landmark: rightPupil, x=0.78261787; y=0.54776514
Landmark: leftEyeBrowLeft, x=0.71933734; y=0.53303427
Landmark: leftEyeBrowUp, x=0.7256926; y=0.5320847
Landmark: leftEyeBrowRight, x=0.7333774; y=0.5329594
Landmark: rightEyeBrowLeft, x=0.76563233; y=0.53686714
Landmark: rightEyeBrowUp, x=0.78357726; y=0.5374825
Landmark: rightEyeBrowRight, x=0.7988768; y=0.5429575
Landmark: leftEyeLeft, x=0.7218825; y=0.54265666
Landmark: leftEyeRight, x=0.7381058; y=0.54474115
Landmark: leftEyeUp, x=0.7287737; y=0.5410849
Landmark: leftEyeDown, x=0.7291001; y=0.54527205
Landmark: rightEyeLeft, x=0.77009064; y=0.5488282
Landmark: rightEyeRight, x=0.7880702; y=0.54891306
Landmark: rightEyeUp, x=0.778157; y=0.5459737
Landmark: rightEyeDown, x=0.7784402; y=0.55022097
Landmark: noseLeft, x=0.73085135; y=0.5707799
Landmark: noseRight, x=0.74700916; y=0.57319427
Landmark: mouthUp, x=0.7397919; y=0.58404857
Landmark: mouthDown, x=0.74021983; y=0.5951085
MouthOpen: false; confidence=91.05297
Mustache: false; confidence=95.113785
Pose: pitch=1.6241417; roll=11.053664; yaw-40.602734
Quality: brightness=49.62646; sharpness=99.93052
Smile: true; confidence=87.8063
Sunglasses=false; confidence=99.95385
###############
###############
Age range: 26-43
Beard: true; confidence=98.0061
BoundingBox: left=0.12851782, top=0.47375, width=0.23170732, height=0.154375
Confidence: 99.99996
[...]
We can see that the Amazon Rekognition service detected two faces, one with beard and one without. In both cases the service is pretty sure that it has detected a face inside the bounding box. The first detection is the person in the center of the image. Amazon’s algorithm thinks that this person is happy, but is not that sure about it. It has detected that the person’s eyes are open, that the person has no eyeglasses and that it’s a male person in the age range 35-52. The mouth of the person is not open, nor does it have a mustache or sunglasses. However, the person smiles with a confidence of about 87.8%.
On images with more details and persons it is sometimes not that clear which detection belongs to which face. Hence, it can make sense to draw the bounding box on the image.
As said before, we must take the orientation of the image into consideration and rotate the bounding box if necessary. The corresponding code to do that looks like this:
private BoundingBox convertBoundingBox(BoundingBox bb, String orientationCorrection, int width, int height) {
    if (orientationCorrection == null) {
        System.out.println("No orientationCorrection available.");
        return null;
    } else {
        float left = -1;
        float top = -1;
        switch (orientationCorrection) {
        case "ROTATE_0":
            left = width * bb.getLeft();
            top = height * bb.getTop();
            break;
        case "ROTATE_90":
            left = height * (1 - (bb.getTop() + bb.getHeight()));
            top = width * bb.getLeft();
            break;
        case "ROTATE_180":
            left = width - (width * (bb.getLeft() + bb.getWidth()));
            top = height * (1 - (bb.getTop() + bb.getHeight()));
            break;
        case "ROTATE_270":
            left = height * bb.getTop();
            top = width * (1 - bb.getLeft() - bb.getWidth());
            break;
        default:
            System.out.println("Orientation correction not supported: " +
                    orientationCorrection);
            return null;
        }
        System.out.println("BoundingBox: left=" + (int)left + ", top=" +
                (int)top + ", width=" + (int)(bb.getWidth()*width) +
                ", height=" + (int)(bb.getHeight()*height));
        BoundingBox outBB = new BoundingBox();
        outBB.setHeight(bb.getHeight()*height);
        outBB.setWidth(bb.getWidth()*width);
        outBB.setLeft(left);
        outBB.setTop(top);
        return outBB;
    }
}
Depending on the orientation of the image, the left and top coordinate is computed based on the available information. The return value of this method is a new BoundingBox that already contains the pixel values instead of the relative floating point number that are given relative to the width and height of the image.
This converted BoundingBox allows us to load the image using the Java SDK class ImageIO and draw a red rectangle for each bounding box:
private void drawBoundingBoxes(byte[] bytes, DetectFacesResult result) {
    int width;
    int height;
    BufferedImage img;
    Graphics2D graphics;
    try {
        img = ImageIO.read(new ByteArrayInputStream(bytes));
        width = img.getWidth();
        height = img.getHeight();
        graphics = img.createGraphics();
    } catch (IOException e) {
        System.err.println("Failed to read image: " + e.getLocalizedMessage());
        return;
    }
    System.out.println("Image: width=" + width + ", height=" + height);

    String orientationCorrection = result.getOrientationCorrection();
    System.out.println("Orientation correction: " + orientationCorrection);

    List faceDetails = result.getFaceDetails();
    for (FaceDetail faceDetail : faceDetails) {
        drawBoundingBox(faceDetail, orientationCorrection, width, height, graphics);
    }

    try {
        ImageIO.write(img, "jpg", new File("img_bb.jpg"));
    } catch (IOException e) {
        System.err.println("Failed to write image: " + e.getLocalizedMessage());
    }
}

private void drawBoundingBox(FaceDetail faceDetail, String orientationCorrection, int width, int height,
        Graphics2D graphics) {

    BoundingBox bb = faceDetail.getBoundingBox();
    BoundingBox cbb = convertBoundingBox(bb, orientationCorrection, width, height);
    if (cbb == null) {
        return;
    }

    graphics.setColor(Color.RED);
    graphics.setStroke(new BasicStroke(10));
    graphics.drawRect(cbb.getLeft().intValue(), cbb.getTop().intValue(),
            cbb.getWidth().intValue(), cbb.getHeight().intValue());
}
The ImageIO.read() methods loads the image into a BufferedImage that can be stored using the corresponding ImageIO.write() method. In between we create a Graphics2D instance that allows us to draw rectangles on the buffered image. The sample code draws a red rectangle with 10 pixels thickness for each converted bounding box:
Clearly we can see the two bounding boxes and verify that each of them contains a face.
4.3 Compare Faces
The API method “Compare Faces” allows us to detect a face that is given by the first image (called source image) in a second one (called target image). If the source image is not a classical portrait that only contains one image, Amazon Rekognition will take the largest face. The service returns all matches of this face in the target image together with similarity value that indicates how sure the service is, that the person in the target image is the person from the source image.
To extend our application, we add the following code to the switch statement in the App class:
case "compare-faces":
    CompareFaces compareFaces = new CompareFaces();
    compareFaces.run(args);
    break;
The new class CompareFaces looks like this:
public class CompareFaces {

    public void run(String[] args) {
        if (args.length < 3) {
            System.err.println("Please provide two images:  .");
            return;
        }

        ByteBuffer image1 = loadImage(args[1]);
        ByteBuffer image2 = loadImage(args[2]);
        if (image1 == null || image2 == null) {
            return;
        }

        CompareFacesRequest request = new CompareFacesRequest()
                .withSourceImage(new Image().withBytes(image1))
                .withTargetImage(new Image().withBytes(image2))
                .withSimilarityThreshold(70F);

        CompareFacesResult result = ClientFactory.createClient().compareFaces(request);

        List boundingBoxes = new ArrayList<>();
        List faceMatches = result.getFaceMatches();
        for (CompareFacesMatch match : faceMatches) {
            Float similarity = match.getSimilarity();
            System.out.println("Similarity: " + similarity);
            ComparedFace face = match.getFace();
            BoundingBox bb = face.getBoundingBox();
            boundingBoxes.add(bb);
        }

        BoundingBoxDrawer bbDrawer = new BoundingBoxDrawer();
        bbDrawer.drawBoundingBoxes(image2.array(), result.getTargetImageOrientationCorrection(), boundingBoxes);
    }

    private ByteBuffer loadImage(String imgPath) {
        byte[] bytes;
        try {
            bytes = Files.readAllBytes(Paths.get(imgPath));
        } catch (IOException e) {
            System.err.println("Failed to load image: " + e.getMessage());
            return null;
        }
        return ByteBuffer.wrap(bytes);
    }

}
We expect that the user provides two images: a source image and a target image. Both images are provided as command line parameters and loaded into a ByteBuffer using the method loadImage(). In the next step the code creates an instance of CompareFacesRequest and sets the source and target image as well as the similarity threshold we want to use. This request is send to the Amazon Rekognition service using the client’s method compareFaces().
The result of the invocation is an instance of CompareFacesResult that delivers the potential matches with its method getFaceMatches(). For each match we output the similarity and add the bounding box to a list. This list is later on provided to an instance of BoundingBoxDrawer, which basically contains the refactored code from the previous example and draws the bounding box on the target image and saves it inside the current working directory.
We can now compile and start the program with two images:
java -jar target\rekognition-1.0-SNAPSHOT-jar-with-dependencies.jar compare-faces img\dinner2.jpg img\dinner3.jpg
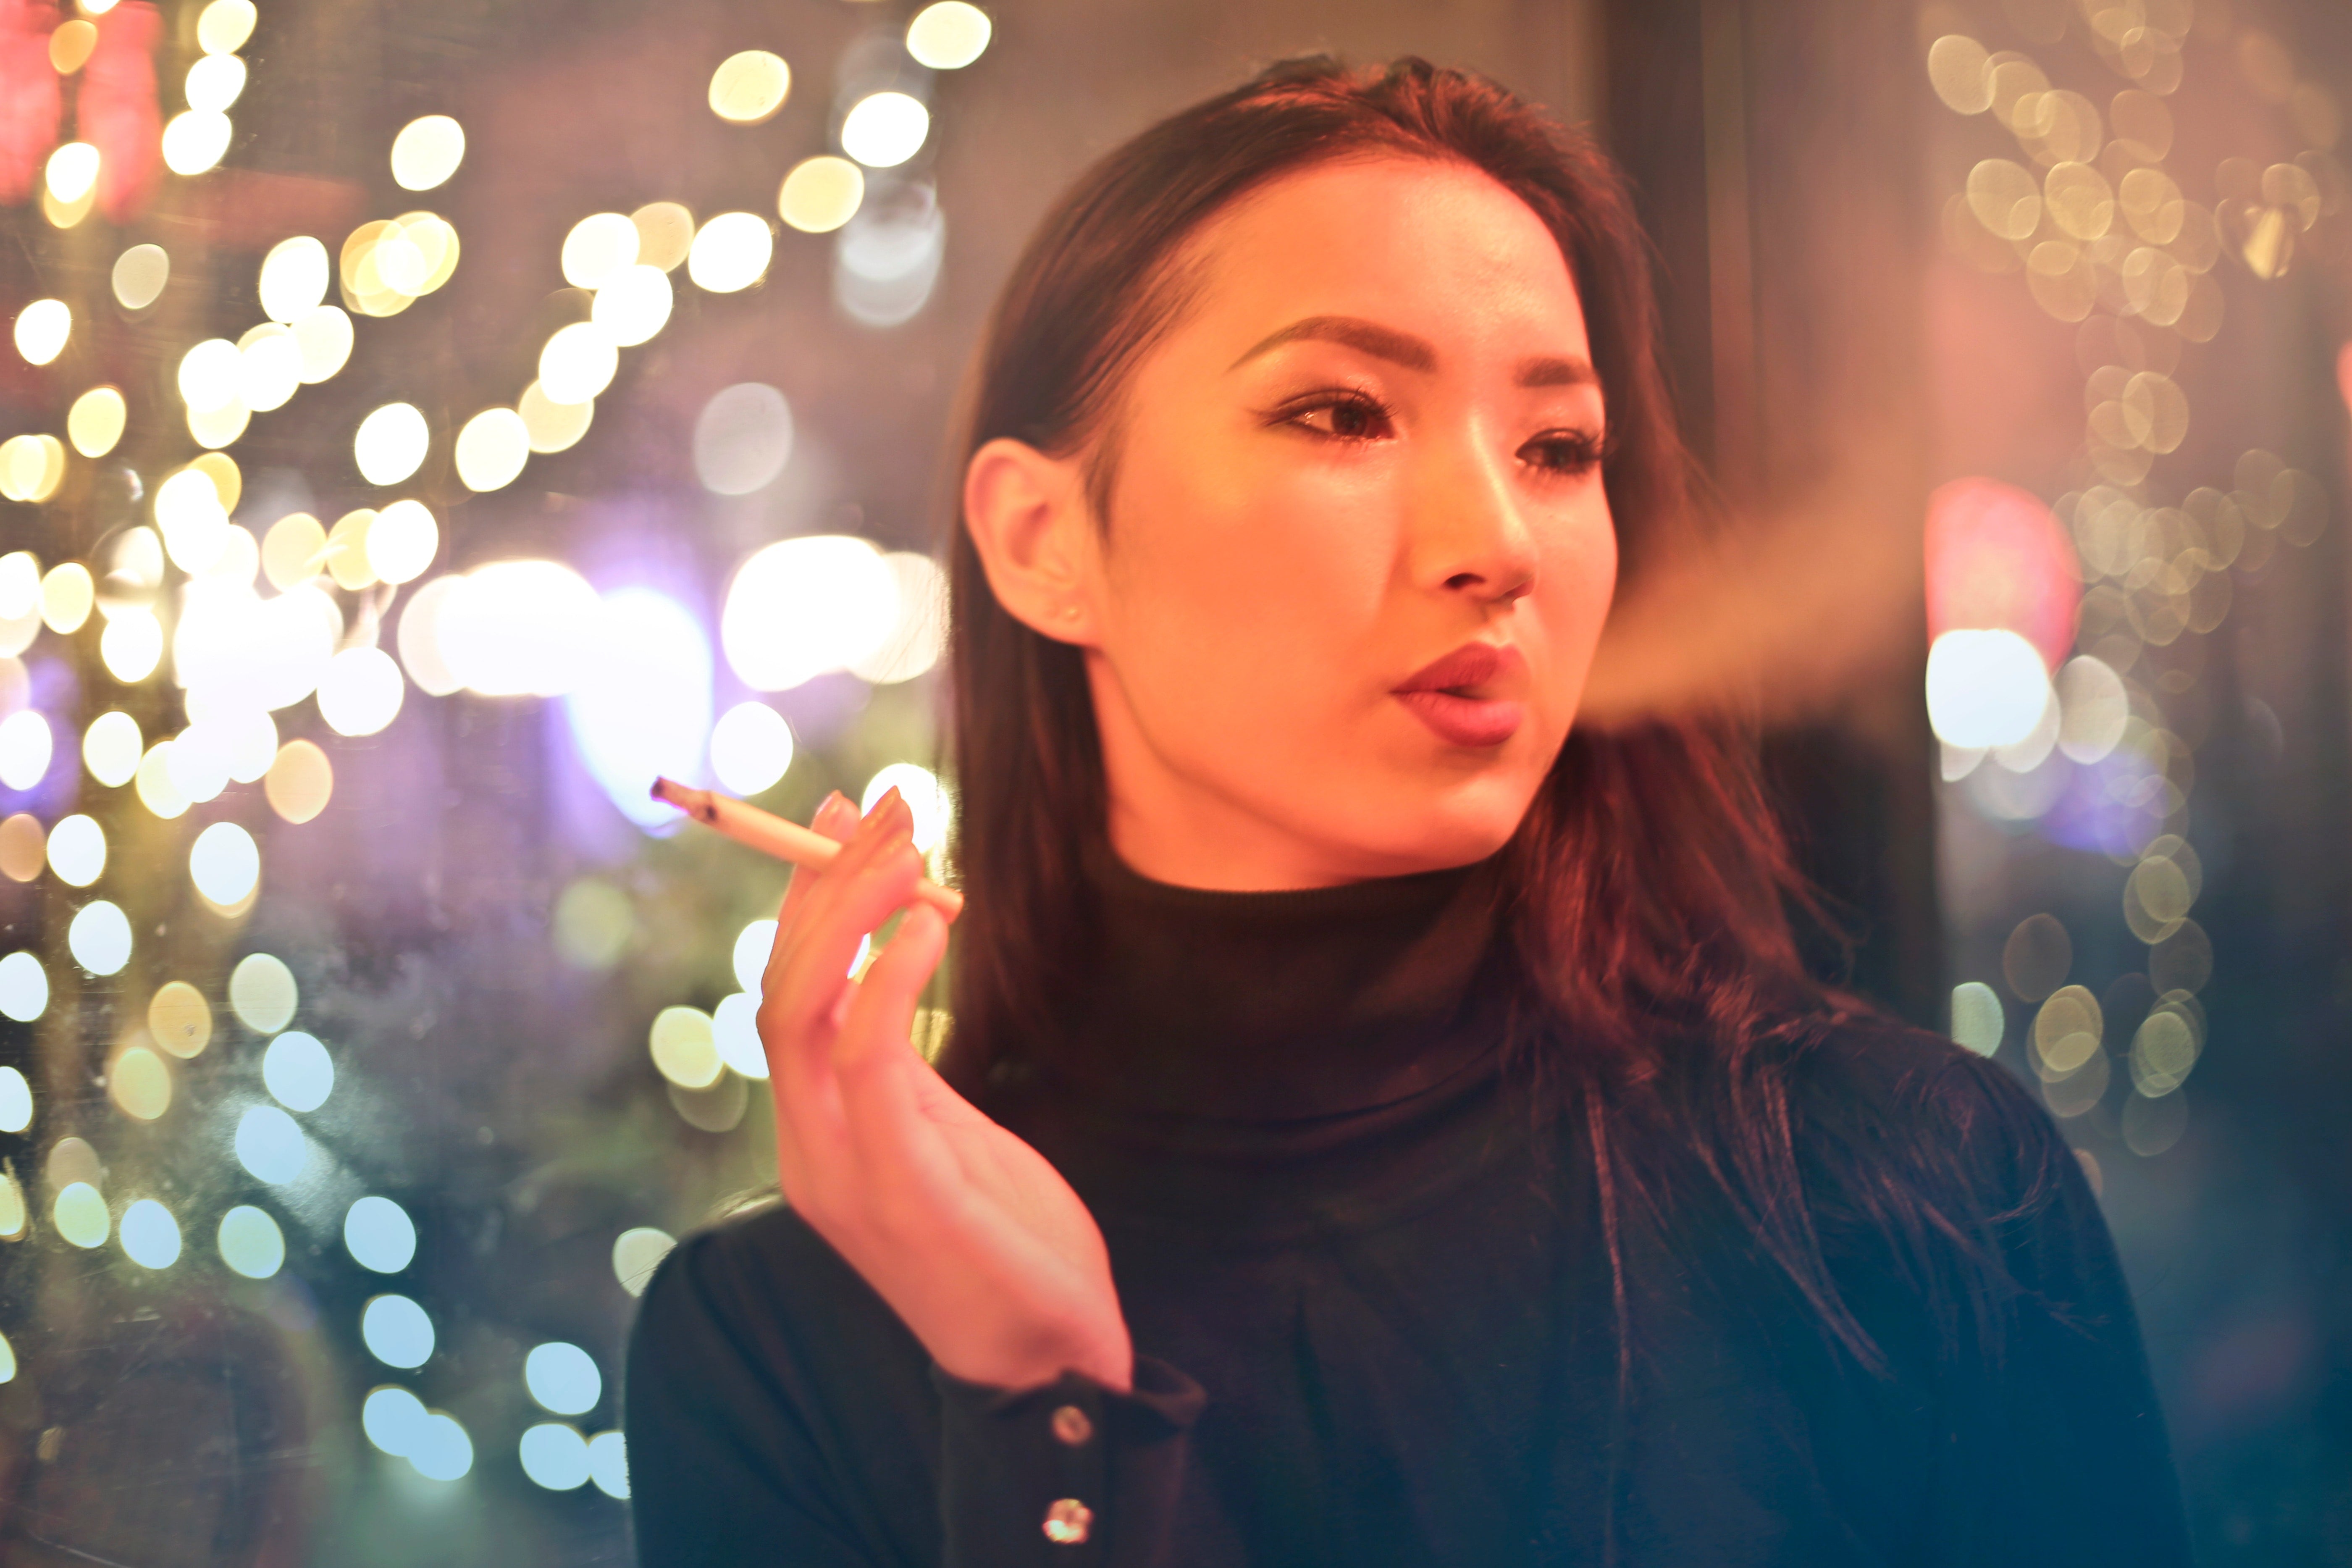
The first image is the portrait of a woman:
The second image shows the woman together with a man:

Our sample application outputs the following information:
Similarity: 96.0
Image: width=5760, height=3840
BoundingBox: left=2341, top=936, width=1076, height=1073
Amazon’s algorithm is pretty sure (96.0%) that the woman on the target image is the same person as the one on the source image. The bounding boxes on the target image tell us where the algorithm has located the woman:

5. Collections
A collection is the basic unit in Amazon Rekognition to manage faces. You can create one or more collections and store faces in it. Afterwards you can search a specific collection for a face match. This is different to the operation “Compare Faces” which only allows to search a face in the source image in the target image.
You create a collection within a specific Amazon region and the collection is associated with the current face detection model.
A use case where collections are helpful is for example when you want to monitor customers in a shop. To separate staff from customers, you could create a collection named “staff” and enroll face images for all employees of the company. Now you only need to query the collection and you know if the detected face belongs to a staff member or is a customer. You could also create a second collection with people who are not allowed to enter the building. If your application detects a face from this collection, an alarm could inform the staff.
5.1 Create Collection
The very first step to work with collections is of course to create one. The following snippet extends the switch statement in the App class:
case "create-collection":
    CreateCollection cc = new CreateCollection();
    cc.run(args);
    break;
The new class CreateCollection looks simple:
public class CreateCollection {

    public void run(String[] args) {
        if (args.length < 2) {
            System.err.println("Please provide a collection name.");
            return;
        }

        String collectionName = args[1];

        CreateCollectionRequest request = new CreateCollectionRequest()
                .withCollectionId(collectionName);

        AmazonRekognition rekognition = ClientFactory.createClient();
        CreateCollectionResult result = rekognition.createCollection(request);

        Integer statusCode = result.getStatusCode();
        String collectionArn = result.getCollectionArn();
        String faceModelVersion = result.getFaceModelVersion();
        System.out.println("statusCode=" + statusCode + "\nARN="
            + collectionArn + "\nface model version=" + faceModelVersion);
    }
}
We expect as argument a collection name and pass it to the withCollectionId() method of the CreateCollectionRequest. The request is subsequently passed as argument to the method createCollection() of the AmazonRekognition client.
The client response contains the status code, the internal Amazon Resource Name (ARN), which is globally unique, and the face model version.
After having the class compiled, we can invoke it the following way:
java -jar target\rekognition-1.0-SNAPSHOT-jar-with-dependencies.jar create-collection my-coll
This produces the following sample output:
statusCode=200
ARN=aws:rekognition:eu-west-1:047390200627:collection/my-coll
face model version=3.0
Obviously, the operation was successful and created a collection with the name my-coll for the face model version 3.0.
5.2 List Collections
Now that we have created the first collection, it is time to list all available collections.
Therefore, we add another case to our command line argument evaluator:
case "list-collections":
    ListCollections lc = new ListCollections();
    lc.run(args);
    break;
The class ListCollections sends a ListCollectionsRequest to the Amazon Rekognition service and prints all returned ids:
public class ListCollections {

    public void run(String[] args) {

        ListCollectionsRequest request = new ListCollectionsRequest()
                .withMaxResults(100);

        AmazonRekognition rekognition = ClientFactory.createClient();
        ListCollectionsResult result = rekognition.listCollections(request);

        List collectionIds = result.getCollectionIds();
        while (collectionIds != null) {
            for (String id : collectionIds) {
                System.out.println(id);
            }

            String token = result.getNextToken();
            if (token != null) {
                result = rekognition.listCollections(request.withNextToken(token));
            } else {
                collectionIds = null;
            }
        }
    }
}
As the result list may be very long, the API provides a pagination option. It returns a token if further collections are available. The next request has to submit this token and therewith gets the next set of collection identifiers.
The compile version of the class can be executed the following way:
java -jar target\rekognition-1.0-SNAPSHOT-jar-with-dependencies.jar list-collections
Having only one collection created, the output looks like this:
my-coll
5.3 Delete Collection
Finally, we have to implement the functionality that removes a collection from Amazon Rekognition.
As in the two steps before, we extend the class App:
case "delete-collection":
        DeleteCollection dc = new DeleteCollection();
        dc.run(args);
        break;
The new class DeleteCollection simply creates a DeleteCollectionRequest with the ID of the collection to be deleted and sends it to the backend:
public class DeleteCollection {

    public void run(String[] args) {
        if (args.length < 2) {
            System.err.println("Please provide a collection name.");
            return;
        }

        String collectionId = args[1];

        DeleteCollectionRequest request = new DeleteCollectionRequest()
                .withCollectionId(collectionId);
        AmazonRekognition rekognition = ClientFactory.createClient();
        DeleteCollectionResult result = rekognition.deleteCollection(request);

        Integer statusCode = result.getStatusCode();
        System.out.println("Status code: " + statusCode);
    }
}
Invoking it with the ID of an existing collection results in the following output:
java -jar target\rekognition-1.0-SNAPSHOT-jar-with-dependencies.jar delete-collection my-coll
Status code: 200
5.4 Describe Collection
After having worked for some time with a collection, it is helpful to query some metadata about it. Therefore, the Amazon Rekognition API provides the “Describe Collection” method.
For an implementation we extend the App class:
case "describe-collection":
        DescribeCollection descc = new DescribeCollection();
        descc.run(args);
        break;
The new class DescribeCollection looks like:
public class DescribeCollection {

    public void run(String[] args) {
        if (args.length < 2) {
            System.err.println("Please provide a collection name.");
            return;
        }

        DescribeCollectionRequest request = new DescribeCollectionRequest()
                .withCollectionId(args[1]);

        AmazonRekognition rekognition = ClientFactory.createClient();
        DescribeCollectionResult result = rekognition.describeCollection(request);

        System.out.println("ARN: " + result.getCollectionARN()
            + "\nFace Model Version: " + result.getFaceModelVersion()
            + "\nFace Count: " + result.getFaceCount()
            + "\nCreated: " + result.getCreationTimestamp());
    }
}
The DescribeCollectionRequest just takes the name of the collection while the result provides us the ARN, the face model version, the face count and the creation timestamp:
java -jar target\rekognition-1.0-SNAPSHOT-jar-with-dependencies.jar describe-collection my-coll
ARN: arn:aws:rekognition:eu-west-1:047390200627:collection/my-coll
Face Model Version: 3.0
Face Count: 0
Created: Fri Sep 07 21:28:05 CEST 2018

5.5 Index Faces
Now that we know how to work with collections it is time to insert some faces. The corresponding API method is called “Index Faces”.
In order to insert a face into a collection we need to provide an image with faces and Amazon Rekognition will insert all detected faces into the collection. In most cases you will prefer images with only one person (e.g. a portrait), as otherwise you may insert unintentionally other persons/faces into the collection. If you are unsure about an image, you can of course use the “Detect Faces” method to check how many faces Amazon Rekognition will detect.
The service will not store the image you have provided. It creates internally a data structure about a detected face and stores it inside the collection. Currently there is no way to access this information directly. It is used indirectly when you perform a search against the collection. In this case Amazon Rekognition will try to match the provided face against all faces within the collection. The service will of course use the internal data structure to perform this search, but you as a user of the API will not get in touch with it.
If you want to correlate a match in a collection with the image you have provided to index this face, you must provide an “external identifier”. In simple cases like ours this can be the filename, in more complex applications you may have to keep track of the face ID that Amazon Rekognition returns for each detected face and the image it is located on.
The first step is to extend our main class:
case "index-faces":
    IndexFaces indf = new IndexFaces();
    indf.run(args);
    break;
The IndexFaces class expects at least two further arguments: a collection the detected faces should be inserted into and at least one image:
public class IndexFaces {

    public void run(String[] args) {

        if (args.length < 3) {
            System.err.println("Please provide a collection and images:   ... ");
            return;
        }

        AmazonRekognition rekognition = ClientFactory.createClient();

        String collectionId = args[1];
        for (int i = 2; i < args.length; i++) {

            String imageArg = args[i];
            Path path = Paths.get(imageArg);
            ByteBuffer byteBuffer;
            try {
                byte[] bytes = Files.readAllBytes(path);
                byteBuffer = ByteBuffer.wrap(bytes);
            } catch (IOException e) {
                System.err.println("Failed to read file '" + imageArg + "': " + e.getMessage());
                continue;
            }

            IndexFacesRequest request = new IndexFacesRequest()
                    .withCollectionId(collectionId)
                    .withDetectionAttributes("ALL")
                    .withImage(new Image().withBytes(byteBuffer))
                    .withExternalImageId(path.getFileName().toString());
            IndexFacesResult result = rekognition.indexFaces(request);

            System.out.println("Indexed image '" + imageArg + "':");

            List faceRecords = result.getFaceRecords();
            for (FaceRecord rec : faceRecords) {
                FaceDetail faceDetail = rec.getFaceDetail();
                BoundingBox bb = faceDetail.getBoundingBox();
                System.out.println("Bounding box: left=" + bb.getLeft() +
                        "; top=" + bb.getTop() +
                        "; width=" + bb.getWidth() +
                        "; height=" + bb.getHeight());

                Face face = rec.getFace();
                System.out.println("Face-ID: " + face.getFaceId() +
                        "\nImage ID: " + face.getImageId() +
                        "\nExternal Image ID: " + face.getExternalImageId() +
                        "\nConfidence: " + face.getConfidence());
            }
        }
    }
}
For each provided image a ByteBuffer containing the bytes of the image is constructed. This buffer is passed to an instance of IndexFacesRequest. The IndexFacesRequest also takes the collection ID and an external image ID to keep track of the provided image as Amazon will not store it. Additionally we also tell the service that all attributes should be detected. As mentioned before, per default only the basic attributes of a face are processed.
The response contains a list of face records. Each record consists of a FaceDetail and Face instance. We already know the FaceDetail class from the “Detect Faces” call, the Face class provides an internal face ID, an internal image ID, the external image ID we have provided and a confidence value.
Running the above code providing the previously created collection and two image results in the following output:
>java -jar target\rekognition-1.0-SNAPSHOT-jar-with-dependencies.jar index-faces my-coll img\dinner1.jpg img\dinner2.jpg

Indexed image 'img\dinner1.jpg':
Bounding box: left=0.35050505; top=0.12651515; width=0.18787879; height=0.28181818
Face-ID: 7c1f2f31-7d88-4bb3-98e4-040edfe3c60a
Image ID: e6dd5551-bd19-5377-94f4-db69730e7ba3
External Image ID: dinner1.jpg
Confidence: 99.99777

Indexed image 'img\dinner2.jpg':
Bounding box: left=0.45353535; top=0.09249432; width=0.3050505; height=0.45792267
Face-ID: 0c8f1a0f-e401-4caf-8a5f-ec06d175f486
Image ID: b1dd15e7-4d08-5489-a14b-dd0dc009143a
External Image ID: dinner2.jpg
Confidence: 99.999916
On each provided image Amazon Rekognition has detected one face and returned face ID, image ID and the external ID (in our case the filename). In both cases Amazon Rekognition is pretty sure that the bounding box contains a face.
Now that these two faces have been added to the collection my-coll, we can use the “describe-collection” command to verify this:
>java -jar target\rekognition-1.0-SNAPSHOT-jar-with-dependencies.jar describe-collection my-coll
ARN: arn:aws:rekognition:eu-west-1:047390200627:collection/my-coll
Face Model Version: 3.0
Face Count: 2
Created: Fri Sep 07 21:28:05 CEST 2018
5.6 Search Faces
Having created a collection with two faces, we can now match it against faces from images. Therefore, we use the “Search Faces By Image” method, which takes an image and uses the detected faces on it to search the collection. Alternatively, one could also search by an existing face ID as returned by the “Index Faces” call.
Our new code is invoked from the App class:
case "search-faces-by-image":
        SearchFacesByImage sfbi = new SearchFacesByImage();
        sfbi.run(args);
        break;
To search for faces by image, we have to provide two arguments: a collection and an image.
public class SearchFacesByImage {

    public void run(String[] args) {

        if (args.length < 3) {
            System.err.println("Please provide a collection and images:  ");
            return;
        }

        String collectionId = args[1];
        String imageArg = args[2];

        Path path = Paths.get(imageArg);
        ByteBuffer byteBuffer;
        try {
            byte[] bytes = Files.readAllBytes(path);
            byteBuffer = ByteBuffer.wrap(bytes);
        } catch (IOException e) {
            System.err.println("Failed to read file '" + imageArg + "': " + e.getMessage());
            return;
        }

        SearchFacesByImageRequest request = new SearchFacesByImageRequest()
                .withCollectionId(collectionId)
                .withImage(new Image().withBytes(byteBuffer));

        AmazonRekognition rekognition = ClientFactory.createClient();
        SearchFacesByImageResult result = rekognition.searchFacesByImage(request);

        List faceMatches = result.getFaceMatches();
        for (FaceMatch match : faceMatches) {
            Float similarity = match.getSimilarity();
            Face face = match.getFace();
            System.out.println("MATCH:" +
                    "\nSimilarity: " + similarity +
                    "\nFace-ID: " + face.getFaceId() +
                    "\nImage ID: " + face.getImageId() +
                    "\nExternal Image ID: " + face.getExternalImageId() +
                    "\nConfidence: " + face.getConfidence());
        }
    }
}
Both arguments are passed to an instance of SearchFacesByImageRequest. The received result contains a list of face matches. Each FaceMatch tells us the similarity of the match and the identifiers of the face inside our collection:
>java -jar target\rekognition-1.0-SNAPSHOT-jar-with-dependencies.jar search-faces-by-image my-coll img\dinner3.jpg
MATCH:
Similarity: 96.45872
Face-ID: 0c8f1a0f-e401-4caf-8a5f-ec06d175f486
Image ID: b1dd15e7-4d08-5489-a14b-dd0dc009143a
External Image ID: dinner2.jpg
Confidence: 9999.99
If you compare the “Face-ID” the service has returned for a match, you will see it is the same one we got when we indexed the image dinner2.jpg. This conforms with the returned “External Image ID” we have provided before.
6. Video Operations
In this chapter we will take a closer look at the available video operations.
You can use Amazon Rekognition to detect the following content within a video:
- Labels
- Faces
- People
- Celebrities
In order to analyze video material, you must store it inside an Amazon S3 bucket. As all operations are asynchronous, you start an operation by calling for example StartLabelDetection. When the asynchronous job finishes, it sends a notification message to an Amazon SNS topic. This status can be retrieved by querying the Amazon Simple Queue Service (SQS). Calling the corresponding get operation will deliver the results of the analysis to your application.
Instead of using the Amazon SQS service, one might also implement an Amazon Lambda function that subsribes to a Amazon SNS topic. The function will be called for each message on the topic and can subsequently process the analysis results on the server side.
The videos must be encoded using the H.264 codec. Supported file formats are MPEG-4 and MOV. A video file can contain one or more codecs. If you encounter any difficulties, please verify that the specific file contains H.264 encoded content.
The maximum file size for videos is 8 GB. If you have larger files, you must split them before into smaller chunks.
The section before has shown how to create collections and how to search for faces that are stored in a collection in images. The same can be done with videos. This means you would create a collection and index faces. The StartFaceSearch operation can then be used to begin a search for the faces within the collection.
6.1 Preparations
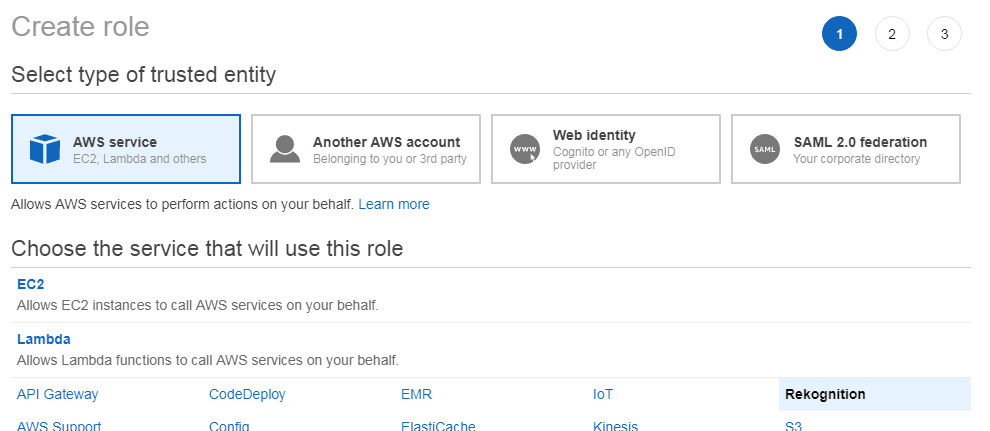
Before we can start to implement our first video analysis, we must setup an IAM service role that allows Amazon Rekognition to access Amazon SNS topics. Therefore, go to the IAM service page inside the Amazon AWS console and create a new role. Chose “AWS service” as type and “Rekognition” as service:
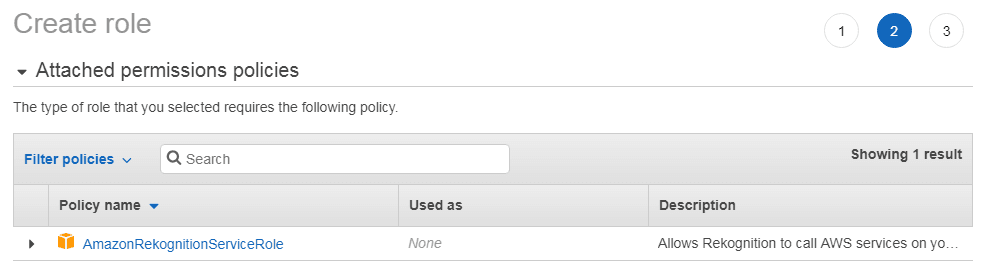
In the next step check that the new role has the policy “AmazonRekognitionServiceRole” attached:
This role allows the Amazon Rekognition service to access SNS topics that are prefixed with “AmazonRekognition”.
The last step requires you to specify a name for the new role:
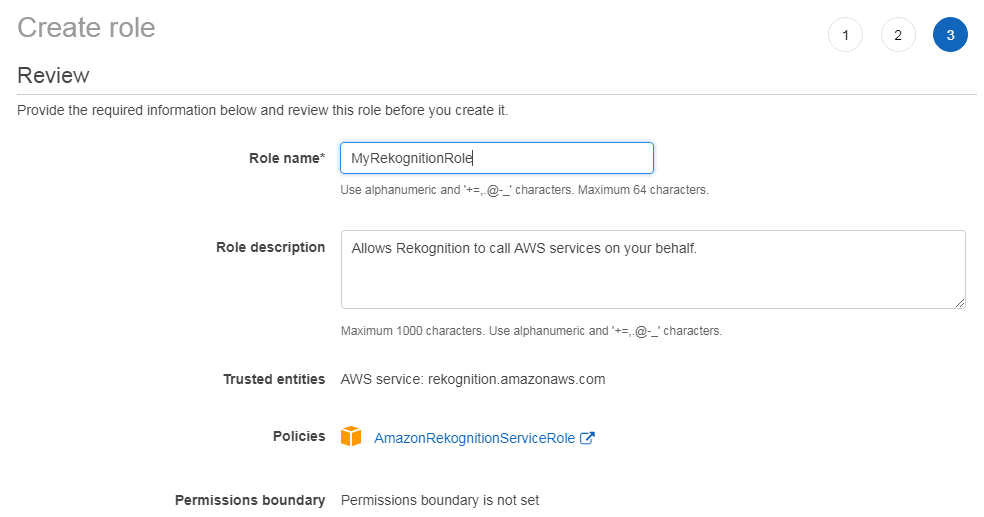
Please write down the ARN of this role, as we need it later on.
You need to ensure that the user you are using has at least the following permissions:
- AmazonSQSFullAccess
- AmazonRekognitionFullAccess
- AmazonS3ReadOnlyAccess
Additionally we add the following “inline policy” to this IAM user:
{
    "Version": "2012-10-17",
    "Statement": [{
        "Sid": "MySid",
        "Effect": "Allow",
        "Action": "iam:PassRole",
        "Resource": "arn:"
    }]
}
Please replace the ARN with the one you have noted above.
Now it’s time to create a SNS topic. Therefore, navigate to the SNS service inside the AWS console and create a new topic. Please note that the topic name must start with AmazonRekognition:
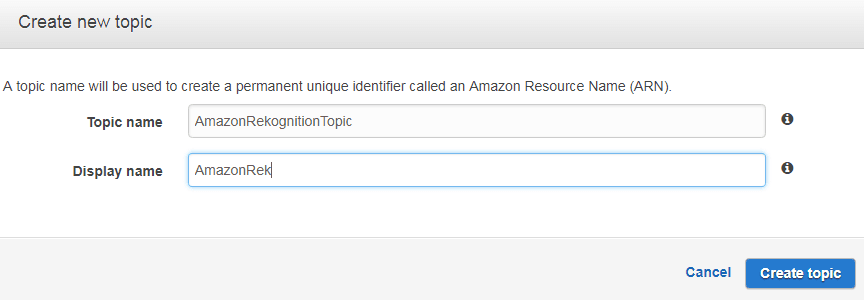
Once again, please write down the ARN of the topic.
Having a SNS topic, we can create a standard queue for it using the SQS console inside AWS:
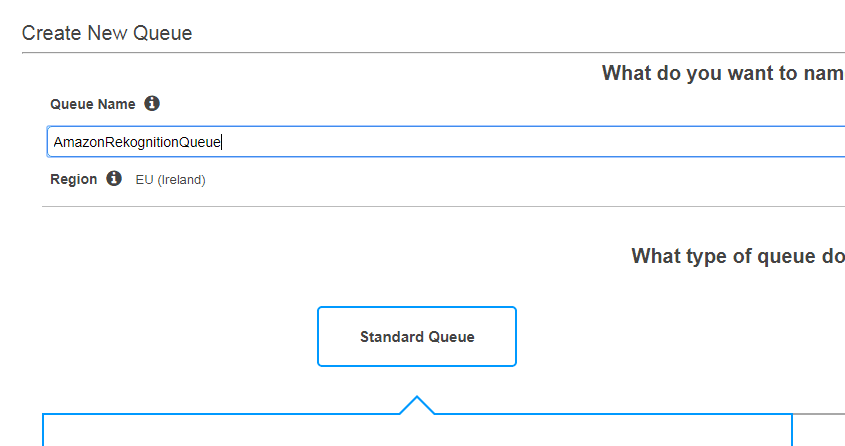
The new queue is supposed to store message for the previously created topic. Hence, we subscribe this queue to the topic:
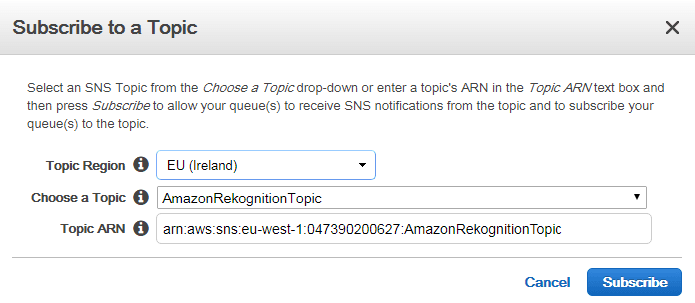
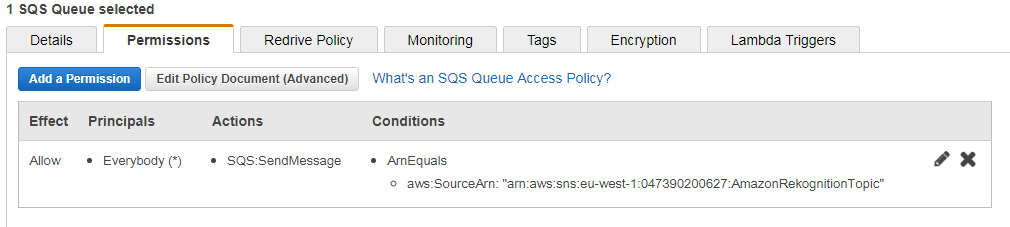
Verify that the SNS topic can send messages to the queue by reviewing the permissions of the SQS queue:
Finally, we can upload a video to a S3 bucket. How to work with Amazon S3 is explained for example here. Note that the bucket resides in the same region as the SNS topic, SQS queue and the one configured for your application.
6.2 Detect Labels
After all the setup operations, we are now ready to implement an application that detects labels in a video.
Therefore, we extend the App class:
case "detect-labels-video":
        DetectLabelsVideo detectLabelsVideo = new DetectLabelsVideo();
        detectLabelsVideo.run(args);
        break;
Additionally we create a new class named DetectLabelsVideo:
public class DetectLabelsVideo {

    private static final String SQS_QUEUE_URL = "https://sqs.eu-west-1.amazonaws.com/...";
    private static final String ROLE_ARN = "arn:aws:iam::...";
    private static final String SNS_TOPIC_ARN = "arn:aws:sns:...";

    public void run(String[] args) throws InterruptedException {

        if (args.length < 3) {
            System.err.println("Please provide a collection and images:  <video width="300" height="150">");
            return;
        }

        String s3Bucket = args[1];
        String video = args[2];

        NotificationChannel channel = new NotificationChannel()
            .withSNSTopicArn(SNS_TOPIC_ARN)
            .withRoleArn(ROLE_ARN);
        AmazonRekognition rekognition = ClientFactory.createClient();
        AmazonSQS sqs = ClientFactory.createSQSClient();

        String jobId = startLabelDetection(s3Bucket, video, channel, rekognition);

        System.out.println("Waiting for message with job-id:" + jobId);
        boolean jobFound = false;
        while (!jobFound) {
            List messages = sqs.receiveMessage(SQS_QUEUE_URL).getMessages();
            System.out.print(".");
            for (Message message : messages) {
                String body = message.getBody();
                try {
                    JsonNode jsonMessageTree = new ObjectMapper().readTree(body);
                    JsonNode msg = jsonMessageTree.get("Message");
                    JsonNode jsonResultTree = new ObjectMapper().readTree(msg.textValue());

                    JsonNode msgJobId = jsonResultTree.get("JobId");
                    JsonNode msgStatus = jsonResultTree.get("Status");

                    System.out.println("\nFound job: " + msgJobId);

                    if (msgJobId.asText().equals(jobId)) {
                        jobFound = true;
                        if (msgStatus.asText().equals("SUCCEEDED")) {
                            getResultsLabels(rekognition, jobId);
                        } else {
                            System.out.println("Video analysis did not succeed: " + msgStatus);
                        }
                        sqs.deleteMessage(SQS_QUEUE_URL, message.getReceiptHandle());
                    } else {
                        System.out.println("Job received was not job " + jobId + " but " + msgJobId);
                        sqs.deleteMessage(SQS_QUEUE_URL, message.getReceiptHandle());
                    }
                } catch (IOException e) {
                    System.err.println("Failed to parse message: " + e.getMessage());
                }
            }
            Thread.sleep(1000);
        }
    }

    private String startLabelDetection(String s3Bucket, String video, NotificationChannel channel,
            AmazonRekognition rekognition) {
        StartLabelDetectionRequest request = new StartLabelDetectionRequest()
                .withVideo(new Video()
                        .withS3Object(new S3Object()
                                .withBucket(s3Bucket)
                                .withName(video)))
                .withMinConfidence(50F)
                .withJobTag("DetectLabels")
                .withNotificationChannel(channel);

        StartLabelDetectionResult result = rekognition.startLabelDetection(request);
        System.out.println("Started label detection.");
        return result.getJobId();
    }

    private void getResultsLabels(AmazonRekognition rekognition, String jobId) {

        String token = null;
        do {

            GetLabelDetectionRequest request = new GetLabelDetectionRequest()
                    .withJobId(jobId)
                    .withMaxResults(10)
                    .withSortBy(LabelDetectionSortBy.TIMESTAMP);
            if (token != null) {
                request.withNextToken(token);
            }
            GetLabelDetectionResult result = rekognition.getLabelDetection(request);

            List labels = result.getLabels();
            for (LabelDetection detection : labels) {
                Label label = detection.getLabel();
                Long timestamp = detection.getTimestamp();
                System.out.println("Label: " + label.getName() +
                        "; confidence=" + label.getConfidence() +
                        "; ts=" + timestamp);
            }

            token = result.getNextToken();
        } while (token != null);
    }
}
As a first step please replace the values for the constants SQS_QUEUE_URL, ROLE_ARN and SNS_TOPIC_ARN to your values. You get the URL for the SQS queue by selecting the queue in the AWS console in the service page for SQS in the “details” tab.
The code creates at the beginning a NotificationChannel using the ARNs for the role and the SNS topic. This channel is used to submit the StartLabelDetectionRequest request. Additionally this request also specifies the video location in Amazon S3 using the bucket and video name, the minimum confidence for detections and a tag for the job. The result message contains the ID of the job that is processed asynchronously in the background.
Hence, our code has to poll the SQS queue using an instance of AmazonSQS. This is created by some new code inside ClientFactory:
public static AmazonSQS createSQSClient() {
    ClientConfiguration clientConfig = createClientConfiguration();

    return AmazonSQSClientBuilder
            .standard()
            .withClientConfiguration(clientConfig)
            .withCredentials(new ProfileCredentialsProvider())
            .withRegion("eu-west-1")
            .build();
}
The ClientConfiguration is the same as for the Rekognition client, so we can refactor it into the method createClientConfiguration().
The AmazonSQS provides the method receiveMessage() to collect new messages from the SQS queue. The URL of the queue is provided as first parameter to this method. The following code iterates over all messages and extracts the job ID. If it matches the one we have obtained before, the status of the job is evaluated. In case it is SUCCEEDED, we can query the Amazon Rekognition service for the results.
This is done by submitting a GetLabelDetectionRequest with the job ID, the maximum of results and a sorting order to the Rekognition service. As the list may be very long, the results are paged using a token. While the result contains a “next token”, we have to submit another request to retrieve the remaining results. For each detected label we output the name of the label, its confidence and the timestamp relative to the beginning of the video.
The user has can start the application by providing three arguments:
java -jar target\rekognition-1.0-SNAPSHOT-jar-with-dependencies.jar detect-labels-video javacodegeeks-videos people_walking.mp4
The first argument is the operation to start in our application, the second the S3 bucket and the third the name of the video inside the bucket. As mentioned before, please double-check that the bucket resides within the AWS region you are using. Here I have chosen a video with walking people. Feel free to choose any H.264 encoded video that you have.
A sample output for the video looks like this:
Started label detection.
Waiting for message with job-id:563b31a1f1fa05a9cb917d270c7c500631bc13e159ea18e4e8bfa5d6ad689624
......
Found job: "563b31a1f1fa05a9cb917d270c7c500631bc13e159ea18e4e8bfa5d6ad689624"
Label: Crowd; confidence=58.403896; ts=0
Label: Human; confidence=98.9896; ts=0
Label: People; confidence=97.9793; ts=0
Label: Person; confidence=98.9896; ts=0
Label: Crowd; confidence=53.8455; ts=166
Label: Human; confidence=98.9825; ts=166
Label: People; confidence=97.965004; ts=166
Label: Person; confidence=98.9825; ts=166
Label: Human; confidence=98.9161; ts=375
Label: People; confidence=97.8322; ts=375
Label: Person; confidence=98.9161; ts=375
Label: Crowd; confidence=51.8283; ts=583
Label: Human; confidence=98.9411; ts=583
Label: People; confidence=97.8823; ts=583
Label: Person; confidence=98.9411; ts=583
Label: Human; confidence=98.896996; ts=792
Label: People; confidence=97.794; ts=792
Label: Person; confidence=98.896996; ts=792
Label: Human; confidence=99.0301; ts=959
Label: People; confidence=98.060104; ts=959
Label: Person; confidence=99.0301; ts=959
Label: Human; confidence=99.026695; ts=1167
Label: People; confidence=98.0535; ts=1167
Label: Person; confidence=99.026695; ts=1167
Label: Clothing; confidence=51.8821; ts=1376
[...]
As we can see, the service is pretty sure that it has detected a crowd with humans. The output is truncated, as the same output repeats for the rest of the sample video.
6.3 Track Persons
Another interesting operation for video analytics is to track persons within a video. Amazon Rekognition provides therefore the methods StartPersonTracking and GetPersonTracking.
The basic steps are the same as in the example before. First, we have to extend the App class:
case "track-persons":
    TrackPersons trackPersons = new TrackPersons();
    trackPersons.run(args);
    break;
Next, we can reuse or refactor the class from the previous example. As the loop that polls the message queue remains the same, we only have to replace the two methods startLabelDetection() and getResultsLabels with the following two methods:
private String startPersonTracking(String s3Bucket, String video, NotificationChannel channel,
        AmazonRekognition rekognition) {

    StartPersonTrackingRequest request = new StartPersonTrackingRequest()
            .withVideo(new Video()
                    .withS3Object(new S3Object()
                            .withBucket(s3Bucket)
                            .withName(video)))
            .withJobTag("track-person")
            .withNotificationChannel(channel);
    StartPersonTrackingResult result = rekognition.startPersonTracking(request);
    return result.getJobId();
}

private void getPersonTracking(AmazonRekognition rekognition, String jobId) {
    String token = null;
    do {
        GetPersonTrackingRequest request = new GetPersonTrackingRequest()
                .withJobId(jobId)
                .withMaxResults(10)
                .withSortBy(PersonTrackingSortBy.TIMESTAMP);
        if (token != null) {
            request.setNextToken(token);
        }
        GetPersonTrackingResult result = rekognition.getPersonTracking(request);
        List persons = result.getPersons();
        for (PersonDetection detection : persons) {
            PersonDetail person = detection.getPerson();
            Long index = person.getIndex();
            Long timestamp = detection.getTimestamp();
            System.out.println("Face with id " + index + " detected at " + timestamp + ".");
        }
        token = result.getNextToken();
    } while (token != null);
}
The first method creates and submits a new GetPersonTrackingRequest. This instance transports the location of the video within Amazon S3, a job tag and a notification channel to the Amazon Rekognition service. The resulting job ID is returned to the caller of this method. It is subsequently used to fetch the correct message from the SQS queue. Once the corresponding message is found, the method getPersonTracking() is called. It sends a GetPersonTrackingRequest with the job ID, the maximum of results and the sort order to the backend. The response contains a list with PersonDetection objects. Eech PersonDetection provides an index of the person within the video (useful to track the person throughout the subsequent lists), a timestamp of the detection within the video and details about the face detection (not shown in the code above).
Starting the application on the video before shows the following sample output:
java -jar target\rekognition-1.0-SNAPSHOT-jar-with-dependencies.jar track-persons javacodegeeks-videos people_walking.mp4
Waiting for message with job-id:6ea86fa7c61860f5043077365930ff1aaafb39532cfe046ddca01ed138a075f6
............................................................................
Found job: "6ea86fa7c61860f5043077365930ff1aaafb39532cfe046ddca01ed138a075f6"
Face with id 0 detected at 0.
Face with id 1 detected at 0.
Face with id 2 detected at 0.
Face with id 3 detected at 0.
Face with id 4 detected at 0.
Face with id 5 detected at 0.
Face with id 3 detected at 41.
Face with id 4 detected at 41.
Face with id 5 detected at 41.
Face with id 6 detected at 41.
Face with id 3 detected at 125.
Face with id 4 detected at 125.
Face with id 5 detected at 125.
Face with id 0 detected at 166.
Face with id 3 detected at 166.
Face with id 4 detected at 166.
Face with id 5 detected at 166.
Face with id 6 detected at 166.
Face with id 3 detected at 250.
It is now up to you to extend the examples to a complete application.
7. Download the Source Code
That was Amazon AWS Rekognition Tutorial.
You can download the full source codes of this example here: Amazon AWS Rekognition Tutorial

I am getting error on this conversion
List faceDetails = result.getFaceDetails();
for (FaceDetail faceDetail : faceDetails) {
printFaceDetails(faceDetail);
}
as
DetectFaces.java:[61,38] incompatible types: java.lang.Object cannot be converted to com.amazonaws.services.rekognition.model.FaceDetail
Although I sorted it in one way by
//List faceDetails = result.getFaceDetails();
for (FaceDetail faceDetail : result.getFaceDetails()) {
printFaceDetails(faceDetail);
}
i am curious to know how can we convert it.
Define as below to resolve this:
List<FaceDetail> faceDetails = result.getFaceDetails();
Great examples, thank you.
If i have to debug the code, how to provide credentials?
Debugger will work in this code also, alternatively You can provide the credentials in source code using basicAuth class.
Hi Martin. Great article.
I’d like to know how to make the same works for AWS SDK for Java V2. As I tried to follow the instructions in https://docs.aws.amazon.com/sdk-for-java/v2/developer-guide/setup-project-maven.html
but it didn’t work.
What changes do I need to make? Thanks
Steps to reproduce: Step1) Create a New Maven Package mvn archetype:generate -DgroupId=org.myjavasdk01.example01 -DartifactId=myjavasdk01 -DarchetypeArtifactId=maven-archetype-quickstart -DinteractiveMode=false step2) I added the following to POM file created above: org.apache.maven.plugins maven-compiler-plugin 1.8 1.8 Step3) Configure the SDK as a Maven Dependency software.amazon.awssdk bom 2.10.9 pom import Step4) software.amazon.awssdk aws-json-protocol 2.10.9 software.amazon.awssdk protocol-core 2.10.9 Step5) I want – for example perform the List operation in the following link: https://docs.aws.amazon.com/rekognition/latest/dg/list-collection-procedure.html So I first delete the “App” class and create a new one and name it: ListCollections and add the following to it: package org.myjavasdk01.example01; import java.util.List; import com.amazonaws.services.rekognition.AmazonRekognition; import com.amazonaws.services.rekognition.AmazonRekognitionClientBuilder; import com.amazonaws.services.rekognition.model.ListCollectionsRequest; import com.amazonaws.services.rekognition.model.ListCollectionsResult; public class… Read more »
How much time this logic will take to find face in 1000images face collection. Please reply