EDITORIAL NOTE: Amazon S3 (Simple Storage Service) is a web service offered by Amazon Web Services. Amazon S3 provides storage through web services interfaces (REST, SOAP, and BitTorrent).
Amazon does not make details of S3’s design public, though it clearly manages data with an object storage architecture. According to Amazon, S3’s design aims to provide scalability, high availability, and low latency at commodity costs.
S3 is designed to provide 99.999999999% durability and 99.99% availability of objects over a given year, though there is no service-level agreement for durability. (Source: Wikipedia)
Now, we provide a comprehensive guide so that you can develop your own Amazon S3 based applications. We cover a wide range of topics, from setup and configuration, to API usage and pricing. With this guide, you will be able to get your own projects up and running in minimum time. Enjoy!
Table Of Contents
1. Introduction
While Amazon’s web shop grew over the years, the need for a scalable IT infrastructure became more urgent from day to day. This let Amazon create its own service based infrastructure. On the search for new business models, Amazon was one of the first pioneers to offer the services build for their own business also to customers.
Amazon S3 is therefore a storage service that is designed to store “any amount of data at any time anywhere on the web”. It offers a simple to use web service interface that can be used by application developers for different use case. Projects can store their webpage on Amazon S3 as well as artifacts needed by their application. Beyond that applications may store use data in S3. Amazon also integrates the storage service into other services, hence it is possible to use the data stored in S3 also for analytical investigations or face recognition.
2. Data Model
The basic unit to store data inside Amazon S3 is the “object”. An object consists of the actual data enriched with metadata. The metadata is a set of name-value pairs that provide additional information about the object. Next to default information like the last modification date this information also provides standard HTTP metadata like the Content-Type. It is also possible to provide user-defined metadata, like for example the application used to create this object.
Objects are organized in buckets. You can think of a bucket as a collection of objects that share the same namespace. Buckets are also used for access control, usage reporting and transfer charges. For example, the image file geek.jpg that is located in the bucket javacodegeeks has the URL http://javacodegeeks.s3.amazonaws.com/photos/geek.jpg.
As buckets span namespaces, every object within a bucket has a unique key. Hence the combination of “web service endpoint + bucket + key + version” identifies an object in Amazon S3. In the example before javacodegeeks was the bucket, s3.amazonaws.com the web service endpoint and photos/geek.jpg the key. The version is optional and can be left out.
Although Amazon states that you can access the data from anywhere around the world, for many applications it is crucial to know where the data resides. Therefore you can choose the region a bucket is located on. This helps end users to optimize latency times and to address regulatory requirements. The following regions are currently available:
- US East (N. Virginia)
- US East (Ohio)
- US West (N. California)
- US West (Oregon)
- Canada (Central)
- Asia Pacific (Mumbai)
- Asia Pacific (Seoul)
- Asia Pacific (Singapore)
- Asia Pacific (Sydney)
- Asia Pacific (Tokyo)
- EU (Frankfurt)
- EU (Ireland)
- EU (London)
- South America (São Paulo)
Updates of a key in a bucket are atomic. This means that the operation is either successful and all data is written or not successful and no data is written. The atomicity of the operation guarantees that no corrupted data is left over when something goes wrong. As the data written to a key is distributed over the machines at Amazon, a successful write operation also means that the data has been replicated within Amazon’s cluster and is safe against the failure of machines within the cluster.
But as the information about new data has to be distributed over the cluster it can happen that operations subsequent to a modification do not reflect the update. For example, after having added a new object to a bucket, a listing of the bucket’s content may not return the new object. The other way around it can occur that after having deleted an object, the object is still listed as member of the bucket. Another case is when the data is updated and read directly after the update. In this case it may happen that the process still reads the old data.
Object locking is not supported in Amazon S3. This means that if your application needs to protect an existing object against modifications from other processes, you have to implement this functionality in your own application. The same is true for subsequent updates of different objects, also known as transactions. As Amazon S3 does not provide any kind of transactional behavior, moving for example data from one key to another might result in the state that the data is successfully created at the new location but the subsequent deletion of the old key fails.
If that data is easily reproducible, e.g. thumbnail images, one can use the “Reduced Redundancy Storage” (RRS) option of Amazon S3. RRS reduces the cost for storage but at the same time does not replicate the data to as many different storage devices as it would do without this option. With RRS enabled the expected loss of data is 0.01% of objects per year which can be acceptable depending on the concrete use case.
3. Usage
3.1 APIs
Amazon S3 offers two different APIs for developers: A REST interface and a SOAP interface. While SOAP over HTTP is deprecated, it is still supported over HTTPS. But new features might not be available over SOAP, hence Amazon recommends to use the REST interface. With REST the application uses standard HTTP requests (like GET, PUT, etc.) to download or upload data. Amazon even puts the object’s metadata into HTTP headers during data retrieval.
3.2 Setup
Now that we have learned about the concepts of Amazon S3, we can start to build our first application. As build system we use Apache Maven in version 3.x or higher.
This enables us to create a project directly from an archetype:
mvn archetype:generate -DgroupId=com.javacodegeeks -DartifactId=amazon-s3 -DarchetypeArtifactId=maven-archetype-quickstart -DinteractiveMode=false
This creates the following directory structure:
amazon-s3

|-- pom.xml

`-- src

|-- main

| `-- java

| `-- com

| `-- javacodegeeks

| `-- App.java

`-- test

`-- java

`-- com

`-- javacodegeeks

`-- AppTest.java
As a first step we edit the pom.xml file in the root directory of our project and add the following dependencies:
<properties>
	<aws-sdk.version>1.11.86</aws-sdk.version>
	<google-guava.version>19.0</google-guava.version>
	<junit.version>4.12</junit.version>
	<project.build.sourceEncoding>UTF-8</project.build.sourceEncoding>
</properties>

<dependencies>
	<dependency>
		<groupId>com.amazonaws</groupId>
		<artifactId>aws-java-sdk-core</artifactId>
		<version>${aws-sdk.version}</version>
	</dependency>
	<dependency>
		<groupId>com.amazonaws</groupId>
		<artifactId>aws-java-sdk-s3</artifactId>
		<version>${aws-sdk.version}</version>
	</dependency>
	<dependency>
		<groupId>com.google.guava</groupId>
		<artifactId>guava</artifactId>
		<version>${google-guava.version}</version>
	</dependency>
	<dependency>
		<groupId>junit</groupId>
		<artifactId>junit</artifactId>
		<version>${junit.version}</version>
	</dependency>
</dependencies>
As you can see, we add the two artifacts aws-java-sdk-core and aws-java-sdk-s3 provided by Amazon. They contain the core functionality of the AWS as well as the Java classes to communicate with the S3 services. Additionally we add Google’s Guava library and the junit library for unit testing.
Having added the necessary dependencies, we add a build section that defines the target version of our class files and uses the maven-assembly-plugin to build a single jar that contains all dependencies. This way we can later simply start the application by providing only one jar on the classpath (java -cp target\amazon-s3-1.0-SNAPSHOT-jar-with-dependencies.jar ...):
<build>
	<plugins>
		<plugin>
			<groupId>org.apache.maven.plugins</groupId>
			<artifactId>maven-compiler-plugin</artifactId>
			<version>3.6.1</version>
			<configuration>
				<source>1.8</source>
				<target>1.8</target>
			</configuration>
		</plugin>
		<plugin>
			<artifactId>maven-assembly-plugin</artifactId>
			<configuration>
				<archive>
					<manifest>
						<mainClass>com.javacodegeeks.App</mainClass>
					</manifest>
				</archive>
				<descriptorRefs>
					<descriptorRef>jar-with-dependencies</descriptorRef>
				</descriptorRefs>
			</configuration>
			<executions>
				<execution>
					<id>make-assembly</id>
					<phase>package</phase>
					<goals>
						<goal>single</goal>
					</goals>
				</execution>
			</executions>
		</plugin>
	</plugins>
</build>
Now you can invoke the build and create a simple jar application that only outputs “Hello World!”:
>mvn package
>java -jar target/amazon-s3-1.0-SNAPSHOT-jar-with-dependencies.jar
Hello World!
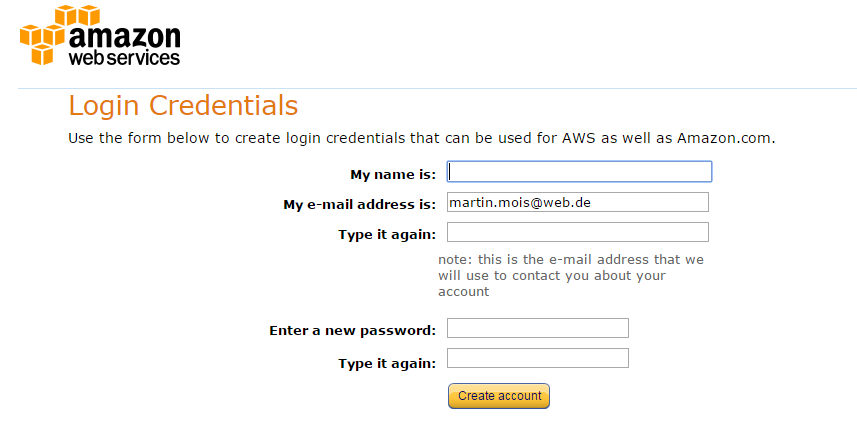
Now that our Java application has been set up, we can create an AWS account. If you already have an AWS account you can skip the following steps and directly login to the AWS console. To create a new AWS account point your browser to the following URL: https://aws.amazon.com/s3 and click on “Sign Up”:

Fill in your email address and click on “Sign in using our secure server”. This leads you to the following page, where you have to enter your name, re-type your email address and enter a password.
On the following page you will have to provide contact information:

To complete the sign up process, the following pages will ask for payment information, verify your identity and ask for a support plan. Finally you can confirm all your input and create an AWS account.
3.3 Authentication
Having signed up for Amazon S3 it is now time to create a dedicated user. This can be done through the AWS console by searching for the term “IAM” (which is short term for Identity and Access Management). This brings you to the following screen:

A click on “Add user” lets you enter the user name and its access type:
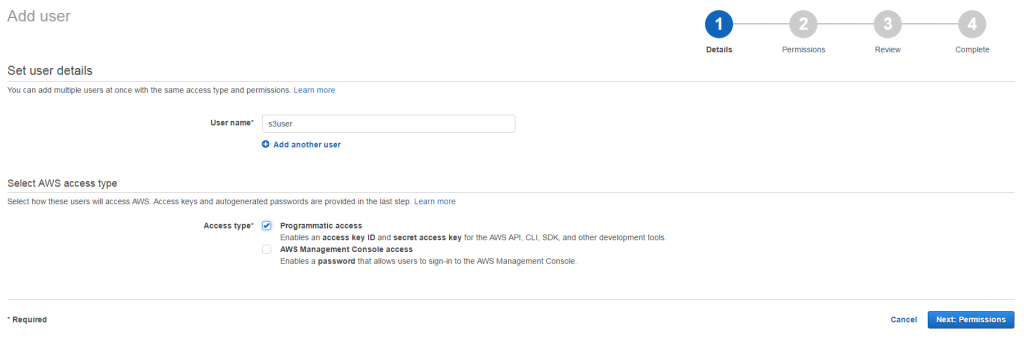
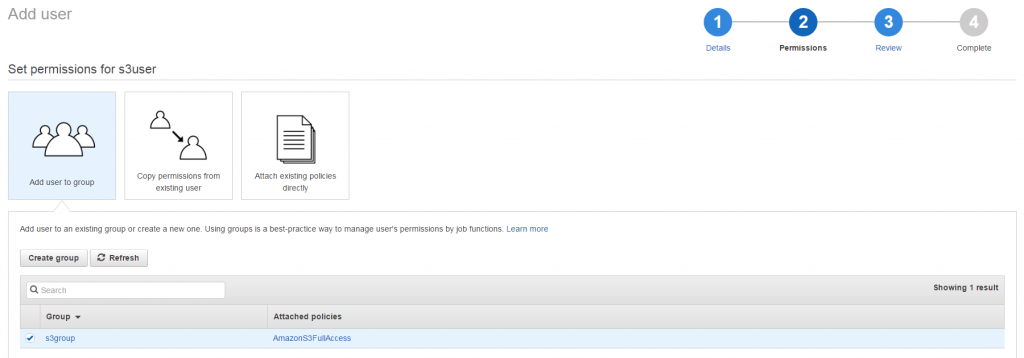
As the user we are going to create should only interact with the S3 API, we do not need to check the option “AWS Management Console access” but only the option “Programmatic access”. On the following screen we add the user to a new group named “s3group”. This is done by clicking on “Create group” and by providing the group’s name as well as by choosing the permission set “AmazonS3FullAccess”:
On the following page you can review your changes and save them. On this page you will also see the access key and the secret key for the new user.
The Amazon S3 SDK can read the credentials for your account from a profile file that is created inside the home directory of your OS user, located at:
~/.aws/credentialson Linux, OS X, or UnixC:\Users\USERNAME\.aws\credentialson Windows
This file contains the access key id as well as the secret access key in the following format:
[default]
aws_access_key_id = <your_access_key_id>
aws_secret_access_key = <your_secret_access_key>
For testing purposes it can also be handy to provide the credentials as environment variables. On Linux, OS X and Unix you can set them the following way:
export AWS_ACCESS_KEY_ID=<your_access_key_id>
export AWS_SECRET_ACCESS_KEY=<your_secret_access_key>
On a Windows system this can be done like this:
set AWS_ACCESS_KEY_ID=<your_access_key_id>
set AWS_SECRET_ACCESS_KEY=<your_secret_access_key>
The Java SDK even supports to set the access key id and the secret access key by the means of system properties:
java -Daws.accessKeyId=<your_access_key_id> -Daws.secretKey=<your_secret_access_key> -jar <your.jar>
If you have multiple access keys, you can store them in different sections in the profile file:
[default]
aws_access_key_id=<your_access_key_id>
aws_secret_access_key=<your_secret_access_key>

[profile2]
aws_access_key_id=<your_access_key_id>
aws_secret_access_key=<your_secret_access_key>
In this case you select the profile to be used by telling its name to the ProfileCredentialsProvider:
AmazonS3 s3Client = AmazonS3ClientBuilder.standard()
                        .withCredentials(new ProfileCredentialsProvider("profile2"))
                        .build();
As an alternative you can also use the environment variable AWS_PROFILE:
export AWS_PROFILE="myProfile"
On Windows:
set AWS_PROFILE="myProfile"
The environment variable AWS_CREDENTIAL_PROFILES_FILE lets you specify an alternative location for the profile file.
If you do not provide any credential provider, then the SDK does search for them in the following way:
- Environment variables
- Java System Properties
- The default credential profiles file
When using Amazon ECS, there are further options (see here).
Last but not least you can provide the credentials programmatically:
BasicAWSCredentials awsCreds = new BasicAWSCredentials("your_access_key_id", "your_secret_access_key");
AmazonS3 s3Client = AmazonS3ClientBuilder.standard()
                        .withCredentials(new AWSStaticCredentialsProvider(awsCreds))
                        .build();
3.4 List Buckets
The knowledge about authentication enables us to implement our first simple client that only lists all buckets in our account:
public class ListBucketsApp {

    public static void main(String[] args) throws IOException {
        ClientConfiguration clientConf = new ClientConfiguration();
        clientConf.setProxyHost("wish-proxy-ilm.mph.morpho.com");
        clientConf.setProxyPort(3128);
        clientConf.setProxyUsername("g510581");
        clientConf.setProxyPassword("MAR42l1id");
        clientConf.setConnectionTimeout(60 * 1000);
        AWSCredentials credentials = getAwsCredentials();
        AWSStaticCredentialsProvider credentialsProvider = new AWSStaticCredentialsProvider(credentials);
        AwsEnvVarOverrideRegionProvider regionProvider = new AwsEnvVarOverrideRegionProvider();
        AmazonS3 amazonS3 = AmazonS3ClientBuilder.standard()
                .withClientConfiguration(clientConf)
                .withCredentials(credentialsProvider)
                .withRegion(regionProvider.getRegion())
                .build();
        List<Bucket> buckets = amazonS3.listBuckets();
        for (Bucket bucket : buckets) {
            System.out.println(bucket.getName() + ": " + bucket.getCreationDate());
        }
    }

    private static AWSCredentials getAwsCredentials() throws IOException {
        AWSCredentials credentials;
        try (InputStream is = ListBucketsApp.class.getResourceAsStream("/credentials.properties")) {
            if (is == null) {
                throw new RuntimeException("Unable to load credentials from properties file.");
            }
            credentials = new PropertiesCredentials(is);
        }
        return credentials;
    }
}
First of all we construct a ClientConfiguration and set the connection timeout to one minute. This part is optional but illustrates how to set low level parameters for the Amazon S3 client. The small helper method getAwsCredentials constructs an instance of AWSCredentials. In this case we have chosen the PropertiesCredentials. It needs an InputStream or File that points to a properties file containing the two properties accessKey and secretKey with the access key id and the secret key as values.
Having an instance of AWSCredentials allows us to create a credential provider like the AWSStaticCredentialsProvider. Alternatively we could have also used the EnvironmentVariableCredentialsProvider or the ProfileCredentialsProvider. While the first one reads the credentials from environment variables as described above, the second one uses the already mentioned profile files to extract the necessary information. For example, this looks like the following:
AmazonS3 s3Client = new AmazonS3Client(new ProfileCredentialsProvider());
The provider concept can also be utilized for the region. The AWS SDK provides for example the AwsEnvVarOverrideRegionProvider that inspects the environment variable AWS_REGION for the region to be used. This region string can then be passed to the method withRegion() of the AmazonS3ClientBuilder.
After having provided the client configuration, the credentials and the region, we can finally build an instance of AmazonS3. On this instance we can invoke the method listBuckets() to retrieve a list of all available buckets.
You can run this sample by setting the classpath for the JVM to the created jar and by providing the classname:
mvn clean install
export AWS_REGION=eu-central-1
java -cp target/amazon-s3-1.0-SNAPSHOT-jar-with-dependencies.jar com.javacodegeeks.ListBucketsApp
If you see the following error message, you might have forgotten to setup the environment variable AWS_REGION: Unable to load region information from any provider in the chain. Please choose the region based on your location (see here).
3.5 Create Buckets
Only viewing existing data is boring, hence we create an additional class that lets us create a new bucket in a specified region:
public class CreateBucketApp {
    private static final Logger LOGGER = Logger.getLogger(CreateBucketApp.class.getName());

    public static void main(String[] args) throws IOException {
        if (args.length < 1) {
            LOGGER.log(Level.WARNING, "Please provide the following arguments: <bucket-name>");
            return;
        }
        AmazonS3 amazonS3 = AwsClientFactory.createClient();
        CreateBucketRequest request = new CreateBucketRequest(args[0],
                AwsClientFactory.createRegionProvider().getRegion());
        Bucket bucket = amazonS3.createBucket(request);
        LOGGER.log(Level.INFO, "Created bucket " + bucket.getName() + ".");
    }
}
To make the class more readable we have moved the code that constructs the AmazonS3 client and the AwsRegionProvider into a simple factory class. The sample above allows the user to provide the bucket name as argument on the command line and then passes this to the CreateBucketRequest object. The latter can then be provided to the method createBucket() of the AmazonS3 client.
If you do not want to create the CreateBucketRequest object yourself, you can also use the method createBucket(String) that allows you to specify the bucket name. The region is then extracted from the URL of the amazon endpoint.
Similar to the example above, we start the application after we have built it and provide a bucket name on the command line:
mvn clean install
export AWS_REGION=eu-central-1
java -cp target\amazon-s3-1.0-SNAPSHOT-jar-with-dependencies.jar com.javacodegeeks.CreateBucketApp mybucket
3.6 Put Object
After having created a bucket we can insert an object into it. The following code shows how to do that in a simplified version:
public class PutObjectApp {
    private static final Logger LOGGER = Logger.getLogger(PutObjectApp.class.getName());

    public static void main(String[] args) throws IOException {
        if (args.length < 3) {
            LOGGER.warning("Please provide the following parameters: <bucket-name> <key> <file>");
            return;
        }
        String bucketName = args[0];
        String key = args[1];
        Path filePath = Paths.get(args[2]);
        AmazonS3 amazonS3 = AwsClientFactory.createClient();
        PutObjectRequest putObjectRequest = new PutObjectRequest(bucketName, key, filePath.toFile());
        PutObjectResult result = amazonS3.putObject(putObjectRequest);
        LOGGER.info("Put file '" + filePath + "' under key " + key + " to bucket " + bucketName);
    }
}
First we check that the user has provided at least the three arguments that are necessary for an enrollment: bucket name, key, file. For the sake of simplicity we do not check the values for correctness in our client, as there are for example rules for the naming of keys:
- Alphanumeric characters [0-9a-zA-Z]
- Special characters !, -, _, ., *, ‘, (, and )
Additionally one can use the slash ‘/’ in the key name, although Amazon S3 does not support file hierarchies. So if you name your key videos/vacations2017.mpg“, then the Amazon Console uses the slash to group keys that start with videos/ together, but the data model is a flat structure.
The following characters need a special handling like an URL encoding, as normal browsers may not work properly with them or handle them unintentionally: &, $, @, =, ;, :, +, . In general you should avoid using brackets (like {,}, (, )), the caret, the tilde, the pipe or the pound character.
With a reference to the AmazonS3 object, we can call the putObject() method and pass the constructed PutObjectRequest to it. This PutObjectRequest gets exactly the parameters we have asked from the user before.
3.7 Multipart Upload
The put object operation we have seen in the last section is only suitable for small objects. If you need to upload larger objects (up to 5 TB), we want to use the “multipart upload” feature of Amazon S3. Instead of uploading the data in one single request, it uses multiple requests that can be even issued in parallel in order to increase throughput.
Before we can start with the upload, we must initiate the multipart upload:
InitiateMultipartUploadRequest initRequest = new InitiateMultipartUploadRequest(bucketName, key);
InitiateMultipartUploadResult initResponse = amazonS3.initiateMultipartUpload(initRequest);
The request object needs the name of the bucket as well as the key of the new object. Following requests are connected with this multipart upload by the “upload id“ that is contained within InitiateMultipartUploadResult response. You can see this, when we construct the UploadPartRequest:
UploadPartRequest uploadRequest = new UploadPartRequest()
		.withBucketName(bucketName)
		.withKey(key)
		.withUploadId(initResponse.getUploadId())
		.withPartNumber(part) // parts start with 1
		.withFileOffset(filePosition)
		.withFile(filePath.toFile())
		.withPartSize(partSize);
UploadPartResult uploadPartResult = amazonS3.uploadPart(uploadRequest);
partETags.add(uploadPartResult.getPartETag());
The UploadPartRequest needs next to the already mentioned “upload id” also the bucket name and the key. Beyond that we also have to provide the part number (numbering starts with one and not zero), the offset in the file that should be uploaded as well as the size of this part. Parts have to be at least 5 MB and should not exceed 5 GB. One upload can contain up to 10,000 parts.
The response of the UploadPartRequest contains an eTag. These eTags must be collected and later on passed to the CompleteMultipartUploadRequest:
CompleteMultipartUploadRequest completeMultipartUploadRequest = new CompleteMultipartUploadRequest(bucketName,
	key, initResponse.getUploadId(), partETags);
amazonS3.completeMultipartUpload(completeMultipartUploadRequest);
If we want to abort an already initiated multipart upload, we can do this by invoking the method abortMultipartUpload() of the Amazon S3 client:
amazonS3.abortMultipartUpload(new AbortMultipartUploadRequest(bucketName,
	key, initResponse.getUploadId()));
The complete application then looks as follows:
public class MultipartUploadApp {
    private static final Logger LOGGER = Logger.getLogger(PutObjectApp.class.getName());

    public static void main(String[] args) throws IOException {
        if (args.length < 3) {
            LOGGER.warning("Please provide the following parameters: <bucket-name> <key> <file>");
            return;
        }
        String bucketName = args[0];
        String key = args[1];
        Path filePath = Paths.get(args[2]);
        AmazonS3 amazonS3 = AwsClientFactory.createClient();

        InitiateMultipartUploadRequest initRequest = new InitiateMultipartUploadRequest(bucketName, key);
        InitiateMultipartUploadResult initResponse = amazonS3.initiateMultipartUpload(initRequest);
        LOGGER.info("Initiated upload with id: " + initResponse.getUploadId());

        long fileSize = Files.size(filePath);
        long partSize = 5 * 1024 * 1024; // 5MB
        long filePosition = 0;
        List<PartETag> partETags = new ArrayList<>();

        try {
            int part = 1;
            while (filePosition < fileSize) {
                partSize = Math.min(partSize, fileSize - filePosition);

                UploadPartRequest uploadRequest = new UploadPartRequest()
                        .withBucketName(bucketName)
                        .withKey(key)
                        .withUploadId(initResponse.getUploadId())
                        .withPartNumber(part) // parts start with 1
                        .withFileOffset(filePosition)
                        .withFile(filePath.toFile())
                        .withPartSize(partSize);
                UploadPartResult uploadPartResult = amazonS3.uploadPart(uploadRequest);
                partETags.add(uploadPartResult.getPartETag());
                LOGGER.info("Uploaded part: " + part);

                filePosition += partSize;
                part++;
            }

            CompleteMultipartUploadRequest completeMultipartUploadRequest = new CompleteMultipartUploadRequest(bucketName,
                    key, initResponse.getUploadId(), partETags);
            amazonS3.completeMultipartUpload(completeMultipartUploadRequest);
        } catch (SdkClientException e) {
            LOGGER.warning("Failed to upload file: " + e.getMessage());
            amazonS3.abortMultipartUpload(new AbortMultipartUploadRequest(bucketName, key, initResponse.getUploadId()));
            LOGGER.info("Aborted upload.");
        }
    }
}
While the application above illustrates the general handling of multipart uploads, it is unfortunately a rather lengthy code snippet just to upload one larger file. As uploads like this have often to be implemented, the Amazon SDK ships with the TransferManager, which eases handling of multipart uploads a lot:
TransferManager tm = TransferManagerBuilder.defaultTransferManager();
It attempts to use multiple threads for uploads which can have a significant impact on throughput and reliability. As the TransferManager manages threads and connections, a single instance can be used through the complete application.
Instead of using the default configuration for the TransferManager, one can also configure its own one:
AmazonS3 amazonS3 = AwsClientFactory.createClient();
TransferManagerBuilder transferManagerBuilder = TransferManagerBuilder.standard();
transferManagerBuilder.setS3Client(amazonS3);
transferManagerBuilder.setExecutorFactory(() -> Executors.newFixedThreadPool(4));
TransferManager tm = transferManagerBuilder.build();
Next to setting the concrete AmazonS3 instance like in our example, one can also configure the thread pool that should be used or set the file size from which on the TransferManager should use multipart uploads. If the file size is below the configured threshold, then the TransferManager simply uses the single request upload as discussed before.
Once the upload has been started, one can register a progress listener. This way the user application can provide information about the current upload status:
PutObjectRequest putObjectRequest = new PutObjectRequest(bucketName,
	key, filePath.toFile());
Upload upload = tm.upload(putObjectRequest);

upload.addProgressListener((ProgressEvent progressEvent) -> {
	LOGGER.info("Progress: " + progressEvent);
});
Finally the main thread of our application has to wait for the upload to finish:
try {
	upload.waitForCompletion();
} catch (InterruptedException e) {
	LOGGER.warning("Failed to upload file: " + e.getLocalizedMessage());
}
3.8 List Objects
Now that we have uploaded one or more objects into a bucket, it is time to list these objects. Therefore the Amazon S3 API provides the ListObjectsV2Request request as shown in the following sample application:
public class ListObjectsApp {
    private static final Logger LOGGER = Logger.getLogger(ListObjectsApp.class.getName());

    public static void main(String[] args) throws IOException {
        if (args.length < 3) {
            LOGGER.warning("Please provide the following parameters: <bucket-name> <delimiter> <prefix>");
            return;
        }
        String bucketName = args[0];
        String delimiter = args[1];
        String prefix = args[2];

        AmazonS3 amazonS3 = AwsClientFactory.createClient();
        ListObjectsV2Request listObjectsRequest = new ListObjectsV2Request();
        listObjectsRequest.setBucketName(bucketName);
        listObjectsRequest.setDelimiter(delimiter);
        listObjectsRequest.setPrefix(prefix);
        ListObjectsV2Result result = amazonS3.listObjectsV2(listObjectsRequest);

        for (S3ObjectSummary summary : result.getObjectSummaries()) {
            LOGGER.info(summary.getKey() + ":" + summary.getSize());
        }
    }
}
Listing object keys can get a little bit tricky as a bucket is a flat hierarchy of objects, i.e. even if you use for example the slash as delimiter between your own hierarchy levels, Amazon S3 does not care about it. But to ease the handling of such kind of hierarchies, the list object request offers the possibility to filter by prefix and delimiter. If you application for example manages the files of a backup, you might have object keys like the following:
know-how.txt
documents/programming/java/amazon-s3.java
documents/programming/python/amazon-s3.py
photos/2016/12/31/img_3213.jpg
...
To list only objects that are located under documents/programming you will have to set the prefix to documents/programming/ and the delimiter to /. Note that the prefix ends with the delimiter, i.e. the request will only return keys that contain this prefix with the ending slash.
Querying only objects that reside in the “root level” of the hierarchy can be done by only specifying the slash as delimiter and providing no prefix. As objects in the root level do not contain a slash in the key, the delimiter / lets the service only return the know-how.txt file.
3.9 Delete Object
At this point of the tutorial we know how to create buckets and objects and how to list them. One basic operation is still missing: the deletion. Hence it is not surprising that we can issue a DeleteObjectRequest to delete existing objects from a bucket:
public class DeleteObjectApp {
    private static final Logger LOGGER = Logger.getLogger(DeleteObjectApp.class.getName());

    public static void main(String[] args) throws IOException {
        if (args.length < 2) {
            LOGGER.warning("Please provide the following parameters: <bucket-name> <key>");
            return;
        }
        String bucketName = args[0];
        String key = args[1];

        AmazonS3 amazonS3 = AwsClientFactory.createClient();
        DeleteObjectRequest deleteObjectRequest = new DeleteObjectRequest(bucketName, key);
        amazonS3.deleteObject(deleteObjectRequest);
        LOGGER.info("Deleted object with key '" + key + "'.");
    }
}
The code is easy to understand and straightforward. After having read the provided bucket name and key from the parameter list, a new AmazonS3 client is created. The DeleteObjectRequest needs to know the bucket name and of course the key. If no exception is thrown, the object is successfully removed from the bucket.
As it is often necessary to delete a complete set of objects, the SDK provides an appropriate API for that, too. One can pass a list of objects keys to the DeleteObjectsRequest that is deleted one after the other:
public class DeleteObjectsApp {
    private static final Logger LOGGER = Logger.getLogger(DeleteObjectsApp.class.getName());

    public static void main(String[] args) throws IOException {
        if (args.length < 2) {
            LOGGER.warning("Please provide the following parameters: <bucket-name> <key> [key...]");
            return;
        }
        String bucketName = args[0];
        List<DeleteObjectsRequest.KeyVersion> keyVersionList = new ArrayList<>(args.length - 1);
        for (int i = 1; i < args.length; i++) {
            DeleteObjectsRequest.KeyVersion keyVersion = new DeleteObjectsRequest.KeyVersion(args[i]);
            keyVersionList.add(keyVersion);
        }

        AmazonS3 amazonS3 = AwsClientFactory.createClient();
        DeleteObjectsRequest deleteObjectsRequest = new DeleteObjectsRequest(bucketName);
        deleteObjectsRequest.setKeys(keyVersionList);
        List<DeleteObjectsResult.DeletedObject> deletedObjects;
        try {
            DeleteObjectsResult result = amazonS3.deleteObjects(deleteObjectsRequest);
            deletedObjects = result.getDeletedObjects();
        } catch (MultiObjectDeleteException e) {
            deletedObjects = e.getDeletedObjects();
            List<MultiObjectDeleteException.DeleteError> errors = e.getErrors();
            for (MultiObjectDeleteException.DeleteError error : errors) {
                LOGGER.info("Failed to delete object with key '" + error.getKey()
					+ "': " + e.getLocalizedMessage());
            }
        }
        for (DeleteObjectsResult.DeletedObject deletedObject : deletedObjects) {
            LOGGER.info("Deleted object with key '" + deletedObject.getKey() + "'.");
        }
    }
}
The deleteObjects() call returns a list of all objects that have been successfully deleted. In case an exception is thrown, the corresponding MultiObjectDeleteException contains the information which objects have been deleted successfully and which not. Hence it is possible to save bandwidth and money by using the deleteObjects() call for a multi object deletion.
3.10 Copy Object
Another important operation when dealing with large objects is the copy call. Instead of downloading and then uploading the data again under a new key, it is possible to do this with one API invocation on the server side. Therefore the SDK provides the copyObject() method:
public class CopyObjectApp {
    private static final Logger LOGGER = Logger.getLogger(CopyObjectApp.class.getName());

    public static void main(String[] args) throws IOException {
        if (args.length < 4) {
            LOGGER.warning("Please provide the following parameters:    ");
            return;
        }
        String srcBucketName = args[0];
        String srcKey = args[1];
        String dstBucketName = args[2];
        String dstKey = args[3];

        AmazonS3 amazonS3 = AwsClientFactory.createClient();
        CopyObjectRequest copyObjectRequest = new CopyObjectRequest(srcBucketName, srcKey, dstBucketName, dstKey);
        CopyObjectResult result = amazonS3.copyObject(copyObjectRequest);
        String eTag = result.getETag();
        LOGGER.info("Copied object from bucket " + srcBucketName + " with key " + srcKey + " to bucket"
                + dstBucketName + " with key " + dstKey + ", eTag: " + eTag);
    }
}
It takes as arguments the bucket name and key of the source object and the bucket name and key of the destination object.
3.11 Get Object
After having uploaded objects you applications also needs to be able to download them later on. The GetObjectRequest has been designed to do exactly this:
public class GetObjectApp {
    private static final Logger LOGGER = Logger.getLogger(GetObjectApp.class.getName());

    public static void main(String[] args) throws IOException {
        if (args.length < 3) {
            LOGGER.warning("Please provide the following parameters: <bucket-name> <key> <file>");
            return;
        }
        String bucketName = args[0];
        String key = args[1];
        Path filePath = Paths.get(args[2]);
        AmazonS3 amazonS3 = AwsClientFactory.createClient();

        GetObjectRequest getObjectRequest = new GetObjectRequest(bucketName, key);
        S3Object s3Object = amazonS3.getObject(getObjectRequest);

        LOGGER.info("Downloaded S3 object: " + s3Object.getKey() + " from bucket " +s3Object.getBucketName());

        S3ObjectInputStream stream = s3Object.getObjectContent();
        FileUtils.copyInputStreamToFile(stream, filePath.toFile());
    }
}
It simply takes the name of the bucket as well as the object’s key as arguments of the constructor. Invoking Amazon’s S3 client’s method getObject() then returns a S3Object. The actual file content can be retrieved by invoking getObjectContent(). In the example code above we are using Apache’s commons-io library to simplify the conversion of the InputStream into a file.
3.12 Delete Bucket
Finally it is time to remove the buckets we have created:
public class DeleteBucketApp {
    private static final Logger LOGGER = Logger.getLogger(DeleteBucketApp.class.getName());

    public static void main(String[] args) throws IOException {
        if (args.length < 1) {
            LOGGER.log(Level.WARNING, "Please provide the following arguments: <bucket-name>");
            return;
        }
        String bucketName = args[0];
        AmazonS3 amazonS3 = AwsClientFactory.createClient();
        DeleteBucketRequest deleteBucketRequest = new DeleteBucketRequest(bucketName);
        amazonS3.deleteBucket(deleteBucketRequest);
        LOGGER.log(Level.INFO, "Deleted bucket " + bucketName + ".");
    }
}
In analogy to the create bucket example, we have to create a DeleteBucketRequest and pass it to the deleteBucket().
4. Storage Classes
Amazon S3 provides different storage classes that fit different requirements:
- STANDARD
- STANDARD_IA
- REDUCED_REDUNDANCY
- GLACIER
The STANDARD class is designed for performance-sensitive use cases, i.e. the data is updated and accessed frequently and must be available in real-time. If no storage class is specified when uploading data, STANDARD is the default class.
The IA in STANDARD_IA stands for infrequent access and therewith explains this class. It can be used for data that is stored for a longer time but accessed infrequently. Although these object are available in real time, access does cost more money. To put an object into a bucket using the STANDARD_IA storage class, you can simply set the storage class on the PutObjectRequest:
PutObjectRequest putObjectRequest = new PutObjectRequest(bucketName, key, filePath.toFile());
putObjectRequest.setStorageClass(StorageClass.StandardInfrequentAccess);
The PUT, COPY and POST requests for the STANDARD_IA as well as the GET requests are typically twice as expensive as their counterparts in the STANDARD class. Additionally one has to pay for the transition from STANDARD_IA to STANDARD. Therefore the mere storage cost in STANDARD_IA is 27% cheaper than in the STANDARD class. Hence you should think carefully about using STANDARD or STANDARD_IA.
Some data like thumbnail images computed from a larger version of the image can be reproduced very simple. Losing this data is not as critical as losing the original data. Therefore Amazon introduced a separate storage class for this kind of data: REDUCED_REDUNDANCY. The durability for this class is only 99.99% instead of 99.999999999% as for STANDARD and STANDARD_IA. This means the expected loss of objects is about 0.01% per year. If you store for example 10.000 objects you might lose one per year. If an object is lost, the Amazon S3 service returns a 405 error.
Last but not least Amazon also offers a storage class for objects that should be archived: GLACIER. This class is suitable if you have data that is accessed infrequently and for which you do not need real-time access. The last point means that you have to restore data if you want to access them.
Please note that you cannot specify GLACIER as storage class when you upload objects for the first time. Instead you will have to use one of the other three storage classes: STANDARD, STANDARD_IA or REDUCED_REDUNDANCY. Objects are then moved to the GLACIER class using Amazon’s “Object Lifecycle Management”.
4.1 Object Lifecycle Management
Amazon allows you to define certain actions that are applied automatically to your objects that reside within a certain bucket. These actions are attached as “lifecycle subresource” to the bucket and consist of the following two actions:
- Transition actions: Objects are moved from one storage class to another.
- Expiration actions: Objects are removed when they expire.
While transition actions can be used to manage the storage classes for the objects within one bucket, expiration actions are used to specify when certain objects can be deleted by Amazon automatically. The latter is interesting if you store for example log files in S3 that your applications only needs for a certain amount of time. When this time expires, the log files can be removed.
As we have learned before, we can use the lifecycle management to move objects from one of the real-time access storage classes to the GLACIER class. The following are some points you must know before doing that:
- You can move an object to GLACIER, but you cannot move it back to STANDARD, STANDARD_IA or REDUCED_REDUNDANCY. If you need to do that, you will first have to restore the object and subsequently copy this object with the storage class setting.
- You cannot access objects moved from S3 to the GLACIER storage class through the Amazaon Glacier API.
- Amazon stores for each object a 8 KB data block of meta information in S3 such that you list all objects in real-time.
- Each object in GLACIER occupies an additional data block with meta information of about 32 KB. Storing huge amounts of small files can cost therefore additional money.
- It may take up to 5 hours until objects are restored from GLACIER as temporary copy. The objects remain in the GLACIER storage until you delete them there.
One can of course use Amazon’s SDK to setup a configuration rule for a bucket. The following sample code demonstrates that:
public class LifeCycleConfigurationApp {
    private static final Logger LOGGER = Logger.getLogger(LifeCycleConfigurationApp.class.getName());

    public static void main(String[] args) throws IOException {
        if (args.length < 1) {
            LOGGER.log(Level.WARNING, "Please provide the following arguments: <bucket-name>");
            return;
        }
        String bucketName = args[0];

        BucketLifecycleConfiguration.Rule rule =
                new BucketLifecycleConfiguration.Rule()
                        .withId("Transfer to IA, then GLACIER, then remove")
                        .withFilter(new LifecycleFilter(
                                new LifecycleTagPredicate(new Tag("archive", "true"))))
                        .addTransition(new BucketLifecycleConfiguration.Transition()
                                .withDays(30)
                                .withStorageClass(StorageClass.StandardInfrequentAccess))
                        .addTransition(new BucketLifecycleConfiguration.Transition()
                                .withDays(365)
                                .withStorageClass(StorageClass.Glacier))
                        .withExpirationInDays(365 * 5)
                        .withStatus(BucketLifecycleConfiguration.ENABLED);
        BucketLifecycleConfiguration conf =
                new BucketLifecycleConfiguration()
                        .withRules(rule);

        AmazonS3 amazonS3 = AwsClientFactory.createClient();
        amazonS3.setBucketLifecycleConfiguration(bucketName, conf);
    }
}
First of all we create a Rule with the identifier “Transfer to IA, then GLACIER, then remove”. As the name already indicates, we are going to move an object after a certain amount of time to the storage class STANDARD_IA and later to GLACIER. Instead of applying this rule to all objects within one bucket, we can filter for objects that meet a specific criteria. In this example this we want to move only objects that are tagged with archive=true. The code to tag an object during upload looks for example like this:
putObjectRequest.setTagging(new ObjectTagging(Arrays.asList(new Tag("archive", "true"))));
Next we add two transitions, one that moves the objects after 30 days to the STANDARD_IA storage and another one that moves the objects after one year to the GLACIER class. If the objects still exists after five years, we want to remove the object completely. Hence we set the expiration time appropriately. Finally we create an BucketLifecycleConfiguration and add the rule we have just created to it. This configuration can then be send using Amazon’s S3 client.
While working with storage classes, a few general rules must be considered:
- Once objects are transitioned in STANDARD_IA, you cannot move them back to STANDARD or REDUCED_REDUNDANCY.
- Once objects are transitioned in GLACIER, you cannot move them back to any other class.
- You cannot move an object to REDUCED_REDUNDANCY.
Beyond the general rules above one also has to acknowledge Amazon’s pricing, because transitioning an object for example into STANDARD_IA costs money.
5. Encryption
Encryption means to encode an object in Amazon S3 in a way that only authorized persons can decode and therewith use it. Basically one can protect the data while it is send to Amazon’s servers and/or while the data is stored at Amazon.
To protect data during the transmission, you can choose to use Secure Socket Layer (SSL) or its successor Transport Layer Security (TLS) for the transfer of HTTP requests (HTTPS). Using Amazon’s Java SDK one can simply set the protocol using the ClientConfiguration:
ClientConfiguration clientConf = new ClientConfiguration();
clientConf.setProtocol(Protocol.HTTPS);
AWSCredentialsProvider credentialsProvider = getAwsCredentialsProvider();
AwsEnvVarOverrideRegionProvider regionProvider = createRegionProvider();
return AmazonS3ClientBuilder.standard()
		.withClientConfiguration(clientConf)
		.withCredentials(credentialsProvider)
		.withRegion(regionProvider.getRegion())
		.build();
HTTPS provides authentication, i.e. one can be reasonable sure to communicate with Amazon’s servers, and encryption, i.e. the data is encoded in a way that does not allow others to read or manipulate the data. But using HTTPS only protects the transfer of the data. After the data has reached Amazon’s servers, the data is again unprotected and can be read from storage. To protect data while it resides on Amazon’s server, you have basically two choices:
- Server-Side Encryption: Amazon S3 encrypts the data before it is saved to disc.
- Client-Side Encryption: You client application manages the encryption process and sends the data already encrypted to Amazon.
The first choice (Server-Side Encryption) has the advantage that Amazon has already implemented the encryption as well as the key management for you. But is also means that the data is for a short while unprotected on Amazon’s machines (the moment before it is stored). Using client-side encryption allows you own application to encrypt the data and manage the keys. This way the data is already protected in the memory of your client machine and Amazon never sees the original content. But you will have to care about algorithms and key management yourself.
Amazon offers three different types of Server-Side Encryption:
- Amazon S3-Managed Keys (SSE-S3)
- AWS KMS-Managed Keys (SSE-KMS)
- Customer-Provided Keys (SSE-C)
5.1 Amazon S3-Managed Keys (SSE-S3)
Using SSE-S3 will encrypt each object with a unique key using multi-factor encryption. Additionally this unique key is encrypted with a master key that rotates regularly. The S3 service uses 256-bit Advanced Encryption Standard (AES-256) to encrypt the data. Please note that server-side encryption only encrypts the object data but not its metadata.
To use SSE-S3 encryption with the Java SDK, you will have to set the SSE algorithm as metadata on the PutObjectRequest:
PutObjectRequest putObjectRequest = new PutObjectRequest(bucketName, key, filePath.toFile());

ObjectMetadata objectMetadata = new ObjectMetadata();
objectMetadata.setSSEAlgorithm(ObjectMetadata.AES_256_SERVER_SIDE_ENCRYPTION);
putObjectRequest.setMetadata(objectMetadata);
The returned PutObjectResult tells you the encryption algorithm used by Amazon:
PutObjectResult result = amazonS3.putObject(putObjectRequest);
result.getSSEAlgorithm();
If you need to change the algorithm, you can simply use a CopyObjectRequest and set the new algorithm on it:
CopyObjectRequest copyObjRequest = new CopyObjectRequest(
	sourceBucket, sourceKey, targetBucket, targetKey);

ObjectMetadata objectMetadata = new ObjectMetadata();
objectMetadata.setSSEAlgorithm(ObjectMetadata.AES_256_SERVER_SIDE_ENCRYPTION);

copyObjRequest.setNewObjectMetadata(objectMetadata);
5.2 AWS KMS-Managed Keys (SSE-KMS)
Using server-side encryption with AWS KMS–Managed Keys (SSE-KMS) means to use Amazon’s Key Management Service (AWS KMS) which is designed to scale for large distributed applications. In contrast to SSE-S3 the AWS KMS service uses a master key created by the customer (CMK) using either the API services of AWS KMS or the IAM console of AWS. Both allow to create key, define policies for them and provide audit logs about the usage for each key.
When you add a SSE-KMS-encrypted object for the first time to a bucket in a specific region, a default key (CMK) is created by Amazon. This key will then be used in subsequent calls unless you specify another key. To indicate that SSE-KMS should be used, the corresponding REST request should have a header with the key x-amz-server-side-encryption and the value aws:kms. The additional header x-amz-server-sideencryption-aws-kms-key-id is used to specify the key id. The Java SDK sets the header x-amz-server-side-encryption automatically when you specify the SSEAwsKeyManagementParams:
SSEAwsKeyManagementParams awsKMParams = new SSEAwsKeyManagementParams();
putObjectRequest.setSSEAwsKeyManagementParams(awsKMParams);
If you have already created an AWS KMS-Key, you can provide its id directly as argument to the constructor:
SSEAwsKeyManagementParams awsKMParams = new SSEAwsKeyManagementParams(awsKmsKeyId);
putObjectRequest.setSSEAwsKeyManagementParams(awsKMParams);
More information about Amazon’s Key Management can be found here.
5.3 Customer-Provided Keys (SSE-C)
If you don’t like the idea that Amazon stores the key that was used for encrypting your data, you can also provide your own custom key (SSE-C) as part of your requests. Amazon then uses this key to either encrypt or decrypt the data on the server side, but it does not store the key. They only store a randomly salted HMAC value of the encryption key in order to validate future requests. But this also means that if you lose the key provided for encryption, the information stored in the object is lost as your application is responsible for the key management.
The following sample shows how to upload and download an object to a bucket using a custom key:
public class PutAndGetObjectEncryptedSSECApp {
    private static final Logger LOGGER = Logger.getLogger(PutAndGetObjectEncryptedSSECApp.class.getName());

    public static void main(String[] args) throws IOException, NoSuchAlgorithmException {
        if (args.length < 3) {
            LOGGER.warning("Please provide the following parameters: <bucket-name> <key> <file>");
            return;
        }
        String bucketName = args[0];
        String key = args[1];
        Path filePath = Paths.get(args[2]);
        AmazonS3 amazonS3 = AwsClientFactory.createClient();

        KeyGenerator generator = KeyGenerator.getInstance("AES");
        generator.init(256, new SecureRandom());
        SecretKey secretKey = generator.generateKey();
        SSECustomerKey sseKey = new SSECustomerKey(secretKey);

        PutObjectRequest putObjectRequest = new PutObjectRequest(bucketName, key, filePath.toFile());
        putObjectRequest.setSSECustomerKey(sseKey);

        PutObjectResult result = amazonS3.putObject(putObjectRequest);

        LOGGER.info("Put file '" + filePath + "' under key " + key + " to bucket "
			+ bucketName + " " + result.getSSEAlgorithm());

        GetObjectRequest getObjectRequest = new GetObjectRequest(bucketName, key);
        getObjectRequest.setSSECustomerKey(sseKey);
        S3Object s3Object = amazonS3.getObject(getObjectRequest);
        FileUtils.copyInputStreamToFile(s3Object.getObjectContent(), filePath.toFile());
    }
}
To generate the key no additional libraries are necessary. Instead you can use the functionality from the JRE to create a KeyGenerator and let it generate a key for you. This key is wrapped inside a SSECustomerKey which subsequently is passed to the PutObjectRequest as well as to the GetObjectRequest.
5.4 AWS KMS–Managed Customer Master Key (CSE-KMS)
The server-side encryption may not be enough for your requirements because in all cases Amazon knows the key you are using and has at some point in time the raw data in its hand. To prevent that Amazon knows the raw data, you can use a KMS key but encrypt the data inside the client. In this case the AmazonS3EncryptionClient from the SDK first sends a request to the KMS service to retrieve a data key for encryption. The KMS answers with a randomly chosen data key and returns it in two versions. The first version is used by the client to encrypt the data, the second one is used ciphered version of this data key. The ciphered version is send as metadata along with the encrypted data to Amazon S3. When downloading the data the client downloads the encrypted object together with the ciphered data key. It then sends the ciphered data key to the KMS service and receives a plain text version of it that can be used to decrypt the object.
The AmazonS3EncryptionClient can be created just like the normal Amazon S3 client:
ClientConfiguration clientConf = new ClientConfiguration();
clientConf.setConnectionTimeout(60 * 1000);
AWSCredentialsProvider credentialsProvider = getAwsCredentialsProvider();
AwsEnvVarOverrideRegionProvider regionProvider = createRegionProvider();
CryptoConfiguration cryptoConfiguration = new CryptoConfiguration();
cryptoConfiguration.setAwsKmsRegion(RegionUtils.getRegion(regionProvider.getRegion()));
KMSEncryptionMaterialsProvider materialsProvider = new
		KMSEncryptionMaterialsProvider("");
AmazonS3EncryptionClientBuilder.standard()
		.withClientConfiguration(clientConf)
		.withCredentials(credentialsProvider)
		.withRegion(regionProvider.getRegion())
		.withCryptoConfiguration(cryptoConfiguration)
		.withEncryptionMaterials(materialsProvider)
		.build();
Additionally we are providing a CryptoConfiguration as well as a KMSEncryptionMaterialsProvider. While the latter is used to provide the id of your customer master key, the CryptoConfiguration has the task to deliver the region for the KMS service. The client constructed as described above implements the same interface as the “normal” S3 client, hence all operations can be executed as already shown.
5.5 Client-Side Master Key (CSE-C)
The “AWS KMS–Managed Customer Master Key” allows you to encrypt the data inside the client, but Amazon still knows the data key you are using. If you need to manage the keys in your own application, you can also generate the master key yourself. In this scenario the client generates a random data key used to encrypt the object before the upload. It then encrypts the data key with the master key provided by the client application and sends the encrypted data key together with the encrypted data to Amazon. This way Amazon does not know about the raw data nor the key used to encrypt the data. During the download Amazon loads next to the object the encrypted data key and decrypts it using the client’s master key. The additional material information tells the client which master key to use.
The following code shows how to create a AmazonS3EncryptionClient with a static encryption materials provider that takes a symmetric SecretKey as input:
public static AmazonS3 createEncryptionClient(SecretKey secretKey) throws IOException {
	ClientConfiguration clientConf = new ClientConfiguration();
	clientConf.setConnectionTimeout(60 * 1000);
	AWSCredentialsProvider credentialsProvider = getAwsCredentialsProvider();
	AwsEnvVarOverrideRegionProvider regionProvider = createRegionProvider();
	CryptoConfiguration cryptoConfiguration = new CryptoConfiguration();
	cryptoConfiguration.setAwsKmsRegion(RegionUtils.getRegion(regionProvider.getRegion()));
	EncryptionMaterials materials = new EncryptionMaterials(secretKey);
	StaticEncryptionMaterialsProvider materialsProvider = new StaticEncryptionMaterialsProvider(materials);
	return AmazonS3EncryptionClientBuilder.standard()
			.withClientConfiguration(clientConf)
			.withCredentials(credentialsProvider)
			.withRegion(regionProvider.getRegion())
			.withCryptoConfiguration(cryptoConfiguration)
			.withEncryptionMaterials(materialsProvider)
			.build();
}
As the AmazonS3EncryptionClient also implements the interface AmazonS3, it can be used like the “normal” S3 client:
public class PutAndGetObjectEncryptedCSECApp {
    private static final Logger LOGGER = Logger.getLogger(PutAndGetObjectEncryptedCSECApp.class.getName());

    public static void main(String[] args) throws IOException, NoSuchAlgorithmException {
        if (args.length < 3) {
            LOGGER.warning("Please provide the following parameters: <bucket-name> <key> <file>");
            return;
        }
        String bucketName = args[0];
        String key = args[1];
        Path filePath = Paths.get(args[2]);

        KeyGenerator generator = KeyGenerator.getInstance("AES");
        generator.init(256, new SecureRandom());
        SecretKey secretKey = generator.generateKey();

        AmazonS3 amazonS3 = AwsClientFactory.createEncryptionClient(secretKey);

        PutObjectRequest putObjectRequest = new PutObjectRequest(bucketName, key, filePath.toFile());
        PutObjectResult result = amazonS3.putObject(putObjectRequest);

        LOGGER.info("Put file '" + filePath + "' under key " + key + " to bucket " +
			bucketName + " " + result.getSSEAlgorithm());

        GetObjectRequest getObjectRequest = new GetObjectRequest(bucketName, key);
        S3Object s3Object = amazonS3.getObject(getObjectRequest);
        FileUtils.copyInputStreamToFile(s3Object.getObjectContent(), filePath.toFile());
    }
}
6. Versioning
To protect your data against unintended deletion or overwrites, you can enable versioning for a bucket. This will create a new version of an object if you upload new data to the same key instead of overwriting the old data or only set a deletion marker in case you delete the object. Hence an object like image.jpg can exist in multiple versions (like version 1, version 2, etc.) and you can retrieve the old versions if necessary.
Versioning is enabled or suspended on a complete bucket and not on single objects. Once you have enabled versioning on a bucket you cannot disable it but only suspend it. This means that buckets can be in one of the following states:
- unversioned: This is the default state, i.e. objects are not versioned.
- versioning-enabled: Objects are versioned.
- versioningsuspended: Versionin has been enabled on this bucket but is now suspended.
Whenever you change the state of a bucket, the new state applies to all objects in the bucket but no object is changed. That means for example that if you enable versioning for the first time on a bucket, all existing objects get the version null. On the other hand it also means that if you suspend versioning, all existing versions are kept.
The following code demonstrates how to enable (or disable) versioning on an existing bucket:
public class BucketVersioningApp {
    private static final Logger LOGGER = Logger.getLogger(BucketVersioningApp.class.getName());

    public static void main(String[] args) throws IOException {
        if (args.length < 2) {
            LOGGER.log(Level.WARNING, "Please provide the following arguments: <bucket-name> <versioning-status>");
            return;
        }
        String bucketName = args[0];
        String versioningStatus = args[1];
        AmazonS3 amazonS3 = AwsClientFactory.createClient();

        if (!BucketVersioningConfiguration.ENABLED.equals(versioningStatus)
                && !BucketVersioningConfiguration.SUSPENDED.equals(versioningStatus)) {
            LOGGER.log(Level.SEVERE, "Please provide a valid versioning status.");
            return;
        }

        BucketVersioningConfiguration conf = new BucketVersioningConfiguration();
        conf.setStatus(versioningStatus);

        SetBucketVersioningConfigurationRequest request =
                new SetBucketVersioningConfigurationRequest(bucketName, conf);
        amazonS3.setBucketVersioningConfiguration(request);

        conf = amazonS3.getBucketVersioningConfiguration(bucketName);
        LOGGER.info("Bucket " + bucketName + " has this versioning status: " + conf.getStatus());
    }
}
As arguments you have to provide the name of the bucket and the new versioning status. This can be one of the following string constants: Enabled, Suspended. The status Off is not allowed because you can only suspend versioning on a bucket but never disable it. Amazon’s S3 client expects an object of type SetBucketVersioningConfigurationRequest as request object for setBucketVersioningConfiguration(). The SetBucketVersioningConfigurationRequest is filled with the bucket name and the BucketVersioningConfiguration.
The method getBucketVersioningConfiguration() can be used to retrieve the current versioning configuration.
Once you have enabled versioning on a bucket you can upload different versions of the same object for the same key and Amazon S3 will automatically create the versions on the server for you. The following example demonstrates this (assuming that you have enabled versioning on the bucket):
public class VersioningExampleApp {
    private static final Logger LOGGER = Logger.getLogger(VersioningExampleApp.class.getName());

    public static void main(String[] args) throws IOException {
        if (args.length < 2) {
            LOGGER.warning("Please provide the following parameters: <bucket-name> <key>");
            return;
        }
        String bucketName = args[0];
        String key = args[1];
        AmazonS3 amazonS3 = AwsClientFactory.createClient();
        Charset charset = Charset.forName("UTF-8");

        byte[] bytes = "Version 1".getBytes(charset);
        PutObjectRequest putObjectRequest = new PutObjectRequest(bucketName, key,
                new ByteArrayInputStream(bytes), new ObjectMetadata());
        amazonS3.putObject(putObjectRequest);

        bytes = "Version 2".getBytes(charset);
        putObjectRequest = new PutObjectRequest(bucketName, key,
                new ByteArrayInputStream(bytes), new ObjectMetadata());
        amazonS3.putObject(putObjectRequest);

        List<String> versionIds = new ArrayList<>();
        ListVersionsRequest listVersionsRequest = new ListVersionsRequest();
        listVersionsRequest.setBucketName(bucketName);
        VersionListing versionListing;
        do {
            versionListing = amazonS3.listVersions(listVersionsRequest);
            for (S3VersionSummary objectSummary : versionListing.getVersionSummaries()) {
                LOGGER.info(objectSummary.getKey() + ": " + objectSummary.getVersionId());
                if (objectSummary.getKey().equals(key)) {
                    versionIds.add(objectSummary.getVersionId());
                }
            }
            listVersionsRequest.setKeyMarker(versionListing.getNextKeyMarker());
            listVersionsRequest.setVersionIdMarker(versionListing.getNextVersionIdMarker());
        } while (versionListing.isTruncated());

        for (String versionId : versionIds) {
            GetObjectRequest getObjectRequest = new GetObjectRequest(bucketName, key);
            getObjectRequest.setVersionId(versionId);
            S3Object s3Object = amazonS3.getObject(getObjectRequest);
            StringWriter stringWriter = new StringWriter();
            IOUtils.copy(s3Object.getObjectContent(), stringWriter, charset);
            LOGGER.info(versionId + ": " + stringWriter.toString());
        }

        for (String versionId : versionIds) {
            DeleteVersionRequest dvr = new DeleteVersionRequest(bucketName, key, versionId);
            amazonS3.deleteVersion(dvr);
            LOGGER.info("Deleted version " + versionId + ".");
        }
    }
}
For the sake of simplicity we just upload two versions of the same object with different content (here the strings Version 1 and Version 2). The ListVersionsRequest allows us to list all objects and their versions. Therefore we have to set at least the bucket name and the issue this request by invoking the method listVersions() on the Amazon S3 client. This returns an object of type VersionListing that contains a list of S3VersionSummary. The example above iterates over all summaries and fetches those that correspond to the key of the object we have just created.
As the list of objects and versions may be huge for buckets with plenty of objects, the version list is chunked. To retrieve the next chunk we have to provide the “key marker” and the “version id marker” that is provided in the last response and set them on the next request. This way the Amazon servers know how to proceed.
Once we have collected all versions of the object we have uploaded, we can retrieve them using the already known GetObjectRequest. Now that we are working with versions, we have to set additionally the version id on the request object.
If you want to delete a specific version, you cannot do this using the normal DeleteObjectRequest. This request will only mark the latest version as deleted and return on a subsequent GetObjectRequest a 404 error. To permanently remove objects from a bucket you have to use the DeleteVersionRequest. It takes next to the obligatory bucket name and the key also the versionId. This way you can delete specific versions from a bucket.
Please note that if you submit a simple delete request on a delete marker creates just another delete marker. Hence a delete marker can be thought of another version of the object just denoting that this object has been removed. To permanently remove a delete marker, you will have to use the DeleteVersionRequest just like for a “normal” object version.
7. Command Line
This section explains how to use Amazon’s Command Line Client (aws-cli) to interact with the S3 service. The project is hosted on github such that you have access to the latest sources.
7.1 Installation
The aws-cli tool is written in python and can be obtained through pip:
$ pip install --upgrade --user awscli
The upgrade option lets pip update all requirements of the tool while the user argument lets pip install aws-cli into a subdirectory of your user directory to avoid conflicts with already installed libraries.
If you haven’t installed python and pip yet, Amazon provides detailed tutorials that explain these installation steps for different operating systems:
Once everything has been setup correctly, you should be able to run the following command:
$ aws --version
Finally, you can uninstall the aws-cli with the following command:
$ pip uninstall awscli
Once you have got aws-cli running, you can configure it using the following command:
$ aws configure
AWS Access Key ID [None]:
AWS Secret Access Key [None]:
Default region name [None]: us-west-2
Default output format [None]: json
The configure option asks interactively for your AWS access key and secret access key. After you have provided the two keys you have to set the default region (here: us-west-2) and the default output format (here: json). If you need different profiles, you can specify this additionally using the argument --profile:
$ aws configure --profile my-second-profile
Beyond using the CLI configuration you can also specify some configuration options as arguments to the command:
$ aws ... --output json --region us-west-2
Your access key and secret access key can be provided through environment variables (here for Linux, macOS, or Unix):
$ export AWS_ACCESS_KEY_ID=
$ export AWS_SECRET_ACCESS_KEY=
$ export AWS_DEFAULT_REGION=us-west-2
On Windows systems you have to set them the following way:
$ set AWS_ACCESS_KEY_ID=
$ set AWS_SECRET_ACCESS_KEY=
$ set AWS_DEFAULT_REGION=us-west-2
Of course, you can use named profiles stored in configuration files. The file ~/.aws/credentials (on Windows: %UserProfile%\.aws\credentials) looks like this:
[default]
aws_access_key_id=
aws_secret_access_key=
The remaining configuration options are stored in ~/.aws/config (on Windows: %UserProfile%\.aws\config):
[default]
region=us-west-2
output=json
7.2 Buckets
High-level commands for the creation and deletion of buckets are provided by the aws-cli tool. Just provide the string s3 as first argument to aws followed by a shortcut for “make bucket”, “remove bucket”:
$ aws s3 mb s3://my-bucket
The command above creates a new bucket with the name my-bucket while the following one removes this bucket again:
$ aws s3 rb s3://my-bucket
Please note that you can only delete buckets that are already empty. Removing buckets with contents can be done by providing the option --force:
$ aws s3 rb s3://my-bucket --force
To list the contents of a bucket use the following command:
$ aws s3 ls s3://my-bucket
The aws tool also supports filtering by prefix, hence you can easily list all objects in the “folder” my-path:
$ aws s3 ls s3://my-bucket/my-path
Last but not least it is possible to list all available buckets:
$ aws s3 ls
7.3 Objects
The command line interface supports high-level operations for uploading, moving and removing objects. These commands are encoded similar to the well-known Unix command line tools cp, mv and rm.
Uploading a local file to s3 therefore can be written like this:
$ aws s3 cp local.txt s3://my-bucket/remote.txt
Additionally one can also specify the storage class for the new remote object:
$ aws s3 cp local.txt s3://my-bucket/remote.txt --storage-class REDUCED_REDUNDANCY
The new file can be removed by using the command rm:
$ aws s3 rm s3://my-bucket/remote.txt
It is also possible to move complete sets of files from S3 to the local machine:
$ aws s3 mv s3://my-bucket/my-path ./my-dir --include '*.jpg' --recursive
As the options indicate, the command only moves files that end with .jpg and does this recursively on the complete folder structure.
7.4 Synchronization
Often it is useful to synchronize complete folder structures and their content either from the local machine to S3 or vice versa. Therefor the aws-cli tool comes with the handy option sync:
$ aws s3 sync my-dir s3://my-bucket/my-path
The command above updates all files in S3 that have a different size and/or modification timestamp than the one in the local directory. As it does not remove objects from the S3, you must specify the --delete option to let the tool also remove files in S3 that are not present in your local copy:
$ aws s3 sync my-dir s3://my-bucket/my-path --delete
When synchronizing your local copy with the remote files in S3 you can also specify the storage class and the access privilges:
$ aws s3 sync my-dir s3://my-bucket/my-path --acl public-read --storage-class STANDARD_IA
The acl option takes the arguments private, public-read and public-read-write.
8. Pricing
When you sign-up for Amazon S3 you get 5 GB of standard storage, 20,000 GET and 2,000 PUT requests and 15 GB of data transfer for free as part of the AWS Free Usage Tier. If this contingent is empty, you have to pay for all requests and all storage depending on the storage class as listed on the Pricing site.
The storage prices also vary by region. While on GB costs for example currently $0.026 in the region “US West”, it costs $0.0405 in the region “South America”. In Europe for example is the region “Ireland” cheaper than “Frankfurt” or “London”.
Next to the storage one also has to pay for the HTTP requests. The pricing here depends on the type of request. Requests that upload or download larger amounts of data cost more than simple GET requests. In the “US West” region you have to pay for example $0.004 per 10,000 GET requests and $0.005 per 1,000 PUT, COPY, POST or LIST requests. DELETE requests are free, as long as the object resides in the standard storage class.
9. Download
This was a tutorial on Amazon S3.
You can download the full source code of this tutorial here: amazon-s3-tutorial


Hi gud write . What would be the recommended (stable) maven dependency version of the artifacts aws-java-sdk-core and aws-java-sdk-s3.
Hi I followed the steps and able to upload docs to my s3 bucket when I am running in local.
But after deployment of my project, its showing access denied.
Please let me know if anything is required to configure at java side or at my s3 console?
how to download the pdf?
Hello Shamim,
You can find the pdf version of this here: https://www.javacodegeeks.com/minibook/amazon-s3-tutorial but first you have to login. If you don’t have an account you should first create one.