EDITORIAL NOTE: AWS Lambda is an event-driven, serverless computing platform provided by Amazon as a part of the Amazon Web Services. It is a computing service that runs code in response to events and automatically manages the computing resources required by that code.
The purpose of Lambda, as compared to AWS EC2, is to simplify building smaller, on-demand applications that are responsive to events and new information. AWS targets starting a Lambda instance within milliseconds of an event. Node.js, Python, Java, Go and C# through .NET Core are all officially supported as of 2016, and other languages can be supported via call-outs. However, some runtimes, such as the Java Virtual Machine, may be slower than others to start.
AWS Lambda was designed for use cases such as image or objects uploads to Amazon S3, updates to DynamoDB tables, responding to website clicks or reacting to sensor readings from an IoT connected device. AWS Lambda can also be used to automatically provision back-end services triggered by custom HTTP requests, and “spin down” such services when not in use, to save resources. (Source: Wikipedia)
Now, we provide a comprehensive guide so that you can develop your own Amazon Lambda based applications. We cover a wide range of topics to be able to get your own projects up and running in minimum time. Enjoy!
Table Of Contents
1. Introduction
Amazon Web Services (AWS) provides the infrastructure to host and run your applications at different levels of abstraction.
The most obvious solution for hosting code is of course renting a bare metal machine, setting up the operating system and installing all necessary software. You can do that with Amazon EC2, although this service is more known for renting virtual machines that run on physical hosts provided by Amazon. In both solutions you must care about the operating system you are using and the installation of the server software (e.g. Tomcat).
Amazon Beanstalk goes one step further by providing services that take a ready-to-use war file and deploy it on a virtual machine that was setup by Amazon on behalf of you. As a developer you no longer have to care about the details of setting up the operating system or the server software. If you implement your application such that it is independent of the OS and runs on the provided version of Apache Tomcat, Amazon can automatically deploy your software and even scale out the number of virtual machines necessary to serve all clients without much delay. You just tell Amazon the limits it should operate in and you can concentrate on the implementation.
With Amazon Lambda the level of abstraction is put even one step higher. With Lambda you no longer care about virtual machines and their scale out yourself. All you have to do is to provide Amazon some code (typically in form of a prepared jar file) and Amazon cares about its execution on behalf of you. In contrast to Amazon Beanstalk you do not care about the number of virtual machines used for the execution nor the number of load balancers. Amazon promises to execute your code as often as it is requested. And you pay only for the time used for its execution, not for the time your virtual machines are running. The latter point is extremely interesting for operations that are not executed on a regular basis or if you are just starting a new business. If you don’t need your service, you are not paying anything. On the other hand, if your business starts through and you have hundreds of new customers over night, you don’t have to care about renting new servers or adjusting the limits Amazon will operate in.
But this freedom also comes with the cost of not knowing in which environment your code gets executed and without having the possibility to use local state. Especially the fact that your code is stateless must be considered from the very beginning of your project. Of course, you can use data stores like Amazon S3, Amazon’s DynamoDB or even your own data store deployed as a “normal” EC2 instance, but the methods you are going to implement only get their parameters and can return a value, just like a static method in Java. But this should be clear if you imagine that Amazon is going to deploy your code on any virtual machine it fits on and calls it with the parameters provided by the caller. The infrastructure does not care about the number of times a specific instance of your code gets executed nor does it route all invocations from the same client to the same virtual machine. You can initialize static variable to cache often used data structures, but you must keep in mind that these structures are used by all execution threads and may not be initialized if your code runs for the very first time on a new machine.
You can invoke Lambda functions in response to different events. When a specific S3 bucket changes or data is inserted or removed from a DynamoDB table. You can map HTTP requests coming from the Internet to a specific Lambda function using the API gateway. Or you just invoke the code using API calls from the AWS SDK. This way Lambda functions be used like triggers in classical database systems or can be used to build complete applications.
Code for Amazon Lambda can be written in different languages: Node.js, Java, Go, C# and Python. In this tutorial we will concentrate of course on Java, but for smaller functions you may consider some scripting language that does not need to be compiled and provided in a specific archive format.
The fact that you don’t have to care about the virtual or physical servers your code is executed on, this type of programming model is often referred to as “serverless” computing. Of course, you still need servers to execute your code but you just don’t care about it. This aspect of the deployment is just put into the hand of the infrastructure provider.
2. Concepts
The following concepts make up Amazon Lambda:
- Lambda function: This is the custom code you have written and that will be executed by Amazon’s infrastructure.
- Event source: A service that triggers the execution of your Lambda function.
- Downstream resources: Other services that are called by your code.
- Log streams: Your code can produce logging output that is collected by Amazon’s infrastructure.
The Lambda function is the a normal Java method executed by Amazon’s infrastructure. When you upload your code (i.e. your jar file), you can specify which Java method is bound to the specific Lambda function. The infrastructure passes any event data to the function as first parameter. Your function can evaluate this data and invoke any further logic.
The second parameter to your Lambda function is a context object. It can be used to interact with the AWS runtime. For example, you can query the remaining execution time before your function is terminated.
Additionally you can use a logging framework like log4j to create log statements, which are send to Amazon CloudWatch. Exception can be used to terminate the execution of the function and are send to the client, depending on the way the function was invoked.
3. Usage
This chapter explains how to implement Lambda functions and describes various aspects related to the Lambda infrastructure.
3.1 Your First Function
Now that we have learned about the main concepts of Amazon Lambda, we can start to implement our first function.
In this tutorial we are going to use maven as build system. If you are not familiar with maven, you can find instructions on how to setup and use maven for example here.
To create a simple maven project, we issue the following statement on the command line:
mvn archetype:generate -DgroupId=com.javacodegeeks.com -DartifactId=aws-lambda -DarchetypeArtifactId=maven-archetype-quickstart -DinteractiveMode=false
This creates a new directory named aws-lambda in our current working directory with the following structure:
aws-lambda
|-- pom.xml
`-- src
    |-- main
    |   `-- java
    |       `-- com
    |           `-- javacodegeeks
    |               `-- aws
    |                   `-- App.java
    `-- test
        `-- java
            `-- com
                `-- javacodegeeks
                    `-- aws
                        `-- AppTest.java
You can delete the two files App.java and AppTest.java as we are not going to create a normal Java application.
To access AWS lambda specific classes, we add the following maven dependency to the pom.xml:
<dependency>
    <groupId>com.amazonaws</groupId>
    <artifactId>aws-lambda-java-core</artifactId>
    <version>1.2.0</version>
</dependency>
Additionally we add the following plugin to the plugins section of your build:
<plugin>
    <groupId>org.apache.maven.plugins</groupId>
    <artifactId>maven-shade-plugin</artifactId>
    <version>2.4.3</version>
    <configuration>
        <createDependencyReducedPom>false</createDependencyReducedPom>
    </configuration>
    <executions>
        <execution>
            <phase>package</phase>
        <goals>
                <goal>shade</goal>
            </goals>
        </execution>
    </executions>
</plugin>
The shade plugins creates an uber jar that contains all dependencies. This way we can upload a single jar instead of providing all dependencies separately.
There are different ways to implement a request handler in Lambda, here we chose the one that implements the interface RequestHandler<T,U>:
package com.javacodegeeks.aws;

import com.amazonaws.services.lambda.runtime.Context;
import com.amazonaws.services.lambda.runtime.RequestHandler;

public class HelloWorldRequestHandler implements RequestHandler<String,String> {

    @Override
    public String handleRequest(String s, Context context) {
        return "My first request handler: " + s;
    }
}
The two generic parameters of the interface RequestHandler define the types of the first argument and the return value of the handleRequest method. This simple example just uses java.lang.String, but you can use arbitrary classes here. The event source will convert the incoming data (e.g. the JSON inside an HTTP request) into an object of the request type.
Now you can build the jar by running the following command:
mvn package
Afterwards you will find two different jar files in the target directory:
aws-lambda-1.0-SNAPSHOT.jar
original-aws-lambda-1.0-SNAPSHOT.jar
The jar file without the prefix original is the shaded jar that contains the dependencies. You can easily verify this by opening the jar with a zip viewer of your choice and list the classes. You will see classes from the package com.amazonaws.
Now you have to login to the AWS console. If you are a first time AWS user, you will have to create an AWS account. How to do this is described for example here.
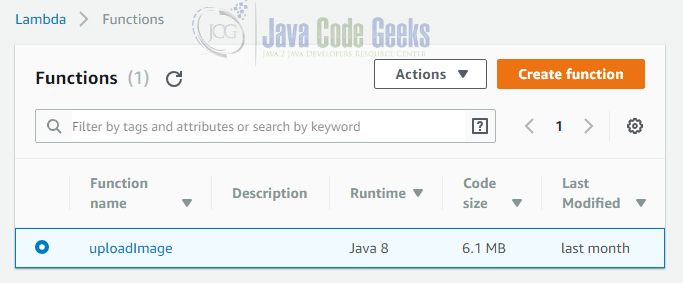
Inside the AWS console you can choose “Lambda” from the “Services” menu. The page lists all available Lambda functions and provides a button to create a new function:
After having clicked on “Create Function”, the following page lets us provide details about it:
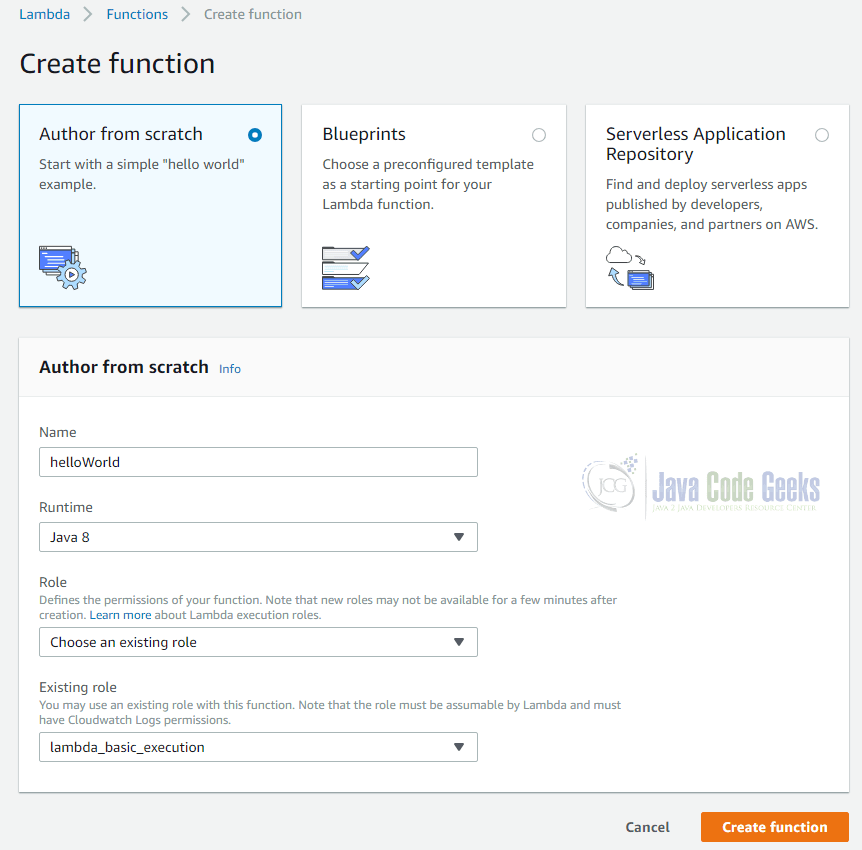
As we have implemented the function completely from scratch, we chose the option “Author from scratch”. Alternatively, you can also choose a preconfigured template or find an implementation in Amazon’s repository.
The “Author from scratch” box requests us to enter a name, chose the runtime (here: Java 8) and a role.
If this is your first Lambda function, you can create a new role by choosing “Create custom role”. This will bring a new browser windows up that asks you for more details about the new role:
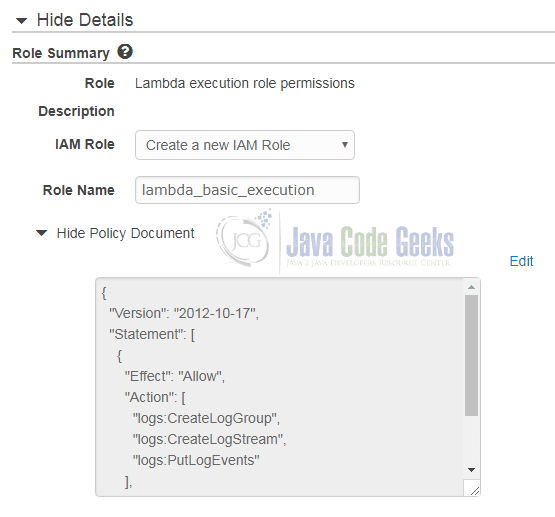
In this dialog we chose “Create a new IAM role” and set “lambda_basic_execution” as the role’s name. Once we have clicked on “Allow”, the role is selected in the “Author from scratch” box.
A click on “Create function” brings us the following page:
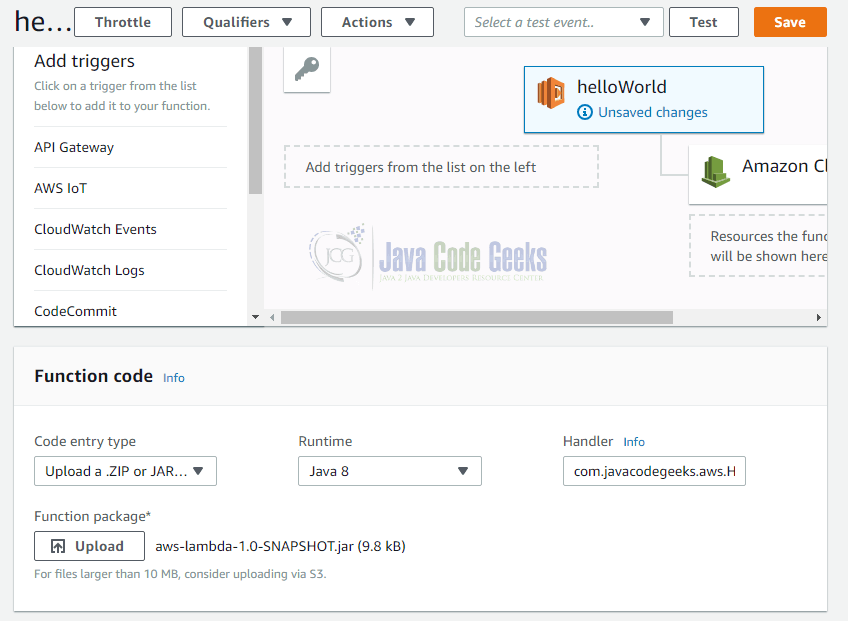
Inside the box “Function code” we chose “Upload a .ZIP or JAR” as “Code Entry Type” and as runtime “Java 8”. The input box “Handler” lets us specify the name of the function to be invoked in the form Class::method. In our example from above, we enter:
com.javacodegeeks.aws.HelloWorldRequestHandler::handleRequest
The “Upload” button brings up a file choser dialog where you can chose the jar file to upload. In our example we chose the file aws-lambda-1.0-SNAPSHOT.jar.
Now we can click on “Save”. This lets Amazon Lambda create the function. It is now ready to be executed.
The most simple way to execute a Lambda function is to use the built-in test functionality. Therefore, we must first create a test event. The following dialog will appear after a click on “Test”:

We chose the option “Create new test event”, provide a name for the event and specify the constant string “JavaCodeGeeks” as string. This is the string that is provided as first parameter to our function. Afterwards we can click on “Test” and the test case will be executed:
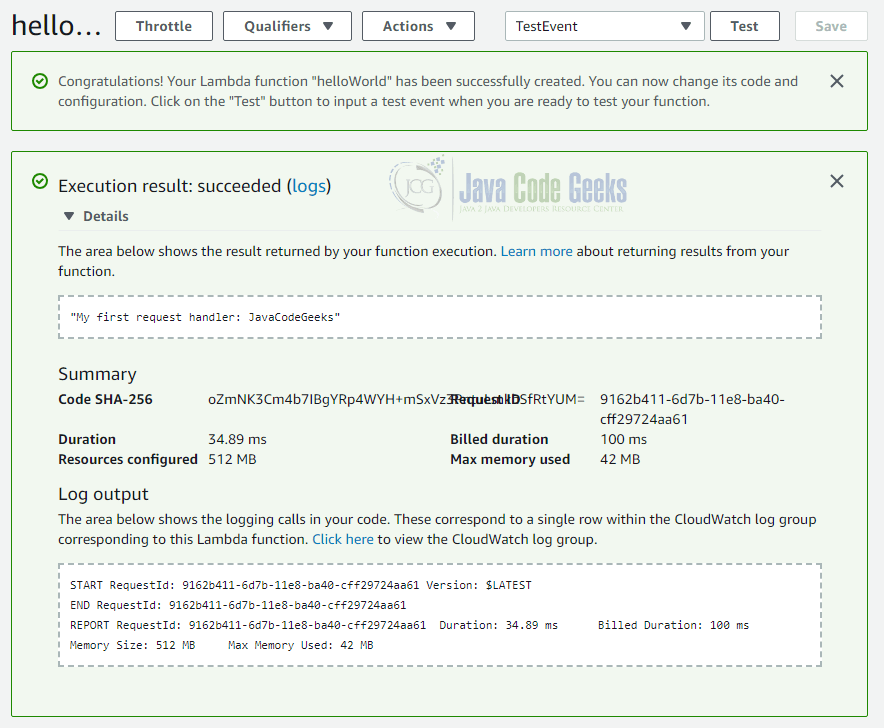
Inside the “Execution result” box you can see the string My first request handler: JavaCodeGeeks. This is exactly the return value we would have expected to be produced by our sample function.
In the summary section you can also find information about the billed duration (here: 100ms), the maximum of memory used (here: 42 MB) and the actual duration (here: 34.89 ms).
On the Lambda Dashboard you will find some metrics about the invocations of your functions. After our first test, these might look like this:
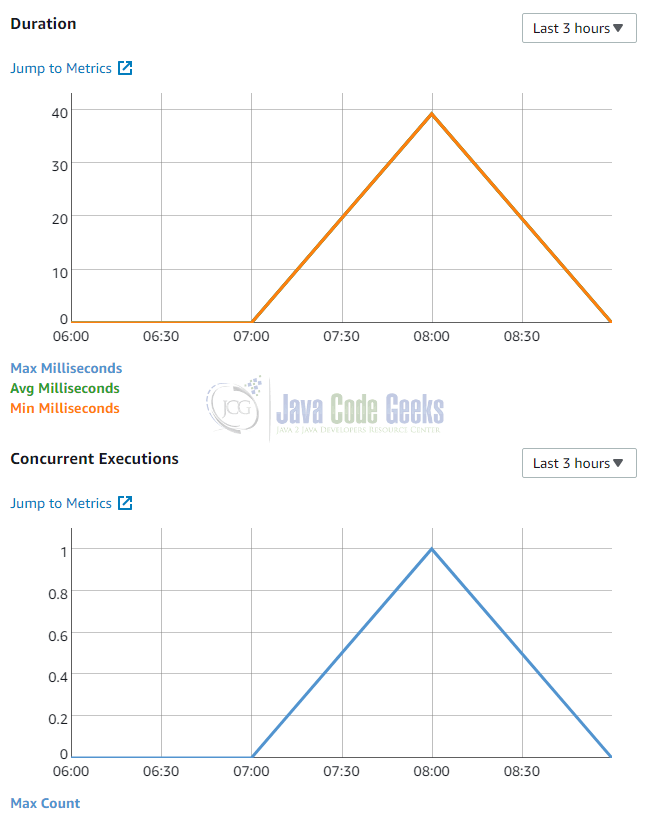
In the two charts we see the duration and concurrency depicted over time. As we have only one invocation and only one concurrent instance, these diagrams look very simple. But you can imagine that this information is of more interest if you are running a production system with hundreds of invocations.
After we have seen how to invoke a simple Lambda function, we can take a more detailed look at the further settings of a single function:
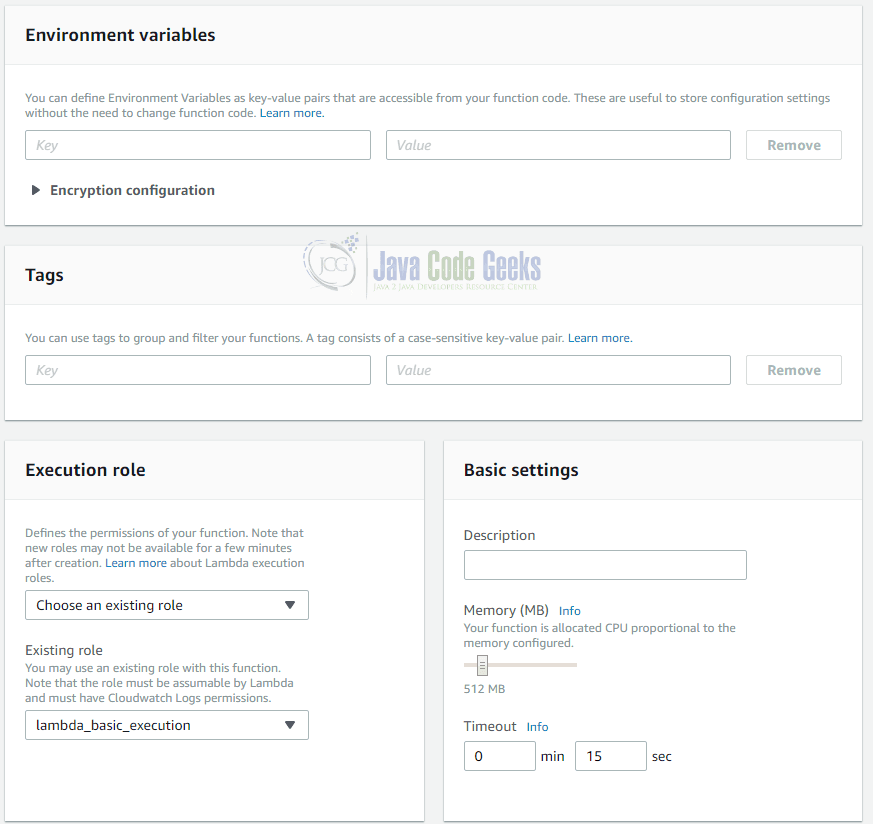
The box “Environment variables” allows you to define a set of variables that can be accessed at runtime. This is helpful for simple configuration options.
If you have plenty of Lambda functions, you can filter them by tags. Therefore, it is possible to provide key/value pairs for each function.
We have learned before that a Lambda function is executed in the context of a certain user role. This role can be provided in the box “Execution role”. A role defines a set of permissions that can be granted either to users or like in this example to Lambda functions. In order to be able to invoke a Lambda function you must define a role that has CloudWatch Logs permission.
If you are not sure whether a selected role has the required permissions, you can go to the IAM service in your AWS console and look at the details page of the role:
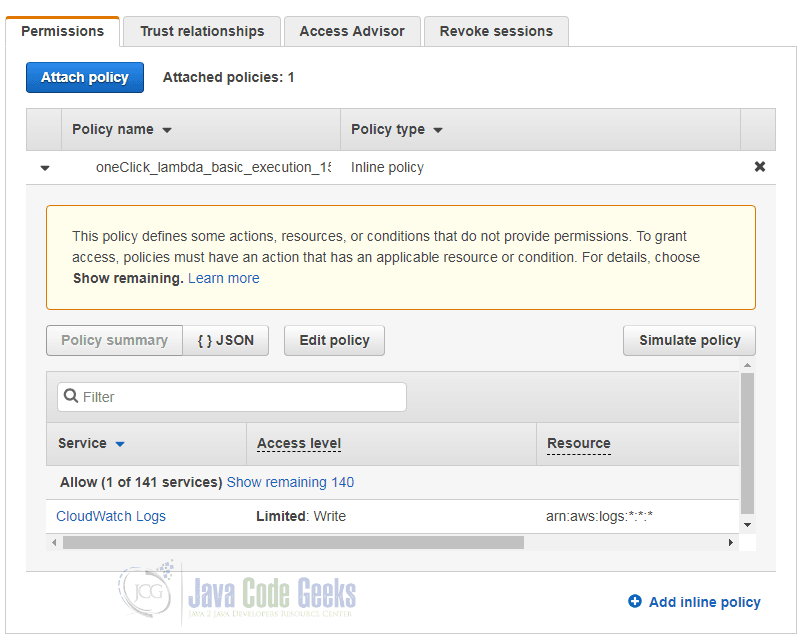
In the lower table we see that this specific role has the permission to write to Amazon’s CloudWatch service.
Additionally you can configure the amount of memory the infrastructure should provide for your function as well as a timeout interval after which your function will be terminated. Both settings let you control the costs as you pay for the total amount of time used by your functions as well as the memory provided for them. If you have created a new AWS account, you can use the free-tier offer which means that in the first 12 month you get 1 million requests as well as 400,000 GB-Seconds for free.
Next to the settings described above, you can limit the concurrency of your function (the default is unlimited concurrency), select a virtual private network your function runs in and select a resource like Amazon’s SNS service to which events are sent if a certain number of processing through Lambda functions failed.
3.2 Handler Implementations
In the previous section we have seen how to implement a simple handler. But we are not limited to this specific format.
Instead of implementing the interface RequestHandler, we can also use a plain Java class that does not implement any specific interfaces. The following class will do the same thing:
package com.javacodegeeks.aws;

import com.amazonaws.services.lambda.runtime.Context;

public class HelloWorldHandler {

    public String handleRequest(String input, Context context) {
        return "My first request handler: " + input;
    }
}
Next to the RequestHandler interface the Lambda SDK also provide the RequestStreamHandler interface. This interface enforces the implementation of a method that uses an InputStream for the input and an OutputStream as return value:
To convert the InputStream into a String, we utilize Apache’s commons-io library:
<dependency>
    <groupId>commons-io</groupId>
    <artifactId>commons-io</artifactId>
    <version>2.5</version>
</dependency>
Now we can implement the same logic as above:
package com.javacodegeeks.aws;

import com.amazonaws.services.lambda.runtime.Context;
import com.amazonaws.services.lambda.runtime.RequestStreamHandler;
import org.apache.commons.io.IOUtils;

import java.io.IOException;
import java.io.InputStream;
import java.io.OutputStream;
import java.nio.charset.Charset;

public class HelloWorldRequestStreamHandler implements RequestStreamHandler {

    @Override
    public void handleRequest(InputStream inputStream, OutputStream outputStream,
                              Context context) throws IOException {
        Charset encoding = Charset.forName("UTF-8");
        String input = IOUtils.toString(inputStream, encoding);
        String output = "My first request handler: " + input;
        IOUtils.write(output, outputStream, encoding);
    }
}
3.3 Context
In our examples above, we have seen that an instance of Context is provided as parameter to each function, but until now we have not used it at all.
You can use the Context object to interact with the execution environment of your Lambda function. Therefore, the Context provides a series of properties that can be accessed by your function. The following Lambda function shows how to return some interesting information from the Context:
package com.javacodegeeks.aws;

import com.amazonaws.services.lambda.runtime.ClientContext;
import com.amazonaws.services.lambda.runtime.Context;
import com.amazonaws.services.lambda.runtime.RequestHandler;

import java.util.Map;

public class ContextHandler implements RequestHandler<String,String> {

    @Override
    public String handleRequest(String input, Context context) {
        StringBuilder sb = new StringBuilder();
        sb.append("awsRequestId=").append(context.getAwsRequestId()).append("\n");
        sb.append("functionName=").append(context.getFunctionName()).append("\n");
        sb.append("functionVersion=").append(context.getFunctionVersion()).append("\n");
        sb.append("memoryLimitInMB=").append(context.getMemoryLimitInMB()).append("\n");
        sb.append("remainingTimeInMillis=").append(context.getRemainingTimeInMillis()).append("\n");

        return sb.toString();
    }
}
In the example above we return the following properties:
- awsRequestId: This is the ID associated with the current request. This ID remains the same on retries.
- functionName: The name of the Lambda function as defined in AWS.
- functionVersion: The version of the function.
- memoryLimitInMB: The memory limit we have set for this function.
- remainingTimeInMillis: The number of milliseconds that remain until the execution is terminted.
When we upload the class above and configure it as Lambda function “returnContext” we get the following sample output:
awsRequestId=89566fcc-6e37-11e8-805a-e97b7daee95b
functionName=returnContext
functionVersion=$LATEST
memoryLimitInMB=256
remainingTimeInMillis=14950
Please note that we have reduced the memory limit to 256 GB, which is perfectly reflected by the sample output.
3.4 Logging
As mentioned before, you can use log statements to trace the execution of your code. These log lines are sent to Amazon CloudWatch and stored there for later analysis.
The simplest form of logging is to use System.out:
package com.javacodegeeks.aws;

import com.amazonaws.services.lambda.runtime.Context;
import com.amazonaws.services.lambda.runtime.RequestHandler;

public class SysOutContextHandler implements RequestHandler<String,String> {

    @Override
    public String handleRequest(String input, Context context) {
        System.out.println("awsRequestId=" + context.getAwsRequestId());
        System.out.println("functionName=" + context.getFunctionName());
        System.out.println("functionVersion=" + context.getFunctionVersion());
        System.out.println("memoryLimitInMB=" + context.getMemoryLimitInMB());
        System.out.println("remainingTimeInMillis=" + context.getRemainingTimeInMillis());
        return "OK";
    }
}
Running this function with the name “logContext” will create the following log events in CloudWatch:

You can navigate to CloudWatch by clicking on the blue “logs” link after you have executed the function. As we can see, Amazon has created one log event for the start of the function, one for each System.out.println() call and two at the end of the execution.
In general Amazon Lambda will create one log event for each call of System.out.println(). If the String contains a line break, each line will be treated as a separate log event.
Instead of using System.out and System.err, you can also use the logger provided by the Context object:
package com.javacodegeeks.aws;

import com.amazonaws.services.lambda.runtime.Context;
import com.amazonaws.services.lambda.runtime.LambdaLogger;
import com.amazonaws.services.lambda.runtime.RequestHandler;

public class LambdaLoggerContextHandler implements RequestHandler<String,String> {

    @Override
    public String handleRequest(String input, Context context) {
        LambdaLogger logger = context.getLogger();
        logger.log("awsRequestId=" + context.getAwsRequestId());
        logger.log("functionName=" + context.getFunctionName());
        logger.log("functionVersion=" + context.getFunctionVersion());
        logger.log("memoryLimitInMB=" + context.getMemoryLimitInMB());
        logger.log("remainingTimeInMillis=" + context.getRemainingTimeInMillis());
        return "OK";
    }
}
This is maybe the simplest way, but it also means that your code is bound to the AWS framework.
To stay more independent of the execution environment, you can also use the popular logging library log4j.
To use log4j you must include the following maven dependencies:
<dependency>
	<groupId>com.amazonaws</groupId>
	<artifactId>aws-lambda-java-log4j2</artifactId>
	<version>1.0.0</version>
</dependency>
<dependency>
	<groupId>org.apache.logging.log4j</groupId>
	<artifactId>log4j-core</artifactId>
	<version>2.8.2</version>
</dependency>
<dependency>
	<groupId>org.apache.logging.log4j</groupId>
	<artifactId>log4j-api</artifactId>
	<version>2.8.2</version>
</dependency>
Additionally, the shade plugin must be configured to use the log4j2-cachefile-transfomer:
<plugin>
	<groupId>org.apache.maven.plugins</groupId>
	<artifactId>maven-shade-plugin</artifactId>
	<version>2.4.3</version>
	<configuration>
		<createDependencyReducedPom>false</createDependencyReducedPom>
	</configuration>
	<executions>
		<execution>
			<phase>package</phase>
			<goals>
				<goal>shade</goal>
			</goals>
			<configuration>
				<transformers>
					<transformer
							implementation="com.github.edwgiz.mavenShadePlugin.log4j2CacheTransformer.PluginsCacheFileTransformer">
					</transformer>
				</transformers>
			</configuration>
		</execution>
	</executions>
	<dependencies>
		<dependency>
			<groupId>com.github.edwgiz</groupId>
			<artifactId>maven-shade-plugin.log4j2-cachefile-transformer</artifactId>
			<version>2.8.1</version>
		</dependency>
	</dependencies>
</plugin>
The log4j library can be configured by placing a file named log4j2.xml inside the src/main/resources folder of the project:
<?xml version="1.0" encoding="UTF-8"?>
<Configuration packages="com.amazonaws.services.lambda.runtime.log4j2">
    <Appenders>
        <Lambda name="Lambda">
            <PatternLayout>
                <pattern>%d{yyyy-MM-dd HH:mm:ss} %X{AWSRequestId} %-5p %c{1}:%L - %m%n</pattern>
            </PatternLayout>
        </Lambda>
    </Appenders>
    <Loggers>
        <Root level="info">
            <AppenderRef ref="Lambda" />
        </Root>
    </Loggers>
</Configuration>
Now we can see the following log events in CloudWatch:
START RequestId: 5cfc1f27-6e3c-11e8-bbb9-c79d86ee7e9f Version: $LATEST
2018-06-16 12:30:18 5cfc1f27-6e3c-11e8-bbb9-c79d86ee7e9f INFO  Log4j2ContextHandler:13 - awsRequestId=5cfc1f27-6e3c-11e8-bbb9-c79d86ee7e9f
2018-06-16 12:30:18 5cfc1f27-6e3c-11e8-bbb9-c79d86ee7e9f INFO  Log4j2ContextHandler:14 - functionName=logContext
2018-06-16 12:30:18 5cfc1f27-6e3c-11e8-bbb9-c79d86ee7e9f INFO  Log4j2ContextHandler:15 - functionVersion=$LATEST
2018-06-16 12:30:18 5cfc1f27-6e3c-11e8-bbb9-c79d86ee7e9f INFO  Log4j2ContextHandler:16 - memoryLimitInMB=512
2018-06-16 12:30:18 5cfc1f27-6e3c-11e8-bbb9-c79d86ee7e9f INFO  Log4j2ContextHandler:17 - remainingTimeInMillis=14910
END RequestId: 5cfc1f27-6e3c-11e8-bbb9-c79d86ee7e9f
REPORT RequestId: 5cfc1f27-6e3c-11e8-bbb9-c79d86ee7e9f	Duration: 110.00 ms	Billed Duration: 200 ms 	Memory Size: 512 MB	Max Memory Used: 73 MB
The benefit of this approach is that you can easily configure the format of the output through the well-known log4j configuration file. Beyond that, your code stays independent from the execution environment and you can easily integrate third party libraries that also depend on log4j.
3.5 Request and Response Objects
Until now, we have used instances of java.lang.String as input and output parameter. However, we are not limited to that. Instead, we can use arbitrary complex data structures and let Amazon Lambda map the input to instances of your model classes and to instances of our response classes.
In the next sample, we are going to use the class Order as input to our Lambda function and the class Response as return value:
package com.javacodegeeks.aws;

import org.apache.logging.log4j.LogManager;
import org.apache.logging.log4j.Logger;

import java.text.SimpleDateFormat;
import java.util.Date;

public class RequestResponseHandler {
    private static final Logger LOGGER = LogManager.getLogger(RequestResponseHandler.class);

    public static class Order {
        private String productId;
        private String amount;

        public String getProductId() {
            return productId;
        }

        public void setProductId(String productId) {
            this.productId = productId;
        }

        public String getAmount() {
            return amount;
        }

        public void setAmount(String amount) {
            this.amount = amount;
        }
    }

    public static class Response {
        private String timestamp;
        private String state;

        public String getTimestamp() {
            return timestamp;
        }

        public void setTimestamp(String timestamp) {
            this.timestamp = timestamp;
        }

        public String getState() {
            return state;
        }

        public void setState(String state) {
            this.state = state;
        }
    }

    public Response handleRequest(Order order) {
        LOGGER.info("Received order for product " + order.getProductId() + ": amount=" + order.getAmount());

        SimpleDateFormat sdf = new SimpleDateFormat("yyyy-MM-dd'T'HH:mm:ss.SSSZ");
        Response response = new Response();
        response.setTimestamp(sdf.format(new Date()));
        response.setState("Shipped");

        return response;
    }
}
As you can see, the request handler only takes one parameter of type Order. If we do not use it, we can omit the Context object. The Order class is a simple POJO with getter and setter methods for the fields productId and amount. Amazon Lambda will automatically serialize any given JSON string into this structure.
Hence, we can create a test case for this function that uses the following JSON object as input data:
{
  "productId": "4711",
  "amount": 2
}
The implementation of the handler just outputs the provided values. Afterwards it creates a new instance of Response and fills it with the current timestamp as well as with the state. After having executed this simple handler, you will see the following output:
{
  "timestamp": "2018-06-16T13:07:20.441+0000",
  "state": "Shipped"
}
Together with log4j the code above is completely independent from Amazon AWS and can therefore be unit tested or reused in different execution environments.
3.6 Retry and Scaling
It can happen that the execution of your Lambda function results in an error. The following reasons can be the cause of this:
- Your function does not finish before the timeout.
- The input data cannot be parsed.
- The execution reaches a resource limit (e.g. the memory limit).
If the invocation of the function is not triggered by a stream-based source like e.g. Amazon Kinesis or DynamoDB streams), we have to distinguish between a synchronous and asynchronous invocation.
Invoking the Lambda function synchronously, like for example using the AWS SDK to directly invoke the function, will raise a 429 error. The calling application can decide whether to retry or not.
If the Lambda function is called asynchronously, Amazon will automatically perform two retries with a delay between these retry attempts. If these two retries fail again and you configured a “dead letter queue” (DLQ), the request will be stored in the DLQ and can be processed later. In cases where no DLQ is configured (which is the default), the request is discarded and lost.
The execution environment takes a different form of error handling if the Lambda function is supposed to process stream-based sources. In this case, the error is treated as blocking one and no further events from the stream will be processed until the events expire. This ensures that all events are processed in the correct order.
There is also a difference between stream-based and not stream-based event sources when it comes down to scaling behavior.
Stream-based event sources have one instance for each shard of the stream. If you are running for example 10 shards of DynamoDB, you will have 10 instances of your Lambda function processing the events.
In case of a not stream-based event source like for example a Lambda function that is invoked each time a new object is put into a S3 bucket, the number of concurrently running instances depends on the rate of events. If you have for example in average three new objects every second and processing an object takes two seconds, you will have six concurrent instances in average.
To handle bursts smoothly, Amazon Lambda will increase the number of concurrent instances in larger chunks if necessary. The size of the chunk depends on the region you are operating in. In the region EU (London) you will get 500 new instances at once, while in EU (Frankfurt) you will get 1000 and 3000 in EU (Ireland). Amazon will increase the number of concurrent instance until their number is sufficient to handle all requests. It will also scale the number of instances down once they are no longer needed.
4. Event Sources
In this chapter, we are going to take a closer look at some available event sources, i.e. services in the AWS cosmos that can trigger the execution of a Lambda function.
4.1 S3
A popular service in the AWS world is Amazon S3. It is an object store that can be used to store any kind of files. Each file is identified by the bucket it is stored in as well as its key inside the bucket. Buckets are a kind of collection of files, i.e. you can use different buckets to implement different kinds of user access patterns or to separate different kind of data.
Imagine your are using a bucket for images the users of your application have uploaded. At some other point in your application, you need a thumbnail version of each uploaded image. To solve this task you can use a Lambda function that is triggered each time a new object is created in your upload bucket.
The following JSON document is a sample for an event published by Amazon S3 each time a new object is created (taken from here):
{
   "Records":[
      {
         "eventVersion":"2.0",
         "eventSource":"aws:s3",
         "awsRegion":"us-east-1",
         "eventTime":"1970-01-01T00:00:00.000Z",
         "eventName":"ObjectCreated:Put",
         "userIdentity":{
            "principalId":"AIDAJDPLRKLG7UEXAMPLE"
         },
         "requestParameters":{
            "sourceIPAddress":"127.0.0.1"
         },
         "responseElements":{
            "x-amz-request-id":"C3D13FE58DE4C810",
            "x-amz-id-2":"FMyUVURIY8/IgAtTv8xRjskZQpcIZ9KG4V5Wp6S7S/JRWeUWerMUE5JgHvANOjpD"
         },
         "s3":{
            "s3SchemaVersion":"1.0",
            "configurationId":"testConfigRule",
            "bucket":{
               "name":"mybucket",
               "ownerIdentity":{
                  "principalId":"A3NL1KOZZKExample"
               },
               "arn":"arn:aws:s3:::mybucket"
            },
            "object":{
               "key":"HappyFace.jpg",
               "size":1024,
               "eTag":"d41d8cd98f00b204e9800998ecf8427e",
               "versionId":"096fKKXTRTtl3on89fVO.nfljtsv6qko",
               "sequencer":"0055AED6DCD90281E5"
            }
         }
      }
   ]
}
As parsing of the JSON document is already done by the Lambda infrastructure, all we have to do is to provide a complete Java class structure this document can be mapped to. Fortunately, we do not have to reinvent the wheel as Amazon publishes exactly this class in the following maven artifact:
<dependency>
	<groupId>com.amazonaws</groupId>
	<artifactId>aws-java-sdk-s3</artifactId>
	<version>1.11.345</version>
</dependency>
With the help of this library, we can implement our Lambda function in the following way:
package com.javacodegeeks.aws;

import com.amazonaws.services.lambda.runtime.Context;
import com.amazonaws.services.lambda.runtime.RequestHandler;
import com.amazonaws.services.lambda.runtime.events.S3Event;
import com.amazonaws.services.s3.AmazonS3;
import com.amazonaws.services.s3.AmazonS3ClientBuilder;
import com.amazonaws.services.s3.event.S3EventNotification;
import com.amazonaws.services.s3.model.*;
import org.apache.commons.io.IOUtils;
import org.apache.logging.log4j.LogManager;
import org.apache.logging.log4j.Logger;

import javax.imageio.ImageIO;
import java.awt.*;
import java.awt.image.BufferedImage;
import java.io.ByteArrayInputStream;
import java.io.ByteArrayOutputStream;
import java.io.IOException;
import java.util.List;

public class S3EventHandler implements RequestHandler<S3Event, String> {
    private static final Logger LOGGER = LogManager.getLogger(S3EventHandler.class);
    static final int THUMBNAIL_WIDTH = 512;
    static final int THUMBNAIL_HEIGHT = 512;

    @Override
    public String handleRequest(S3Event s3Event, Context context) {
        LOGGER.info("Invoked " + S3EventHandler.class.getSimpleName() + " with "
                + (s3Event.getRecords() == null ? 0 : s3Event.getRecords().size()) + " records.");
        List records = s3Event.getRecords();
        if (records != null) {
            for (S3EventNotification.S3EventNotificationRecord record : records) {
                String eventName = record.getEventName();
                if ("ObjectCreated:Put".equals(eventName)) {
                    S3EventNotification.S3Entity s3 = record.getS3();
                    if (s3 != null) {
                        String bucketName = s3.getBucket().getName();
                        String key = s3.getObject().getKey();
                        if (key.endsWith(".jpg") || key.endsWith(".jpeg")) {
                            AmazonS3 client = AmazonS3ClientBuilder.defaultClient();
                            GetObjectRequest getObjectRequest = new GetObjectRequest(bucketName, key);
                            S3Object s3Object = client.getObject(getObjectRequest);
                            S3ObjectInputStream inputStream = s3Object.getObjectContent();
                            try {
                                byte[] bytes = IOUtils.toByteArray(inputStream);
                                byte[] scaledBytes = scaleImage(bytes);
                                uploadThumbnailImage(bucketName, key, client, scaledBytes);
                                LOGGER.info("Successfully created thumbnail image.");
                            } catch (IOException e) {
                                LOGGER.error("Failed to get content of S3 object (bucket=" + bucketName
                                        + ", key=" + key + "): " + e.getMessage(), e);
                            }
                        } else {
                            LOGGER.debug("Key does not end with .jpg or .jpeg.");
                        }
                    } else {
                        LOGGER.debug("No S3 object in Record.");
                    }
                } else {
                    LOGGER.debug("Ignoring record (not a put request).");
                }
            }
        }
        return "OK";
    }

    private void uploadThumbnailImage(String bucketName, String key, AmazonS3 client, byte[] scaledBytes) {
        int lastIndexOfDot = key.lastIndexOf('.');
        String newKey = key.substring(0, lastIndexOfDot) + "_thumb"
                + key.substring(lastIndexOfDot+1);

        ObjectMetadata metadata = new ObjectMetadata();
        metadata.setContentLength(scaledBytes.length);
        PutObjectRequest putObjectRequest = new PutObjectRequest(bucketName, newKey,
                new ByteArrayInputStream(scaledBytes), metadata);
        client.putObject(putObjectRequest);
    }

    private byte[] scaleImage(byte[] bytes) throws IOException {
        BufferedImage img = ImageIO.read(new ByteArrayInputStream(bytes));
        int width = img.getWidth();
        int height = img.getHeight();
        if (width > 0 && height > 0) {
            int newWidth = THUMBNAIL_WIDTH;
            int newHeight = THUMBNAIL_HEIGHT;
            if (width > THUMBNAIL_WIDTH || height > THUMBNAIL_HEIGHT) {
                if (width >= height) {
                    newWidth = THUMBNAIL_WIDTH;
                    newHeight = (int)((THUMBNAIL_WIDTH / (double)width) * (double)height);
                } else {
                    newHeight = THUMBNAIL_HEIGHT;
                    newWidth = (int)((THUMBNAIL_WIDTH / (double)height) * (double)width);
                }
            }
            Image scaledInstance = img.getScaledInstance(newWidth, newHeight, Image.SCALE_DEFAULT);
            BufferedImage thumbnail = new BufferedImage(newWidth, newHeight, BufferedImage.TYPE_3BYTE_BGR);
            Graphics2D graphics = thumbnail.createGraphics();
            graphics.drawImage(scaledInstance, 0, 0, null);
            ByteArrayOutputStream outputStream = new ByteArrayOutputStream();
            ImageIO.write(thumbnail, "jpg", outputStream);
            return outputStream.toByteArray();
        } else {
            return bytes;
        }
    }
}
The handler function iterates over the available records and filters out those that match the event name “ObjectCreated:Put” and whose S3 key ends with either “.jpeg” or “.jpg”. In this case it constructs a new Amazon S3 client object in order to load the image data directly from S3 using a GetObjectRequest. The content of the S3 object is provided as S3ObjectInputStream, which can be converted to a byte array. The byte array can be scaled using the standard Java API. Please note that Amazon seems to use openjdk in their Lambda infrastructure, hence, not all encoders may be present. In our example, we have to use for example an image of type TYPE_3BYTE_BGR to write a jpg image.
Finally yet importantly, we create a new key containing the suffix
_thumb and upload the new image to the Amazon S3 service.In order to execute this function, the role under which it is executed must possess read and write access to S3. The required privileges can be granted to the role in IAM by assigning the AmazonS3FullAccess policy to the role:

Having uploaded the Lambda function as explained above, we can navigate to our S3 bucket and register the new Lambda function under “Properties” as trigger for new objects:
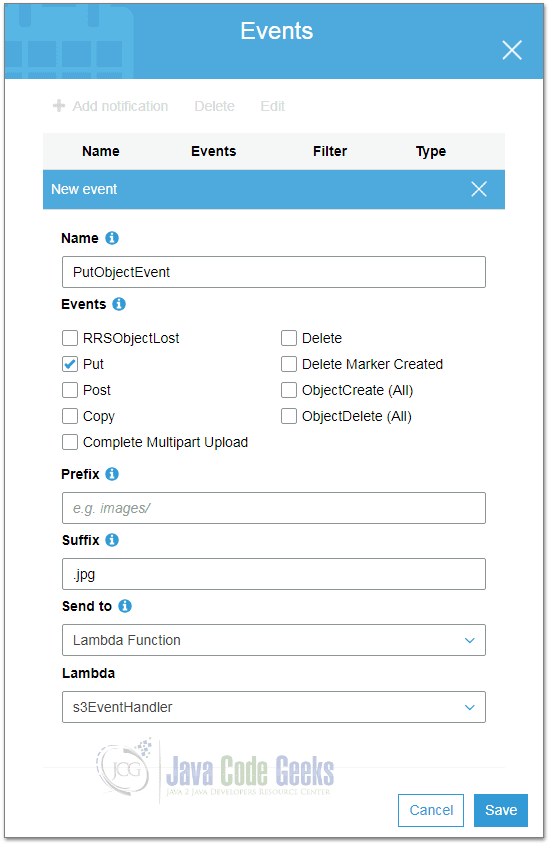
Next to a name and the type of requests the function should be triggered, we can chose an optional prefix and suffix and of course, our Lambda function.
When we subsequently upload a new image with width or height greater than 512 pixels, the new Lambda function should be executed and creates a new thumbnail image in the same bucket. You can monitor its execution in CloudWatch.
4.2 DynamoDB
DynamoDB is a NoSQL database that allows storing arbitrary data items in tables. Items are similar to row in relation databases, but in contrast to relational databases DynamoDB is schemaless, i.e. except for the partition key and an optional sort key each item can have different attributes. The partition key is used to distribute data over different shards while the sort key determines the order in which data with the same partition key is stored. Having a sort key allows iterating over the data in a sorted way, which comes handy when you want to display for example all access events of a specific user sorted by time. In this use case, you would use the user id as partition key for the event table and the timestamp of the event as sort key.
A trigger has to process all changes in a table it is attached to. Hence, DynamoDB streams are a stream-based event source for Lambda functions. This means that the function is called for each event until it either processes the event successfully or the event times out. Blocking until an event has been processed successfully ensures that the trigger processes the events in the correct order and that each event can be processed correctly.
A sample event from DynamoDB looks like the following:
{
	"Records": [{
		"eventID": "1",
		"eventVersion": "1.0",
		"dynamodb": {
			"Keys": {
				"Id": {
					"N": "101"
				}
			},
			"NewImage": {
				"Message": {
					"S": "New item!"
				},
				"Id": {
					"N": "101"
				}
			},
			"StreamViewType": "NEW_AND_OLD_IMAGES",
			"SequenceNumber": "111",
			"SizeBytes": 26
		},
		"awsRegion": "us-west-2",
		"eventName": "INSERT",
		"eventSourceARN": eventsourcearn,
		"eventSource": "aws:dynamodb"
	}]
}
Similar to the S3 events, we have an array of records with an eventSource, eventName, awsRegion and eventVersion. The eventName tells us the type of event (here: INSERT). The attribute dynamodb provides more detailed information: Keys contains the partition and sort keys, NewImage the new values and OldImage the old values (if available).
With the help of this information, we can easily implement triggers that update other tables or even other services. You can for example send an email each time a new user is created or the shipping state of product changes.
As the library aws-java-sdk-dynamodb already provides ready-to-use data structures for the DynamoDB events, we add a dependency on it in our pom.xml:
<dependency>
	<groupId>com.amazonaws</groupId>
	<artifactId>aws-java-sdk-dynamodb</artifactId>
	<version>1.11.346</version>
</dependency>
Now we can implement a simple RequestHandler that processes a DynamoDB event and logs all interesting parts of it:
package com.javacodegeeks.aws;

import com.amazonaws.services.dynamodbv2.model.AttributeValue;
import com.amazonaws.services.dynamodbv2.model.StreamRecord;
import com.amazonaws.services.lambda.runtime.Context;
import com.amazonaws.services.lambda.runtime.RequestHandler;
import com.amazonaws.services.lambda.runtime.events.DynamodbEvent;
import org.apache.logging.log4j.LogManager;
import org.apache.logging.log4j.Logger;

import java.util.List;
import java.util.Map;

public class DynamoDbEventHandler implements RequestHandler<DynamodbEvent, String> {
    private static final Logger LOGGER = LogManager.getLogger(DynamoDbEventHandler.class);

    @Override
    public String handleRequest(DynamodbEvent dynamodbEvent, Context context) {
        List records = dynamodbEvent.getRecords();
        if (records != null) {
            for (DynamodbEvent.DynamodbStreamRecord record : records) {
                StringBuilder sb = new StringBuilder();
                sb.append("eventName=").append(record.getEventName());
                StreamRecord dynamodb = record.getDynamodb();
                if (dynamodb != null) {
                    sb.append(";keys=");
                    appendMap(sb, dynamodb.getKeys());
                    sb.append(";oldImage=");
                    appendMap(sb, dynamodb.getOldImage());
                    sb.append(";newImage=");
                    appendMap(sb, dynamodb.getNewImage());
                }
                LOGGER.info("Record: " + sb.toString());
            }
        }
        return "OK";
    }

    private void appendMap(StringBuilder sb, Map<String, AttributeValue> map) {
        if (map != null) {
            int count = 0;
            for (Map.Entry<String, AttributeValue> entry : map.entrySet()) {
                if (count > 0) {
                    sb.append(",");
                }
                sb.append(entry.getKey()).append("/").append(entry.getValue());
                count++;
            }
        }
    }
}
As with S3 events, we iterate over the list with DynamodbStreamRecords and retrieve its keys, the old and new values.
However, before we can use this new RequestHandler we have to setup a DynamoDB table and configure a trigger. Therefore, we navigate within the AWS console to the service “DynamoDB” and click on “Create table”:

The following dialog asks us for some basic information about the new table. We have to provide a name and the primary key. In our example, we create a partition key with the name ID of type String and do not use a sort key:
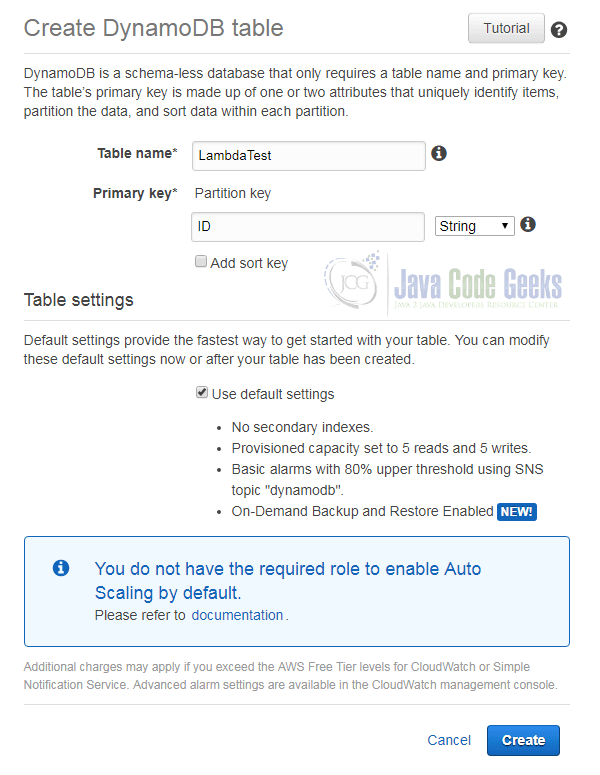
The default settings for indexes and the provisioned read and write capacity are OK for our use case here. A click on “Create” lets AWS create a new table for us.
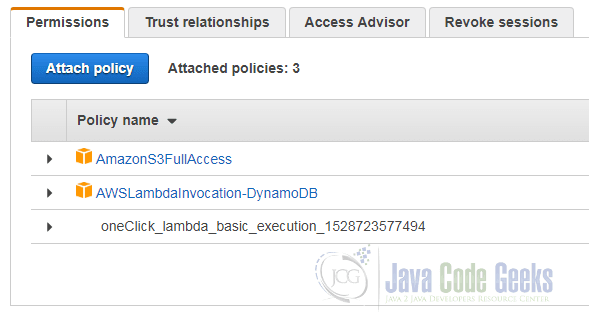
Before we can add the trigger, we have to attach the privilege to read the Lambda stream to the role that will execute the Lambda function. This can be done by navigating to the IAM service, selecting the role and adding the policy AWSLambdaInvocation-DynamoDB as shown in the following screenshot:
Now that our role can access the stream, we can go back to the “DynamoDB” service and choose the table we have just created. In the details page for this table we select the tab “Triggers”. The blue button with the label “Create trigger” lets us instantiate a new trigger that is bound to our new Lambda function by choosing the option “Existing Lambda function”:

The following dialog asks us to select the Lambda function and a batch size:
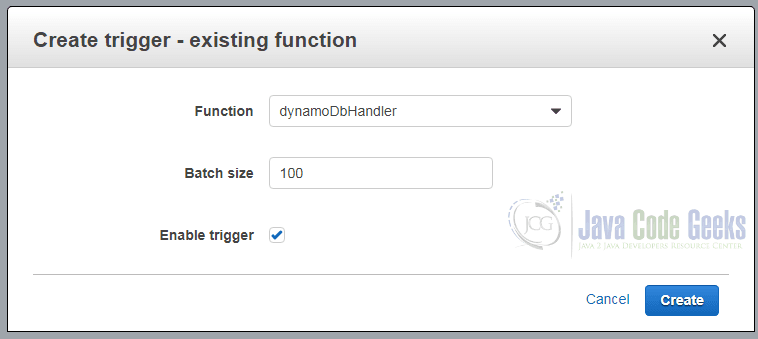
With a click on “Create” our code will be executed each time an item is updated in the table we have attached the trigger to.
To test this, we choose the tab “Items” on the table’s detail page and click on “Create item”:
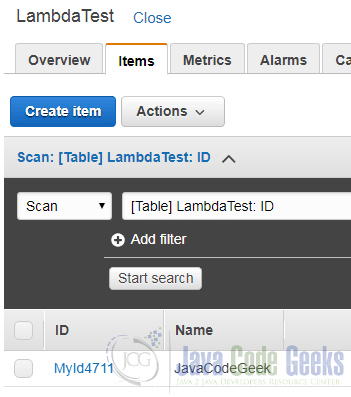
With the help of the following dialog we can submit a JSON document that contains at least a value for the attribute ID:
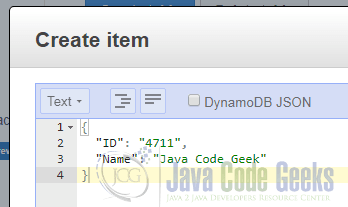
Additionally, we also add a value for the attribute Name. We can use this attribute as it is not part of the primary key and DynamoDB as a schemaless database won’t validate our additional attributes against any kind of schema.
Clicking “Save” should not trigger our Lambda function. You can verify this by navigating to the “CloudWatch” service and inspecting the logs for our Lambda function:
2018-06-16 13:43:35 6453ae2b-af62-4090-93d0-b5607e05ee55 INFO DynamoDbEventHandler:33 - Record: eventName=INSERT;keys=ID/{S: 4711,};oldImage=;newImage=ID/{S: 4711,},Name/{S: Java Code Geek,}
As expected, the log statement shows the name of the event, the key and the new values. In case of an update event, you would also see the old value.
4.3 API Gateway
Another interesting service in the AWS world in combination with Lambda is the “API Gateway” service. It can be used to provide a publicly available REST-API that is backed by Lambda functions.
To keep it simple, we will implement a Lambda function that returns the current timestamp and can be invoked by an HTTP GET-request.
The code for this function looks like this:
package com.javacodegeeks.aws;

import java.text.SimpleDateFormat;
import java.util.Date;

public class APIGatewayHandler {

    public String handleRequest() {
        SimpleDateFormat sdf = new SimpleDateFormat("yyyy-MM-dd'T'HH:mm:ss.SSSZ");
        return sdf.format(new Date());
    }
}
As usual, we upload the corresponding jar file and register the method as Lambda function with the name “apiGatewayFunction”.
Having created the Lambda function, we navigate to the start page of the “API Gateway” service and click on “Create API”:
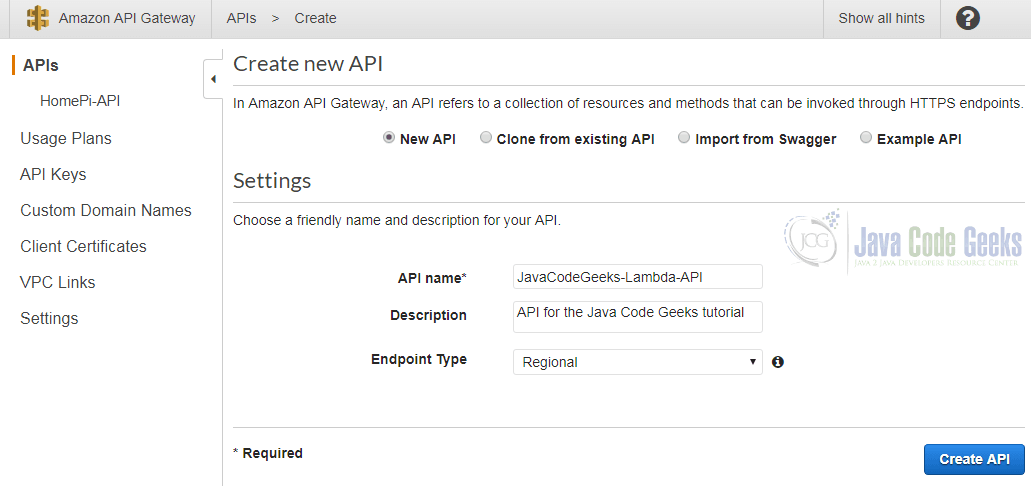
Here we choose “New API”, provide a name and description for it and an endpoint type. Endpoint in the AWS terminology is the place where the content is served. The default is “Regional”, meaning that the API is located only in the region of this API and not distributed to other endpoints.
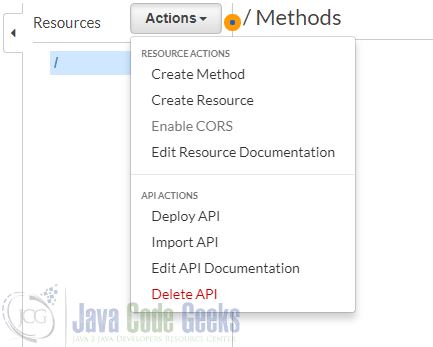
Once the API been created, we can create a new “resource”. A “resource” is from a technical point of view the part of the URL after the server’s name and the port. A new resource can be created through the “Actions” menu:
The following dialog asks for a resource name and the path:
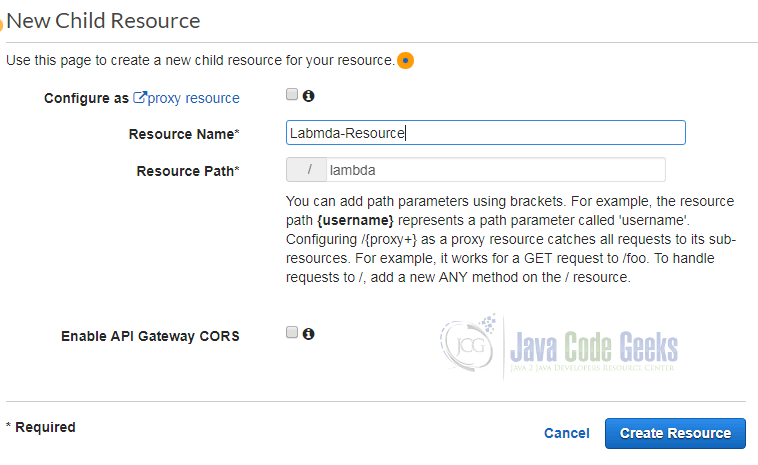
Additionally, you can enable Cross-Origin-Resource-Sharing (CORS) and configure this resource to be a proxy resource, meaning that requests are forwarded without interaction with API Gateway to a webserver in the backend. As we do not need both options, we leave them disabled.
Afterwards we can add a new HTTP method for the new resource:
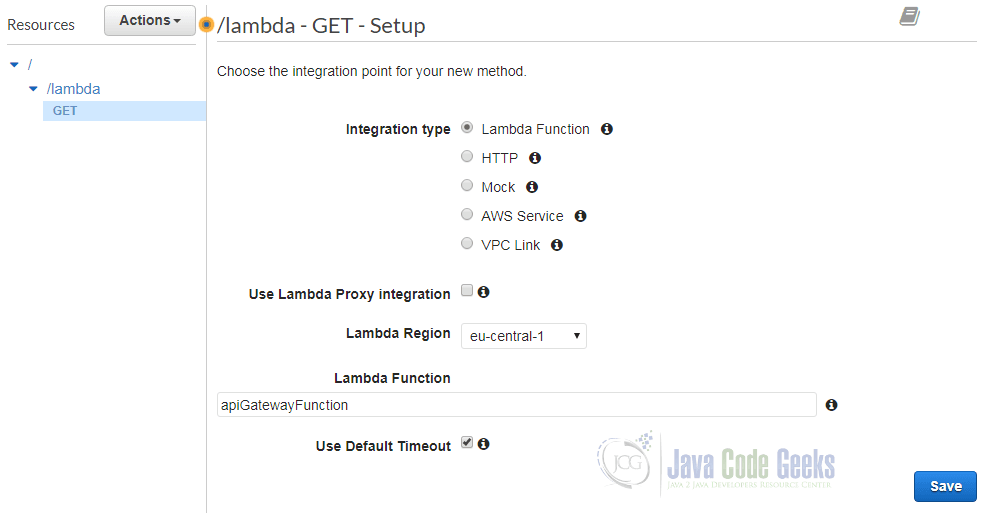
In this simple example we chose a GET request and set “Lambda Function” as integration type. Next, we select the region where the Lambda function has been defined and chose the name of the function. We use the default timeout and do not enable proxy integration. A click on “Save” bring us to the following diagram:
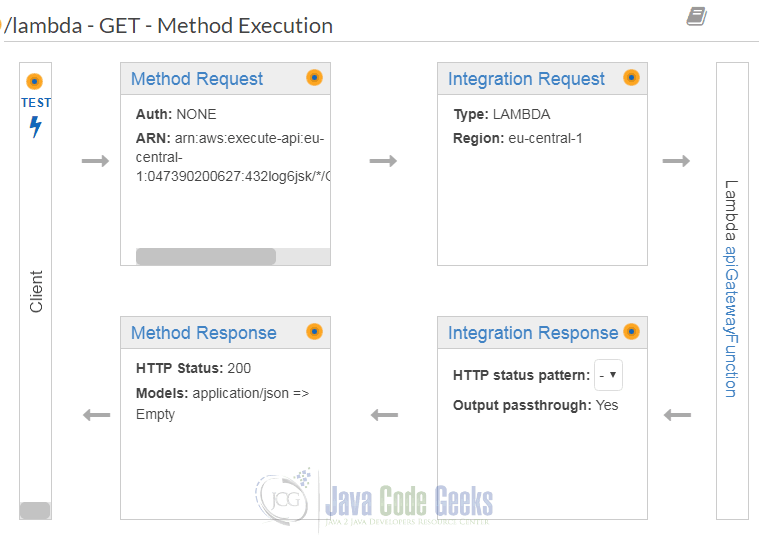
It visualizes the data flow for the HTTP method we just setup. The client submits its requests, which are converted into an integration request of type “Lambda”. This integration request calls our Lambda function. Its answer in form of an integration response is transformed into a method response and finally returned to the client.
Now that we have defined a resource and one GET method for this resource, we can deploy the new API. This is done through the “Actions” menu and brings up the following dialog:
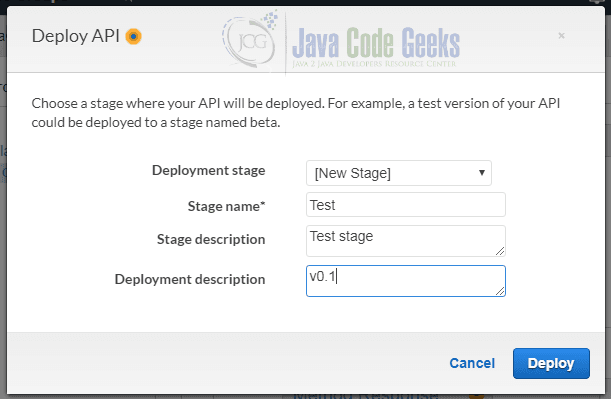
We can define different deployment stages in order to separate different versions of our API. This way we can have one “production” deployment, one “pre-production” deployment and so on. In this tutorial we create a new deployment with the name “Test” and the description “Test stage”. As deployment description we chose “v0.1”.
A click on “Deploy” releases our API and shows its URL:

You can see that the stage name is the very first part of the URL’s path. To invoke our Lambda function we add the name of the resource we have defined above (here: lambda) and invoke the URL in our web browser:
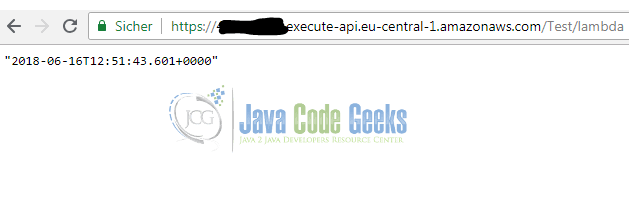
As expected, the Lambda function returns the current timestamp.
5. Versions and Aliases
In the course of this tutorial we have created different Lambda functions. To keep an overview about what is deployed in which version, AWS offers us the possibility to define versions and aliases.
Creating a version means to create a snapshot of the current code and save it together with a description. This can be done by choosing Publish new version from the Actions menu. The following dialog box will appear:

You are asked for a description and then you can click on Publish. AWS will automatically assign the version 1 as label.
Additionally, a version also has an ARN that contains the name of the Lambda function as well as its version. It might look something like this:
arn:aws:lambda:eu-central-1:054390200838:function:s3EventHandler:1
ARN stands for “Amazon Resource Name” and uniquely identifies a resource in the AWS world. With the help of this ARN you can now reference the version 1 of our Lambda function “s3EventHandler” everywhere we need it. In the S3 configuration dialog, where have selected the Lambda function to be executed for each new object, we can now put this ARN and tell S3 to use exactly this version.
However, what if a specific Lambda function is referenced in different services? Do we have to navigate to all configuration pages and update the reference once we have published a new version of our function? The answer is of course: No. AWS allows us to define aliases that point to a specific version of Lambda function. Instead of referencing directly a concrete version, we can create an alias and point it to this function version.
This is done through the Actions menu, using the menu item Create alias:
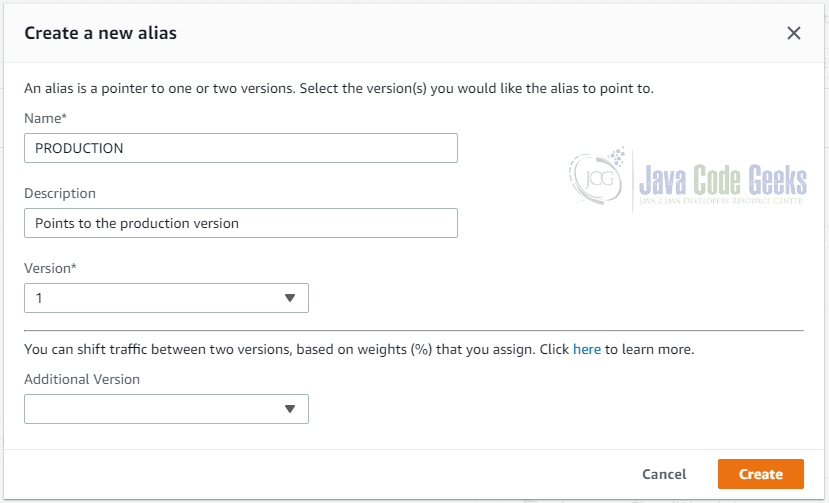
This dialog asks us for a name for the alias. Here we just chose “PRODUCTION” in order to indicate that this is the production-ready version of our function. Next to a description, we also have to provide the version of the Lambda function our alias points to.
As you can see in the screenshot, it is possible to define an additional version and, once you have selected an additional version, also a weight. This allows AWS to distribute only a certain amount of requests to this alias to one version of the function and the remaining amount to another version. This pattern is known as “canary release”, i.e. you can test a new version with a small amount of users. If somethings goes wrong, only a small amount of users will be affected and you can turn off the new version. If everything is fine with the new version of your code, you can increase the number of users step by step.
Please note that you can update an alias in contrast to a version after you have created it. This way you can of course point your “PRODUCTION” alias afterwards to a new version of your code. However, version 1 will remain version 1. You cannot change the version once it has been published.
6. Best Practices
In this section, we will discuss some best practices when working with Lambda functions.
To better unit test our code, it makes sense to implement the logic of the function within a separate method or even class without passing the AWS Context object around. We can extract the values we need from the context and pass them to another method:
package com.javacodegeeks.aws;

import com.amazonaws.services.lambda.runtime.Context;
import com.amazonaws.services.lambda.runtime.RequestHandler;

public class SeparateHandler implements RequestHandler<String, String> {

    @Override
    public String handleRequest(String input, Context context) {
        return echoString(input, context.getAwsRequestId());
    }

    String echoString(String input, String awsRequestId) {
        return input + " (AWS-Request-ID: " + awsRequestId + ")";
    }
}
The example above implements the “logic” inside the echoString method, which can be tested without having to construct a Context object. If we would even extract the code into a separate class, it might be possible to use the same code inside another application without any Lambda dependencies.
AWS will keep a certain number of instances of your Lambda function in memory, to be able to execute requests immediately at any time. Therefore, you can try to initialize static variables at the very first time the value is used and then re-use the computation result from the static variable. This way you do not have to construct the same objects every time again.
A simple way of passing configuration to your Lambda function is to use environment variables. As you can define them easily inside the AWS console, you can for example read the name of an S3 bucket from an environment variable instead of hard coding it or reading it from a specific configuration file that has be loaded before.
The execution environment provides a Virtual Machine for the execution of Java code. In addition, it provides the Java Runtime Environment (JRE). As you cannot specify the exact JVM version to use, you should try to control the dependencies yourself, as over time the JDK code provided by the execution environment may change and introduce subtle changes. Hence, it can make sense to rely on external dependencies that are included in our uploaded jar instead of relying on code provided the runtime environment.
As you have to pay for invocations of your Lambda functions, you should be careful with recursion. Verify that the termination criterion is met every time because otherwise endless invocations of the same function can lead to expensive costs.
To keep your costs under control, you also have to determine the optimal amount of memory necessary to execute your Lambda function. We have already seen that the CloudWatch logs contain for each execution of the function a line like this:
REPORT RequestId: 5cfc1f27-6e3c-11e8-bbb9-c79d86ee7e9f Duration: 110.00 ms Billed Duration: 200 ms Memory Size: 512 MB Max Memory Used: 73 MB
This example shows that we have setup 512 MB memory for this function, but it has only used 73 MB. Therefore, we should tune the memory setting and determine in a stress test a memory setting that is not too low but let’s our function perform well.
7. Pricing
You are paying for the time and memory all your Lambda functions consume. Within the free tier, you have 1 M requests per month and 400,000 GB-Seconds per month for free. When you have reached the free tier limits, which are not limited to the first twelve month of a new AWS account, you have to pay $0.0000002 per request and $0.00001667 for every GB-Second.
To understand this better, let us create a simple example. Assume that you have one Lambda function that requires 512 MB of memory and runs in average one second. This function is called about five M times a month.
You can compute first the GB-Seconds: 5,000,000 * 1s * 512MB/1024 = 2,500,000 GB-Seconds. As the first 400,000 GB-Seconds are free; you have to pay for 2,100,000 GB-Seconds. With a price of $0.00001667 for every GB-Second you pay $35.007 for the computation.
Then you have 5 M requests. With 1 M requests for free, you will have to pay for 4 M requests. One request costs $0.0000002, i.e. 4 M requests cost $0.8.
In total, you will have to pay $35.807.
8. Download the Source Code
This was an Amazon Lambda Tutorial.
You can download the full source codes of this example here: Amazon Lambda Tutorial

Hi. How can I download this tutorial in pdf version? I am already registered, and I don’t want to register again with a different email to get the pdf.
Thanks
Hello valentino,
Since you have already subscribed the url for the book is here: https://www.javacodegeeks.com/minibook/amazon-aws-lambda-tutorial
You have to login in order to download the book. If you don’t have an account, you can create one!
Thanks a lot for your kind reply!
I am unable to download this pdf whether logged in or not, on chrome or IE, and the login gives me endless Capta tasks ..
The url for the book is here: https://www.javacodegeeks.com/minibook/amazon-aws-lambda-tutorial
You have to login in order to download the book though. If you don’t have an account, you can create one! If you still have problems let me know!