1. Introduction to MySQL replication
In a large scale enterprise system, data consistency and backup is of prime importance. It is equally important to distribute the load on the database server using copies of the database. However, maintaining backup or additional instances is a difficult task especially when you try to copy entire database repeatedly. MySQL replication helps us precisely solve this problem by incrementally creating a copy of master database into the configured slave databases. MySQL replication can be used to consistently keep copying the main database into multiple slave databases.
This configuration has multiple benefits like:
- A slave database is incrementally updated thus reducing the load on master database for creation of a copy.
- A database replica can be used for heavy backend operations. This allows to maintain the performance and response time of the master database quite well.
- A slave database can be used to serve data faster to different regions around the world.
Table Of Contents
- 1. Introduction to MySQL Replication
- 2. Setting up MySQL servers
- 3. Topologies of MySQL replication
- 4. Configuring the servers for MySQL replication
- 5. Enabling Master-Slave replication
- 5.1 Configure the master
- 5.2 Slave database Configuration
- 6. Sourcing data from multiple slaves
- 7. Configuring multiple slaves for Single master database
- 8. Pros and Cons of Replication
- 9. Conclusion
2. Setting up MySQL servers
In order to setup MySQL replication, you would require to setup at least two separate servers. They could either exist on the same machine but different ports or they could be on different machines altogether. For the sake of this tutorial, we would be using two different machines with a simple MySQL installation over the port 3306. It is also possible to use the same machine with multiple server instances running on the same machine. However, the process to setup multiple instances might appear complex and hence is not being discussed here. You could explore the option at this link
The IPs I would use for the machines are listed below:
- Master: 192.168.1.25
- Slave: 192.168.1.26
The IPs listed above are my local device IPs. In case of remote MySQL servers, you could utilise the relevant public IP address. In order to setup the server, follow the instructions from my previous tutorial. Once you have the server installed on both the machines, we can proceed with the understanding and configuration of MySQL database replication.
3. Topologies of MySQL replication
Before proceeding with the replication process, it is really important to understand the MySQL replication in detail. There are multiple types of MySQL replication configurations possible. Irrespective of the configuration being used, the main goal behind replication remains the same – Reduce the load on the master server during database intensive operations being performed in the backend. The common point among each configuration is that a database configured to act as a slave is always a read-only database for the outside users connecting to the database. By default, replication is an asynchronous process unless configured to be otherwise. In the below listed topologies, one of the topologies involves synchronous data copy. This ensures better data consistency but adds to the load on master data as it needs to wait for the copy to be created.
Let’s discuss the types of MySQL replication configurations in detail:
3.1 Master with Slaves Configuration
In a master with slaves configuration, the data relays unidirectionally from master to its multiple slaves and terminates there. In such a configuration, there is a single master database server configured to act as a master and serve the application while multiple backup/slave servers take care of the data intensive operations. A typical depiction of such an implementation is shown below.
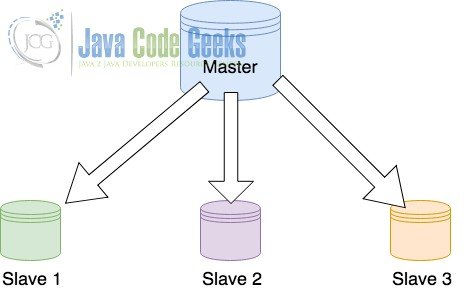
As shown in the figure above, the slaves continuously receives the data as it gets updated on the master database. The slaves do not own the responsibility to transfer the data to other slaves. The process of data transfer from master to slaves is completely asynchronous.
3.2 Master with relay slaves configuration
A relay slave is a configuration where one of the slave also holds the responsibility to relay the data to other connected slaves. In such a configuration, the master sends the data to a limited number of slaves rather than serving multiple slaves with the replica data. This configuration is done to reduce the load, on the master, of forwarding data to the slaves.
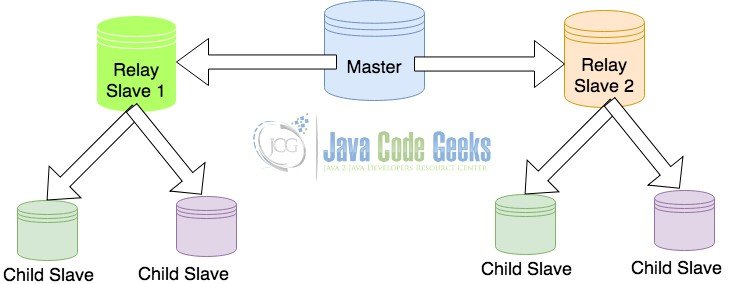
This type of configuration has a cascading impact on the child slaves. If a link between the master and one of the relay slaves is slow or down for a while, it consequently would delay the replication in the relevant child slaves too. Thus, this type of replication is only preferred if the replication delays are acceptable.
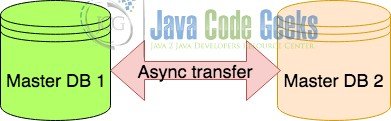
3.3 Multi-master circular configuration
A multi-master configuration is provided by custom configuration interfaces wherein there are two master databases configured to act as slaves for each other in a cluster topology. Also known as master with active master configuration, this type of configuration is preferred when the only goal is to maintain a copy of the database. It saves us the time and money invested in setting up additional slave servers for each master database.
3.4 Master with a Back-up master configuration
The above discussed topologies are asynchronous topologies. In an asynchronous topology, the master database merely sends the data to the slave and resumes its operations. It does not wait for a feedback from the slave. Thus, if the data is lost or there is any issue while writing the data to the disk, master database would not be able to handle it. A master with Back-up master configuration precisely to ensure zero data loss. In this type of configuration, the master communicates with a back-up master in a semi-synchronous manner. A semi-synchronous communication means that the master waits until the back-up master database acknowledges the data update. The master database resumes its processing as soon as the acknowledgement is received irrespective of whether the data is committed or not. However, this reduces the chances of data loss to a great extent.
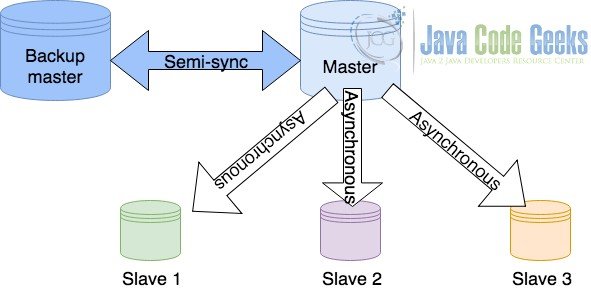
Such a configuration has a considerable impact on the performance of the master database and hence it is preferred only when the loss of data is critical. It is also important to note that the communication is semi-synchronous only with the Back-up master database while the slaves still communicate asynchronously.
3.5 Multiple masters – Single Slave configuration
This is one of its kind configuration where the slave is bombarded with data from multiple masters. Such a configuration is implemented when the sole goal is to backup the data. Such a configuration is generally preferred by the hosting servers to ensure the uptime and data consistency. Such a configuration is as simple as the first one as long as there is no conflicting tables involved. A depiction of this configuration has been displayed below.

4. Configuring the servers for MySQL replication
Now that we have sufficient understanding about the possible MySQL replication topologies, let us proceed with the configuration of the servers for replication. Configuring the servers for MySQL replication involves configuring the unique ID for each server, configuring the master and slave with their respective roles and providing relevant permissions to the slave on the master database. This section will cover the relevant steps in detail.
In order to configure the ID of the servers, open up the my.cnf configuration file from the MySQL configuration directory. It could be found on the path /etc/my.cnf in Linux, /usr/local/mysql/support-files/my.cnf in MacOS and in case of Windows, it could be found in the relevant base directory. If the file is not found, you could create one in the relevant directory. Ideally, MySQL server should be able to pick it up. In case of MacOS, if you installed MySQL server using the .dmg file, you might need to select the Configuration file from the System Preferences. For the rest of the OS, MySQL server detects the configuration file automatically.
Once you have the file, ensure that the following details are present in the file already.
[mysqld]
log-bin=mysql-bin
binlog-do-db=mynewdb
server-id=1
innodb_flush_log_at_trx_commit=1
Of the above properties, the one of our interest is the server-id. This variable is used to give different ID to the server incase multiple servers are running on the same machine or a master slave configuration is being configured. For one of the machines/servers that you are using, change this ID to 2. This will help the replication engine to identify the data flow direction easily. Once the changes in the parameter is done and saved, we would have two server instances – One with the ID as 1 and the other with ID 2. Restart the MySQL server for which the ID was updated. Now, the servers are ready to be configured for Replication.
Now, understanding the remaining properties:
log-bin: This property identifies the location where the logs of the replication process will be stored
binlog-do-db: This property identifies the database that will be replicated onto the slave database server
innodb_flush_log_at_trx_commit: This property is used to configure log flushing in case of a synchronous setup where the master database gets an acknowledgement of the commit. In case of slave, the logs are cleared when the backup data update has been committed.
Once the following configurations are done on both the client as well as server, restart the MySQL services on both the systems. In order to restart the services, follow the OS specific approaches provided below:
MacOSx: Go to the System Settings > MySQL. Stop the running server instance. Select the relevant configuration file in the Configuration tab and start the server again. This should start the server with the configured properties. In case you have trouble starting up the server, ensure that the properties are saved correctly and the port is not in use.
Linux: In all the Linux variants, you could use the below command to restart the server. The command will be helpful as long as you have one system per database server.
$ sudo service mysql restart
Windows: In case of Windows, you would need to stop the MySQL56 service. In order to do so, open up the Windows search and type in Services. In the Services window, look for the MySQL56(default name) service. Right click the service and restart it to ensure that the changes are reflected.
5. Enabling Master-Slave replication
5.1 Configure the master
The first step towards enabling the master slave replication is to create a user that has the access to the master database for the replication purpose. The user will be used by the slave to read the data from the master for replication. In order to do so, execute the below command that creates a user named rep_user for the purpose of replication.
$ GRANT REPLICATION SLAVE ON *.* TO 'rep_user'@'192.168.1.26' IDENTIFIED BY 'password';
The above command maps the new user to the slave IP address. Thus, it can be exclusively used by the specific slave only. This ensures proper logging for audit purposes. Execute the above command followed by the below command to write the changes in the grants.
$ FLUSH PRIVILEDGES
Now that we have permitted the replication user from the slave database to access all the databases from the master, we need to choose which database actually needs to be replicated. Select the database to be replicated.
$ use mynewdb
In order to allow us to revert the changes, you need to take a backup of its current state. To do so, lock the database using the command below.
$ FLUSH TABLES WITH READ LOCK;
The above command will flush any pending requests on the database and lock in from modifications. Once we have it locked, take a backup of the current state of the database and also check the current state to understand the position from which the replication will begin. To take a backup, execute the below command from Command Prompt or Terminal.
$ mysqldump -u root -p --opt mynewdb > mynewdb.sql
Remember that this is not a MySQL prompt command and hence needs to be executed outside it. Check the current database status to get the information about the current position of the database.
$ SHOW MASTER STATUS;
+------------------+----------+--------------+------------------+
| File             | Position | Binlog_Do_DB | Binlog_Ignore_DB |
+------------------+----------+--------------+------------------+
| mysql-bin.000001 |      104 | mynewdb      |                  |
+------------------+----------+--------------+------------------+
1 row in set (0.00 sec)
Note the value of the position column here as it would be useful to verify the successful master-slave configuration. Now that we have the necessary dump and the information about the position, the database can now be unlocked and we can get started on the slave database configuration. To unlock the tables, execute the below command.
$ UNLOCK TABLES;
5.2 Slave database Configuration
The first step towards starting up with the slave database is to create a database with the same name as the replication master database. Once created, the database needs to be imported into the slave to cover for the data that might already exist in the master. To do so, execute the below self explanatory commands.
$ create database mynewdb;
$ exit
Execute the below import command outside the MySQL terminal.
$ mysql -u root -p mynewdb < /path/to/mynewdb.sql
Once we have the database imported and ready to use, we need to start with the configuration of the slave. To configure the database, open up the configuration file in a compatible plain text editor. Configure the following parameters in the configuration file. In case you are using multiple servers on the same machine, edit the relevant my2.cnf as advised in this tutorial.
[mysqld]
log-bin=mysql-bin
binlog-do-db=mynewdb
server-id=2
relay-log=/path/to/mysql-relay-bin.log
Save the changes and restart the server to ensure that the changes are reflected. Finally, it is time to configure the master server to be the master of this slave database. Open up the mysql prompt once again and enter the below command to configure the slave DB to read from the position noted above – 104.
CHANGE MASTER TO MASTER_HOST='192.168.1.25',MASTER_USER='repl_user', MASTER_PASSWORD='password', MASTER_LOG_FILE='mysql-bin.000001', MASTER_LOG_POS= 104;
Thus, the database server at 192.168.1.25 will act as master server for my slave database server at 192.168.1.26. Note here that the MASTER_LOG_POS=104 attribute decides the position from where the read would begin for the replication.
The credentials passed above are the credentials of replication user created during master database configuration process above. The slave is now ready to replicate the database as the changes are made to the master database. All that is left to do is start the server as a slave with the below command entered in the MySQL prompt.
$ START SLAVE
The slave is now reading the data to replicate it automatically. At any point of time, to check the status of the read, you could execute the below command.
$ mysql> SHOW SLAVE STATUS\G
*************************** 1. row ***************************
               Slave_IO_State: Waiting for master to send event
                  Master_Host: master
                  Master_User: repl_user
                  Master_Port: 3306
                Connect_Retry: 60
              Master_Log_File: mysql-bin.000001
          Read_Master_Log_Pos: 931
               Relay_Log_File: slave-relay-bin.000056
                Relay_Log_Pos: 950
        Relay_Master_Log_File: mysql-bin.000001
             Slave_IO_Running: Yes
            Slave_SQL_Running: Yes
              Replicate_Do_DB:
          Replicate_Ignore_DB:
           Replicate_Do_Table:
       Replicate_Ignore_Table:
      Replicate_Wild_Do_Table:
  Replicate_Wild_Ignore_Table:
                   Last_Errno: 0
                   Last_Error:
                 Skip_Counter: 0
          Exec_Master_Log_Pos: 931
              Relay_Log_Space: 1365
              Until_Condition: None
               Until_Log_File:
                Until_Log_Pos: 0
           Master_SSL_Allowed: No
           Master_SSL_CA_File:
           Master_SSL_CA_Path:
              Master_SSL_Cert:
            Master_SSL_Cipher:
               Master_SSL_Key:
        Seconds_Behind_Master: 0
Master_SSL_Verify_Server_Cert: No
                Last_IO_Errno: 0
                Last_IO_Error:
               Last_SQL_Errno: 0
               Last_SQL_Error:
  Replicate_Ignore_Server_Ids: 0
The \G in the above command is a formatting argument. It displays data in a one line per column format. In case there are any issues in the start up of the slave, you might need to skip over the issue by using the below command.
SET GLOBAL SQL_SLAVE_SKIP_COUNTER = 1; SLAVE START;
6. Sourcing data from multiple slaves
Now that we have setup a single source and single slave, let us try to setup something complex. Masters in a multiple source topology need to be configured to use either of the below:
- Global Transaction Identifier (GTID)
- Binary-log position based replication
To configure and use a Global transaction identifier, it is important to enable gtid_mode. To configure each master with a different GTID, use the below command.
CHANGE MASTER TO MASTER_HOST='master1', MASTER_USER='repl_user', MASTER_PORT=3306, MASTER_PASSWORD='password', \
MASTER_AUTO_POSITION = 104 FOR CHANNEL 'master-1';
To configure the master with a different GTID, just change the values of the above command to a different one. In order to configure multiple masters using binary log position parameter, you can use the below command with the relevant binary log parameter obtained using parameter SHOW MASTER STATUS;
$ CHANGE MASTER TO MASTER_HOST='master1', MASTER_USER='repl_user', MASTER_PORT=3306, MASTER_PASSWORD='password' \
MASTER_LOG_FILE='master1-bin.000001', MASTER_LOG_POS=104 FOR CHANNEL 'master-1';
Once this configuration is done, the masters are ready to act as multiple sources. The next step is to start the slave either for a specific channel or for multiple channels. In order to start the server for a specific database replication, start the slave database using the below code.
$ START SLAVE thread_types FOR CHANNEL master-1;
The thread_types could be chosen as per the required thread_types. For more information on the same, you could refer the below link. To start the replication for all the sources, use the below command.
$ START SLAVE thread_types;
7. Configuring multiple slaves for Single master database
So far, we have seen configurations for two different topologies. One being the Single Master Single Slave and the other was the Multi master single slave. In order to configure a multi-slave single master topology, there are very simple steps to follow. In order to configure multiple slaves, you need the following:
- Additional user for additional slaves with the necessary replication grant
- A slave with a different server id
With these requirements being fulfilled, an additional slave can be easily configured. To add a new replication user, use the below command with the corresponding server IP.
$ GRANT REPLICATION SLAVE ON *.* TO 'rep_user'@'xxx.xxx.xxx.xxx' IDENTIFIED BY 'password';
The username and passwords can be different if necessary. In case you plan to create a large number of slaves, it is advisable to create a global access user to avoid the trouble of creating users repeatedly. A global access user could be created using the below command.
$ GRANT REPLICATION SLAVE ON *.* TO 'rep_user'@'%' IDENTIFIED BY 'password';
The above command will create a replication user that can be used by any slave that is being configured. Thus, the user configuration for each slave need not be remembered. The next step is to configure a different server-id. As already explained in the above sections, it can be configured using the configuration file of the respective server.
8. Pros and Cons of Replication
The pros of implementing MySQL replication include the following:
- Reduced load on master for data processing operations
- Smoother load distribution for database intensive applications
- Safer and consistent data backup
- Multi copies of data allows to serve data faster in each region
Despite numerous benefits of replication, it is a process that should be done carefully. Below are a few expected negative impacts if not taken care well.
- Increase on master load for relaying the data to the slaves. It is a burden when the number of slaves cross an optimum limit
- Async replication does not provide 100% consistency. Thus, a perfect replica can still not be assured.
9. Conclusion
The article covers in detail about configuring the MySQL replication master and slave servers. There are a variety of possible configurations in the replication. The choice of the topology totally depends on the task you are targeting to perform. There are numerous benefits of replication as listed above. However, the replication must be implemented carefully and as needed. MySQL replication adds to the load on server if the number of slaves increase. Thus, with the right number of slaves configured perfectly, MySQL replication helps in reducing the load on the master server and maintain data backup as well.

Please, fix user names – they are different (repl_user and rep_user).