1. Introduction to MySQL Server
MySQL is an open source relational database management system developed by a Swedish company in 1995. MySQL being an open source system, it has been used by numerous famous companies like Facebook, Google, Twitter, Flickr as well as Youtube. MySQL server is also a central component in LAMP, an open source web application framework. MySQL database server is written in C and C++ and uses lexical analyser to process SQL queries.
Sun Microsystems acquired MySQL server in 2008 and later acquired by Oracle with the acquisition of Sun Microsystem. The founder had forked MySQL during the acquisition by Sun Microsystems and launched Maria DB.However, MySQL held its position in the market and kept being used by numerous organisations.
In this article, we would be discussing about the installation of MySQL server. Next, we will take you through some basics of SQL queries and explain how to execute them. Later, we will proceed with the discussion of a few complex query structures like joins and sub queries in MySQL.
Table Of Contents
2. Installing MySQL server
MySQL server is available in multiple variants depending on the database architecture and license preferences. The available variants are:
Free:
Commercial:
Throughout the tutorial, we will be working with MySQL Community Server and its features. In order to install MySQL community server, head over to its download page.
On scrolling to the bottom of the page, you would find a list of downloads and a select box to allow the OS selection. Select the OS as per your need.
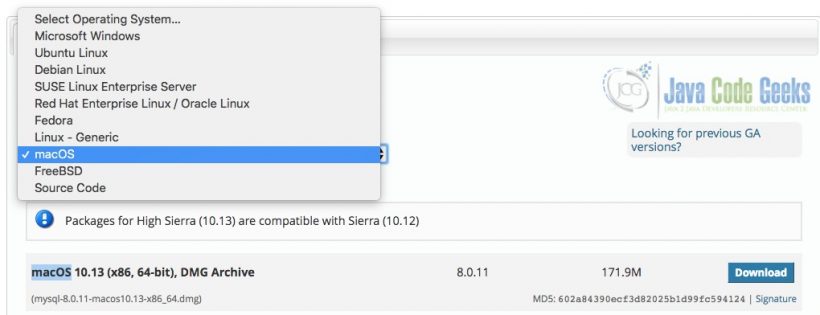
After selecting the OS, these are the recommended setups to download:
MacOS: dmg archive
Linux variants: Corresponding DEB bundle as per your architecture. In Linux variants like Ubuntu and Debian, it is also possible to install using the apt repository nowadays.
Windows: exe executable file
After downloading the relevant setup, proceed with the installation as per the steps mentioned below:
2.1 Installing in MacOS
In MacOS, double click the downloaded .dmg file to start with the setup. It will show up a screen similar to the one shown below. Accept the license and select the installation location. Once the location is selected, it will show the amount of space that would be occupied by the installation as shown below.
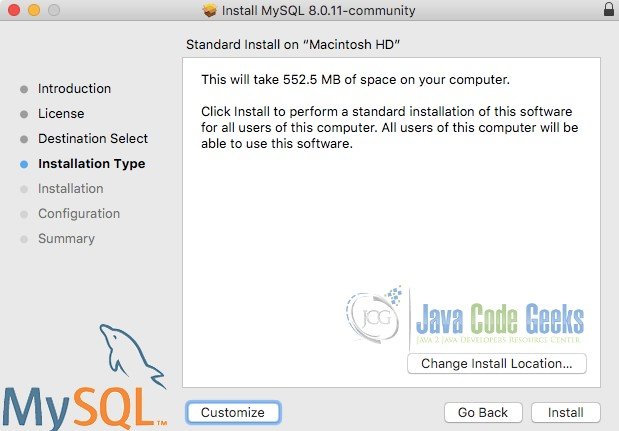
On click of install, the install progresses and MySQL server is installed. The next step is to configure the MySQL Service and root user password. It is important to remember the password being entered as it is the administrator password required to create further users. Configure the service name and credentials and click finish.
2.2 Installing in Windows
The process of installation in Windows OS is quite similar to MacOS. Execute the .exe file that you must have downloaded by now. As long as the exe is compatible with your system, the setup should start and proceed flawlessly.
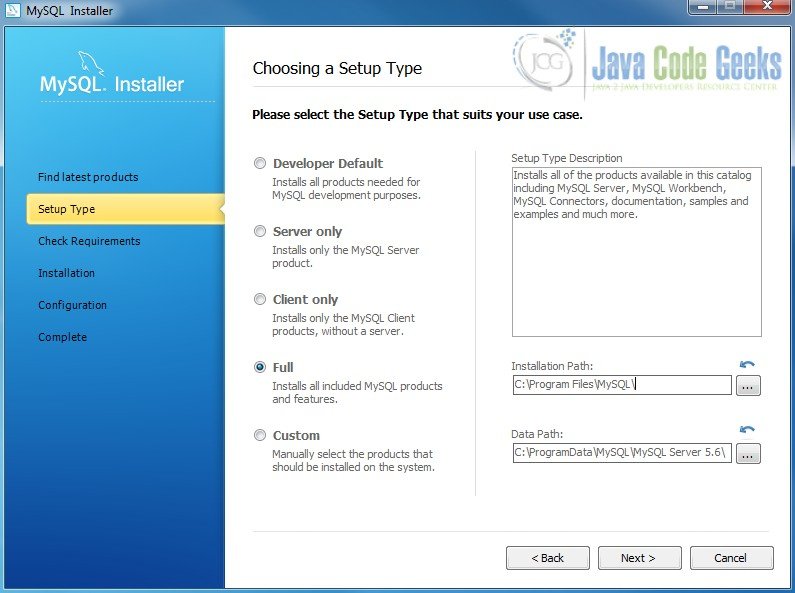
A window similar to the one shown above will be displayed. Choose the installation location when prompted for it. You could choose to proceed with the installation of server only. Full installation basically installs a bunch of SQL utilities too which may not be necessary. Once the installation goes through, the next step would be configuration of the database server credentials. Configure the credentials and complete the installation process.
2.3 Installing in Linux variants
For Linux variants, MySQL server installer is available as a .deb file. The .deb file allows you to complete the process in quite similar fashion as shown above. However, for people who prefer command line, it is possible to install mysql server using command line too. MySQL server is available over apt, yum as well as zypper repository. Further, we will be discussing installation of MySQL server using apt repository.
In order to setup apt repository for the installation of MySQL server, follow the below steps and execute the necessary commands.
- Select the right apt package name from this link. The name format will be mysql-apt-config_x.x.xx-x_all.deb.
- Download the corresponding package
- Once downloaded, execute the below command.
$ sudo dpkg -i /PATH/version-specific-package-name.deb
- During the installation of above package, enter the version to be installed when it prompts for installation
- Once the configuration is complete, run the below command to update the apt repository.
$ sudo apt-get update
- To finally install the MySQL server, execute the below command.
sudo apt-get install mysql-server
- Once installed, the server is started automatically by starting the relevant service. You can check the status using the below command.
sudo service mysql status
3. Connecting to MySQL database
Command line has its challenges for starting up every application. Even for MySQL, you might face challenges especially when it comes to MacOSX. To begin with, we will see how to connect to MySQL database using command line in Windows.
3.1 Connecting to MySQL database server using Windows command prompt
Before connecting to the MySQL server, you need to ensure that the relevant service is up and running. In order to check that, navigate to the list of services by searching Services in the start menu and checking the service list for MySQL56 service. The status of service indicates whether MySQL server is started or stopped. Once it is identified to be running, we could connect to the server using command prompt. Windows commands works mainly on the PATH environment variable. As long as the path environment variable has an entry of the bin location of MySQL installation, all the mysql commands could be used directly. In case there is no entry of the MySQL installation path, you could navigate to the MySQL Server installation folder. Go into the bin folder and open the terminal from the folder.
Once you are in the terminal, you need to type in the following command:
> mysql -u root -p
This should connect to the mysql server with the username root specified in the command above. It will ask for the password as indicated by the -p flag. Enter the password as configured in the beginning and you would be able to see the MySQL prompt as shown below.
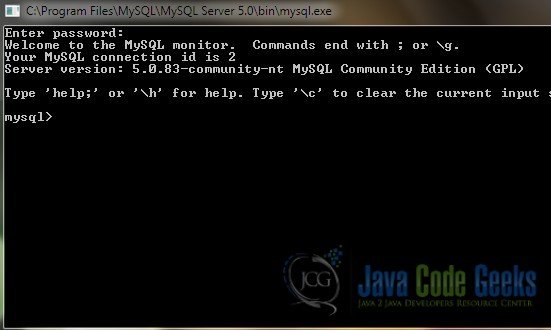
This prompt allows you to interact with the MySQL database using simple SQL queries. We would see the same in the further sections.
You can also use the mysql command to connect to other remote databases and use the terminal to interact with the remote database. In order to do so, you need to use the below command. The attributes passed in the command are quite self-explanatory.
> mysql --host=localhost --user=myname --password=password mydb
3.2 Connecting to MySQL database server using Linux Terminal
Connecting to MySQL server using Linux terminal is quite similar to connecting to it using Windows command prompt. To begin with, ensure that the MySQL server is up and running. In order to check that a process of MySQL server is indeed running, type the below command:
$ ps -eF|grep mysql
The command gives list of running MySQL process. Look for the processes other than the grep process that just executed. If the MySQL server is not running, it could be started using the below command in most distros.
$ service mysqld start
Once the server has started, type the below command to connect to the database with root user.
$ mysql -u root -p
Enter the password and you should be able to see a prompt similar to the one shown above. You should be allowed to get in with a similar MySQL prompt in the window as shown above.
3.3 Connecting to MySQL database server using MacOS terminal
In the MacOS, the process of starting and stopping the server is quite different considering the UI perspective. In MacOS, in order to check the status or start or stop the server, you need to head over to the System Preferences. In the System preferences, you should be able to find the MySQL icon in the bottom area as shown below.

Click the MySQL icon, to view the service status. A window similar to the one shown below will be visible. The server could be stopped or started from here at the click of button quite easily.
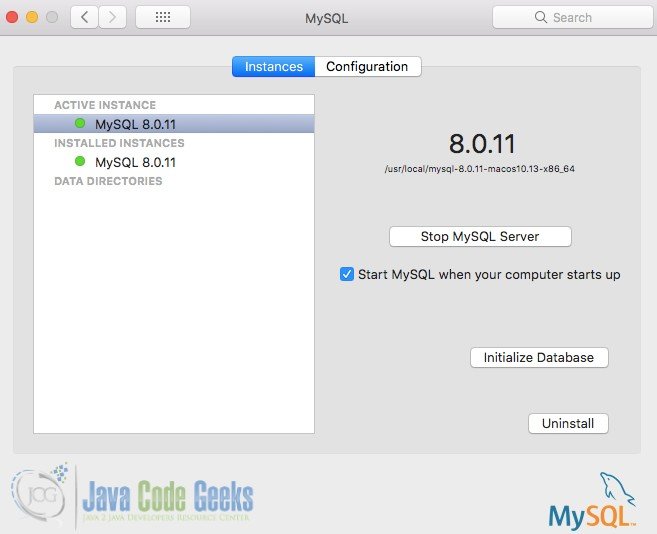
As visible in the above image, it is also possible to re-initialise the database and set a new password for root directly from the above window. In order to reset the password and re-initialise the database, simply click the Initialise database button. It will ask for a new password and you would be all set to go.
Once the server is identified to be up and running, the next step is to connect to the database server using the same commands as above. Type in the command shown below to get connected to the database server.
$ mysql -u root -p
4. Connecting to a schema and executing queries
Once you are connected to the database server, it is time to execute queries. Irrespective of the operating system, the process execution of query using command prompt is the same for all. This section would cover all the basic operations related to execution of SQL queries.
4.1 Creating and checking schema
The first step towards working with the MySQL database is to create a schema. A schema is created using the below command.
mysql> create schema tutorial;
Here tutorial could be replaced by the name of schema that you wish to have. In order to execute the query, type it in the mysql prompt as shown above. Once typed, simply press enter. It would give a success message mentioning 1 row affected. In case it does not, ensure that you put a semicolon after the query. In case it was missed, there will be a prompt with a ‘>’ arrow. If such a prompt shows up, you need to put a semicolon and press enter.
Thus, a new schema will be created. In order to confirm the same, you could view the list of schemas using the below command.
mysql> show schemas;
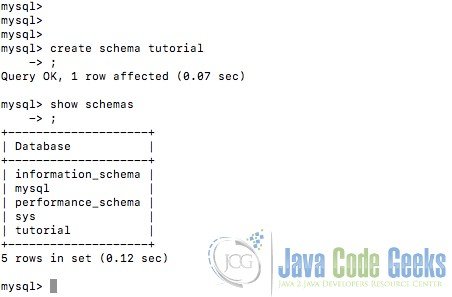
As it can be seen in the image above, the list of schemas are displayed in a formatted console output. You might see a slightly different output depending on the number of schemas that you have created. In case you followed the tutorial precisely, the list should display just one schema in the list.
4.2 Selecting schema and creating tables
Once the schema is created, the next step is to select the schema and create tables in it. To start with the selection of schema, execute the below command with the name of schema that you just created.
mysql> use tutorial
Note that in this statement, the semicolon at the end of statement is not really necessary. On execution of the above command, you should be able to see the output Database Changed. Once the database schema is selected, verify the selection using the below command.
mysql> select database() from dual;
The query will output the name of selected database in a similar format as shown above. The next step is a create first table in the schema. We would be considering a use-case of a blogging website to create the tables. Hence, create two tables, users and articles using the queries below.
mysql> CREATE TABLE `tutorial`.`users` (`userid` INT NOT NULL,`name` VARCHAR(45) NULL,`email` VARCHAR(100) NULL,`password` VARCHAR(24) NULL, PRIMARY KEY (`userid`));
Table Created
mysql> CREATE TABLE `tutorial`.`articles`(`articleid` INT NOT NULL,`content` TEXT NULL,`userid` INT NULL,PRIMARY KEY (`articleid`), INDEX `user_fk_idx` (`userid` ASC),CONSTRAINT `user_fk` FOREIGN KEY (`userid`) REFERENCES `tutorial`.`users` (`userid`) ON DELETE NO ACTION ON UPDATE NO ACTION);
Table Created
Execute the queries, one after the other. The output Table Created should be available after the execution of each of the queries. The created table list could be checked using the below command.
mysql> show tables;
+--------------------+
| Tables_in_tutorial |
+--------------------+
| articles           |
| users              |
+--------------------+
2 rows in set (0.00 sec)

mysql>
Thus, it displays the list of tables with the name of schema in the heading.
4.3 Adding & Fetching data to the tables using MySQL command line
Adding the data to the tables is quite simple. We would add data to just the users table to keep it simple. Execute the below queries to add the data to the users table.
mysql> insert into users values (1,'Abhishek', 'abcd@javacodegeeks.com','mysql123');
Query OK, 1 row affected (0.08 sec)

mysql> insert into users values (2,'Dennis', 'denis@javacodegeeks.com','mysql123');
Query OK, 1 row affected (0.04 sec)

mysql>
The queries above are shown with the relevant output as well. Once the records are inserted successfully, you could check the data in the table in the table using a select query for the same. Execute the below query to fetch the list of records from the users table.
mysql> select * from users;
+--------+----------+-------------------------+----------+
| userid | name     | email                   | password |
+--------+----------+-------------------------+----------+
|      1 | Abhishek | abcd@javacodegeeks.com  | mysql123 |
|      2 | Dennis   | denis@javacodegeeks.com | mysql123 |
+--------+----------+-------------------------+----------+
2 rows in set (0.00 sec)
As it could be seen here, the command line displays list of records in a console formatted output. The column names become the headers of the table and the rest of the rows are the records. Similarly, it is possible to execute almost every SQL query using the command prompt.
4.4 Update & Delete records
Once we have the records in the table, there might be need to update or delete the records as and when needed. This can be achieved by using the Update and Delete SQL queries as explained further. Consider the user Dennis in the above displayed records. As it can be seen, the email ID has a spell error for Dennis. Let us correct that using an update query.
mmysql> update users set email='dennis@javacodegeeks.com' where userid=2;
Query OK, 1 rows affected (0.39 sec)
Rows matched: 1  Changed: 1  Warnings: 0
Similarly to delete a record, use the delete query with the corresponding userid in the where clause.
mysql> delete from users where userid=2;
Query OK, 1 rows affected (0.50 sec)
4.5 Check the database table structure
There are chances that you might need to know the structure of a certain database table at certain moment during the development. Database structure is basically list of columns and data types of the columns. The structure of any table could be obtained using the command below.
mysql> desc articles;
On execution of the command, an output similar to the one shown below will be obtained. As it can be seen, it provides details about datatype, primary key, default value as well as not null constraint if applied.
mysql> desc articles;
+-----------+---------+------+-----+---------+-------+
| Field     | Type    | Null | Key | Default | Extra |
+-----------+---------+------+-----+---------+-------+
| articleid | int(11) | NO   | PRI | NULL    |       |
| content   | text    | YES  |     | NULL    |       |
| userid    | int(11) | YES  | MUL | NULL    |       |
+-----------+---------+------+-----+---------+-------+
3 rows in set (0.00 sec)
4.6 Pre-Defined MySQL functions
At times, there are certain tasks that we prefer to get it done within the database. For instance, we wish to calculate the number of users or check the current date and time. MySQL database comes pre-packaged with these features. To check the count of users in the above table, just execute the below query.
mysql> select count(1) from users;
It will return the count of user records in the table. Similarly one can check the current date and time using the below query.
mysql> select now();
+---------------------+
| now()               |
+---------------------+
| 2018-05-18 11:59:03 |
+---------------------+
1 row in set (0.00 sec)
Thus, it shows the current date and time in the above format. The now() function could be used for setting the value of creation time or update time of the record automatically. In addition to these functions, there are numerous other functions like min(), max(), avg(), sum() and few others.
5. MySQL administration
MySQL database administration involves several tasks. However, herein we will discuss three simple tasks namely – Create user, assigning grant to the user and dropping the user. In order to create a user, select the mysql database in the beginning. Once the database is selected, execute the below queries to received the output as shown below.
mysql> create user 'newuser'@'localhost' identified by 'newpassword';
Query OK, 0 rows affected (0.06 sec)
The rights to the user could be assigned selectively as per the requirements. In order to assign all the rights to the newly created user, execute the below query and verify the output.
mysql> grant all on tutorial.* to 'newuser'@'localhost';
Query OK, 0 rows affected (0.04 sec)
Once the grant is provided, you can exit the prompt and try to connect using the new user. In order to exit and reconnect using the new user, execute the below queries.
mysql> exit
Bye
MacBook-Air:bin abhishekkothari$ ./mysql -u newuser -p
Enter password:
Welcome to the MySQL monitor.  Commands end with ; or \g.
Your MySQL connection id is 14
Server version: 8.0.11 MySQL Community Server - GPL

Copyright (c) 2000, 2018, Oracle and/or its affiliates. All rights reserved.

Oracle is a registered trademark of Oracle Corporation and/or its
affiliates. Other names may be trademarks of their respective
owners.

Type 'help;' or '\h' for help. Type '\c' to clear the current input statement.

mysql>
Once logged in successfully, try to check the list of schemas. If you had other schemas in the database previously like I did, you would notice that the list of schemas does not show all of them. The output would be similar to the one shown below. The first schema information_schema is a general MySQL schema for every user. The second schema being displayed is the schema for which the user has been provided the necessary grants to view it.
mysql> show schemas;
+--------------------+
| Database           |
+--------------------+
| information_schema |
| tutorial           |
+--------------------+
2 rows in set (0.00 sec)
In order to drop the user, exit the command prompt and re-login using the root user. To drop the user that was recently created, execute the below query.
mysql> drop user 'newuser'@'localhost'
    -> ;
Query OK, 0 rows affected (0.07 sec)
In order to confirm the deletion of the user, you could exit and try to login again using the same user. You would be denied the permission. Thus, we can create & delete users as well as manage the permissions provided to the users.
6. Conclusion
The article captured in detail the installation process of MySQL server for every popular operating system. In addition to discussing the installation process, it also discussed about the basics of using the MySQL database with the command line in every operating system. Thus, the article provides an in-depth knowledge for any developer to get started with using MySQL database server. However, this is not the end of it. For those who find the command line tools clumsy and prefer GUI over command line, checkout this article for an insight on the most popular MySQL database GUI tool – MySQL workbench.

sucks, search engine terms inaccurate. yet the text does use some similar terms as database connection through jdbc. Wasted time. If you wanna share your knowledge then first learn SEO instead of just doing whatever you feel like and wast peoples time