1. Introduction
As an Enterprise Java Developer, one of the main focus in the job is developing web applications. With a web application, many challenges also come into the picture as consequences. To be specific, some of these are state management, workflow and validations. The HTTP protocol’s stateless nature only make things more complex. The Spring’s web framework is designed to help us in these challenges. Based on the Model-View-Controller (MVC) pattern, Spring MVC helps us to build applications which are very loosely coupled and flexible, even after we take care of all the challenges presented by HTTP protocol and other.
In this lesson, we will start by understanding the purpose of each of the Spring MVC Component and the role they play in handling request and response objects throughout their life in a Spring application. After this, we will start configuring a simple Spring MVC application, adding a component at each step, writing a very simple Thymeleaf template and finally including a JUnit test case for the Controller we write. Let’s get started!
2. Life of a Request
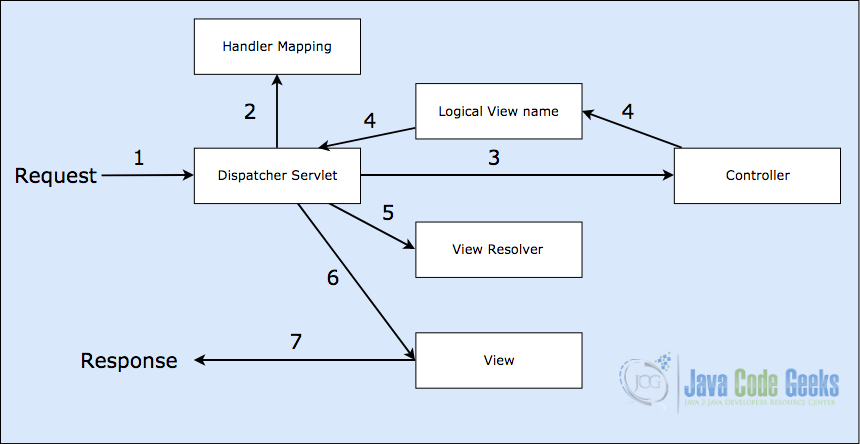
As soon as a user on the web clicks on a link on an HTML page, work of a request object starts. When a request object leaves the browser and enters into a Spring MVC application which finally transforms into a response object, it makes several stops to provide some information to the MVC Components and get loaded with some new information. The above image shows all the stops the request object makes before it is transformed into a response object.
Let us understand what all steps do a request object takes in a Spring MVC application:
- The request first arrives at the
DispatcherServletwhich acts as a Front Controller and delegates responsibility to other components of the framework to do the processing. To identify the Controller where a request should be sent,DispatcherServletconsults the Handler Mappings which extract the URL from the request object and finds the appropriate Controller for this request. - Once a request reaches a Controller, it drops all information it has and patiently waits for Controller to perform his processing. Usually, Controller provides a model and a view name which provides the HTML content for the response.
- To keep things decoupled between a Controller and views, Controller only returns the logical view name as a String to the
DispatcherServlet.DispatcherServletthen consults a View Resolver to map this String logical view name to a specific view implementation which can be a JSP page or an HTML page. - After
DispatcherServletknows which View to render, it finally sends the model data to the actual view so that a response object can be constructed. Now, the life of the request object is over. - This View is now converted to a response object and sent back to the user where it can be shown in a browser.
Sounds like all the work was done by request object and the user only sees the response object. That’s true!
3. Project Setup
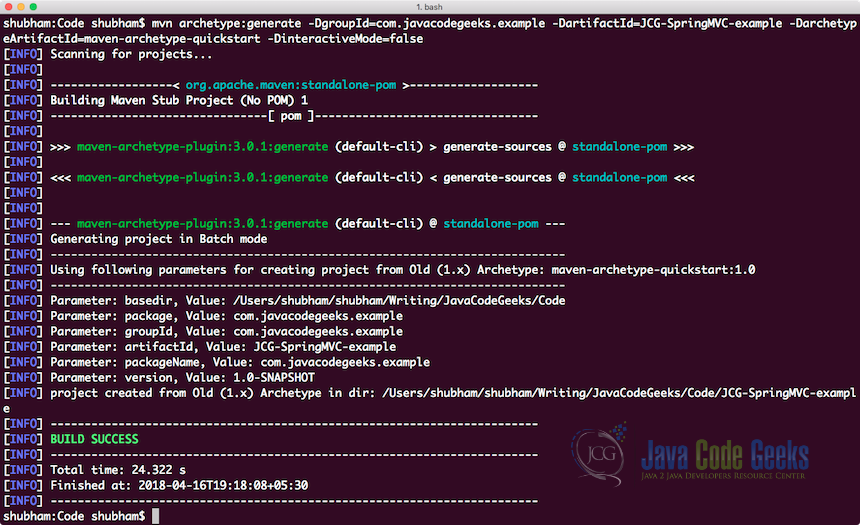
We will be using one of the many Maven archetypes to create a sample project for our example. To create the project execute the following command in a directory that you will use as workspace:
Create project
mvn archetype:generate -DgroupId=com.javacodegeeks.example -DartifactId=JCG-SpringMVC-example -DarchetypeArtifactId=maven-archetype-quickstart -DinteractiveMode=false
If you are running maven for the first time, it will take a few seconds to accomplish the generate command because maven has to download all the required plugins and artifacts in order to make the generation task.
Once you have created the project, feel free to open it in your favourite IDE. Next step is to add appropriate Maven Dependencies to the project.
Here is the pom.xml file with the appropriate dependencies:
pom.xml
<project xmlns="http://maven.apache.org/POM/4.0.0" xmlns:xsi="http://www.w3.org/2001/XMLSchema-instance"
  xsi:schemaLocation="http://maven.apache.org/POM/4.0.0 http://maven.apache.org/maven-v4_0_0.xsd">
  <modelVersion>4.0.0</modelVersion>

  <groupId>com.javacodegeeks.example</groupId>
  <artifactId>JCG-SpringMVC-example</artifactId>
  <version>1.0-SNAPSHOT</version>
  <name>JCG-SpringMVC-example</name>
  <packaging>war</packaging>
  <description>Spring MVC Hello World Example</description>

  <dependencies>

    <!--Spring MVC Dependencies-->
    <dependency>
      <groupId>org.springframework</groupId>
      <artifactId>spring-webmvc</artifactId>
      <version>4.3.9.RELEASE</version>
    </dependency>
    <dependency>
      <groupId>org.springframework</groupId>
      <artifactId>spring-web</artifactId>
      <version>4.3.9.RELEASE</version>
    </dependency>

    <!-- Servlet -->
    <dependency>
      <groupId>javax.servlet</groupId>
      <artifactId>servlet-api</artifactId>
      <version>2.5</version>
      <scope>provided</scope>
    </dependency>
    <dependency>
      <groupId>javax.servlet.jsp</groupId>
      <artifactId>jsp-api</artifactId>
      <version>2.1</version>
      <scope>provided</scope>
    </dependency>
    <dependency>
      <groupId>javax.servlet</groupId>
      <artifactId>jstl</artifactId>
      <version>1.2</version>
    </dependency>

  </dependencies>

  <build>
    <plugins>
      <plugin>
        <artifactId>maven-compiler-plugin</artifactId>
        <version>3.6.1</version>
        <configuration>
          <source>1.8</source>
          <target>1.8</target>
        </configuration>
      </plugin>
      <plugin>
        <artifactId>maven-war-plugin</artifactId>
        <version>3.0.0</version>
        <configuration>
          <warSourceDirectory>WebContent</warSourceDirectory>
        </configuration>
      </plugin>
    </plugins>
    <!-- added to remove Version from WAR file -->
    <finalName>${project.artifactId}</finalName>
  </build>
</project>
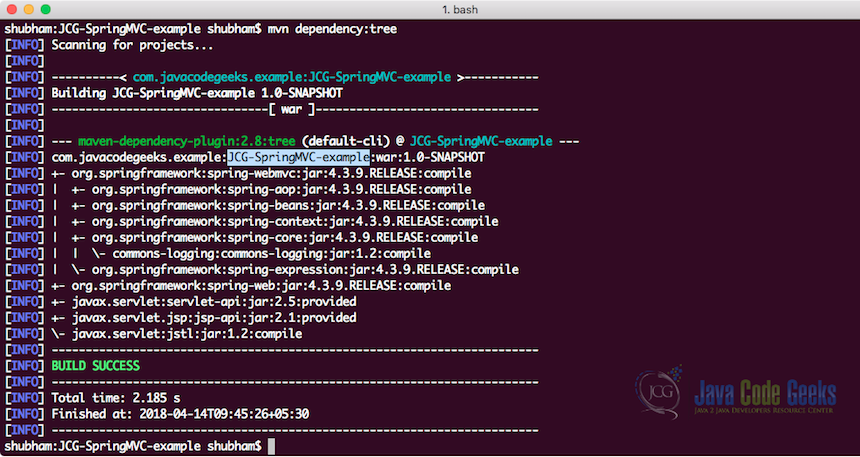
Finally, to understand all the JARs which are added to the project when we added this dependency, we can run a simple Maven command which allows us to see a complete Dependency Tree for a project when we add some dependencies to it. Here is a command which we can use:
Dependency Tree
mvn dependency:tree
When we run this command, it will show us the following Dependency Tree:
4. Configuring DispatcherServlet
As we expressed in the last section, everything starts at DispatcherServlet. So, this will be the first component we will be adding to our project. Note that instead of a web.xml file, we will configuring DispatcherServlet in a Java class:
AppInitializer.java
package com.javacodegeeks.example.config;

import org.springframework.web.servlet.support.
        AbstractAnnotationConfigDispatcherServletInitializer;

public class AppInitializer extends
        AbstractAnnotationConfigDispatcherServletInitializer {

    @Override
    protected Class<?>[] getRootConfigClasses() {
        return new Class[] { RootConfig.class };
    }

    @Override
    protected Class<?>[] getServletConfigClasses() {
        return new Class[] { WebConfig.class };
    }

    @Override
    protected String[] getServletMappings() {
        return new String[] { "/" };
    }
}
The first thing to notice here is that any class which extends AbstractAnnotationConfigDispatcherServletInitializer will be used to configure the DispatcherServlet and the application context.
The method getServletMappings() identifies the path where the DispatcherServlet will be mapped to. Here, as we provided a /, it will be the application’s default servlet. When the DispatcherServlet starts up, it creates Spring application context and starts loading it with beans declared in the WebConfig class which is defined by the getServletConfigClasses() method. Finally, the classes returned by getRootConfigClasses() method is used to load the context created by ContextLoaderlistener.
Let’s define the WebConfig and RootConfig classes now and see what their functions are.
5. Enabling Web MVC
One of the classic ways to enable Spring MVC Components is to use XML files with elements. But in this lesson, we will show the latest way to provide all configuration using Java classes only. Let us enable Spring MVC Components by defining our WebConfig class:
WebConfig.java
package com.javacodegeeks.example.config;

import org.springframework.context.annotation.Bean;
import org.springframework.context.annotation.ComponentScan;
import org.springframework.context.annotation.Configuration;
import org.springframework.web.servlet.ViewResolver;
import org.springframework.web.servlet.config.annotation.DefaultServletHandlerConfigurer;
import org.springframework.web.servlet.config.annotation.EnableWebMvc;
import org.springframework.web.servlet.config.annotation.WebMvcConfigurerAdapter;
import org.springframework.web.servlet.view.InternalResourceViewResolver;

@Configuration
@EnableWebMvc
@ComponentScan("com.javacodegeeks.example")
public class WebConfig extends WebMvcConfigurerAdapter {

    @Bean
    public ViewResolver viewResolver() {
        InternalResourceViewResolver viewResolver =
                new InternalResourceViewResolver();
        viewResolver.setPrefix("/WEB-INF/views/");
        viewResolver.setSuffix(".jsp");
        viewResolver.setExposeContextBeansAsAttributes(true);
        return viewResolver;
    }

    @Override
    public void configureDefaultServletHandling(DefaultServletHandlerConfigurer configurer) {
        configurer.enable();
    }
}
A lot of things happened in this configuration class. Let’s understand each of those things:
- The first thing we did is annotating the class with
@ComponentScan. This tells Spring which package to scan to find the Spring Beans and components we define. It will parse all child packages as well in the mentioned package. - We also define a
ViewResolverbean on the class and we configure it to look for JSP pages in a specified location relatively to the classpath for the application. - Finally, this class extends
WebMvcConfigurerAdapterand overrides theconfigureDefaultServletHandlingmethod and callsenable()on the configurer object which tells theDispatcherServletto forward the request for static resources toViewResolverand don’t handle them yourself.
6. Defining Root Config
For the application context beans in a ContextLoaderlistener, we won’t be defining any beans. In a RootConfig class, we can even define the beans for non-web components. Let’s take a look at the sample code:
RootConfig.java
package com.javacodegeeks.example.config;

import org.springframework.context.annotation.ComponentScan;
import org.springframework.context.annotation.Configuration;
import org.springframework.context.annotation.FilterType;
import org.springframework.web.servlet.config.annotation.EnableWebMvc;

@Configuration
@ComponentScan(basePackages = {"com.javacodegeeks.example"},
        excludeFilters = {
                @ComponentScan.Filter(type = FilterType.ANNOTATION, value = EnableWebMvc.class)
        })
public class RootConfig {
}
The only thing we did is annotating the class with @ComponentScan. This tells Spring which package to scan to find the non-web components which might exist in the project.

7. Writing a Simple Controller
Things start to get interesting when we define a component which allows an end-user to interact with the applications we create. A controller is a component which provides mapping in the form of URLs which a user can interact with to get some response. In this example, we will create a single GET Request mapping which just returns the logical view name of a view which is then resolved to a JSP by the configured View Resolver we create. Let’s look at the sample controller we created:
HomeController.java
package com.javacodegeeks.example.controller;

import org.springframework.stereotype.Controller;
import org.springframework.web.bind.annotation.RequestMapping;
import org.springframework.web.bind.annotation.RequestMethod;

@Controller
public class HomeController {

    @RequestMapping(value = "/", method = RequestMethod.GET)
    public String home() {
        return "home";
    }
}
We defined a single GET Mapping here which just returns the logical view name i.e. home. This will be resolved to the path /WebContent/WEB-INF/views/home.jsp.
8. Designing a View
For a JSP view, we will design a very simple JSP page which will just present sample design. We created this file from the application root and on the path /WebContent/WEB-INF/views/home.jsp. Here is the file:
home.jsp
<%@ taglib uri="http://java.sun.com/jsp/jstl/core" prefix="c" %>
<%@ page session="false" %>
<html>
    <head>
        <title>JavaCodeGeeks: Spring MVC</title>
    </head>
    <body>
        <h1>Welcome Spring MVC</h1>
        <p>Hello JavaCodeGeeks!</p>
    </body>
</html>
To see what we have made, we will be running our application next. Note that this is just a basic JSP page and nothing else to present how the ViewResolver resolves a logical view name into a concrete view which DispatcherServlet returns as a response.
9. Running the Application
It’s time we run our application. We use IntelliJ IDE to run the project. To run the project, first configure the Tomcat to accept an exploded WAR artifact:
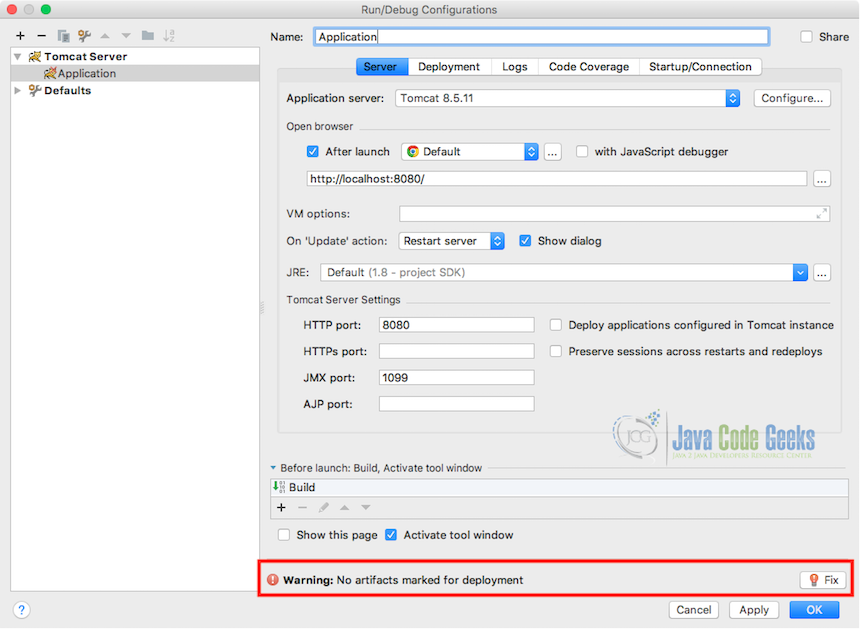
Finally, when we run our application, we can see the output from the JSP view we created:
10. Spring MVC with Spring Boot
Spring Boot is an excellent platform which is built atop the Spring MVC Framework and makes things a lot faster and easy. This ease is created by using many default settings and configurations related to the dependencies we add to our project. Another advantage Spring Boot offers is that it allows us to define a parent dependency through which version compatibility is maintained across the project. Let’s take a look at this in detail.
10.1 Spring Boot Starters
Spring Boot provides very convenient starter dependencies which allows us to select a functionality and add a dependency related to it to our project. Once that is done, Spring Boot itself manages and bring all related dependencies into our project with a correct version number with a guarantee that these dependencies will be compatible with each other. The parent dependency is defined as:
Starter Dependency
<parent>
    <groupId>org.springframework.boot</groupId>
    <artifactId>spring-boot-starter-parent</artifactId>
    <version>1.5.6.RELEASE</version>
</parent>
When you provide a version here and use the same groupId in dependencies section in pom.xml file, version will be automatically imported.
10.2 Staring Spring Boot applications
Each Spring Boot application is provided an entry point in the form of same old main() method. We can run this method just like a normal main method which takes care of initialising the Spring Beans and starting the app. The most common form of the Spring Boot main class can be shown here:
Spring Boot Main class
@SpringBootApplication
public class JCGApplication {
    public static void main(String[] args) {
        SpringApplication.run(JCGApplication.class, args);
    }
}
With a single annotation of @SpringBootApplication, we have enabled the following annotations:
@Configuration: This annotation marks this class a Configuration class and is initialised first by Spring Container@EnableAutoConfiguration: This annotation implied that every class marked with annotations like@Componentand related will be loaded as a Spring Bean@ComponentScan: Finally, this annotation will enable the component scan automatically. By default, when we do not provide any package value, this annotation will pick the package this class resides and start looking for Spring components from there.
Look at how easy other things are made with Spring Boot here.
11. Conclusion
In this lesson, we understood what happens when a request object leaves a web browser and how it gets transformed to a response object. This post also explains what an important role does a DispatcherServlet play while processing a request from a client. We also made a simple Spring MVC application to see how view names are resolved into concrete view implementations as well.
It is important to understand that even though Spring Boot has evolved Spring into a much simpler workspace, it still relies on Spring MVC to provide default settings and beans.
12. Download the Source Code
This was an example of simple Spring MVC application.
You can download the full source code of this example here: JCG-SpringMVC-example

This blows. Is it about Maven, or is it about Spring?
How to deploy the project. I am using Eclipse Oxygen.2 (4.7.2) and Tomcat-8.0.36. The project is deployed, but at localhost:8080 my project is missing “The requested resource is not available”
WebMvcConfigurerAdapter has been deprecated in spring 5.