Docker Compose Environment Variable Binding Examples – Java, Node.Js, PHP, Python, And Ruby On Rails
- DCHQ is fully compatible with Docker Compose (https://docs.docker.com/compose/compose-file/).
The platform however provides core (optional) enhancements to Docker Compose supporting advanced plug-ins with lifecycle stages to handle service discovery use cases. It also supports cross-image environment variable bindings, automatic container IP retrieval and injection, and additional parameters like mem_min, publish_all, cluster_size, host, and registry_id. The service discovery framework takes care of re-configuring the load balancers and other application components when a cluster is scaled in/out or when the containers are stopped/started.
- Get detailed documentation on DCHQ’s Docker Compose supporting service discovery and configuration management: http://dchq.co/docker-compose.html
- Get detailed documentation on DCHQ’s Service Discovery on this page: http://dchq.co/docker-service-discovery.html
Instead of listing all the supported parameters, this page walks through Docker Compose examples — starting with basic use cases to more advanced ones.
- Creating Docker Compose templates
- Using GitHub Gist for version control & application template backup
- Registering Docker private & public repositories
- Automating the building of Docker images & pushing them to the registered Docker registries
- Creating a basic Node.js Hello World application template
- Using environment variable bindings to create a WordPress with MySQL application template
- Using plug-ins and the host parameter to deploy a highly-available Docker Java application
- Using plug-in lifecycle stages for Docker service discovery
- Using registry_id parameter to pull images from a private registry
- Where can I find code and application template examples?
Creating Docker Compose templates
Docker Compose is a YAML template for defining multi-tier or multi-image distributed applications that can run on any Docker-enabled Linux host running anywhere.
Once logged in to DCHQ (either the hosted DCHQ.io or on-premise version), a user can navigate to Manage>App/Machine and then click on the + button to create a new Docker Compose template.
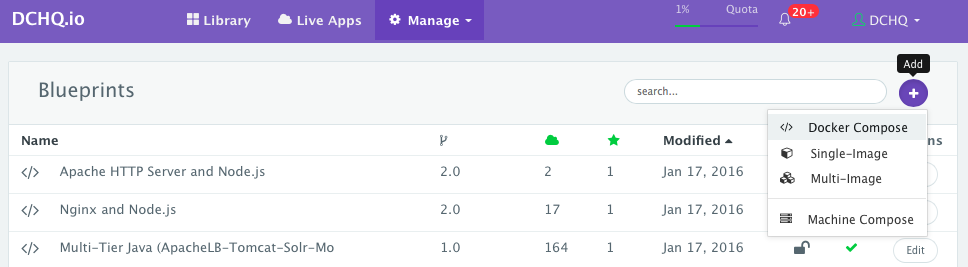
The required fields are:
- Name — this is the name of the application template.
- Version — this is a user-defined version number. To leverage the proper version control in DCHQ, a user needs to register his/her GitHub or GitHub Enterprise account and select the application template back up options using GitHub Gist. Here are thedetailed steps.
- Visibility — the application template owner can decide whether this template is Editable from the self-service Library, is Read-Only, or completely Hidden.
- For “Hidden” templates, users will be able to request the application but will not be able to view the YAML template or make any changes.
- For “Read-Only” templates, users will be able to request the application but will not be able change any of the parameters — i.e. change the image tag name, increase the cluster size, expose different ports, etc.
- Entitled Users — these are the users who will be able to view this application in the self-service Library and will be able to deploy it on one of the clusters available to them. The entitled users do not have permission to manage or delete this application template. By default, the application template is shared with all users. However, the application owner can select specific users or groups.
The optional fields are:
- Short Intro — this will appear when a user click on Customize from the Library page. This also shows up on an organization’s page. For example, here is the official Org page for DCHQ: https://www.dchq.io/landing/products.html#/library?org=DCHQ
- Description — this will appear when a user click on Customize from the Library page. This also shows up on an organization’s page. For example, here is the official Org page for DCHQ: https://www.dchq.io/landing/products.html#/library?org=DCHQ
- Features — these are the features that the application template supports. The author of the application template can select from a number of features like Backup, High-Availability, Horizontally-Scalable, Auto-Service-Discovery, etc.
- External Link — this allows the application template owner to add a link to the official documentation or blog.
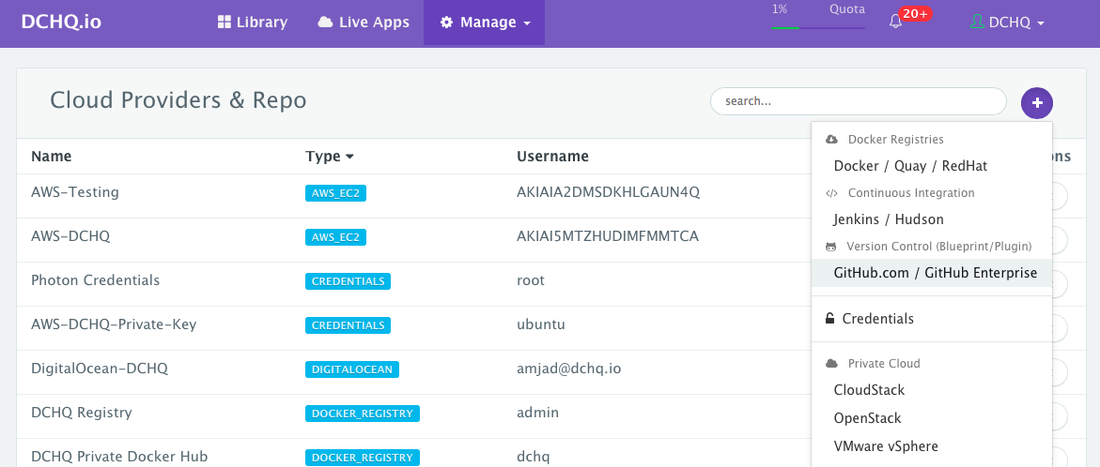
Using GitHub Gist for version control & application template backup
In order to properly manage the different versions of an application template, a user can register a GitHub or GitHub Enterprise account and back up all of the templates to GitHub Gist.
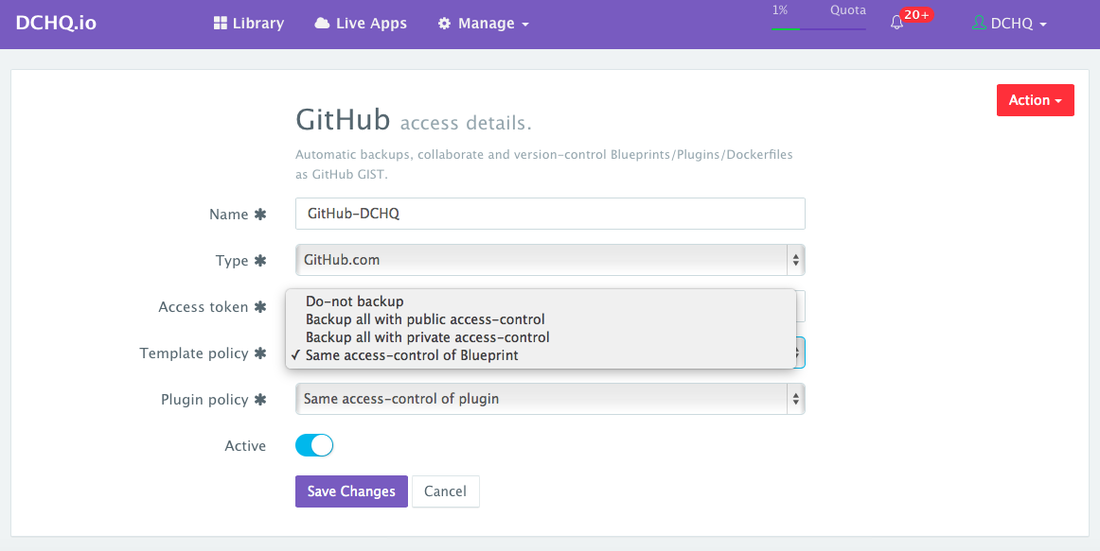
To do that, a user can navigate to Manage > Cloud Providers and then click on the + button to select GitHub.com / GitHub Enterprise.
The required fields are:
- Name — this is the name of the GitHub account.
- Type — this is the type of GitHub account. The available options are GitHub and GitHub Enterprise.
- Access Token — this is the access token for your GitHub account. The access token can be generated by logging into your GitHub account then navigating to Settings > Personal access tokens.
- Template Policy — this is the backup policy for your Docker Compose and Machine Compose templates. A backup is triggered any time a change is made and the template is saved. This means that a user-defined version number (v1.0) may end up having multiple backups in Gist based on the changes made to the template. The available options are:
- Do not backup — this means that your templates will not be backed up.
- Backup all with public access control — this means that all your templates will be backed up and will be publicly accessible.
- Backup all with private access control — this means that all your templates will be backed up and willy only be accessible to the GitHub account owner
- Same access control as blueprint — this means that the template will be backed up and the Gist will be publicly accessible if the application template owner had shared it with all users. If the template owner marked it as private, then the Gist will be only accessible to the GiHub account owner.
- Plugin Policy — this is the backup policy for your BASH script Plugins. These are used for container configuration management & service discovery. A backup is triggered any time a change is made and the plugin is saved. This means that a user-defined version number (v1.0) may end up having multiple backups in Gist based on the changes made to the plugin. The available options are the same as the ones available to the Templates.
Registering Docker private & public repositories
A user can register private or public repositories for Docker Registry, Docker Hub, Quay or Red Hat Container Registry. A user can use the newly registered repository in the following ways:
- Push images to the repository using the Image Build feature.
- Pull images from the repository as part of the Docker Compose template. The registry_id parameter will be needed to reference the registered repository.
- Backup running containers by creating new images and pushing them into the registered repository. This can be done by click on the Actions menu for a running application and then selecting Backup.
To register a Docker repository, a user can navigate to Manage > Cloud Providers and then click on the + button to select Docker Registries.
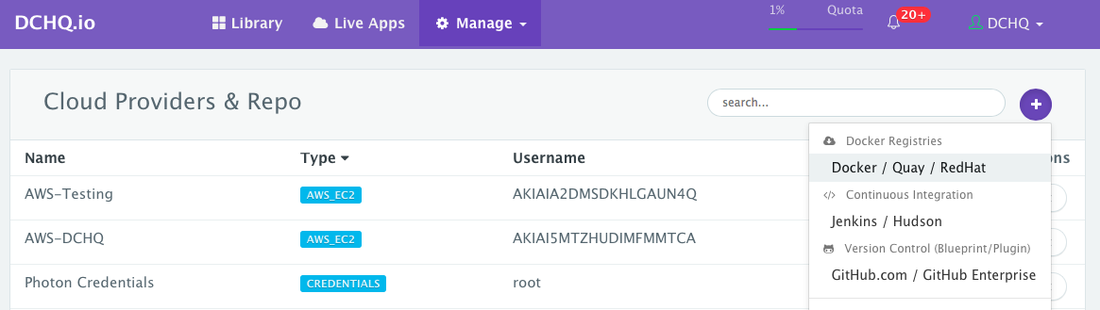
The required fields are:
- Name — this is the name of the Docker Registry
- URL — this is the URL of the Docker Registry (e.g. for Docker Hub it’s https://hub.docker.com/)
- Email — this is the email address used for the Docker registry
- Username — this is the username used for the Docker registry
- Password — this is the password for the Docker registry
- Entitled Users — these are the users who will be able to pull or push images to this registry. The entitled users do not have permission to manage or delete this registry. By default, the registry is marked as private. However, the registry owner can select specific users or groups.

IMPORTANT — once the registry is saved, an automatically generated ID is assigned. This ID will be used when creating Docker Compose templates that need to pull images from this registry. The registry_id parameter in Docker Compose can simply reference this registry (e.g. registry_id: 2c91802251d157d70151f68e02b94410).
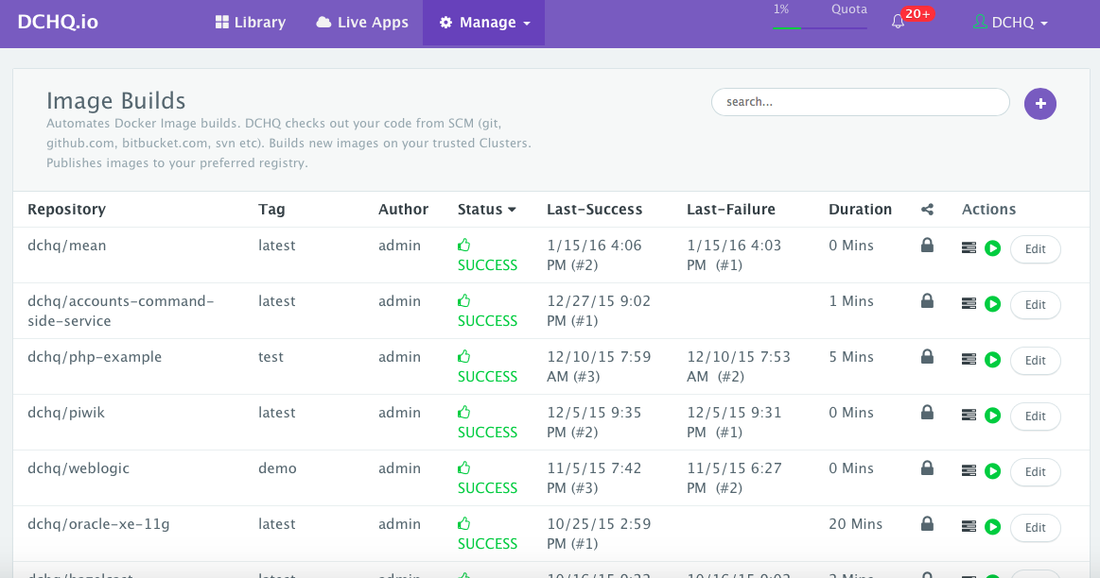
Automating the building of Docker images & pushing them to the registered Docker registries
If you have a Dockerfile in your code repository for building your latest images, then you can use DCHQ to automate the building of the Docker image as well as pushing the new images to one of the registered Docker registries.
Of course, if you’re using Docker Hub, then you have the option to use the Automated Builds feature. However, if you’re using a private registry, then DCHQ can provide the needed image build automation.
Once logged in to DCHQ (either the hosted DCHQ.io or on-premise version), a user can navigate to Automate > Image Build and then click on the + button to create a new Dockerfile (Git/GitHub/BitBucket) image build.
Provide the required values as follows:
- Git URL – (e.g. https://github.com/dchqinc/dchq-docker-php-example.git)
- Git Branch – this field is optional — but a user can specify a branch from a GitHub project. The default branch is master.
- Git Credentials – a user can store the credentials to a private GitHub repository securely in DCHQ. This can be done by navigating to Manage > Cloud Providers and clicking on the + to select Credentials
- Cluster – the building of Docker images is orchestrated through the DCHQ agent. As a result, a user needs to select a cluster on which an agent will be used to execute the building of Docker images. If a cluster has not been created yet, please refer to thissection to either register already running hosts or automate the provisioning of new virtual infrastructure.
- Push to Registry – a user can push the newly created image on either a public or private repository on Docker Hub or Quay. To register a Docker Hub or Quay account, a user should navigate to Manage > Cloud Providers and clicking on the + to selectDocker Registries
- Repository – this is the name of the repository on which the image will be pushed. For example, our image was pushed todchq/php-example:latest
- Tag – this is the tag name that you would like to give for the new image. The supported tag names in DCHQ include:
- {{date}} — formatted date
- {{timestamp}} — the full time-stamp
- Cron Expression – a user can schedule the building of Docker images using out-of-box cron expressions. This facilitates daily and nightly builds for users.
- Who can Manage – a user can mark this build as private or share it with other users or groups.
Once the required fields are completed, a user can click Save.
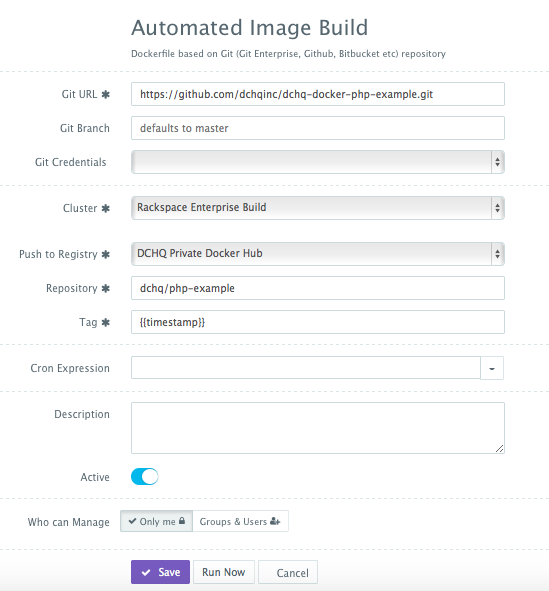
A user can then click on the Play Button to build the Docker image on-demand.
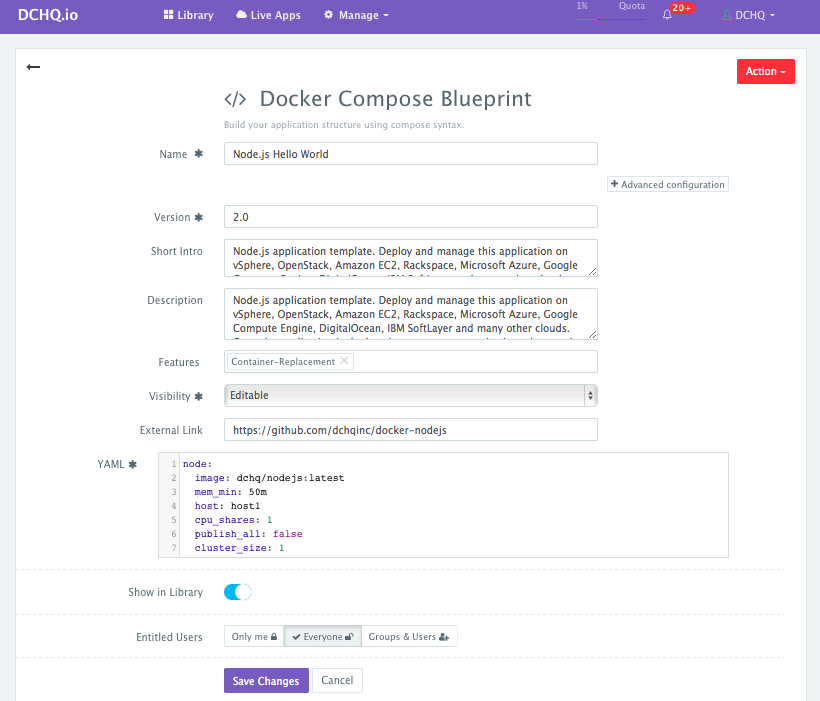
Creating a basic Node.js Hello World application template
Once logged in to DCHQ (either the hosted DCHQ.io or on-premise version), a user can navigate to Manage > App/Machine and then click on the + button to create a new Docker Compose template. Here’s a Docker Compose template for a basic Docker Node.js “Hello World” application.
node:
  image: dchq/nodejs:latest
  mem_min: 50m
  cpu_shares: 1
  publish_all: true
image: dchq/nodejs:latest
- This is the Docker image that will be pulled from a registry to launch a container. By default, all images are pulled from Docker Hub.
- In order to pull from a private repository, the registry_id parameter needs to be added. This should reference the ID of the Docker registry you would have registered.
- To pull from an official repository (like mysql), you can use simply enter image: mysql:latest
- The tag name refers to the tagged images available in a repository. For example, here are the tags available for this Node.js image.
- This Node.js image was built using this GitHub project (https://github.com/dchqinc/docker-nodejs). You can automate the building Docker images using DCHQ.
mem_min: 50m
- mem_min refers to the minimum amount of memory you would like to allocate to a container. In this case, the container will be allocated at least 50MB of memory and will continue using resources from the host based on the load.
cpu_shares: 1
- cpu_shares refer to the amount of CPU allocated to the container
publish_all: true
- If the value is true, this parameter will randomly bind all the exposed ports in the Dockerfile to a random port between 32000-59000 on the host. In this case, port 8080 is exposed in the Dockerfile — so a random port on the host will be bound to port 8080 in the container.
Using environment variable bindings to create a WordPress with MySQL application template
Once logged in to DCHQ (either the hosted DCHQ.io or on-premise version), a user can navigate to Manage > App/Machine and then click on the + button to create a new Docker Compose template.
Here’s a Docker Compose template for Docker WordPress with MySQL.
WordPress:
  image: wordpress:latest
  mem_min: 1g
  publish_all: true
  environment:
  - WORDPRESS_DB_PASSWORD={{MySQL|MYSQL_ROOT_PASSWORD}}
  - WORDPRESS_DB_HOST={{MySQL|container_private_ip}}:3306
  - WORDPRESS_DB_USER={{MySQL|MYSQL_USER}}
  - WORDPRESS_DB_NAME={{MySQL|MYSQL_DATABASE}}
MySQL:
  image: mysql:latest
  mem_min: 400m
  publish_all: false
  environment:
  - MYSQL_USER=root
  - MYSQL_DATABASE=wordpress
  - MYSQL_ROOT_PASSWORD={{alphanumeric | 12}}
A user can create cross-image environment variable bindings by making a reference to another image’s environment variable. In this case, we have made several bindings – including WORDPRESS_DB_HOST={{MySQL|container_private_ip}}:3306 – in which the database container internal IP address is resolved dynamically at request time and is used to ensure that WordPress can establish a connection with the database.
Here is a list of supported environment variable values:
- {{alphanumeric | 8}} – creates a random 8-character alphanumeric string. This is most useful for creating random passwords.
- {{Image Name | ip}} – allows you to enter the host IP address of a container as a value for an environment variable. This is most useful for allowing the middleware tier to establish a connection with the database.
- {{Image Name | container_hostname}} or {{Image Name | container_ip}} – allows you to enter the name of a container as a value for an environment variable. This is most useful for allowing the middleware tier to establish a secure connection with the database (without exposing the database port).
- {{Image Name | container_private_ip}} – allows you to enter the internal IP of a container as a value for an environment variable. This is most useful for allowing the middleware tier to establish a secure connection with the database (without exposing the database port).
- {{Image Name | port_Port Number}} – allows you to enter the Port number of a container as a value for an environment variable. This is most useful for allowing the middleware tier to establish a connection with the database. In this case, the port number specified needs to be the internal port number – i.e. not the external port that is allocated to the container. For example, {{PostgreSQL | port_5432}} will be translated to the actual external port that will allow the middleware tier to establish a connection with the database.
- {{Image Name | Environment Variable Name}} – allows you to enter the value an image’s environment variable into another image’s environment variable. The use cases here are endless – as most multi-tier applications will have cross-image dependencies.
Using plug-ins and the host parameter to deploy a highly-available Docker Java application
Once logged in to DCHQ (either the hosted DCHQ.io or on-premise version), a user can navigate to Manage > App/Machine and then click on the + button to create a new Docker Compose template.
Here’s a Docker Compose template for a Docker Java application with Docker Tomcat and MySQL:
AppServer:
  image: tomcat:8.0.21-jre8
  mem_min: 600m
  publish_all: true
  host: host1
  cluster_size: 1
  environment:
    - database_driverClassName=com.mysql.jdbc.Driver
    - database_url=jdbc:mysql://{{MySQL|container_ip}}:3306/{{MySQL|MYSQL_DATABASE}}
    - database_username={{MySQL|MYSQL_USER}}
    - database_password={{MySQL|MYSQL_ROOT_PASSWORD}}
  plugins:
    - !plugin
      id: oncXN
      restart: true
      arguments:
        - file_url=https://github.com/dchqinc/dchq-docker-java-example/raw/master/dbconnect.war
        - dir=/usr/local/tomcat/webapps/ROOT.war
        - delete_dir=/usr/local/tomcat/webapps/ROOT
MySQL:
  image: mysql:latest
  host: host2
  mem_min: 400m
  environment:
    - MYSQL_USER=root
    - MYSQL_DATABASE=names
    - MYSQL_ROOT_PASSWORD={{alphanumeric|8}}
You will notice that the cluster_size parameter allows you to specify the number of containers to launch (with the same application dependencies). In this case, a cluster of Tomcat application servers can be deployed by specifying the cluster_size.
The host parameter allows you to specify the host you would like to use for container deployments. This is possible if you have selected Weave as the networking layer when creating your clusters. That way you can ensure high-availability for your application server clusters across different hosts (or regions) and you can comply with affinity rules to ensure that the database runs on a separate host for example. Here are the values supported for the host parameter:
- host1, host2, host3, etc. – selects a host randomly within a data-center (or cluster) for container deployments
- IP Address 1, IP Address 2, etc. — allows a user to specify the actual IP addresses to use for container deployments
- Hostname 1, Hostname 2, etc. — allows a user to specify the actual hostnames to use for container deployments
- Wildcards (e.g. “db-”, or “app-srv-”) – to specify the wildcards to use within a hostname
In this application template, you will notice that the Tomcat container is invoking a script plug-in at request time in order to configure the container. These plug-ins can be created by navigating to Manage > Plug-ins. Once the script is provided, the DCHQ agent will execute this script inside the container. A user can specify arguments that can be overridden at request time and post-provision. Anything preceded by the $ sign is considered an argument — for example, $file_url can be an argument that allows developers to specify the download URL for a WAR file. This can be overridden at request time and post-provision when a user wants to refresh the Java WAR file on a running container.
Here are the parameters supported when invoking a plugin:
- id — this is the ID of the plug-in. This can be retrieved from Manage > Plugins and then clicking Edit on your plugin of choice.
- restart — this is a Boolean parameter. If set to true, then the container is restarted after executing the plugin.
- arguments — you can override the arguments specified in the plugin here. The arguments can be overridden when creating the template, when deploying the application and post-provision.
- lifecycle — this is used for service discovery and is covered in detail in the next section
Using plug-in lifecycle stages for Docker service discovery
Docker service discovery is covered in detail on this page:
Once logged in to DCHQ (either the hosted DCHQ.io or on-premise version), a user can navigate to Manage > App/Machine and then click on the + button to create a new Docker Compose template.
Here’s a Docker Compose template for a Docker Java application with Docker Nginx, Tomcat and MariaDB
LB:
  image: nginx:latest
  publish_all: true
  mem_min: 50m
  host: host1
  plugins:
    - !plugin
      id: 0H1Nk
      restart: true
      lifecycle: on_create, post_scale_out:AppServer, post_scale_in:AppServer, post_start:AppServer, post_stop:AppServer
      arguments:
        # Use container_private_ip if you're using Docker networking
        - servers=server {{AppServer | container_private_ip}}:8080;
        # Use container_hostname if you're using Weave networking
        #- servers=server {{AppServer | container_hostname}}:8080;
AppServer:
  image: tomcat:8.0.21-jre8
  mem_min: 600m
  host: host1
  cluster_size: 1
  environment:
    - database_driverClassName=com.mysql.jdbc.Driver
    - database_url=jdbc:mysql://{{MariaDB|container_hostname}}:3306/{{MariaDB|MYSQL_DATABASE}}
    - database_username={{MariaDB|MYSQL_USER}}
    - database_password={{MariaDB|MYSQL_ROOT_PASSWORD}}
  plugins:
    - !plugin
      id: oncXN
      restart: true
      arguments:
        - file_url=https://github.com/dchqinc/dchq-docker-java-example/raw/master/dbconnect.war
        - dir=/usr/local/tomcat/webapps/ROOT.war
        - delete_dir=/usr/local/tomcat/webapps/ROOT
MariaDB:
  image: mariadb:latest
  host: host1
  mem_min: 400m
  environment:
    - MYSQL_USER=root
    - MYSQL_DATABASE=names
    - MYSQL_ROOT_PASSWORD={{alphanumeric|8}}
The service discovery framework in DCHQ provides event-driven life-cycle stages that executes custom scripts to re-configure application components. This is critical when scaling out clusters for which a load balancer may need to be re-configured or a replica set may need to be re-balanced.
You will notice that the Nginx plug-in is getting executed during these different stages or events:
- When the Nginx container is created — in this case, the container IP’s of the application servers are injected into the default configuration file to facilitate the load balancing to the right services
- When the application server cluster is scaled in or scale out — in this case, the updated container IP’s of the application servers are injected into the default configuration file to facilitate the load balancing to the right services
- When the application servers are stopped or started — in this case, the updated container IP’s of the application servers are injected into the default configuration file to facilitate the load balancing to the right services
So the service discovery framework here is doing both service registration (by keeping track of the container IP’s and environment variable values) and service discovery (by executing the right scripts during certain events or stages).
The lifecycle parameter in plug-ins allows you to specify the exact stage or event to execute the plug-in. If no lifecycle is specified, then by default, the plug-in will be execute on_create. Here are the supported lifecycle stages:
- on_create — executes the plug-in when creating the container
- on_start — executes the plug-in after a container starts
- on_stop — executes the plug-in before a container stops
- on_destroy — executes the plug-in before destroying a container
- post_create — executes the plug-in after the container is created and running
- post_start[:Node] — executes the plug-in after another container starts
- post_stop[:Node] — executes the plug-in after another container stops
- post_destroy[:Node] — executes the plug-in after another container is destroyed
- post_scale_out[:Node] — executes the plug-in after another cluster of containers is scaled out
- post_scale_in[:Node] — executes the plug-in after another cluster of containers is scaled in
Using registry_id parameter to pull images from a private registry
Once logged in to DCHQ (either the hosted DCHQ.io or on-premise version), a user can navigate to Manage > App/Machine and then click on the + button to create a new Docker Compose template.
Here’s a Docker Compose template for a Docker LAOP application stack with Docker Apache HTTP Server, Docker PHP-Apache and Docker Oracle XE pulled from a private registry:
HTTP-LB:
  image: httpd:latest
  publish_all: true
  host: host1
  mem_min: 50m
  plugins:
    - !plugin
      id: uazUi
      restart: true
      lifecycle: on_create, post_scale_out:PHP, post_scale_in:PHP
      arguments:
        # Use container_private_ip if you're using Docker networking
        - BalancerMembers=BalancerMember http://{{PHP | container_private_ip}}:80
        # Use container_hostname if you're using Weave networking
        #- BalancerMembers=BalancerMember http://{{PHP | container_hostname}}:80
PHP:
  image: dchq/php-example:latest
  mem_min: 600m
  host: host1
  publish_all: false
  environment:
  - DB_HOST={{Oracle|container_private_ip}}
  - DB_USER={{Oracle|username}}
  - DB_PASS={{Oracle|password}}
  - DB_NAME={{Oracle|sid}}
  - DB_PORT=1521
  - DB_PROVIDER=oraclexe
Oracle:
  image: dchq/oracle-xe:latest
  registry_id: 2c9180ff4f33df5f014f34iob7iu806c
  publish_all: false
  host: host1
  mem_min: 400m
  environment:
    - username=system
    - password=oracle
    - sid=xe
You will notice that the registry_id parameter is referencing the ID of the Docker registry created under Manage > Cloud Providers.
Where can I find code and application template examples?
All of DCHQ’s application templates are published on the official organization page:
We highly recommend that DCHQ On-Premise customers sign up on the DCHQ.io SaaS Platform (for FREE) before trying out DCHQ On-Premise. This will allow you to try out application modeling, deployment and life-cycle management on already published multi-tier application templates.
- All of the code examples are available on our GitHub repository: https://github.com/dchqinc
Here are the most popular and comprehensive examples:
Docker Java
- 28 Docker Java application templates included. A Docker Java application that can be deployed on Docker WebSphere, JBoss, Tomcat and Jetty application servers. The Java application can also connect to Docker MySQL, MariaDB, PostgreSQL and Oracle XE. This project is public and is designed to provide a step-by-step guide for Dockerizing and managing your Java applications using DCHQ.
- GitHub project: https://github.com/dchqinc/docker-java
- Blog & Recorded Demo: http://www.javacodegeeks.com/2015/12/docker-java-application-with-solr-mongo-cassandra.html
- 24 Docker Java application templates included. A Java application that uses Docker Solr for the full-text search and that can be deployed on Docker JBoss, Tomcat and Jetty application servers. The Java application can also connect to MySQL, Oracle XE, Cassandra and Mongo. This project is public and is designed to provide a step-by-step guide for Dockerizing and managing your Java applications using DCHQ.
- 5 Docker Java application templates included. The Java Movie Store application that can be deployed on Docker GlassFish, Tomcat, and Jetty application servers. The Java application can also connect to Docker Mongo and Oracle XE.
- Access to the Docker GlassFish template: https://www.dchq.io/landing/products.html#/library?org=DCHQ&bl=2c91800e502205c3015044dbc4202adc
- Blog & Record Demo: http://dchq.co/blog/end-to-end-automation-for-a-docker-based-java-app-on-four-application-stacks-tomcat-jboss-glassfish-and-jetty-on-any-cloud
Docker LAMP, LAPP, and LAOP Stacks
- 9 Docker PHP application templates included for Docker LAMP, LAPP and LAOP Stacks. A simple PHP application that can be deployed on Docker LAMP (Linux-Apache-MySQL-PHP), LAPP (Linux-Apache-PostgreSQL-PHP), and LAOP (Linux-Apache-Oracle-PHP) stacks. This project is public and is designed to provide a step-by-step guide for Dockerizing and managing your PHP applications using DCHQ.
Docker MEAN.JS with Mongo
- Docker MEAN.JS with Mongo. This template supports container configuration management. The MEAN.JS image is automatically built from the official GitHub project (https://github.com/meanjs/mean). The MEAN.JS leverages environment variable bindings to connect to Mongo and a plug-in to inject the database credentials and container private IP in the development.js file dynamically or at request time.
Docker Node.js
- 3 Docker Node.js application templates included. Docker Node.js “Hello World” Example with Nginx and Apache HTTP Server for Reverse Proxy & Load Balancing.
- GitHub project: https://github.com/dchqinc/docker-nodejs
- Access to the templates
Docker Python
- 3 Docker Flask Python with MongoDB application templates included. Docker Python “ToDo” Example with Nginx and Apache HTTP Server for Reverse Proxy & Load Balancing.
- GitHub project: https://github.com/dchqinc/docker-python
- Access to the templates
Docker Ruby on Rails
- 3 Docker Ruby on Rails “Starter Kit” with Redis, Memcached, and PostgreSQL application templates included. Docker Rails Example with Nginx and Apache HTTP Server for Reverse Proxy & Load Balancing.
Docker Mongo Replica Set
- Docker Mongo Replica Set template. This template supports service discovery & container configuration management. The service discovery framework in DCHQ provides event-driven life-cycle stages that executes custom scripts to re-configure application components. This is critical when scaling out clusters for which a replica set may need to be re-balanced.
- Access to the template: https://www.dchq.io/landing/products.html#/library?org=DCHQ&bl=2c91801a510732e10151362106b5567e
- Blog & Record Demo: http://dchq.co/docker-service-discovery.html
Docker Couchbase Cluster
- Docker Couchbase Cluster template. This template supports service discovery & container configuration management. The service discovery framework in DCHQ provides event-driven life-cycle stages that executes custom scripts to re-configure application components. This is critical when scaling out clusters for which a replica set may need to be re-balanced.
Docker Drupal with MySQL
- Docker Drupal with MySQL. This template supports container configuration management. The Drupal container leverages environment variable bindings to connect to MySQL and a plug-in to inject the database credentials and container private IP in the default.settings.php file dynamically or at request time.
- Access to the template: https://www.dchq.io/landing/products.html#/library?org=DCHQ&bl=2c9180ff4f33df5f014f3498cdd10066
- Blog & Recorded Demo: http://dchq.co/blog/end-to-end-automation-for-docker-based-drupal-with-mysql-on-aws
Docker WordPress with MySQL:
- Docker WordPress with MySQL. The WordPress container leverages environment variable bindings to connect to MySQL.
- Access to the template: https://www.dchq.io/landing/products.html#/library?org=DCHQ&bl=2c9180ff4f33df5f014f348b16350058
- Blog & Recorded Demo: http://dchq.co/blog/installing-dchq-on-premise
| Reference: | Docker Compose Environment Variable Binding Examples – Java, Node.Js, PHP, Python, And Ruby On Rails from our JCG partner Amjad Afanah at the DCHQ.io blog. |

