When developing a mobile application, a common need that arises is the one of storing user’s preferences and using them when the application starts. Since this is a recurring need, Google has created a preferences framework for us. The provided mechanism allows us to show, save and manipulate user’s preferences very easily. Furthermore, the framework has support for automatic UI creation. What I mean is, that, by declaring the type of a user preference, a user interface for manipulating these preferences is automatically generated, without having to write a single line code. How does that sound for rapid application development?
In order to make use of the preferences framework, the first step is to extend the PreferenceActivity class. This is just a convenience class that derives from ListActivity and allows to bootstrap the preferences UI from an XML file. Additionally, it automatically saves to SharedPreferences behind the scenes. Don’t forget that SharedPreferences is the interface responsible for accessing and modifying preference data and that we can manually manipulate it by calling the getSharedPreferences method of an Activity. In order to tie together our PreferenceActivity class and the XML layout file, we use the addPreferencesFromResource method. Thus, our onCreate method is very simple and looks like this:
...
@Override
public void onCreate(Bundle savedInstanceState) {
    super.onCreate(savedInstanceState);
    addPreferencesFromResource(R.xml.preferences);
}
...

This assumes that we have already created a file named “preferences.xml” inside the “res/xml” folder. Then, in run-time, the activity will inflate the given XML resource and add the preference hierarchy to the current preference hierarchy. This XML file has a specific format via which we define the types of the preferences. All types derive from the Preference class, which represents the basic preference UI building block and provides the View to be displayed in the activity and the association with a SharedPreferences object to store/retrieve the preference data. Here are some of the most common subclasses that you can directly use:
- CheckBoxPreference: Provides checkbox widget functionality. Will store a Boolean value.
- RingtonePreference: Allows the user to choose a ringtone from those on the device. The chosen ringtone’s URI will be persisted as a string.
- EditTextPreference: Allows for string input. Will store a string into the SharedPreferences.
- ListPreference: Displays a list of entries as a dialog. This preference will store a string into the SharedPreferences.
Also bear in mind that various preferences can be grouped into categories by using the PreferenceCategory class, which groups Preference objects and provides a disabled title above the group.
Let’s examine what our XML declaration file will be consisted of. We are going to have two categories. Under the first one, we will have a CheckBoxPreference, which will enable or disable data updates to a hypothetical application and a ListPreference which through which we will define how often we want updates to happen. As you might have guessed, there is a dependency between the two preferences. This can be achieved by using the android:dependency attribute. Finally, under the second category, we will have a EditTextPreference via which a welcome message will be saved and shown when necessary. This is what the XML file looks like:
<?xml version="1.0" encoding="utf-8"?>

<PreferenceScreen xmlns:android="http://schemas.android.com/apk/res/android">

    <PreferenceCategory
        android:title="First Category"
        android:key="first_category">

        <CheckBoxPreference
            android:key="perform_updates"
            android:summary="Enable or disable data updates"
            android:title="Enable updates"
            android:defaultValue="true"
        />

        <ListPreference
            android:key="updates_interval"
            android:title="Updates interval"
            android:summary="Define how often updates will be performed"
            android:defaultValue="1000"
            android:entries="@array/updateInterval"
            android:entryValues="@array/updateIntervalValues"
            android:dependency="perform_updates"
        />

    </PreferenceCategory>

    <PreferenceCategory
        android:title="Second Category"
        android:key="second_category">

        <EditTextPreference
            android:key="welcome_message"
            android:title="Welcome Message"
            android:summary="Define the Welcome message to be shown"
            android:dialogTitle="Welcome Message"
            android:dialogMessage="Provide a message"
            android:defaultValue="Default welcome message" />

    </PreferenceCategory>

</PreferenceScreen>
Note that for the ListPreference, an android:entries attribute is defined. We use that to load predefined values which are kept in an external XML file under the name “res/values/arrays.xml”. The “updateInterval” and “updateIntervalValue” entries are used from that file. These are actually key-value pairs, so the actual value stored is the one in the second list. Here is what the file looks like:
<?xml version="1.0" encoding="utf-8"?>

<resources>

    <string-array name="updateInterval">
        <item name="1000">Every 1 second</item>
        <item name="5000">Every 5 seconds</item>
        <item name="30000">Every 30 seconds</item>
        <item name="60000">Every 1 minute</item>
        <item name="300000">Every 5 minutes</item>
    </string-array>

    <string-array name="updateIntervalValues">
        <item name="1000">1000</item>
        <item name="5000">5000</item>
        <item name="30000">30000</item>
        <item name="60000">60000</item>
        <item name="300000">300000</item>
    </string-array>

</resources>
As we explained, the persisting part of the equation is handled by the framework. In order to show you how to read the already persisted values, we will create another activity which will be launched from our main one. Let’s first see how the main activity looks like:
package com.javacodegeeks.android.preferences;

import android.content.Intent;
import android.os.Bundle;
import android.preference.PreferenceActivity;
import android.view.Menu;
import android.view.MenuItem;

public class QuickPrefsActivity extends PreferenceActivity {

    @Override
    public void onCreate(Bundle savedInstanceState) {
        super.onCreate(savedInstanceState);
        addPreferencesFromResource(R.xml.preferences);
    }

    @Override
    public boolean onCreateOptionsMenu(Menu menu) {
        menu.add(Menu.NONE, 0, 0, "Show current settings");
        return super.onCreateOptionsMenu(menu);
    }

    @Override
    public boolean onOptionsItemSelected(MenuItem item) {
        switch (item.getItemId()) {
            case 0:
                startActivity(new Intent(this, ShowSettingsActivity.class));
                return true;
        }
        return false;
    }

}
Nothing special here. We just provide an options menu with only one MenuItem by using the onCreateOptionsMenu method. When the user selects the specific item, we handle its actions inside the onOptionsItemSelected method and we launch a new activity using the startActivity method. If you want to learn more about option menus, check out my older tutorial named “Using options menus and customized dialogs for user interaction”. More information about starting activities can be found in my tutorial “Launching new activities with intents”.
Let’s now create the “ShowSettingsActivity”. First, we have to declare it in the Android manifest file, so here what our “AndroidManifest.xml” file looks like:
<?xml version="1.0" encoding="utf-8"?>

<manifest xmlns:android="http://schemas.android.com/apk/res/android"
      package="com.javacodegeeks.android.preferences"
      android:versionCode="1"
      android:versionName="1.0">

    <application android:icon="@drawable/icon" android:label="@string/app_name">

        <activity android:name=".QuickPrefsActivity" android:label="@string/app_name">
            <intent-filter>
                <action android:name="android.intent.action.MAIN" />
                <category android:name="android.intent.category.LAUNCHER" />
            </intent-filter>
        </activity>

        <activity android:name=".ShowSettingsActivity" />

    </application>

    <uses-sdk android:minSdkVersion="3" />

</manifest>
Here is the code for the activity itself:
package com.javacodegeeks.android.preferences;

import android.app.Activity;
import android.content.SharedPreferences;
import android.os.Bundle;
import android.preference.PreferenceManager;
import android.widget.TextView;

public class ShowSettingsActivity extends Activity {

 @Override
 protected void onCreate(Bundle savedInstanceState) {

  super.onCreate(savedInstanceState);
  setContentView(R.layout.show_settings_layout);

  SharedPreferences sharedPrefs = PreferenceManager.getDefaultSharedPreferences(this);

  StringBuilder builder = new StringBuilder();

  builder.append("\n" + sharedPrefs.getBoolean("perform_updates", false));
  builder.append("\n" + sharedPrefs.getString("updates_interval", "-1"));
  builder.append("\n" + sharedPrefs.getString("welcome_message", "NULL"));

  TextView settingsTextView = (TextView) findViewById(R.id.settings_text_view);
  settingsTextView.setText(builder.toString());

 }

}
Inside the activity, we take reference of the SharedPreferences class by using the static method getDefaultSharedPreferences of the PreferenceManager class. Then, depending on the data type of the preference, we use the appropriate getter method, such as getBoolean or getString. Note that the second argument to those is a default value which will be used if a a value has not yet been stored. We use as keys those defined in the original “preferences.xml” file, i.e. “perform_updates”, “updates_interval” and “welcome_message”. The values are concatenated and then presented in a TextView.
Here is also the simple layout for the specific activity:
<?xml version="1.0" encoding="utf-8"?>

<LinearLayout
    xmlns:android="http://schemas.android.com/apk/res/android"
    android:orientation="vertical"
    android:layout_width="fill_parent"
    android:layout_height="fill_parent"
    >

    <TextView
        android:id="@+id/settings_text_view"
        android:layout_width="fill_parent"
        android:layout_height="wrap_content"
    />

</LinearLayout>
If we now launch the Eclipse configuration, we will get a preferences screen like the following:

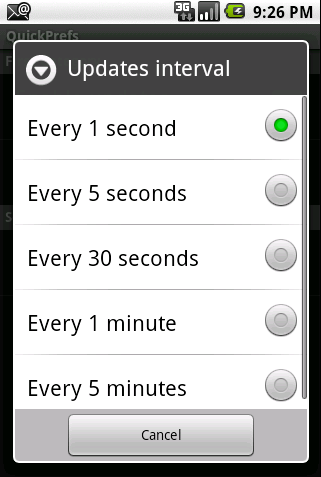
Clicking on the “Updates Interval” will cause a list of options to appear:
Similarly, clicking on the “Welcome Message” preference will cause an edit text to appear:

Now let’s read the already persisted values. Hit the “Menu” button on the emulator so that the options menu appears and choose the “Show current settings” item. This will launch our second activity inside which the values are read and presented as follows:

That’s it guys. A quick guide on how to leverage the preferences framework provided in the SDK to rapidly manipulate user preferences in your application. You can find the Eclipse project created in this tutorial here.
Cheers!
- “Android Full Application Tutorial” series
- Boost your Android XML parsing with XML Pull
- Android Text-To-Speech Application
- Android Reverse Geocoding with Yahoo API – PlaceFinder
- Android Location Based Services Application – GPS location
- Install Android OS on your PC with VirtualBox

This is a very nice, simple tutorial that explains all the basics in a simple language and provides good examples. You make it seem so easy! Well, I guess it is. Anyways, loved the tutorial, cheers to you :)
Nice tutorial, simple, easy to learn…u r great…thank u very much…
How to save the dynamiclly created textbox when a button is clicked.. on each button click a textbox will be added.. so I will not know initally how many text box are created. when the activity is destroyed and again launched it should display with the previous state..i.e the same textboxes which i created before.. please help me ..
Very nice yar . such a good example . good explanation .
Whilst this is a very useful tutorial, I have never seen such a disorganised piece of text-based learning in my life. There is information that is in the wrong place, e,g, the first code snippet is followed by: “This assumes that we have already created a file named “preferences.xml” inside the “res/xml” folder.” This is also followed later by a similar reference to a layout file which is then described after the initial reference. Whilst I appreciate that you are not necessarily wanting to spoon-feed your visitors you could at least put all of the food on the plate at… Read more »
That might explain some problems I’m having – it gives bits of XML but doesn’t tell you where to put them – I think I’ll download the source as it might be easier.
Very useful! I am looking for something where I can make the preferences unreadable for those who are going to decompile the APK. do you know if something like that exists? The reason I want that is because I am calling web services that I don’t want to be used by others and I have not yet found a good way to do it in other ways.
now it is useless because of “This method is deprecated.
This function is
not relevant for a modern fragment-based PreferenceActivity.
Inflates the given XML resource and adds the preference hierarchy to the
current preference hierarchy.”
It’s not useless, because we are still in API 10 world see:
http://developer.android.com/about/dashboards/index.html
Besides deprecation doesn’t mean it doesn’t work in new versions of API. Furthermore personally I don’t like new fragmented version. It just doesn’t fit in if you need few simple preferences.
Agree, I even use API 8 as a minimum. I use deprecated methods all the time :)
Now you can use PreferenceFragment to define preferences in the same way from the xml file. Check it ;)
Can I have two quick preferences? and how see each them, such as alarm android for example. Thanks
can u tell me how to disable a particular item of list preference?
Thanks for this useful article. It’s missing some pieces but since it’s geared towards Android devs it’s not really an issue. Learning is most effective when figuring things out :)
Very useful, I appreciate the time spent to develop this tutorial.
This is VERY OUTDATED. Please update with NON depreciated content. This tutorial NO LONGER teaches what it claims. This code WILL NOT WORK PROPERLY.
Yeah, that’s right. For example, the item tag doesn’t have a name attribute anymore.