Docker Java Application With Solr, Mongo & Cassandra: Design, Deployment, Service Discovery, And Management In Production
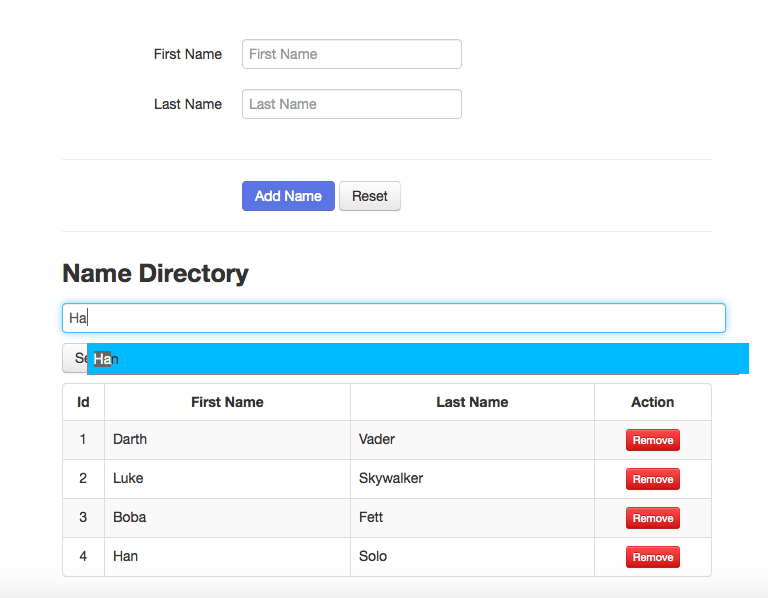
You can clone this sample “Names Directory” Java application from GitHub
A Step by Step Guide for Dockerizing and Managing a Java application consisting of:
- Apache HTTP Server (httpd) and Nginx (for load balancing)
- JBoss, Tomcat and Jetty (as the application server)
- Solr (for the full-text search)
- Mongo, Cassandra, MySQL, and Oracle (for the database)
https://www.youtube.com/watch?v=fktbPUN7QcA
This is an extension of this project (https://github.com/dchqinc/dchq-docker-java-example). The application now supports Solr for full-text search and both Mongo & Cassandra as the supported databases.
To run & manage the 24 Java application templates in this project on 13 different clouds and virtualization platforms (including vSphere, OpenStack, AWS, Rackspace, Microsoft Azure, Google Compute Engine, DigitalOcean, IBM SoftLayer, etc.), make sure that you either:
- Sign Up for FREE on DCHQ.io — http://dchq.io (no credit card required), or
- Download DCHQ On-Premise Standard Edition for FREE — http://dchq.co/dchq-on-premise-download.html
Background
Containerizing enterprise Java applications is still a challenge mostly because existing application composition frameworks do not address complex dependencies, external integrations or auto-scaling workflows post-provision. Moreover, the ephemeral design of containers meant that developers had to spin up new containers and re-create the complex dependencies & external integrations with every version update.
DCHQ, available in hosted and on-premise versions, addresses all of these challenges and simplifies the containerization of enterprise Java applications through an advance application composition framework that extends Docker Compose with cross-image environment variable bindings, extensible BASH script plug-ins that can be invoked at request time or post-provision, and application clustering for high availability across multiple hosts or regions with support for auto scaling.
Once an application is provisioned, a user can monitor the CPU, Memory, & I/O of the running containers, get notifications & alerts, and get access to application backups, automatic scale in/out workflows, and plug-in execution workflows to update running containers. Moreover, out-of-box workflows that facilitate Continuous Delivery with Jenkins allow developers to refresh the Java WAR file of a running application without disrupting the existing dependencies & integrations.
In previous blogs, we demonstrated the end-to-end deployment automation of various Java applications (like Pizza Shop and Movie Store apps) on multi-tier Docker-based application stacks across 13 different clouds & virtualization platforms. For full list of these blogs, you can visit this page: http://dchq.co/docker-java-applications.html
However many users were still confused on some of the fundamental aspects of application modeling. These questions include:
- Where do these environment variables come from in your YAML-based application template?
- How is the database initialized with the proper schemas needed from my Java application?
- I already have a deployment plan for my WebLogic Application Server. Can I run my own script for deploying a Java application?
To address these questions, we created a sample “Names Directory” Java application in this GitHub project that can be deployed on these application stacks:
- Apache HTTP Server (httpd) and Nginx (for load balancing)
- JBoss, Tomcat and Jetty (as the application server)
- Solr (for the full-text search)
- Mongo, Cassandra, MySQL, and Oracle (for the database)
In this project, we will provide a step-by-step guide for configuring, deploying and managing this Java application using different application stacks and on different cloud/virtual infrastructure.
We will cover:
- Configuring the Java files for database and Solr connection environment variables
- Using the liquibase bean to initialize the connected database
- Building the YAML-based application templates that can re-used on any Linux host running anywhere
- Provisioning & auto-scaling the underlying infrastructure on any cloud (with Rackspace being the example in this blog)
- Deploying the multi-tier Java application on the Rackspace cluster
- Monitoring the CPU, Memory & I/O of the Running Containers
- Enabling the Continuous Delivery Workflow with Jenkins to update the WAR file of the running applications when a build is triggered
- Scaling out the Application Server Cluster when the application is resource-constrained using the Service Discovery framework to update the load balancing service
Configuring the Java files for database and Solr connection environment variables
You can clone this sample “Names Directory” Java application from GitHub.
This is the most important step in “Dockerizing” your Java application. In order to leverage the environment variables you can pass when running containers, you will need to make sure that your application is configured in a way that will allow you to change certain properties at request time – like:
- The Solr URL & port you would like to use
- The database driver you would like to use
- The database URL
- The database credentials
- Any other parameters that you would like to change at request time (e.g. the min/max connection pool size, idle timeout, etc.)
To achieve this, we created several Java files to declare the environment variables we need to use to connect to the database and Solr. The Java files can be found in the config directory:
Let’s first examine SolrConfig.java:

You will notice that solr_host and solr_port are declared as environment variables that you can pass when running the application server container.
Now let’s examine DatabaseConfig.java:
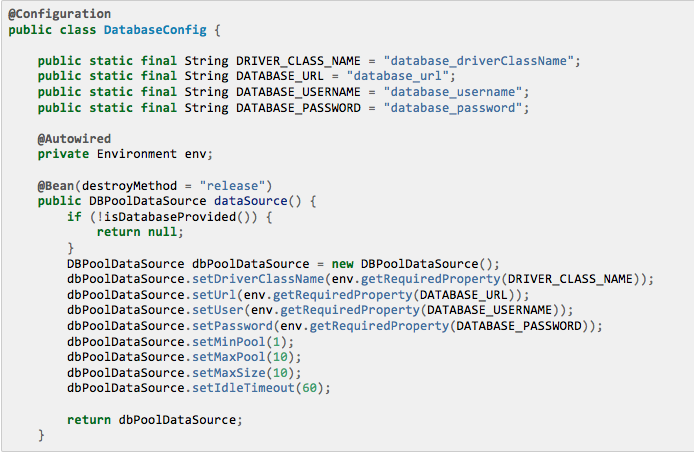
You will notice that database_driverClassName, database_url, database_username, and database_password are declared as environment variables that you can pass when running the application server container. These will be used to connect MySQL, PostgreSQL and Oracle databases.
Next, we’ll examine MongoConfig.java:

You will notice that mongo_url is declared as environment variables that you can pass when running the application server container.
However the MongoConfig.java is also used to populate the database with the right schema & table at startup — if this table is not already found.
Finally, we’ll examine CassandraConfig.java:

You will notice that cassandra_url is declared as environment variables that you can pass when running the application server container.
Using the liquibase bean to initialize the connected MySQL, PostgreSQL and Oracle databases
We typically recommend initializing the database schema as part of the Java application deployment itself. This way, you don’t have to worry about maintaining separate SQL files that need to be executed on the database separately.
However if you already have those SQL files and you still prefer executing them on the database separately – then DCHQ can help you automate this process through its plug-in framework. You can refer to this section for more information.
Initializing the Mongo and Cassandra databases is covered in the MongoConfig.java and CassandraConfig.java files.
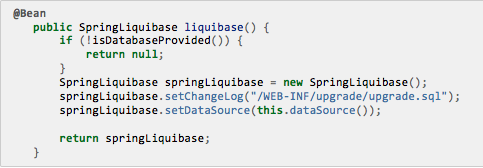
For MySQL, PostgreSQL and Oracle, the liquibase bean is used in the DatabaseConfig.java file to check the dataSource and run SQL statements from upgrade.sql. Liquibase tracks which changelog statements have run against each database.
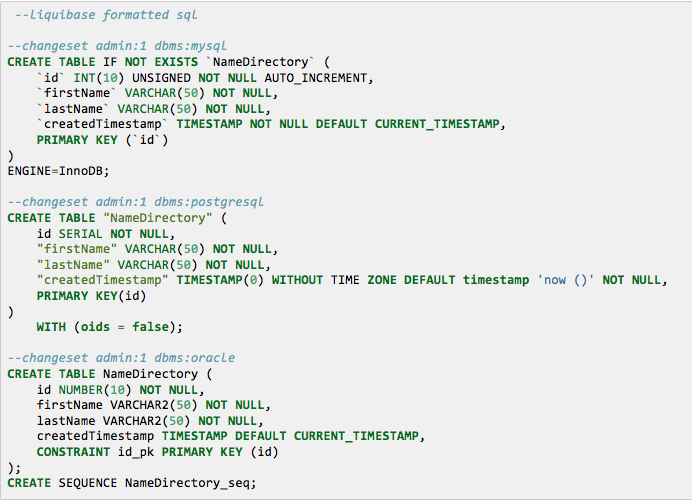
Here’s the actual upgrade.sql file with the SQL statements for initializing the schema on the connected MySQL, PostgreSQL or Oracle database.
Building the YAML-based application templates that can re-used on any Linux host running anywhere
Once logged in to DCHQ (either the hosted DCHQ.io or on-premise version), a user can navigate to Manage > App/Machine and then click on the + button to create a new Docker Compose template.
We have created 24 application templates using the official images from Docker Hub for the same “Names Directory” Java application – but for different application servers and databases.
The templates include examples of the following application stacks (for the same Java application):
- Apache HTTP Server (httpd) & Nginx — for load balancing
- Solr — for the full-text search
- Tomcat, Jetty, and JBoss — for the application servers
- Mongo, Cassandra, MySQL, and Oracle XE — for the databases
Plug-ins to Configure Web Servers and Application Servers at Request Time & Post-Provision
Across all these application templates, you will notice that some of the containers are invoking BASH script plug-ins at request time in order to configure the container. These plug-ins can be executed post-provision as well.
These plug-ins can be created by navigating to Manage > Plug-ins. Once the BASH script is provided, the DCHQ agent will execute this script inside the container. A user can specify arguments that can be overridden at request time and post-provision. Anything preceded by the $ sign is considered an argument — for example, $file_url can be an argument that allows developers to specify the download URL for a WAR file. This can be overridden at request time and post-provision when a user wants to refresh the Java WAR file on a running container.
The plug-in ID needs to be provided when defining the YAML-based application template. For example, to invoke a BASH script plug-in for Nginx, we would reference the plug-in ID as follows:
In the example templates, we are invoking 4 BASH script plug-ins.
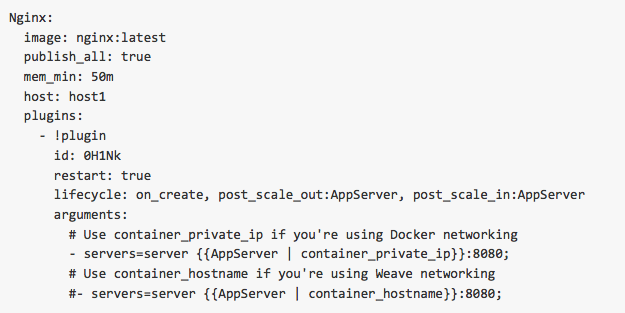
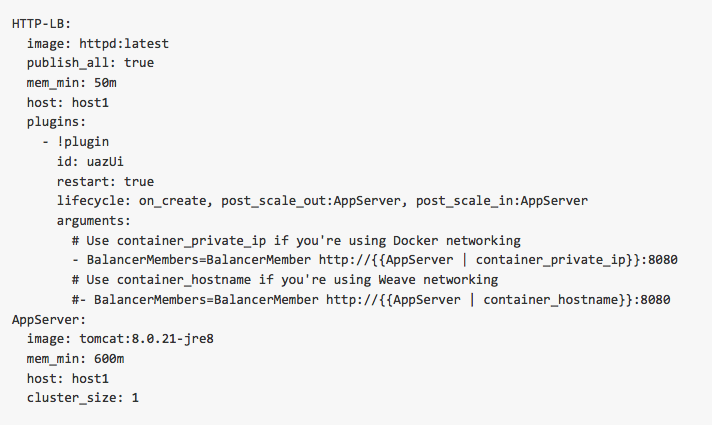
Nginx is invoking a BASH script plug-in that injects container IP’s of the application servers in the default.conf file dynamically (or at request time). The plug-in ID is 0H1Nk.
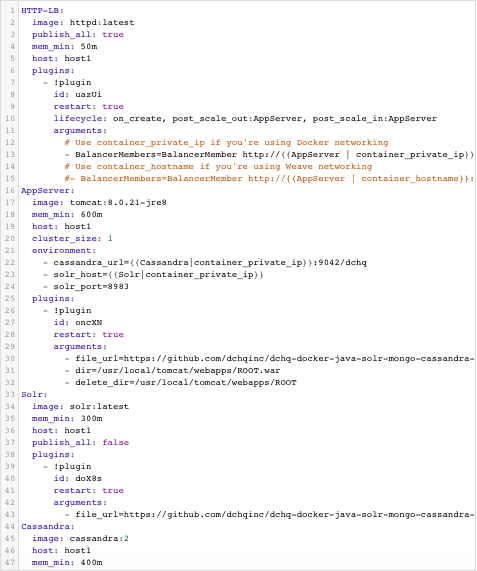
Apache HTTP Server (httpd) is invoking a BASH script plug-in that injects container IP’s of the application servers in the httpd.conf file dynamically (or at request time). The plug-in ID is uazUi.
The beauty of the Nginx and Apache HTTP Server (httpd) plug-ins is that they can be executed post-provision as part of the application server cluster scale in or scale out. This makes it possible to define auto-scale policies that automatically update the web server (or load balancer). This is part of DCHQ’s Service Discovery framework.
Service Discovery with plug-in life-cycle stages
The lifecycle parameter in plug-ins allows you to specify the exact stage or event to execute the plug-in. If not lifecycle is specified, then by default, the plug-in will be execute on_create. Here are the supported lifecycle stages:
- on_create — executes the plug-in when creating the container
- on_start — executes the plug-in after a container starts
- on_stop — executes the plug-in before a container stops
- on_destroy — executes the plug-in before destroying a container
- post_create — executes the plug-in after the container is created and running
- post_start[:Node] — executes the plug-in after another container starts
- post_stop[:Node] — executes the plug-in after another container stops
- post_destroy[:Node] — executes the plug-in after another container is destroyed
- post_scale_out[:Node] — executes the plug-in after another cluster of containers is scaled out
- post_scale_in[:Node] — executes the plug-in after another cluster of containers is scaled in
To get access to the Nginx and Apache HTTP Server (httpd) plug-ins under the EULA license, make sure you either:
- Sign Up for FREE on DCHQ.io — http://dchq.io (no credit card required)
- Download DCHQ On-Premise Standard Edition for FREE — http://dchq.co/dchq-on-premise-download.html
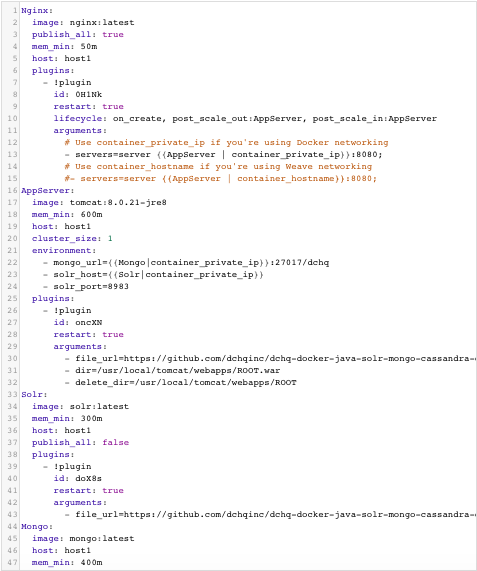
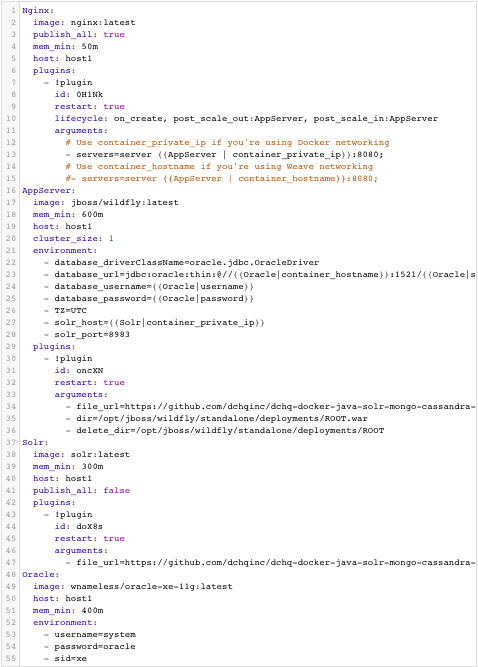
The application servers (Tomcat, Jetty, and JBoss) are also invoking a BASH script plug-in to deploy the Java WAR file from the accessible GitHub URL.
Tomcat, JBoss and Jetty are invoking the exact same BASH script plug-in (plug-in ID: oncXN) – except the WAR file is getting deployed on different directories:
- Tomcat – dir=/usr/local/tomcat/webapps/ROOT.war
- Jetty – dir=/var/lib/jetty/webapps/ROOT.war
- JBoss – dir=/opt/jboss/wildfly/standalone/deployments/ROOT.war
Solr is invoking a different BASH script plug-in (plug-in ID: doX8s) that will get the names.zip file and unzip it in /opt/solr/server/solr/
cluster_size and host parameters for HA deployment across multiple hosts
You will notice that the cluster_size parameter allows you to specify the number of containers to launch (with the same application dependencies).
The host parameter allows you to specify the host you would like to use for container deployments. This is possible if you have selected Weave as the networking layer when creating your clusters. That way you can ensure high-availability for your application server clusters across different hosts (or regions) and you can comply with affinity rules to ensure that the database runs on a separate host for example. Here are the values supported for the host parameter:
- host1, host2, host3, etc. – selects a host randomly within a data-center (or cluster) for container deployments
- IP Address 1, IP Address 2, etc. — allows a user to specify the actual IP addresses to use for container deployments
- Hostname 1, Hostname 2, etc. — allows a user to specify the actual hostnames to use for container deployments
- Wildcards (e.g. “db-”, or “app-srv-”) – to specify the wildcards to use within a hostname
Environment Variable Bindings Across Images
Additionally, a user can create cross-image environment variable bindings by making a reference to another image’s environment variable. In this case, we have made several bindings – including database_url=jdbc:mysql://{{MySQL|container_hostname}}:3306/{{MySQL|MYSQL_DATABASE}} – in which the database container name is resolved dynamically at request time and is used to ensure that the application servers can establish a connection with the database.
Here is a list of supported environment variable values:
- {{alphanumeric | 8}} – creates a random 8-character alphanumeric string. This is most useful for creating random passwords.
- {{Image Name | ip}} – allows you to enter the host IP address of a container as a value for an environment variable. This is most useful for allowing the middleware tier to establish a connection with the database.
- {{Image Name | container_ip}} – allows you to enter the name of a container as a value for an environment variable. This is most useful for allowing the middleware tier to establish a secure connection with the database (without exposing the database port).
- {{Image Name | container_private_ip}} – allows you to enter the internal IP of a container as a value for an environment variable. This is most useful for allowing the middleware tier to establish a secure connection with the database (without exposing the database port).
- {{Image Name | port_Port Number}} – allows you to enter the Port number of a container as a value for an environment variable. This is most useful for allowing the middleware tier to establish a connection with the database. In this case, the port number specified needs to be the internal port number – i.e. not the external port that is allocated to the container. For example, {{PostgreSQL | port_5432}} will be translated to the actual external port that will allow the middleware tier to establish a connection with the database.
- {{Image Name | Environment Variable Name}} – allows you to enter the value an image’s environment variable into another image’s environment variable. The use cases here are endless – as most multi-tier applications will have cross-image dependencies.
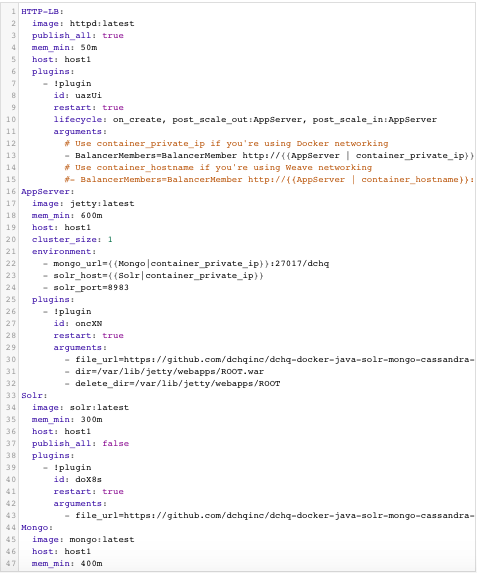
Here are four examples. You can find customize and run all 24 templates yourself.
![]()
Multi-Tier Java (Nginx-Tomcat-Solr-Mongo)
![]()
Multi-Tier Java (Nginx-JBoss-Solr-Oracle-XE)
![]()
Multi-Tier Java (ApacheLB-Tomcat-Solr-Cassandra)
![]()
Multi-Tier Java (ApacheLB-Jetty-Solr-Mongo)
![]()
Provisioning & Auto-Scaling the Underlying Infrastructure on Any Cloud
Once an application is saved, a user can register a Cloud Provider to automate the provisioning and auto-scaling of clusters on 12 different cloud end-points including VMware vSphere, OpenStack, CloudStack, Amazon Web Services, Rackspace, Microsoft Azure, DigitalOcean, IBM SoftLayer, Google Compute Engine, and many others.
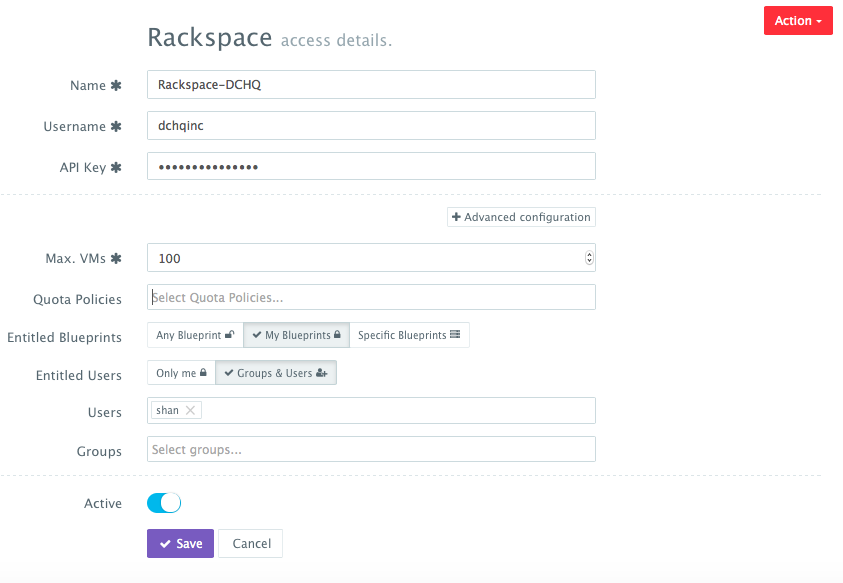
First, a user can register a Cloud Provider for Rackspace (for example) by navigating to Manage > Cloud Providers & Repos and then clicking on the + button to select Rackspace. The Rackspace API Key needs to be provided – which can be retrieved from the Account Settings section of the Rackspace Cloud Control Panel.
A user can then create a cluster with an auto-scale policy to automatically spin up new Cloud Servers. This can be done by navigating to Manage > Clusters page and then clicking on the + button. You can select a capacity-based placement policy and then Weave as the networking layer in order to facilitate secure, password-protected cross-container communication across multiple hosts within a cluster. The Auto-Scale Policy for example, may set the maximum number of VM’s (or Cloud Servers) to 10.

A user can now provision a number of Cloud Servers on the newly created cluster either through the UI-based workflow or by defining a simple YAML-based Machine Compose template that can be requested from the Self-Service Library.
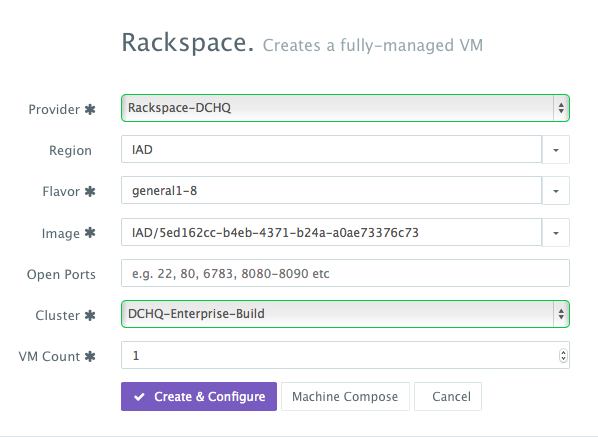
UI-based Workflow – A user can request Rackspace Cloud Servers by navigating to Manage > Hosts and then clicking on the + button to select Rackspace. Once the Cloud Provider is selected, a user can select the region, size and image needed. Ports are opened by default on Rackspace Cloud Servers to accommodate some of the port requirements (e.g. 32000-59000 for Docker, 6783 for Weave, and 5672 for RabbitMQ). A Cluster is then selected and the number of Cloud Servers can be specified.
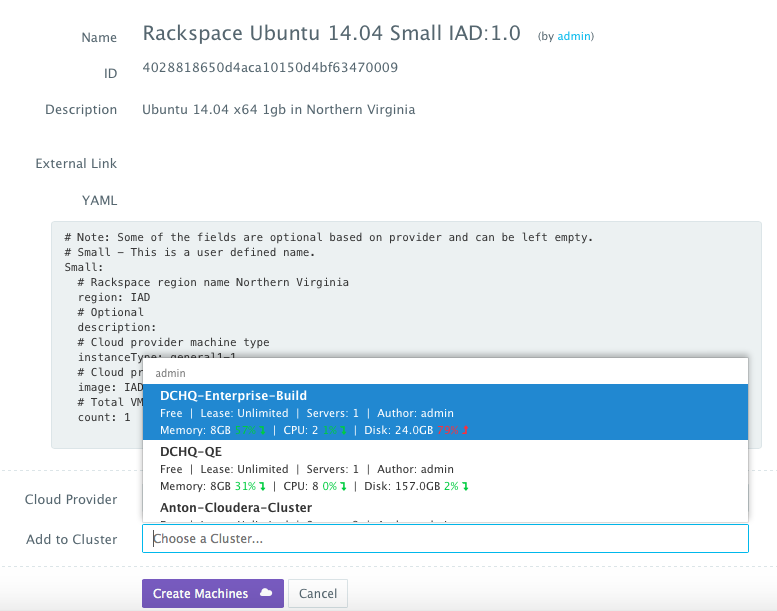
YAML-based Machine Compose Template – A user can first create a Machine Compose template for Rackspace by navigating to Manage > Templates and then selecting Machine Compose.
Here’s the template for requesting a 4GB Cloud Server.

The supported parameters for the Machine Compose template are summarized below:
- description: Description of the blueprint/template
- instanceType: Cloud provider specific value (e.g. general1-4)
- region: Cloud provider specific value (e.g. IAD)
- image: Mandatory – fully qualified image ID/name (e.g. IAD/5ed162cc-b4eb-4371-b24a-a0ae73376c73 or vSphere VM Template name)
- username: Optional – only for vSphere VM Template username
- password: Optional – only for vSphere VM Template encrypted password. You can encrypt the password using the endpoint https://www.dchq.io/#/encrypt
- network: Optional – Cloud provider specific value (e.g. default)
- securityGroup: Cloud provider specific value (e.g. dchq-security-group)
- keyPair: Cloud provider specific value (e.g. private key)
- openPorts: Optional – comma separated port values
- count: Total no of VM’s, defaults to 1.
Once the Machine Compose template is saved, a user can request this machine from the Self-Service Library. A user can click Customize and then select the Cloud Provider and Cluster to use for provisioning these Rackspace Cloud Servers.
Deploying the Multi-Tier Java Application on the Rackspace Cluster
Once the Cloud Servers are provisioned, a user can deploy a multi-tier, Docker-based Java applications on the new Cloud Servers. This can be done by navigating to the Self-Service Library and then clicking on Customize to request a multi-tier application.
A user can select an Environment Tag (like DEV or QE) and the Rackspace Cluster created before clicking on Create Machines.
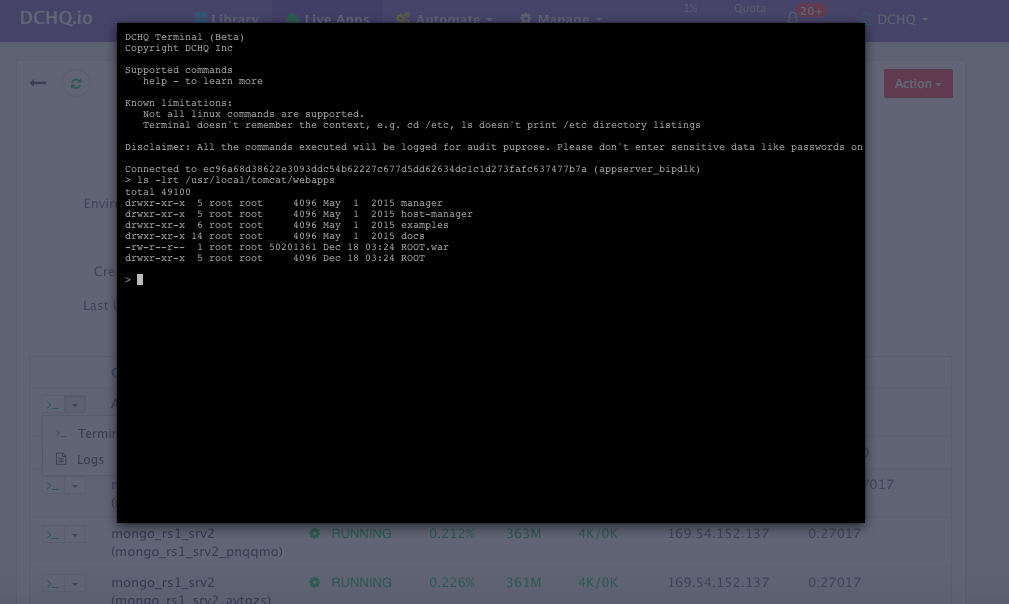
Accessing The In-Browser Terminal For The Running Containers
A command prompt icon should be available next to the containers’ names on the Live Apps page. This allows users to enter the container using a secure communication protocol through the agent message queue. A white list of commands can be defined by the Tenant Admin to ensure that users do not make any harmful changes on the running containers.
For the Tomcat deployment for example, we used the command prompt to make sure that the Java WAR file was deployed under the /usr/local/tomcat/webapps/ directory.
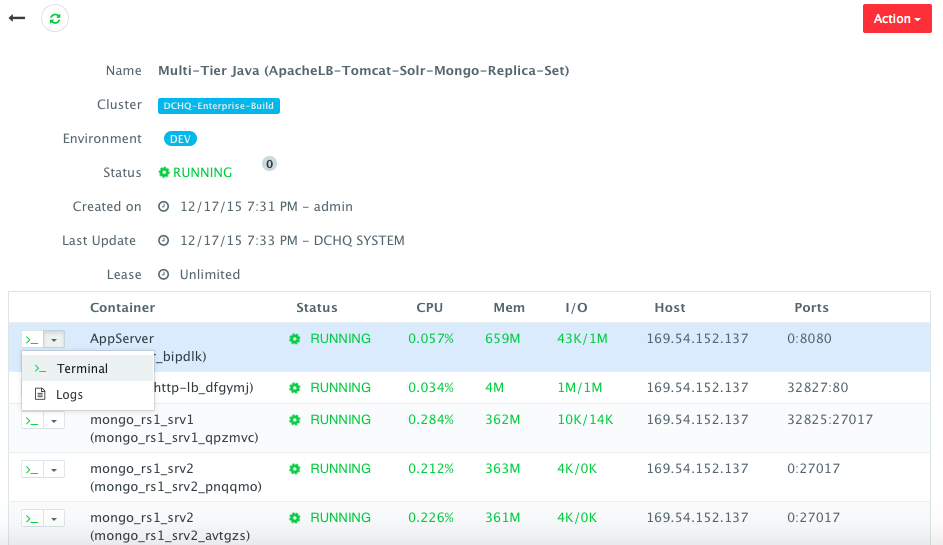
Monitoring the CPU, Memory & I/O Utilization of the Running Containers
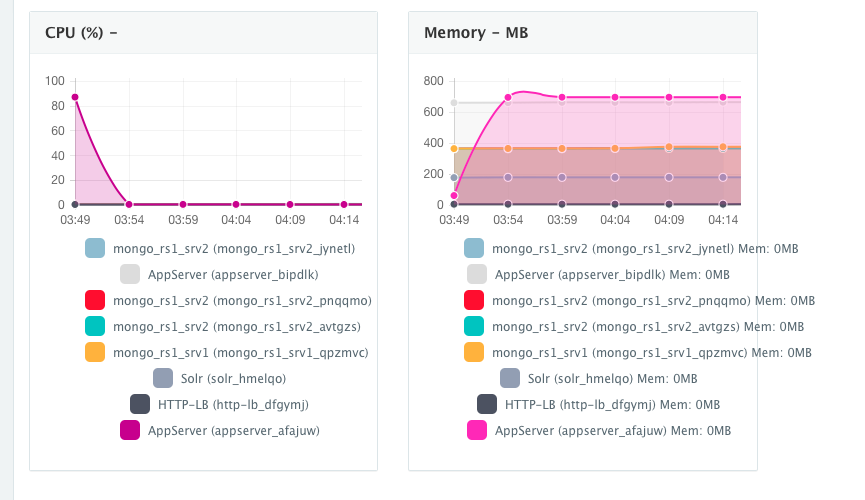
Once the application is up and running, our developers monitor the CPU, Memory, & I/O of the running containers to get alerts when these metrics exceed a pre-defined threshold. This is especially useful when our developers are performing functional & load testing.
A user can perform historical monitoring analysis and correlate issues to container updates or build deployments. This can be done by clicking on the Actions menu of the running application and then on Monitoring. A custom date range can be selected to view CPU, Memory and I/O historically.
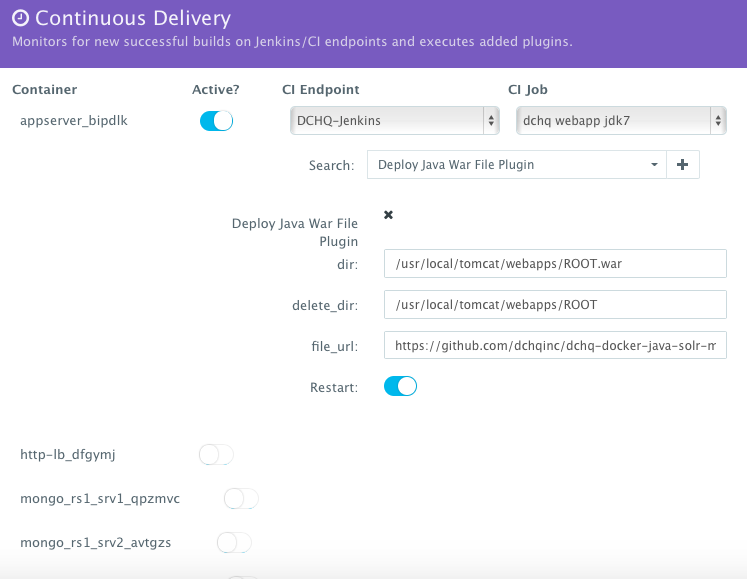
Enabling the Continuous Delivery Workflow with Jenkins to Update the WAR File of the Running Application when a Build is Triggered
For developers wishing to follow the “immutable” containers model by rebuilding Docker images containing the application code and spinning up new containers with every application update, DCHQ provides an automated build feature that allows developers to automatically create Docker images from Dockerfiles or private GitHub projects containing Dockerfiles.
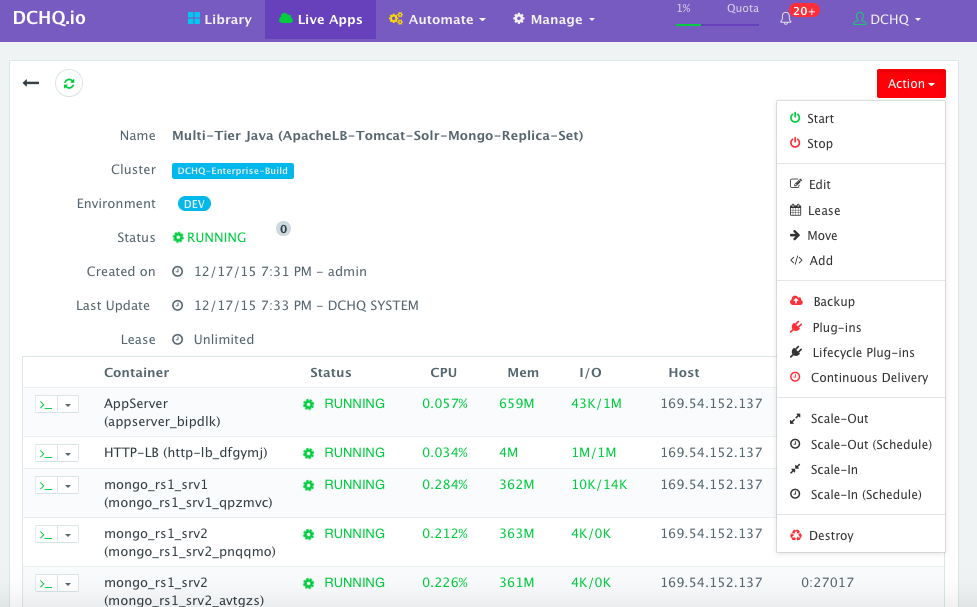
However, many developers may wish to update the running application server containers with the latest Java WAR file instead. For that, DCHQ allows developers to enable a continuous delivery workflow with Jenkins. This can be done by clicking on the Actions menu of the running application and then selecting Continuous Delivery. A user can select a Jenkins instance that has already been registered with DCHQ, the actual Job on Jenkins that will produce the latest WAR file, and then a BASH script plug-in to grab this build and deploy it on a running application server. Once this policy is saved, DCHQ will grab the latest WAR file from Jenkins any time a build is triggered and deploy it on the running application server.
Developers, as a result will always have the latest Java WAR file deployed on their running containers in DEV/TEST environments.
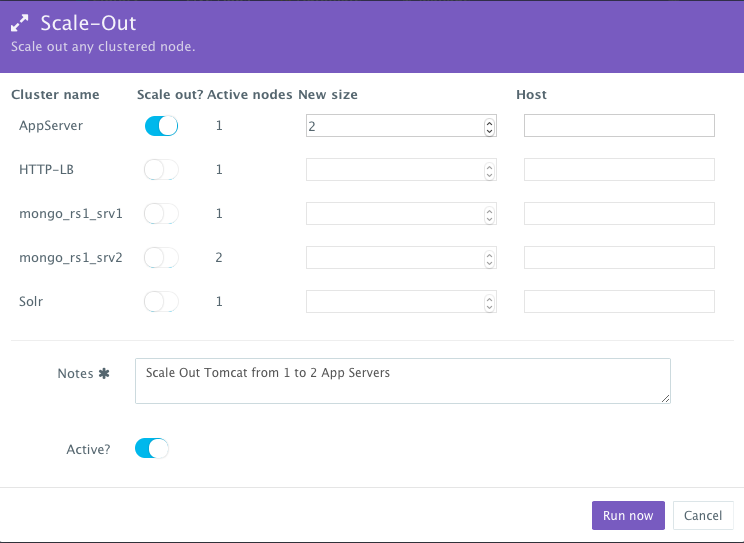
Scaling out the Tomcat Application Server Cluster and leverage the Service Discovery Framework to update the load balancer
If the running application becomes resource constrained, a user can to scale out the application to meet the increasing load. Moreover, a user can schedule the scale out during business hours and the scale in during weekends for example.
To scale out the cluster of Tomcat servers from 1 to 2, a user can click on the Actions menu of the running application and then select Scale Out. A user can then specify the new size for the cluster and then click on Run Now.
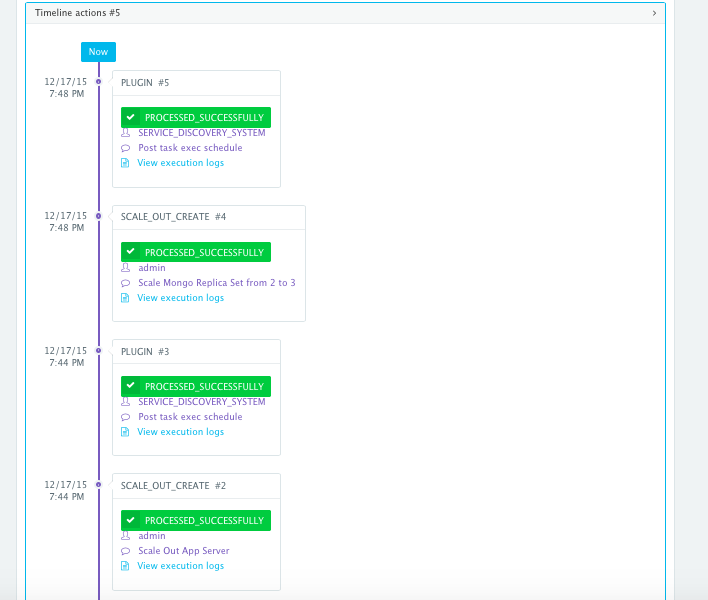
As the scale out is executed, the Service Discovery framework will be used to update the load balancer. A plug-in will automatically be executed on Apache HTTP Server to update Apache HTTP Server’s httpd.conf file so that it’s aware of the new application server added. This is because we have specified post_scale_out:AppServer as the lifecycle event for this plugin.
An application time-line is available to track every change made to the application for auditing and diagnostics. This can be accessed from the expandable menu at the bottom of the page of a running application. In this case, the Service Discovery framework executed the Apache HTTP Server plugin automatically right after the Application Server cluster was scaled out.
Alerts and notifications are available for when containers or hosts are down or when the CPU & Memory Utilization of either hosts or containers exceed a defined threshold.
Conclusion
Containerizing enterprise Java applications is still a challenge mostly because existing application composition frameworks do not address complex dependencies, external integrations or auto-scaling workflows post-provision. Moreover, the ephemeral design of containers meant that developers had to spin up new containers and re-create the complex dependencies & external integrations with every version update.
DCHQ, available in hosted and on-premise versions, addresses all of these challenges and simplifies the containerization of enterprise Java applications through an advance application composition framework that facilitates cross-image environment variable bindings, extensible BASH script plug-ins that can be invoked at request time or post-provision, and application clustering for high availability across multiple hosts or regions with support for auto scaling.
- Sign Up for FREE on http://DCHQ.io or download DCHQ On-Premise
to get access to out-of-box multi-tier Java application templates along with application lifecycle management functionality like monitoring, container updates, scale in/out and continuous delivery.
| Reference: | Docker Java Application With Solr, Mongo, & Cassandra: Design, Deployment, Service Discovery, And Management In Production from our JCG partner Amjad Afanah at the DCHQ.io blog. |

Good article for beginners, I just hosted my package in OpenShift for testing it. But i was wondering how to do it using docker container. Thank-you for showing a path with DCHQ.IO
Have a nice day
Hey Sakar — the Java WAR file in this project can be deployed on your application server of your choice. So you can create a Dockerfile that builds FROM the official Tomcat, Jetty or JBoss images. In that Dockerfile, you can simply add the Java WAR file. For example, here’s what the Dockerfile might look like for JBoss: FROM jboss/wildfly:latest ADD ROOT.war /opt/jboss/wildfly/standalone/deployments/ You can download the WAR file from GitHub and change its name to ROOT.war (https://github.com/dchqinc/dchq-docker-java-solr-mongo-cassandra-example/raw/master/dbconnect.war) Please note that DCHQ provides a few advantages over other provisioning frameworks. First, the service discovery feature allows you to add a… Read more »
As a Docker newbie, where are the DockerFiles and images to deploy and test them on my local machine or VM? Is DCHQ on premise mandatory?
DCHQ has both on-premise and SaaS offering. For SaaS you can register at http://www.dchq.io and try it out for free.