In this post, we look at using the Redux library with ReactJS. Redux, in a gist, centralizes state management. It provides APIs and patterns to manipulate the state in a predictable way. This leads to consistent application behavior. Wherein for the same set of changes we get the same resultant state every time, the change is predictable.
As we work through this article we build a simple ReactJS application to take a ride through the Redux world. It seems intimidating at first but by the time we are done, you will have a better understanding of its benefits and an appreciation of the motivation behind it. Let us get started with some basic concepts first.
1. Basic Concepts
Before we begin creating our sample application, let us go over some terms and their definitions first. Some of the key players in the Redux Universe are as follows:
Actions
You can think of actions as JavaScript Object representing actions that trigger a change in the state of the application. We call or rather dispatch actions in response to an event that may or may not be the result of user action. The only rule with action objects is that they have a “type” property. Other than that the structure of the action object is up to us.
Reducers
Reducers are JavaScript functions that actually change state in response to actions. These are basically pure functions, in that they do not change the data passed into them, rather they use it to create a new state.
Store
This is a plain JavaScript object which holds the state of the entire application. Changes to the data stored in this object results in the re-rendering of the view. Remember its data is changed by reducers which in turn act when actions are triggered by our code.
2. Basic Application Structure
Let us create a basic application structure and pull down all the npm packages we will need. To start off we use the create-react-app package to generate a basic ReactJS application like below:
>npx create-react-app my-app .
This generates a skeletal ReactJS app named my-app in the current folder.
Next, since we will be working with Redux we install a few dependencies related to it among others.
> npm install redux react-redux prop-types redux-immutable-state-invariant
Now we are ready to build our ReactJS Redux application.
3. ReactJS and Redux – Sample Application
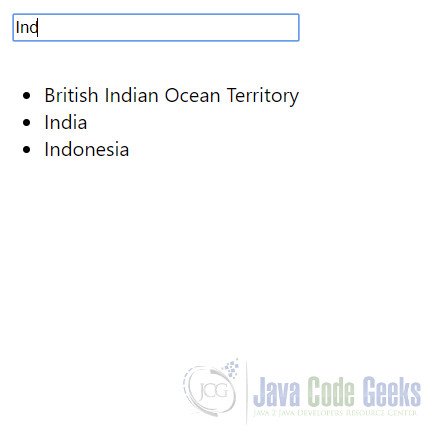
We build a simple application that shows matching country names as the user types in a text box. The country names are fetched from a server API and populated in an unordered list below the text box. Our state will store the text typed in by the user and a list of matching country names fetched from the API. The shape of our state looks like below:
initialState.js
export default {
    user: {
        text: ""
    },
    country: {
        countries: [],
        isLoading: false,
        error: null
    }
};
3.1 Server API Setup
We use Nodejs and Express to quickly set up a server-side API. The API returns a list of countries matching the text supplied to it. The code for our server-side API looks like below:
index.js
const express = require('express');
const app = express();
const bodyParser = require("body-parser");
const api = require('./countryController');
const cors = require('cors');

app.use(bodyParser.json());
app.use(bodyParser.urlencoded({ extended: true }));
app.use(cors());
app.use('/api', api());

const Port = process.env.PORT || 2019;

app.listen(Port, () => {
    console.log(`Listening on ${Port}.`);
});
countryController.js
const router = require('express').Router();

module.exports = () => {
    router.get('/country/:code?', (req, res) => {
        let code = req.params.code || "";
        if (code) {
            return res.json(countries.filter(c => c.code.toLowerCase().indexOf(code.toLowerCase()) > -1 ||
                c.name.toLowerCase().indexOf(code.toLowerCase()) > -1));

        }
        return res.json(countries);
    });
    return router;
};

const countries = [
    { name: 'Afghanistan', code: 'AF' },
    { name: 'Åland Islands', code: 'AX' },
    { name: 'Albania', code: 'AL' },
    { name: 'Algeria', code: 'DZ' },
    { name: 'American Samoa', code: 'AS' },
    { name: 'AndorrA', code: 'AD' },
    { name: 'Angola', code: 'AO' },
...
3.2 Setting up Redux
Redux does require a bit of verbose boilerplate code to get up and running. But don’t let this discourage you. Once you understand what each piece does it will not seem too daunting afterward.
First let us set up our actions, remember, these are JavaScript objects with a mandatory type property. We will create three files for this, namely, actionTypes.js, countryActions.js, and userActions.js. actionTypes.js stores string constants with names of our actions. The other two files contain what are called action creators. Action creators are basically JavaScript functions that return action objects.
actionTypes.js
export const FETCH_COUNTRIES_BEGIN = "FETCH_COUNTRIES_BEGIN";
export const FETCH_COUNTRIES_SUCCESS = "FETCH_COUNTRIES_SUCCESS";
export const FETCH_COUNTRIES_FAILED = "FETCH_COUNTRIES_FAILED";
export const USER_TEXT = "USER_TEXT";
countryActions.js
import { FETCH_COUNTRIES_BEGIN,
         FETCH_COUNTRIES_FAILED,
         FETCH_COUNTRIES_SUCCESS } from './actionTypes';

export function fetch_countries(result) {
    return function (dispatch) {
        dispatch(fetch_countries_begin(result))

        return window.fetch(`http://localhost:2019/api/country/${result}`)
            .then(response =>
                response.json(),
                (error) => {
                    dispatch(fetch_countries_error(error));
                }
            ).then((res) => dispatch(fetch_countries_success(res)));
    }
}

export function fetch_countries_success(result) {
    return { type: FETCH_COUNTRIES_SUCCESS, result };
}

export function fetch_countries_error(result) {
    return { type: FETCH_COUNTRIES_FAILED, result };
}

export function fetch_countries_begin(result) {
    return { type: FETCH_COUNTRIES_BEGIN, result };
}
userActions.js
import { USER_TEXT } from './actionTypes';

export function user_text(result) {
    return { type: USER_TEXT, result };
}
Now that our actions are setup let us set up our reducers next. Reducers are pure functions that take the previous state and action object as parameters and return a new state object. Simple enough, we create two separate reducers, one each to handle the user input and the list of countries from the API. But there is catch here since a reducer synchronously returns a state object how do we handle API calls or rather async operations.
The standard way to do this is by using Redux-thunk. This store enhancing middleware allows reducers to return functions or promises. We will enhance our store later with the thunk middleware, but for now, we will assume it to be. Our reducers look like below:
countryReducer.js
import * as type from "../actions/actionTypes";
import initialState from "./initialState";

export default function country(state = initialState.country, action) {
    switch (action.type) {
        case type.FETCH_COUNTRIES_SUCCESS:
            return { ...state, countries: action.result, isLoading: false, error: null };
        case type.FETCH_COUNTRIES_FAILED:
            return { ...state, countries: [], isLoading: false, error: action.result };
        case type.FETCH_COUNTRIES_BEGIN:
            return { ...state, countries: [], isLoading: true, error: null };
        default:
            return state;
    }
}
userTextReducer.js
import * as type from "../actions/actionTypes";
import initialState from "./initialState";

export default function user(state = initialState.user, action) {
    switch (action.type) {
        case type.USER_TEXT:
            return { ...state, text: action.result };
        default:
            return state;
    }
}
index.js
import { combineReducers } from "redux";
import country from './countryReducer';
import user from './userReducer';

const rootReducer = combineReducers({
    country,
    user
});
export default rootReducer;
Finally, it is time to set up our store. In Redux there is just one central store that stores all of our application’s state. The code looks like below:
configureStore.js
import { createStore, applyMiddleware, compose } from "redux";
import rootReducer from "./reducers";
import reduxImmutableStateInvariant
       from "redux-immutable-state-invariant";
import thunkMiddleware from "redux-thunk";

export default function configureStore(initialState) {
    const composeEnhancers =
        window.__REDUX_DEVTOOLS_EXTENSION_COMPOSE__ || compose;
        // add support for Redux dev tools

    return createStore(
        rootReducer,
        initialState,
        composeEnhancers(applyMiddleware(reduxImmutableStateInvariant(), thunkMiddleware))
    );
}
Now that we are done setting up Redux, let us move forward and work on our UI.
4. Building UI Components
First, we will build our presentational components, viz., Input & CountryList. The Input component renders a simple input tag for the user to type country names into. The code for this component looks like below:
Input.js
import React from 'react';

export default function Input(props) {
    const handleChange = (event) => {
        props.user_text(event.target.value);
        props.fetch_countries(event.target.value);
    }
    return <input type="text"
        style={{ margin: "15px", width: "225px" }}
        placeholder="Type Country Name or Code"
        onChange={handleChange}
        value={props.text} />;
}
Next, we build a component to show the list of countries from the API. Nothing fancy here just rendering an unordered list of country names. The code for this component looks like below:
CountryList.js
import React from 'react';

function CountryList(props) {
    return <>
        <ul>{
            props.countries && props.countries.map(c =>
                <li key={c.code}>{c.name}</li>
            )}
        </ul>
    </>;
}
export default CountryList;
Now let us build our Container Component to present the UI to the user. We call it HomePage.js, an important piece here is connecting this component to Redux using the connect method. It takes two arguments matchStateToProps and matchDispatchToProps. What the two do is to wire up the state of the application to props and actions to props. We then pass these down to presentational components to complete the example. The code for this HomePage component looks like below:
HomePage.js
import React from 'react';
import Input from '../Common/Input';
import CountryList from '../Common/CountryList';
import * as countryActions from '../../Redux/actions/countryActions';
import * as userActions from '../../Redux/actions/userActions';
import { connect } from 'react-redux';
import { bindActionCreators } from "redux";

function HomePage(props) {
    return <><Input
        user_text={props.actions.user_text}
        fetch_countries={props.actions.fetch_countries}>
           </Input>
           <CountryList
        countries={props.country.countries}>
           </CountryList>
           </>;
}
const matchStateToProps = (state) => {
    return {
        country: state.country,
        text: state.text
    }
}
const matchDispatchToProps = (dispatch) => {
    return {
        actions: {
            fetch_countries: bindActionCreators(countryActions.fetch_countries, dispatch),
            fetch_countries_begin:
bindActionCreators(countryActions.fetch_countries_begin, dispatch),
            fetch_countries_success:
bindActionCreators(countryActions.fetch_countries_success, dispatch),
            fetch_countries_error:
bindActionCreators(countryActions.fetch_countries_error, dispatch),
            user_text:
bindActionCreators(userActions.user_text, dispatch)
        }
    }
}

export default
connect(matchStateToProps, matchDispatchToProps)(HomePage);
We are now done with the code part of our application. In the next section, we look at how to run and see the application in action.
5. Running the Application
We need to make some changes to our start command in the package.json. The changes ensure both the server-side API and the client code are launched in parallel. There are utilities available out there to do this, but for this example, I just used the start command instead. Let us modify the start command to look like below:
package.json
...
"start": "start react-scripts start && start node api/index.js",
...
Now running the command npm start launches our app and the result looks like below:
6. Download the Source Code
This was a ReacJS and Redux Tutorial
You can download the full source code of this example here: ReactJS and Redux Tutorial
