In this article, we take a look at unit testing ReactJS code. Writing Unit tests for code is the norm these days making testing of code less of an after thought. We take a look at some Unit Testing frameworks for ReactJS and how to configure them. There is a healthy ecosystem of Testing tools & Frameworks around ReactJS and we can pick and choose as per our preferences. In this article, though, I will describe using the Jest Testing Framework along with Enzyme Helper library.
Enzyme helper library is an abstraction built on top of the more verbose and lower level API of React Test Utils.
We build a primitive calculator application in this example and write tests to validate our code. For this example we use the following set of tools and frameworks. You can switch to your preferences for some of the optional tools listed below:
1. Initial Application Structure
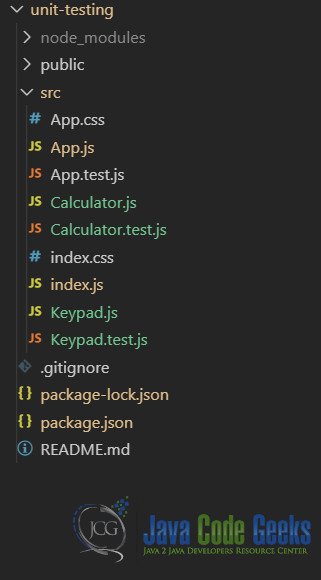
We create our initial application structure using the create-react-app tool. To get started execute the below command to create the skeleton of our ReactJS Application.
>npx create-react-app unit-testing .
This command creates our application unit-testing and its structure should resemble the screenshot below
2. Writing our First Test
With create-react-app one advantage is that our application comes preconfigured with Jest testing framework. Yes, we do not need to perform any additional configuration. We can start writing our tests from the get go. So, let us get started writing our first test. But before we do that we need some functionality to test. I have coded a rudimentary calculator app for the purposes of this test. It has the below two components, we do not need to go into the implementation details of these for now. Instead focus on testing these components.
Calculator.js
import React, { useState } from 'react';
import Keypad from "./Keypad";

function Calculator() {
    const [result, setResult] = useState(0);
    const [operator, setOperator] = useState("");
    const [operand2, setOperand2] = useState(0);
    const [operand1, setOperand1] = useState(0);
    const handleChange = ({ target }) => {
        setResult(target.value);
    }
    const handleEqualsClick = ({ target }) => {
        if (operand1 && operand2 && operator) {
            switch (operator) {
                case "/": setResult(operand1 / operand2);
                    setOperand1(operand1 / operand2);
                    break;
                case "X": setResult(operand1 * operand2);
                    setOperand1(operand1 * operand2);
                    break;
                case "+": setResult(operand1 + operand2);
                    setOperand1(operand1 + operand2);
                    break;
                case "-": setResult(operand1 - operand2);
                    setOperand1(operand1 - operand2);
                    break;
                default:
                    break;
            }
            setOperand2(0);
            setOperator("");
        }
    }
    const handleClearClick = ({ target }) => {
        setResult(0);
        setOperator("");
        setOperand2(0);
        setOperand1(0);
    }
    const handleKeypadClick = ({ target }) => {
        if (!operator) {
            setOperand1(+(operand1 + "" + target.value));
            setResult(+(operand1 + "" + target.value));
        } else {
            setOperand2(+(operand2 + "" + target.value));
            setResult(+(operand2 + "" + target.value));
        }
    }
    const handleOperatorClick = ({ target }) => {
        if (operator) {
            handleEqualsClick({ target });
        }
        setOperator(target.value);
        setOperand2(0);
    }
    return <div className="container-fluid">
        <div className="row">
            <input type="text" readOnly onChange={handleChange} value={result} />
        </div>
        <div className="row">
            <Keypad onEqualsClick={handleEqualsClick}
                onClearClick={handleClearClick}
                onKeyClick={handleKeypadClick}
                onOperatorClick={handleOperatorClick} />
        </div>
    </div>;
}
export default Calculator;
Keypad.js
import React from 'react';

function Keypad(props) {

    return <div className="container">
        <div className="row">
            <button className="btn btn-info m-1" value="1" onClick={props.onKeyClick}>1</button>
            <button className="btn btn-info m-1" value="2" onClick={props.onKeyClick}>2</button>
            <button className="btn btn-info m-1" value="3" onClick={props.onKeyClick}>3</button>
            <button className="btn btn-info m-1" value="/" onClick={props.onOperatorClick}>/</button>
        </div>
        <div className="row">
            <button className="btn btn-info m-1" value="4" onClick={props.onKeyClick}>4</button>
            <button className="btn btn-info m-1" value="5" onClick={props.onKeyClick}>5</button>
            <button className="btn btn-info m-1" value="6" onClick={props.onKeyClick}>6</button>
            <button className="btn btn-info m-1" value="X" onClick={props.onOperatorClick}>X</button>
        </div>
        <div className="row">
            <button className="btn btn-info m-1" value="7" onClick={props.onKeyClick}>7</button>
            <button className="btn btn-info m-1" value="8" onClick={props.onKeyClick}>8</button>
            <button className="btn btn-info m-1" value="9" onClick={props.onKeyClick}>9</button>
            <button className="btn btn-info m-1" value="-" onClick={props.onOperatorClick}>-</button>
        </div>
        <div className="row">
            <button className="btn btn-info m-1" value="Clear" onClick={props.onClearClick}>C</button>
            <button className="btn btn-info m-1" value="0" onClick={props.onKeyClick}>0</button>
            <button className="btn btn-info m-1" value="=" onClick={props.onEqualsClick}>=</button>
            <button className="btn btn-info m-1" value="+" onClick={props.onOperatorClick}>+</button>
        </div>
    </div>;
}
export default Keypad;
We write tests in files with the same name as the component we are testing but ending in test.js. These are then picked up by Jest when we test and the tests written inside are executed. Let us create two files to test each of our two components above. Our first test is to check if the above components render without crashing. The test for this looks like below:
Keypad.test.js
import React from 'react';
import ReactDOM from 'react-dom';
import Keypad from './Keypad';

it('renders without crashing', () => {
    const div = document.createElement('div');
    ReactDOM.render(<Keypad />, div);
    ReactDOM.unmountComponentAtNode(div);
});
Calculator.test.js
import React from 'react';
import ReactDOM from 'react-dom';
import Calculator from './Calculator';

it('renders without crashing', () => {
    const div = document.createElement('div');
    ReactDOM.render(<Calculator />, div);
    ReactDOM.unmountComponentAtNode(div);
});
Each test begins with call to it function with the first parameter describing the expectations as in “it renders without crashing…”. This convention is followed with each test we write for all components. The second parameter is a callback with our test forming the body of the callback. In the above tests we render our components to the DOM using ReactDOM.
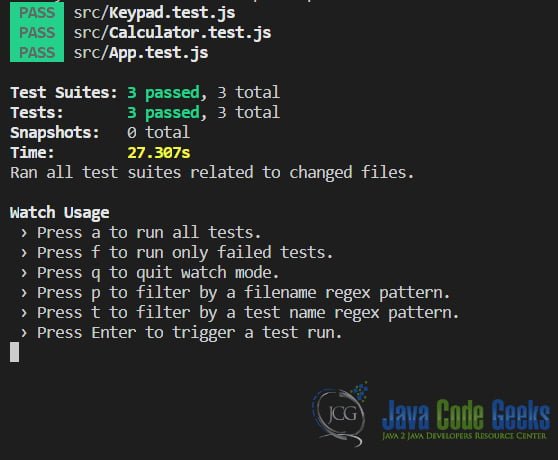
Now to run these tests we run the following command from the terminal at the root of the project.
>npm test
This runs the test and the results are displayed like below:
We explore more advanced scenarios in the following sections
3. Snapshot Testing
The concept of snapshot testing works simply by comparing a reference snapshot of the UI with the current UI generated by the test. In case there is an anomaly, it could point to an issue leading to inadvertent change in the UI of the component. But it could also be due to intentional and deliberate change in the layout. In latter we need to update the stored snapshots. We take a look at both cases below as we test our Container Calculator Component. Point to note is that the snapshots are not images rather tree of nodes in our rendered Component serialized to a file as JSON.
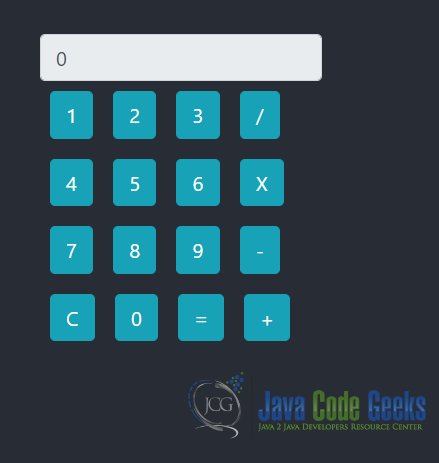
We will write a test to test the UI of our calculator. For reference this is what our UI looks like right now.
We write a test to validate that new changes do not make unintentional changes to the layout of our Calculator. We add the following code to our Calculator.test.js file.
it('renders correctly', () => {
    const Calc = renderer.create(<Calculator />).toJSON();
    expect(Calc).toMatchSnapshot();
});
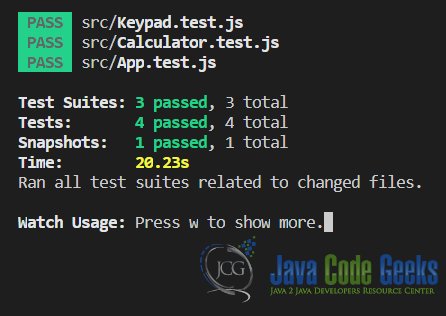
Let us run this test using the npm test command. This the first time we have run a snapshot test and this causes a snapshot to be generated and save to a folder __snapshots___ as a file named Calculator.test.js.snap. Now when we run the test again we should see the below output as all the tests pass.
To test out the snapshot test let us make a change to the layout to simulate an inadvertent change or bug. And then run the tests again to see the output below:
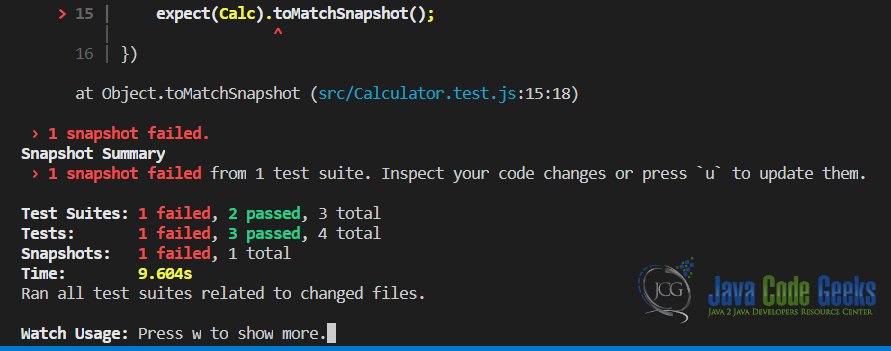
Such tests are useful to ensure that inadvertent or side effects leading to broken UI are caught early on. Next we take a look at how we can use Jest to make asserts and mock artifacts.
4. Mocking
One of the essential parts of unit testing is to isolate or insulate the unit being tested. So that test results are not affected by external events or the environment. Like availability of server side APIs or external resources or other child or parent components. To enable such isolation all testing frameworks provide capabilities to mock artifacts. So that our tests focus on testing one unit at a time.
For example here when we test the keypad component which is a child of Calculator component and renders buttons. We would like to isolate the Keypad component from both so that we can test the behavior of Keypad component alone. As can be seen from code we pass in event callbacks from Calculator to Keypad and we forward the callbacks to the button’s onclick handler based on its value in Keypad. Let us mock these callbacks and simulate button clicks to and then assert that the Calculator passed callbacks are invoked with proper arguments. Our test file would now look like below:
Keypad.test.js
import React from 'react';
import ReactDOM from 'react-dom';
import Keypad from './Keypad';
import Enzyme, { shallow } from 'enzyme';
import Adapter from 'enzyme-adapter-react-16';

Enzyme.configure({ adapter: new Adapter() });

// Mocked Callbacks
const handleKeypadClick = jest.fn(({ target }) => target.value);
const handleOperatorClick = jest.fn(({ target }) => target.value);
const handleEqualsClick = jest.fn(({ target }) => target.value);
const handleClearClick = jest.fn(({ target }) => target.value);

it('renders without crashing', () => {
    const div = document.createElement('div');
    ReactDOM.render(<Keypad />, div);
    ReactDOM.unmountComponentAtNode(div);
});

it('should call handleKeypadClick', () => {
    const keypad = shallow(<Keypad onEqualsClick={handleEqualsClick}
        onClearClick={handleClearClick}
        onKeyClick={handleKeypadClick}
        onOperatorClick={handleOperatorClick} />);

    keypad.find({ value: '2' }).simulate('click', { target: { value: 2 } });

    expect(handleKeypadClick).toBeCalledWith({ target: { value: 2 } });

});
it('should call handleEqualsClick', () => {
    const keypad = shallow(<Keypad onEqualsClick={handleEqualsClick}
        onClearClick={handleClearClick}
        onKeyClick={handleKeypadClick}
        onOperatorClick={handleOperatorClick} />);

    keypad.find({ value: '=' }).simulate('click', { target: { value: '=' } });
    expect(handleEqualsClick).toBeCalledWith({ target: { value: '=' } })
});

it('should call handleOperatorClick', () => {
    const keypad = shallow(<Keypad onEqualsClick={handleEqualsClick}
        onClearClick={handleClearClick}
        onKeyClick={handleKeypadClick}
        onOperatorClick={handleOperatorClick} />);

    keypad.find({ value: '+' }).simulate('click', { target: { value: '+' } });
    expect(handleOperatorClick).toBeCalledWith({ target: { value: '+' } })
});

it('should call handleClearClick', () => {
    const keypad = shallow(<Keypad onEqualsClick={handleEqualsClick}
        onClearClick={handleClearClick}
        onKeyClick={handleKeypadClick}
        onOperatorClick={handleOperatorClick} />);

    keypad.find({ value: 'Clear' }).simulate('click', { target: { value: 'Clear' } });
    expect(handleClearClick).toBeCalledWith({ target: { value: 'Clear' } })
});
5. Download the Source Code
You can download the full source code of this example here: ReactJS Unit Testing Example
