Next.js is a React framework that allows developers to build server-side rendered (SSR) or statically generated web applications. Let’s delve into the intricacies of Next.js POST and PUT requests, focusing on CRUD functionality.
1. Overview of Next.js
1.1 Key Features of Next.js
- Server-side Rendering (SSR): Next.js enables server-side rendering out of the box, improving performance and SEO by generating HTML on the server for each request.
- Static Site Generation (SSG): Next.js supports static site generation, allowing developers to pre-render pages at build time for improved performance and lower hosting costs.
- Automatic Code Splitting: Next.js automatically splits JavaScript code into smaller chunks, ensuring that only necessary code is loaded for each page, resulting in faster load times.
- Client-side Routing: Next.js provides a simple and intuitive routing system that allows for seamless navigation between pages without full page reloads.
- API Routes: With Next.js, developers can easily create API routes to handle server-side logic and data fetching, making it ideal for building full-stack applications.
- Zero Configuration: Next.js requires minimal setup and configuration, allowing developers to focus on writing code rather than configuring tools.
- Hot Module Replacement (HMR): Next.js supports hot module replacement, enabling instant updates to the application code during development without the need for full page reloads.
- Static File Serving: Next.js serves static assets like images, stylesheets, and fonts efficiently, improving overall performance.
- Dynamic Imports: Next.js allows for dynamic imports, enabling lazy loading of components and routes, further optimizing performance.
1.2 Advantages of Using Next.js
Next.js offers several advantages for web development:
- Improved Performance: Next.js optimizes performance through server-side rendering, automatic code splitting, and static site generation.
- Enhanced SEO: Server-side rendering and static site generation improve SEO by ensuring that search engines can crawl and index content effectively.
- Streamlined Development: Next.js simplifies development with features like zero configuration, hot module replacement, and built-in routing.
- Scalability: Next.js is highly scalable and can be used to build small projects as well as large-scale applications.
- Flexibility: Next.js provides flexibility in choosing between server-side rendering, static site generation, or a combination of both based on project requirements.
- Full-stack Capabilities: With support for API routes, Next.js enables developers to build full-stack applications using a single framework.
2. Code Example
Creating a “CRUD” application in Next.js is straightforward. Next.js is a React framework that enables server-side rendering and simplifies the creation of React applications. Here’s a simple step-by-step guide to creating a “CRUD” application in Next.js:
2.1 Setting up Node Js
Ensure that Node.js and npm (Node Package Manager) are installed on your system. It’s recommended to use a Node.js version greater than 18 when working with Next.js.
2.2 Creating a Backend application
To understand the Next.js and http api interaction we need to create a backend application using the express.js framework. You can refer to this article to understand and download a sample backend application.
2.3 Create a new Next.js app
You have the option to initiate a new Next.js application using the create-next-app command, a tool provided by the Next.js team.
npx create-next-app next-http-app
Executing this command will generate a fresh directory named next-http-app and initialize a new Next.js project within it. The command will present prompts for inputs (such as TypeScript or JavaScript app and using default CSS or SCSS), allowing you to make decisions based on your requirements.
2.4 Navigate into the project directory
Navigate to the project directory and modify the src/app/page.tsx typescript file. By default, Next.js creates a simple homepage. Open this file and replace its contents with the following:
"use client";

import React, { useEffect, useState } from "react";

type User = {
  id: number;
  first_name: string;
  last_name: string;
  email: string;
  gender: string;
  phone: string;
};

const Home = () => {
  const [data, setData] = useState<User[]>([]);
  const [deleteSuccessMessage, setDeleteSuccessMessage] = useState("");
  const [createSuccessMessage, setCreateSuccessMessage] = useState("");
  const [updateSuccessMessage, setUpdateSuccessMessage] = useState("");

  useEffect(() => {
    fetchData();
  }, []);

  const fetchData = async () => {
    try {
      const res = await fetch("http://localhost:10091/users");
      const responseData = await res.json();
      setData(responseData.info);
    } catch (err) {
      console.error(err);
    }
  };

  const setTimedMessage = (setMessage: (message: string) => void, message: string) => {
    setMessage(message);
    setTimeout(() => {
      setMessage("");
    }, 60000);
  };

  const handleDelete = async (id: number) => {
    try {
      await fetch(`http://localhost:10091/users/${id}`, { method: "DELETE" });
      setData(data.filter((user) => user.id !== id)); // Remove the deleted user from the state
      setTimedMessage(setDeleteSuccessMessage, "Delete successful");
    } catch (err) {
      console.error(err);
    }
  };

  const handleCreateOrUpdate = async (method: string, url: string, userData: User, setMessage: (message: string) => void) => {
    try {
      const res = await fetch(url, {
        method: method,
        headers: { "Content-Type": "application/json" },
        body: JSON.stringify(userData),
      });
      setTimedMessage(setMessage, `User ${method === "POST" ? "created" : "updated"} successfully`);
      fetchData();
    } catch (err) {
      console.error(err);
    }
  };

  const handleCreate = async (userData: User) => {
    await handleCreateOrUpdate("POST", "http://localhost:10091/users", userData, setCreateSuccessMessage);
  };

  const handleUpdate = async (id: number, updatedUserData: User) => {
    await handleCreateOrUpdate("PUT", `http://localhost:10091/users/${id}`, updatedUserData, setUpdateSuccessMessage);
  };

  return (
    <main>
      <div>
        <h1>Next.js - HTTP CRUD example</h1>
        {deleteSuccessMessage && <div>{deleteSuccessMessage}</div>}
        {createSuccessMessage && <div>{createSuccessMessage}</div>}
        {updateSuccessMessage && <div>{updateSuccessMessage}</div>}
        <table>
          <thead>
            <tr>
              <th>first name</th>
              <th>last name</th>
              <th>email address</th>
              <th>gender</th>
              <th>phone number</th>
              <th>Actions</th>
            </tr>
          </thead>
          <tbody>
            {data.map((user) => (
              <tr key={user.id}>
                <td>{user.first_name}</td>
                <td>{user.last_name}</td>
                <td>{user.email}</td>
                <td>{user.gender}</td>
                <td>{user.phone}</td>
                <td>
                  <button onClick={() => handleDelete(user.id)}>Delete</button>
                  <button onClick={() => handleUpdate(user.id, { ...user, firstName: "Updated" })}>Update</button>
                </td>
              </tr>
            ))}
          </tbody>
        </table>
        <button onClick={() => handleCreate({ firstName: "New", lastName: "User", email: "newuser@example.com", gender: "Male", phone: "1234567890" })}>Create New User</button>
      </div>
    </main>
  );
};

export default Home;
2.4.1 Explanation
This code is a React component called `Home` that demonstrates basic CRUD (Create, Read, Update, Delete) operations using HTTP requests in a React application. Let’s break it down:
- Imports: The code imports necessary functions and types from React to create functional components.
- Type Declaration: Defines a type User representing the structure of user data.
- State Initialization: Initializes state variables using the useState hook. data stores an array of users, deleteSuccessMessage, createSuccessMessage, and updateSuccessMessage store messages indicating the success of delete, create, and update operations respectively.
- Fetching Data: Uses the useEffect hook to fetch user data from a local server when the component mounts. The fetchData function sends a GET request to the server and updates the data state with the received user data.
- Timed Message: Defines a function setTimedMessage to set a message for a specific duration.
- Handle Delete: Defines a function handleDelete to delete a user. It sends a DELETE request to the server with the user’s id, removes the deleted user from the state, and sets a timed success message.
- Handle Create or Update: Defines a function handleCreateOrUpdate to handle both create and update operations. It sends a POST or PUT request to the server with the user data, sets a timed success message, and fetches updated data.
- Handle Create: Defines a function handleCreate to create a new user.
- Handle Update: Defines a function handleUpdate to update an existing user.
- Render: Renders a main section containing a header, success messages, a table displaying user data, buttons for delete and update operations, and a button to create a new user.
- Table Rows: Maps through the data array to render table rows with user data.
- Event Handlers: Provides event handlers for delete, update, and create operations.
- Export: Exports the Home component as the default export.
Next.js provides the default CSS setup. To disable the default CSS, you can comment out the code in the src/app/globals.css file.
3. Run the development server
npm run dev
This command will start the development server, and you’ll be able to see your Next.js app running on http://localhost:3000. If the port is already in use, Next.js will automatically switch to a different port. If you need to specify a custom port, update the scripts tag in the package.json file as shown below.
"scripts": {
    "dev": "next dev -p 8200",
    "build": "next build",
    "start": "next start -p 8202",
    "lint": "next lint"
  }
Once the developer server is up you can see the changes reflected in your browser at http://localhost:8200.
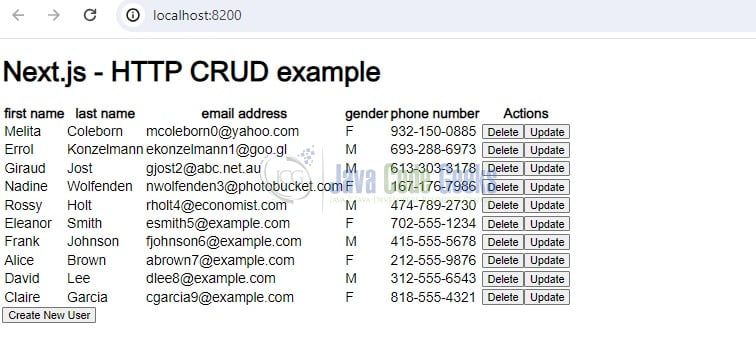
Feel free to interact with the Create, Update, and Delete buttons to explore the CRUD functionality within the Next.js application.
4. Conclusion
In conclusion, grasping the functionality of CRUD operations – Create, Read, Update, and Delete – within a backend application and observing the subsequent outcomes is pivotal for modern web development. These fundamental operations form the cornerstone of interactions between frontend and backend systems, facilitating the exchange of data and enabling dynamic content rendering. By diving into the intricacies of CRUD functionalities, developers acquire a deeper understanding of how information is managed and manipulated across web applications, empowering them to construct resilient and efficient systems. Moreover, mastering CRUD operations enhances problem-solving capabilities and lays the groundwork for crafting seamless user experiences. Ultimately, the adept utilization of CRUD functionalities contributes to the development of responsive, interactive, and feature-rich web applications that adeptly address the evolving demands of users in today’s digital landscape.
5. Download the Code
The tutorial provided instructions on initiating CRUD requests from the Next.js application to a backend application and observing the resulting outcomes.
You can download the full source code of this example here: HTTP POST and PUT calls in Next.js
