Netty is a framework for building high-performance, scalable network applications in Java. One of its key features is its event-driven architecture, which allows us to handle network events efficiently. In this article, we’ll dive into how to customize event handlers and listeners in a Netty chat room application.
1. Netty’s Event Model
Netty is built around the concept of channels and handlers. When network events occur (such as receiving data or a new connection), Netty triggers events that are handled by specific event handlers. These handlers can be customized to perform various tasks based on the type of event.
1.1 Understanding Event Handlers
Custom event handlers in Netty are implementations of the ChannelHandler interface. This interface defines methods that handle various channel events, such as channel activation, data read, channel close, and exceptions. By extending SimpleChannelInboundHandler, we can selectively override the methods that correspond to the events we want to handle.
Listeners in Netty can be implemented using the ChannelFutureListener interface. This interface allows us to specify tasks that should be executed when a certain operation on a ChannelFuture is completed. For instance, we can define a listener to handle actions after a write operation has finished.
2. Building a Chat Room Application with Netty
Let’s create a simple chat room application using Netty. We will use custom event handlers to manage incoming messages and broadcasts to all connected clients. Below is a breakdown of how we can leverage custom event handlers and listeners to create a chat room application:
- Chat Server Handler: This handler should extend
SimpleChannelInboundHandler<String>. It should implement thechannelRead0method to handle incoming chat messages. Upon receiving a message, it should broadcast it to all connected users in the chat room. - Chat Client Handler: This handler should also extend
SimpleChannelInboundHandler<String>. It should handle incoming chat messages received from the server and display them to the user. Additionally, it should implement methods to handle user input and send messages to the server. - User Management: The server needs to maintain a list of connected users. This can be achieved using a
List<Channel>to store a list of connected client channels.
3. Setting up Dependencies
First, let’s ensure we have Maven set up to manage our project dependencies. Include the following Netty dependency in your pom.xml (for Maven):
        <dependency>
            <groupId>io.netty</groupId>
            <artifactId>netty-all</artifactId>
            <version>4.1.105.Final</version>
        </dependency>
4. Implementing the Chat Server
First, we will create a chat server ChatServer.java that echoes messages to all connected clients.
4.1 Chat Server
Here is the server code responsible for bootstrapping the server channel and starting the server. This code binds the server to a specified port where it will actively listen for incoming connections.
import io.netty.bootstrap.ServerBootstrap;
import io.netty.channel.*;
import io.netty.channel.nio.NioEventLoopGroup;
import io.netty.channel.socket.SocketChannel;
import io.netty.channel.socket.nio.NioServerSocketChannel;
import io.netty.handler.codec.string.StringDecoder;
import io.netty.handler.codec.string.StringEncoder;
import java.util.List;
import java.util.ArrayList;

public class ChatServer {

    public static void main(String[] args) throws Exception {
        EventLoopGroup bossGroup = new NioEventLoopGroup(1);
        EventLoopGroup workerGroup = new NioEventLoopGroup();

        try {
            ServerBootstrap serverBootstrap = new ServerBootstrap();
            serverBootstrap.group(bossGroup, workerGroup)
                    .channel(NioServerSocketChannel.class)
                    .childHandler(new ChannelInitializer<SocketChannel>() {
                        @Override
                        public void initChannel(SocketChannel ch) throws Exception {
                            ChannelPipeline pipeline = ch.pipeline();
                            pipeline.addLast(new StringDecoder());
                            pipeline.addLast(new StringEncoder());
                            pipeline.addLast(new ChatServerHandler());
                        }
                    });

            ChannelFuture channelFuture = serverBootstrap.bind(8888).sync();
            System.out.println("Chat server started successfully and is ready to accept clients.");
            channelFuture.channel().closeFuture().sync();
        } finally {
            bossGroup.shutdownGracefully();
            workerGroup.shutdownGracefully();
        }
    }
}
The above code block sets up and initializes a Netty-based chat server, defining how it handles incoming connections, processes I/O operations, and manages client communication.
First, we create two EventLoopGroup instances: bossGroup for handling incoming connections and workerGroup for handling the I/O work.
We Initialize a ServerBootstrap instance to set up and configure the server and associate the bossGroup and workerGroup with the ServerBootstrap to handle incoming connections and I/O operations, respectively. Next, we specify NioServerSocketChannel as the channel type, which indicates the use of NIO-based server sockets for accepting incoming connections.
Next, we set up a ChannelInitializer to configure new SocketChannel instances created by the server and define a pipeline for each SocketChannel that includes a StringDecoder to decode incoming messages and a StringEncoder to encode outgoing messages. We also add a custom ChatServerHandler to the pipeline, responsible for handling incoming messages and managing client connections.
Next, we bind the server to port 8888 using serverBootstrap.bind(8888).sync(), initiating the server’s listening process and use (channelFuture.channel().closeFuture().sync()) to keep the server running until termination.
4.2 Chat Server Handler
Here is the handler used by the chat server.
class ChatServerHandler extends SimpleChannelInboundHandler<String> {

    // List of connected client channels.
    static final List<Channel> connectedUsers = new ArrayList<>();

    @Override
    public void channelActive(ChannelHandlerContext ctx) throws Exception {
        System.out.println("Client connected: " + ctx.channel().remoteAddress());
        connectedUsers.add(ctx.channel());
    }

    @Override
    public void channelRead0(ChannelHandlerContext ctx, String receivedMessage) throws Exception {

        System.out.println("Server Received message: " + receivedMessage);

        // Broadcast the received message to all connected clients
        for (Channel channel : connectedUsers) {
            channel.writeAndFlush(" " + receivedMessage + '\n');
        }
    }

    @Override
    public void exceptionCaught(ChannelHandlerContext ctx, Throwable cause) throws Exception {
        ctx.close();
    }
}
5. Implementing the Chat Client
Next, let’s implement a simple chat client that connects to our server.
5.1 Chat Client
import io.netty.bootstrap.Bootstrap;
import io.netty.channel.*;
import io.netty.channel.nio.NioEventLoopGroup;
import io.netty.channel.socket.SocketChannel;
import io.netty.channel.socket.nio.NioSocketChannel;
import io.netty.handler.codec.string.StringDecoder;
import io.netty.handler.codec.string.StringEncoder;
import java.util.Scanner;

public class ChatClient {

    static String clientName;

    public static void main(String[] args) throws Exception {

        // Get name of the user for this chat session.
        Scanner scanner = new Scanner(System.in);
        System.out.println("Please enter your name: ");
        if (scanner.hasNext()) {
            clientName = scanner.nextLine();
            System.out.println("Welcome " + clientName);
        }

        EventLoopGroup group = new NioEventLoopGroup();

        try {
            Bootstrap bootstrap = new Bootstrap();
            bootstrap.group(group)
                    .channel(NioSocketChannel.class)
                    .handler(new ChannelInitializer<SocketChannel>() {
                        @Override
                        public void initChannel(SocketChannel ch) throws Exception {
                            ChannelPipeline pipeline = ch.pipeline();
                            pipeline.addLast(new StringDecoder());
                            pipeline.addLast(new StringEncoder());
                            pipeline.addLast(new ChatClientHandler());
                        }
                    });

            ChannelFuture cf = bootstrap.connect("localhost", 8888).sync();

            while (scanner.hasNext()) {
                String input = scanner.nextLine();
                Channel channel = cf.sync().channel();
                channel.writeAndFlush("[" + clientName + "]: " + input);
                channel.flush();
            }

            cf.channel().closeFuture().sync();
        } finally {
            group.shutdownGracefully();
        }
    }
}
The above code configures an Bootstrap instance for setting up the client. In this class, we specify a NioSocketChannel for network communication and set up a ChannelInitializer to define how channels are initialized. StringDecoder and StringEncoder are added to the pipeline to handle inbound and outbound messages. We also add a custom ChatClientHandler to the pipeline for handling incoming messages.
Next, we connect to the chat server running on localhost at port 8888 using the configured Bootstrap and use the ChannelFuture (cf) for an asynchronous operation and connection to the server.
5.1.1 Sending Messages
The main method begins the execution of the chat client by asking the user to enter their name using Scanner. To send messages, the program enters a loop that continuously reads user input using Scanner, retrieves the channel from ChannelFuture (cf) and sends the user’s input to the server in the format "[clientName]: message".
5.2 Chat Client Handler Class
Below is the channel handler class that prints chat messages for the client.
class ChatClientHandler extends SimpleChannelInboundHandler<String> {

    @Override
    public void channelRead0(ChannelHandlerContext ctx, String receivedMessage) throws Exception {
        System.out.println("Received message: " + receivedMessage);
    }

}
6. Running the Chat Application
Here are the steps to execute this example. First, compile and run the server class (ChatServer.java) in a separate terminal window with the following command and wait until it has started and is ready to accept clients. Keep an eye on the logs for any messages as shown in Fig 1.0
mvn exec:java -Dexec.mainClass=com.jcg.chatserver.ChatServer

After the server is up and running, launch two or more client instances in separate terminal windows and run the (ChatClient.java) with the following command:
mvn exec:java -Dexec.mainClass=com.jcg.chatclient.ChatClient
Enter a username when prompted in the console, then exchange chat messages via console input and observe the messages being delivered to other clients, as shown in the screenshot of the console output below.
6.1 Example Communication Output
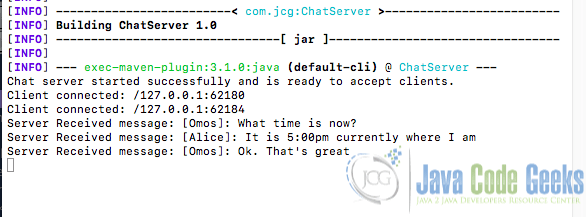
Chat Server Console:
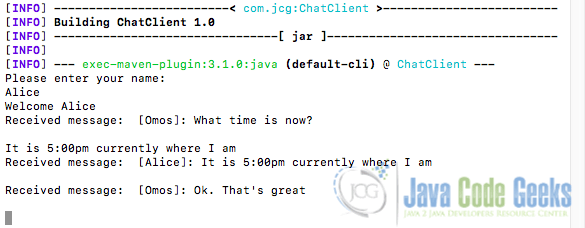
Client Terminal 1:
Client Terminal 2:
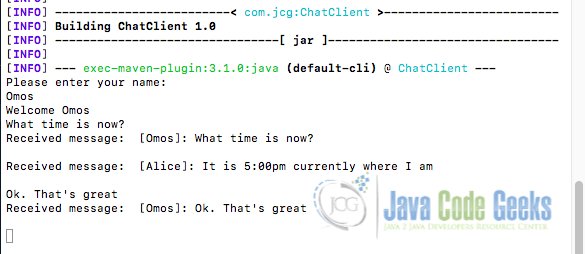
As you can observe in the console logs above, when we type messages in the clients, we will see them being echoed back to all connected clients by the server.
7. Conclusion
This article explored how to use custom event handlers and listeners in Netty to build a simple chat room application. Netty’s powerful event-driven architecture allows us to create efficient and scalable network applications. This chat room example demonstrates the fundamentals of Netty’s event model and how it can be utilized to build real-time communication systems.
8. Download the Source Code
This tutorial was on how to customize event handlers and listeners in Netty by building a chat room app.
You can download the full source code of this example here: Netty chat room customize event handlers listeners
