In the previous post we created our first micro service “ProductService” using SpringBoot and Docker. In this part we will go into details of how to manage multiple microservices using Spring Cloud, netflix libraries, API gateways .
For our order management system, let’s say, a minimal relationship could be something like this :
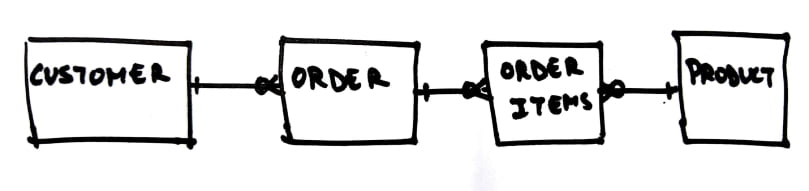
So, let’s build 2 more services called “orderService” and “customerService” in the similar manner how we build the “productService”.
OrderService
To create an order, we could pass customerId, a list of items with productIds and quantity. Lets see how to do that :
@PostMapping("/orders")
    public Order save(@RequestBody CustomerOrderRequest request) {
        return orderRepository.save(Order
                .builder()
                .customerId(request.getCustomerId())
                .externalReference(request.getExternalReference())
                .items(toItems(request.getItems())).build());
    }

    private List toItems(List items) {
        return items.stream().map(item -> Item.builder().productId(item.getProductId())
                .quantity(item.getQuantity()).build()).collect(Collectors.toList());
    }
Here, we are saving customerId, list of items with productIds into the database.
For fetching the complete order Details we would need the complete customer object and the product details. The result would look something like this :
{
	"orderId": "1234",
	"externalReference": "234257hf",
	"customer": {
		"id": 123,
		"firstName": "anirudh",
		"lastName": "bhatnagar",
		"phone": "21323",
		"email": "test@test.com",
		"address": {
			"addressLine1": "123",
			"addressLine2": "pwe",
			"city": "Syd",
			"state": "NSW",
			"country": "Aus",
			"postcode": 2000
		}
	},
	"createdDate": "2018-11-12",
	"items": [{
		"product": {
			"id": 123,
			"name": "Nike Shoes",
			"description": "Mens shoes",
			"price": "100",
			"sku": "1234"
		},
		"quantity": 3
	}],
	"totalOrderCost": "300.00",
	"totalOrderTax": "30.00"
}
The detailed order response should contain details of customer, address, product and total cost of the order. In order to fetch this information, the order service would need to fetch details from product service and customer service.
Fetching Product details from ProductService in Order Service
In order to fetch product service details in order Service, we would need a running product service, and a client in orderController to make a http GET call to ProductService. For the httpClient we would use OpenFeign a client library by Netflix, this is available as part of spring-cloud starter.So lets add that dependency in our build.gradle file :
implementation('org.springframework.cloud:spring-cloud-starter-openfeign')
dependencyManagement {
	imports {
		mavenBom "org.springframework.cloud:spring-cloud-dependencies:${springCloudVersion}"
	}
}
Now that we have added the dependency, we would be making a proxy interface called “ProductServiceProxy” to this service using @FeignClient :
@FeignClient(name = "product-service", url = "localhost:8001")
public interface ProductServiceProxy {

    @GetMapping("/products/{id}")
    Product getProduct(@PathVariable("id") Long id);
}
We’ve added the annotation @FeignClient to the interface and configured the name and url of the product service.
We need to also enable Feign client for our application by adding another annotation in our main class:
@SpringBootApplication
@EnableFeignClients
public class OrderServiceApplication {
......
Finally, we need to make the call to product service running at localhost port 8001 to fetch product details using product id provided in order and populate the order details response object :
@GetMapping("/orders/{id}")
    public CustomerOrderDetails getOrders(@PathVariable("id") Long orderId) {
        final Order order = orderRepository.findById(orderId).orElse(null);
        if (order == null) {
            return null;
        }
        return toCustomerOrderDetails(order);
    }

    private CustomerOrderDetails toCustomerOrderDetails(Order order) {
        return CustomerOrderDetails.builder()
                .orderId(order.getId())
                .createdDate(order.getCreatedDate())
                .externalReference(order.getExternalReference())
                .items(toItemList(order.getItems()))
                .build();
    }

    private List<com.anirudhbhatnagar.orderService.dto.product.Item> toItemList(List<Item> items) {
        return items.stream().map(item -> toItemDto(item)).collect(Collectors.toList());
    }

    private com.anirudhbhatnagar.orderService.dto.product.Item toItemDto(Item item) {
        return com.anirudhbhatnagar.orderService.dto.product.Item
                .builder()
                .product(productServiceProxy.getProduct(item.getProductId())).build();
    }
If you look at the above code carefully,
productServiceProxy.getProduct(item.getProductId())
you will see that, once we get request to fetch order details for a give orderId, we first get the order data saved in order service database and then using the productIds provided in each item or the order, we make a call to productService and populate a orderDetails response object.
Test it
Once the orderService is up and running on port 8002 and productService is running at port 8001. We can test our application: Make sure there are some products created using product service, as described in previous blog.
Note down the productId which you created in your product service and lets create a new order using the same : Do a POST on http://localhost:8002/orders using postman, with the request as given below :
{
"customerId" : "123",
"externalReference" : "1234567",
"items" : [{
	"productId" : 1,
	"quantity" : 2
}]
}
This will create a new order, not down the response to find the order Id. Now lets fetch the order details using this order Id : Do a GET on http://localhost/8002/orders/{order-id}, this should return you the following response :
{
    "orderId": 12,
    "externalReference": "1234567",
    "customer": null,
    "createdDate": null,
    "items": [
        {
            "product": {
                "id": "1",
                "name": "Nike",
                "description": "Shoes",
                "price": "100",
                "sku": "1234"
            },
            "quantity": 2
        }
    ],
    "totalOrderCost": "200"
}
So, here we saw how order service made a request to product service and populated the response object. However, we still see customer as “null”, So in order to populate the customer details, we would need fetch it from Customer Service. In order to set up Customer Service we would do the following :
1. Set up Customer Service in similar way how we did for product or order service using Spring initializer.
2. Set up Proxy client Service in OrderService
3. Call CustomerService from Order Controller to populate customer details inside the Order Details response object.
If everything is working fine, we should see the customer details as well.
Currently, we have hardcoded the URLs of the services in order service, but ideally they would need to be dynamically discovered. So, in the next section, we will add “Service Discovery” and “load balancing” to our 3 microservices.
The entire source code can be referenced here.
| Published on Java Code Geeks with permission by Anirudh Bhatnagar, partner at our JCG program. See the original article here: Spring Boot Microservices , Docker and Kubernetes workshop – part2 Opinions expressed by Java Code Geeks contributors are their own. |
