Web pages can consist of the number of web elements or GUI elements like radio buttons, text boxes, drop-downs, inputs, etc. Web locators in the context of Selenium automation testing are used to perform different actions on the web elements of a page. Which makes it no surprise that as a new Selenium user, the first thing we aim to learn is Selenium Locators.
These locators are the bread and butter of any Selenium automation testing framework, no matter the type of testing you are doing, ranging from unit testing to end-to-end automated cross browser testing. There are many types of locators used such as CSS Selector, XPath, Link, Text, ID, etc. are some of the popular locators for automated cross browser testing. So far, you get 8 types of locators in Selenium. This number however is gonna change in the new Selenium 4 release. Wondering why?
Well, with Selenium 3.0, each element is accessed separately as there is no way to access a web element relative to the nearby elements. This is where the new locator in Selenium 4 (Alpha) can be instrumental as the new locator methods allow you to find the nearby elements based on their visual location relative to other elements in the DOM.
Yep!! you heard it right. Selenium 4 will bring out a new Locator that has been in plans for quite some time now called Relative Locator. And in this post, we are going to do a deep dive into how you can use the latest Selenium 4 Relative Locator, for your daily automation testing.
We covered the features that you can expect from Selenium 4 in our previous post. And in that post itself, we alluded that we would be going in more details on new features. Well, here it is.

Downloading Selenium 4(Alpha)
Indisputably the most used web automation testing framework, Selenium, is widely used for end to end testing with a special special set of features that provide unparalleled automated cross browser testing capabilities. However, the last major number release i.e. Selenium 3.0 was released nearly 3 years ago in October of 2016. Though there is no release date as of yet, and officially Selenium 4 is not formally released, you can get a sneak peek through Selenium 4’s Alpha release.
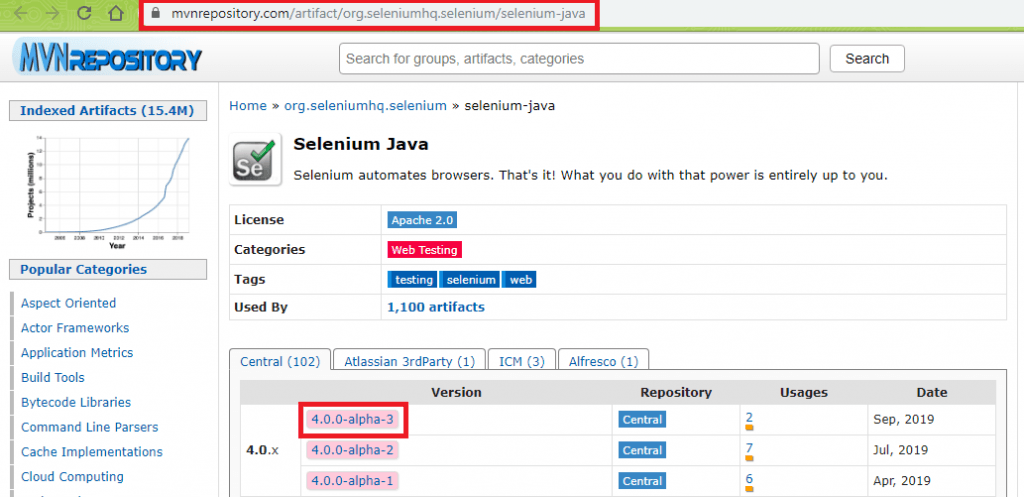
To start with, you have to download the Selenium 4 Alpha from the Maven repository. At the time of covering the Selenium 4 relative locator functionality as a part of this article, the latest version was 4.0.0-alpha-3. As this is an Alpha release of Selenium, we recommend switching back to the stable version i.e. 3.141.XX if you do not want to take any risks with your production test suite as you validate with Selenium automation testing.
Selenium 4 Relative Locator – Methods
As of now, Selenium 4 relative locator methods support usage with withTagName attribute. Following are the ‘relative locator’ options that can be used in Selenium automation testing:
Relative Locator |
Description |
|---|---|
above | Web element to be searched/located appears above the specified element. |
below | Web element to be searched/located appears below the specified element. |
toLeftOf | Web element to be searched/located appears to the left of the specified element. |
toRightOf | Web element to be searched/located appears to the right of the specified element. |
near | Web element to be searched/located is at most 50 pixels away from the specified element. |
Here is a screenshot of the implementation that highlights the usage of relative locators in Selenium automation testing (Source).
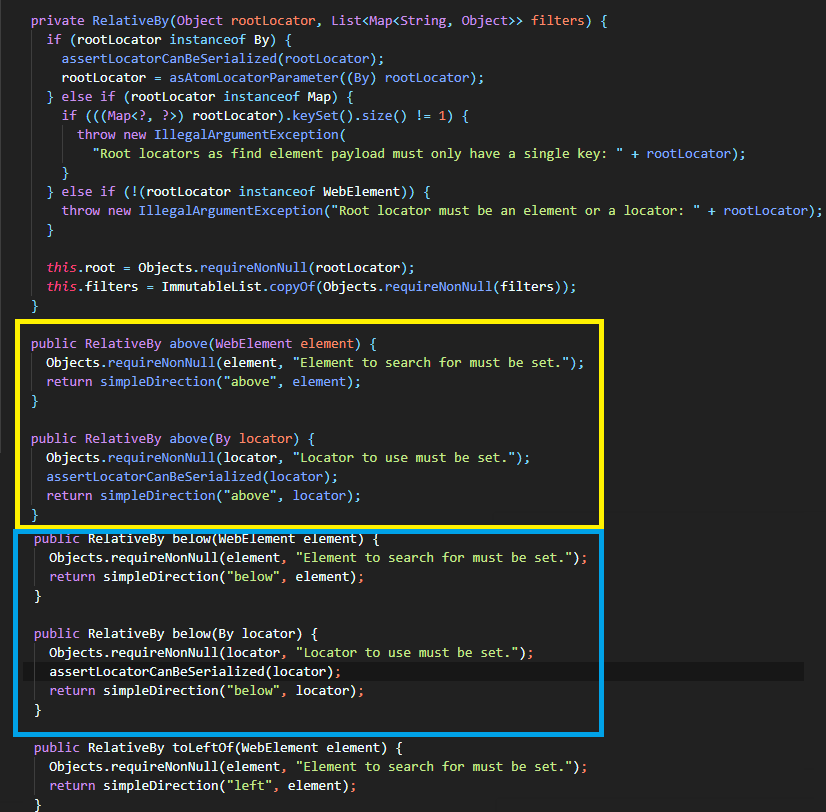
If you are wondering about how Selenium does it, well, it does so with the help of a JavaScript method called getBoundingClientRect(). This JavaScript method allows Selenium to locate the elements using the relative locators for Selenium testing.
Selenium 4 Relative Locator – Usage
The methods for relative locators in Selenium 4 are overloaded and can take relative WebElement or By locator as an argument. Shown below is a sample usage of the relative locator for Selenium automation testing using both the options:
WebElement txt_label = driver.findElement(By.cssSelector("label[id='uname']"));

WebElement txt_label =  driver.findElement(withTagName("input").toRightOf(txt_label));

String txt_name = driver.findElement(withTagName("input").toLeftOf(By.id("some_button"))
Execute Selenium Automation Testing With Relative Locator
Let’s get into action with the new Selenium 4 Relative Locator to perform automated cross browser testing. I am going to perform a trial run of Selenium 4 (Alpha) along with the local Chrome WebDriver. But before that, I am going to create a Maven project for implementation and testing. I will be using the TestNG framework as it can be easily integrated with Maven. Also, because of the built-in annotations (e.g. @BeforeClass, @AfterClass, @Test, etc.) that offers more clarity on the automation tests being triggered.
Also Read: Complete Guide On TestNG Annotations For Selenium Automation Testing
For both the tests that will be demonstrated further, the Project Object Model (pom.xml) file for the Maven project should be updated with the project configuration [including Selenium 4(Alpha)].
<project xmlns="http://maven.apache.org/POM/4.0.0" xmlns:xsi="http://www.w3.org/2001/XMLSchema-instance" xsi:schemaLocation="http://maven.apache.org/POM/4.0.0 http://maven.apache.org/xsd/maven-4.0.0.xsd">
  <modelVersion>4.0.0</modelVersion>
  <groupId>Group-Name</groupId>
  <artifactId>Artifact-Name</artifactId>
  <version>0.0.1-SNAPSHOT</version>
  <build>
        <plugins>
            <plugin>
                <groupId>org.apache.maven.plugins</groupId>
                <artifactId>maven-compiler-plugin</artifactId>
                <configuration>
                    <source>10</source>
                    <target>10</target>
                </configuration>
            </plugin>
        </plugins>
    </build>

    <dependencies>
        <dependency>
            <groupId>org.seleniumhq.selenium</groupId>
            <artifactId>selenium-java</artifactId>
            <version>4.0.0-alpha-3</version>
        </dependency>
        <dependency>
            <groupId>org.testng</groupId>
            <artifactId>testng</artifactId>
            <version>7.0.0</version>
            <scope>test</scope>
        </dependency>
        <dependency>
            <groupId>io.github.bonigarcia</groupId>
            <artifactId>webdrivermanager</artifactId>
            <version>3.0.0</version>
            <scope>compile</scope>
        </dependency>

        <!-- https://mvnrepository.com/artifact/org.slf4j/slf4j-nop -->
        <dependency>
            <groupId>org.slf4j</groupId>
            <artifactId>slf4j-nop</artifactId>
            <version>1.7.28</version>
            <scope>test</scope>
        </dependency>
    </dependencies>
</project>
Example 1 For Selenium 4 Relative Locators
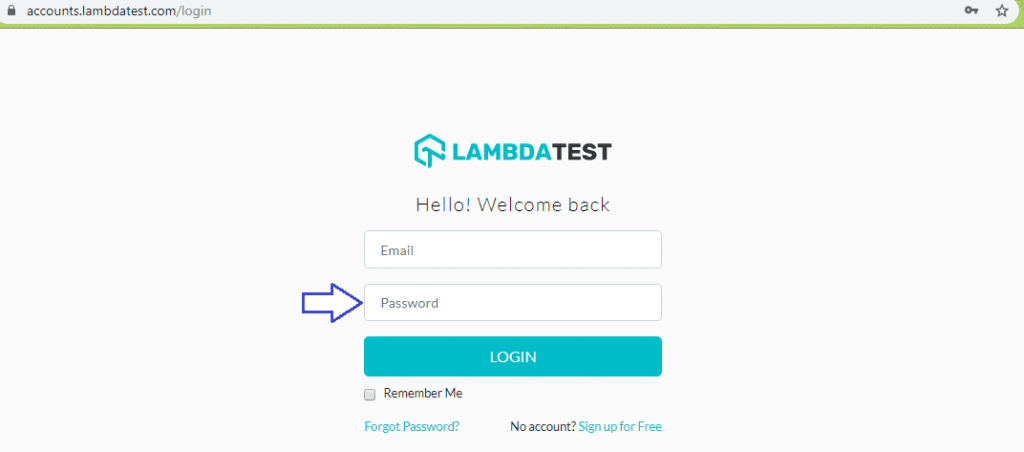
In the first example that demonstrates the usage of Selenium 4 relative locators, the intent is to automate the login to LambdaTest. As the test is performed on the Chrome browser, you should ensure that the Chrome WebDriver is available on the machine.
import io.github.bonigarcia.wdm.WebDriverManager;
import org.openqa.selenium.By;
import org.openqa.selenium.WebDriver;
import org.openqa.selenium.WebElement;
import org.openqa.selenium.chrome.ChromeDriver;
import org.openqa.selenium.firefox.FirefoxDriver;
import org.testng.annotations.AfterClass;
import org.testng.annotations.BeforeClass;
import org.testng.annotations.Test;
import static org.openqa.selenium.support.locators.RelativeLocator.withTagName;
import static org.testng.Assert.assertEquals;
import org.testng.annotations.Test;
import java.net.MalformedURLException;
import java.net.URL;

import java.util.concurrent.TimeUnit;

public class MavenRelocators {
    private WebDriver driver;
    boolean status = false;

    @BeforeClass
    public void setUp(){
        System.setProperty("webdriver.chrome.driver","C:\\location-of-chromedriver.exe");

        driver = new ChromeDriver();
        driver.get("https://accounts.lambdatest.com/login");
        driver.manage().window().maximize();

        driver.manage().timeouts().implicitlyWait(10, TimeUnit.SECONDS);
    }

    @AfterClass
    public void tearDown() throws Exception {
       if (driver != null) {
           driver.quit();
        }
    }

    @Test
    public void test_login_using_relative_locators_1(){
        // Find the label element above the login text box

        WebElement heightLabel = driver.findElement(By.xpath("//*[@id='app']/section/form/div/div/h1"));

        // Locate the textbox where username should be inputted

        WebElement heightUserBox = driver.findElement(withTagName("input")
                                         .below(heightLabel));

        heightUserBox.sendKeys("user-name");

        // Locate the textbox where password should be inputted

        WebElement heightPasswordBox = driver.findElement(withTagName("input")
                 .below(heightUserBox));

        heightPasswordBox.sendKeys("password");

        // Locate the submit button

        WebElement submitbutton = driver.findElement(By.xpath("//*[@id=\'app\']/section/form/div/div/button"));

        submitbutton.click();

        //Wait for 10 seconds to observe the output

        driver.manage().timeouts().implicitlyWait(10, TimeUnit.SECONDS);
    }
}
To find the input field where the username i.e. email-address has to be entered; we first locate the label that is above the input box using By.xpath method. To get the details of the web element i.e. XPath in this case, you should make use of Inspect option in the Chrome browser.
Code Walkthrough:
WebElement heightUserBox = driver.findElement(withTagName("input")As seen in the above statement, the input argument to FindElement method is withTagName. On successful execution, it returns a RelativeLocator.RelativeBy object. The output will be relative to the WebElement heightLabel.
We use the located element to find the field where username has to be inputted. As the input element (for user name) is right below the label, we make use of the below option along with the withTagName() method.
WebElement heightLabel = driver.findElement(By.xpath("//*[@id='app']/section/form/div/div/h1"));

// Locate the textbox where username should be inputted

WebElement heightUserBox = driver.findElement(withTagName("input")
                          .below(heightLabel));
heightUserBox.sendKeys("user-name");
The web element located below the email inputbox is the password inputbox. As the relative location of email inputbox is already known, the below option is used to locate the password inputbox.
WebElement heightPasswordBox = driver.findElement(withTagName("input")
                                     .below(heightUserBox));
heightPasswordBox.sendKeys("password");
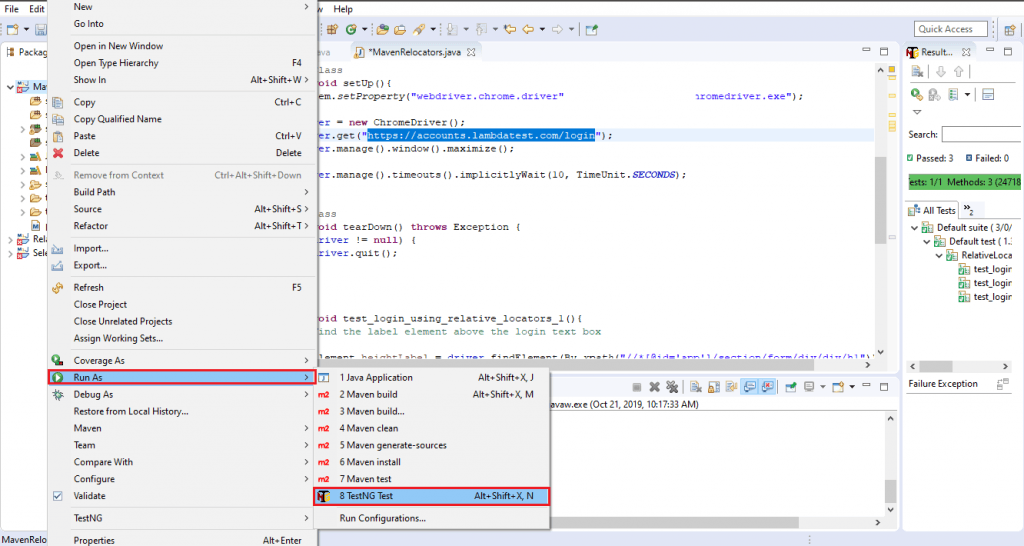
To execute the test, right click on the project and select the option ‘Run As -> TestNG Test’.
Example 2 For Selenium 4 Relative Locators
In this example demonstrating the usage of Selenium 4 relative locators, the intent is to add a new entry in the LambdaTest Sample App. It comprises of two other tests where the sought-after web element is located and verified via its attribute (name/id).
package RelativeLocators;

import io.github.bonigarcia.wdm.WebDriverManager;
import org.openqa.selenium.By;
import org.openqa.selenium.WebDriver;
import org.openqa.selenium.WebElement;
import org.openqa.selenium.chrome.ChromeDriver;
import org.openqa.selenium.firefox.FirefoxDriver;
import org.testng.annotations.AfterClass;
import org.testng.annotations.BeforeClass;
import org.testng.annotations.Test;
import static org.openqa.selenium.support.locators.RelativeLocator.withTagName;
import static org.testng.Assert.assertEquals;
import org.testng.annotations.Test;
import java.net.MalformedURLException;
import java.net.URL;
import java.util.concurrent.TimeUnit;

public class RelativeLocators {
    private WebDriver driver;
    boolean status = false;

    @BeforeClass
    public void setUp(){
        System.setProperty("webdriver.chrome.driver","C:\\Location-To\\chromedriver.exe");

        driver = new ChromeDriver();
        driver.get("https://4dvanceboy.github.io/lambdatest/lambdasampleapp.html");
        driver.manage().window().maximize();

        driver.manage().timeouts().implicitlyWait(10, TimeUnit.SECONDS);
    }

    @AfterClass
    public void tearDown() throws Exception {
       if (driver != null) {
           driver.quit();
        }
    }

    @Test
    public void test_login_using_relative_locators_1(){
        String name = driver.findElement(withTagName("input")
                .above(By.name("li5"))
                .below(By.name("li3")))
                .getAttribute("name");
        assertEquals(name, "li4");

        driver.manage().timeouts().implicitlyWait(10, TimeUnit.SECONDS);
    }

    @Test
    public void test_login_using_relative_locators_2(){
        String txt_name = driver.findElement(withTagName("input")
                .toLeftOf(By.id("addbutton"))
                .below(By.name("li5")))
                .getAttribute("id");
        assertEquals(txt_name, "sampletodotext");

        driver.manage().timeouts().implicitlyWait(10, TimeUnit.SECONDS);
    }

    @Test
    public void test_login_using_relative_locators_3(){
        WebElement txt_name =  driver.findElement(withTagName("input")
                  .toLeftOf(By.id("addbutton"))
                  .below(By.name("li5")));

        txt_name.sendKeys("Relative locators test");

        // Get details of the Submit/Add button
        WebElement submitbutton = driver.findElement(By.xpath("//*[@id=\'addbutton\']"));

        // Submit the new entry
        submitbutton.click();

        driver.manage().timeouts().implicitlyWait(10, TimeUnit.SECONDS);
    }
}
Let us decode the above example that comprises of three different tests. Before jump into the details of any test, it is important that we have a look at the DOM snippet for the app.
<ul class="list-unstyled">
<!-- ngRepeat: sampletodo in sampleList.sampletodos --><li ng-repeat="sampletodo in sampleList.sampletodos" class="ng-scope">
    <input type="checkbox" ng-model="sampletodo.done" name="li1" class="ng-pristine ng-untouched ng-valid">
    <span class="done-false">First Item</span>
</li><!-- end ngRepeat: sampletodo in sampleList.sampletodos --><li ng-repeat="sampletodo in sampleList.sampletodos" class="ng-scope">
    <input type="checkbox" ng-model="sampletodo.done" name="li2" class="ng-pristine ng-untouched ng-valid">
    <span class="done-false">Second Item</span>
</li><!-- end ngRepeat: sampletodo in sampleList.sampletodos --><li ng-repeat="sampletodo in sampleList.sampletodos" class="ng-scope">
    <input type="checkbox" ng-model="sampletodo.done" name="li3" class="ng-pristine ng-untouched ng-valid">
    <span class="done-false">Third Item</span>
</li><!-- end ngRepeat: sampletodo in sampleList.sampletodos --><li ng-repeat="sampletodo in sampleList.sampletodos" class="ng-scope">
    <input type="checkbox" ng-model="sampletodo.done" name="li4" class="ng-pristine ng-untouched ng-valid">
    <span class="done-false">Fourth Item</span>
</li><!-- end ngRepeat: sampletodo in sampleList.sampletodos --><li ng-repeat="sampletodo in sampleList.sampletodos" class="ng-scope">
    <input type="checkbox" ng-model="sampletodo.done" name="li5" class="ng-pristine ng-untouched ng-valid">
    <span class="done-false">Fifth Item</span>
</li><!-- end ngRepeat: sampletodo in sampleList.sampletodos -->
</ul>
Fifth item in the DOM is represented in the DOM by name li5 and Third element is represented by the name li3.
Sub-test 1 – In the first test, the element with name li4 has to be located and assert is raised in case there is an error. The findElement method is called with withTagName method and the TagName is input. As seen from the DOM tree and Inspect screenshot below, each CheckBox is of input type with the name corresponding to the input option i.e. li1, li2, li3, etc.
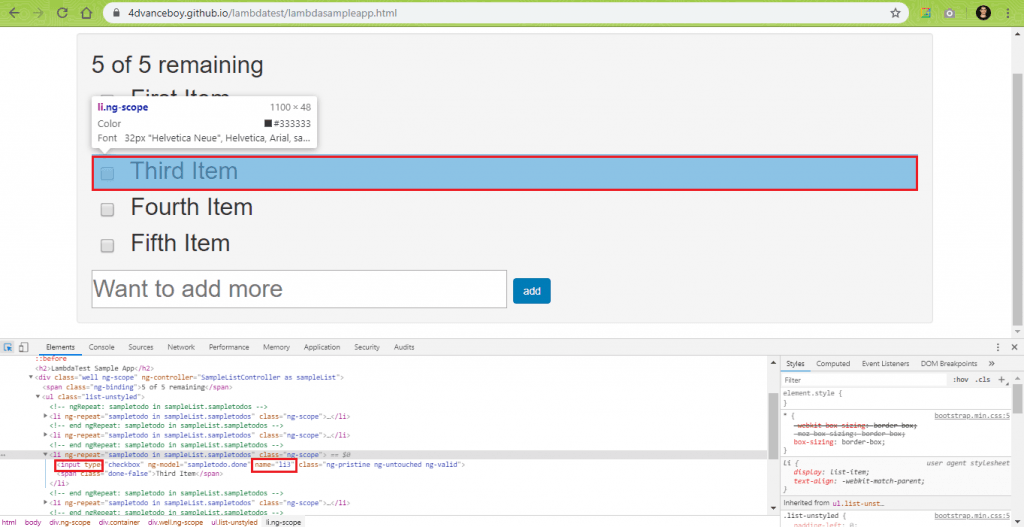
Input web element with name li4 (Fourth Item) is above li3 (Third Item) & below li5 (Fifth Item). Hence, we specify both of these as a part of the test.
@Test
    public void test_login_using_relative_locators_1(){
        String name = driver.findElement(withTagName("input")
                .above(By.name("li5"))
                .below(By.name("li3")))
                .getAttribute("name");
        assertEquals(name, "li4");

        driver.manage().timeouts().implicitlyWait(10, TimeUnit.SECONDS);
    }
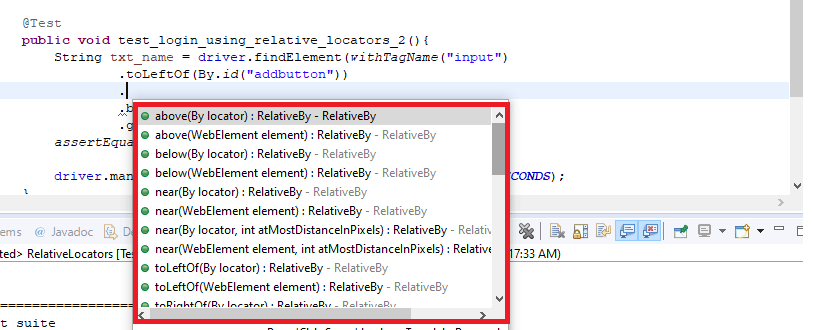
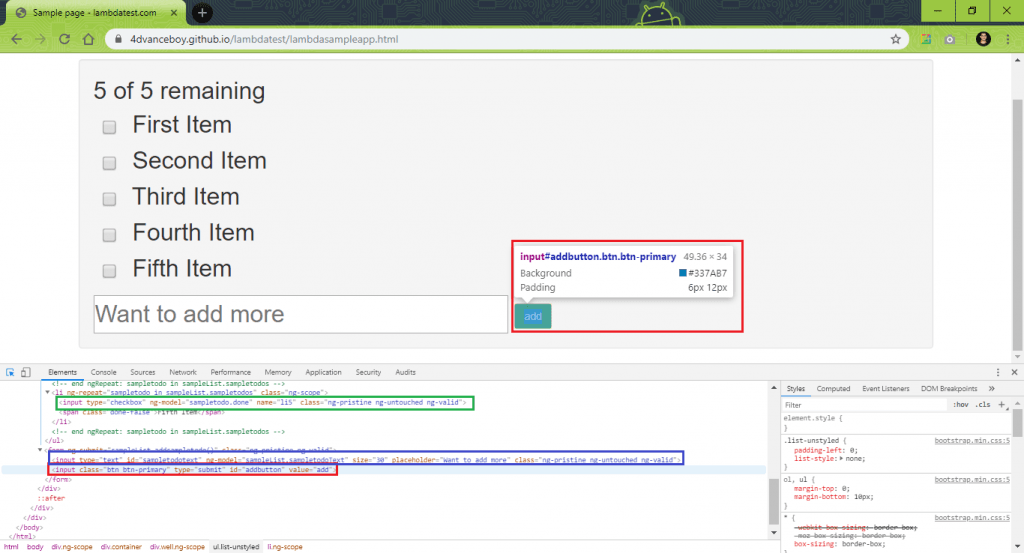
Sub-test 2 – In this test, the input element with the name sampletodotext has to be located. This element is of input type and located to the left of Add Button i.e. id = addbutton & below the element with name li5 (Fifth Item).
@Test
    public void test_login_using_relative_locators_2(){
        String txt_name = driver.findElement(withTagName("input")
                .toLeftOf(By.id("addbutton"))
                .below(By.name("li5")))
                .getAttribute("id");
        assertEquals(txt_name, "sampletodotext");

        driver.manage().timeouts().implicitlyWait(10, TimeUnit.SECONDS);
    }
Assert is raised if the name of the element i.e. txt_name does not match the expected name i.e. sampletodotext.
Sub-test 3 – This test is a logical extension of sub-test 2 where a new item/option has to be added to the lambdasampleapp.
For doing the same, input WebElement to the left of element with id = addbutton [.toLeftOf(By.id("addbutton")] & below the element with name = li5 [.below(By.name("li5"))] has to be located.
As the input element is a textbox, sendKeys method is used to enter values into the textbox i.e. id = sampletodotext. The new option is added to the list by performing a click of the Add Button on the page.
@Test
    public void test_login_using_relative_locators_3(){
        WebElement txt_name =  driver.findElement(withTagName("input")
                  .toLeftOf(By.id("addbutton"))
                  .below(By.name("li5")));

        txt_name.sendKeys("Relative locators test");

        // Get details of the Submit/Add button
        WebElement submitbutton = driver.findElement(By.xpath("//*[@id=\'addbutton\']"));

        // Submit the new entry
        submitbutton.click();

        driver.manage().timeouts().implicitlyWait(10, TimeUnit.SECONDS);
    }
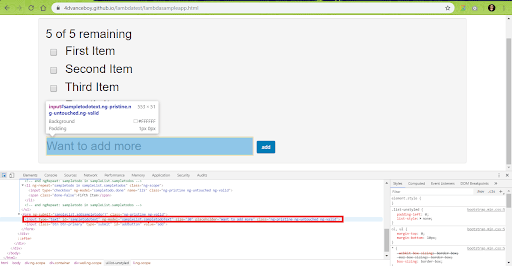
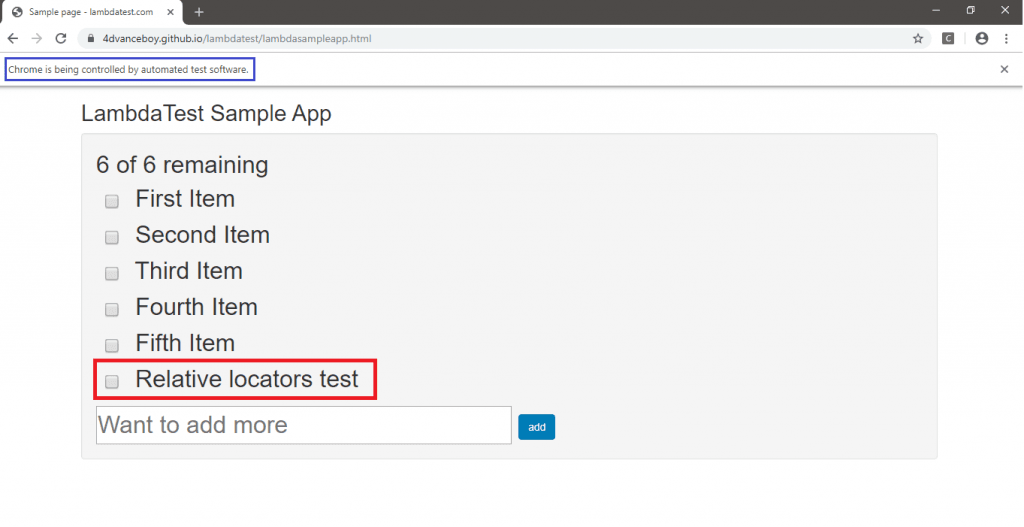
Similar to the Test – 1, this project also has to be executed as a TestNG test. Shown below is the output screenshot where we can see that the last option i.e. Relative locators test has been added to the list.
We are sure that by now you would have got a good grip of Selenium 4 relative locator for Selenium automation testing. As this is Selenium 4’s Alpha release, you might need some more time before support for relative locators starts rolling out for other programming languages like Python, C#, etc.
What’s Your Opinion On The New Locator?
Relative locator in Selenium 4 is an interesting advancement using which developers can access nearby web elements with fewer lines of implementation. As this is an Alpha release, the features may change in further releases. It is important to note that Selenium 4 Relative Locator methods i.e. above, below, toLeftOf, toRightOf, near do not work with overlapping elements.
If you are using Java with Selenium for automated cross browser testing, you should definitely give Selenium 4 (Alpha) a spin. Though there are tools (open-source as well commercial) that offer features similar to Selenium 4 Relative Locator, Selenium 4 has many more features (including improved documentation) that make it worth the wait!
So what do you make of the new locator for Selenium automation testing? Did you find the new Selenium 4 Relative Locator handy? Are you already planning to incorporate the relative locator in your automated cross browser testing scripts? Or do you think it could do better? Let me know your opinion in the comment section below. Happy testing! 🙂

Published on Java Code Geeks with permission by Himanshu Sheth, partner at our JCG program. See the original article here: How Selenium 4 Relative Locator Can Change The Way You Test? Opinions expressed by Java Code Geeks contributors are their own. |
