One of the most performed actions of any webpage tester is taking a screenshot of the webpage. Whenever a tester finds and reports a bug, that bug would not be taken seriously without supporting screenshots or even videos of the issue. This is equally true no matter the type of testing you are doing and that includes selenium automation testing.
In automation testing, especially where a typical test run may involve hundreds of commands and test cases, automated screenshots taken at critical assertions are important for developers and testers in making sure that every test case executed as it should. These proofs are in-turn used for debugging, to find out what went wrong and the reason for failure. For automation testing with selenium, these screenshots help to distinguish whether the failures are due to application failure or due to script failure.
Now with that said, when we say screenshot we could mean capturing an image of any part of the screen including the image of an element in question or even a screenshot of the whole page. Therefore in this post, we would be looking at how you can take automated screenshots of web pages for different purposes using Selenium WebDriver automation scripts. To start off, there are four major ways of capturing screenshot images using Selenium Webdriver. Such as :
- Screenshot of Viewable area
- Screenshot of entire screen i.e. capturing screenshot of full webpage
- Screenshot of the desired webElement
- Cloud based platform supporting screenshots of AUT
Automated Selenium Test Scripts for Taking Screenshots of Viewable Area
This is the most used approach of taking screenshots of applications under automation and the easiest one as well. Selenium provides an out-of-the-box capability called TakeScreenShot interface that can be used for taking screenshots of the viewable area.
You can check the detail of the interface here.
This interface provides a method known as getScreenshotAs which helps to capture the screenshot and store it in the desired location.
Here’s the syntax to capture the screenshot:
File screenshotFile = ((TakesScreenshot)driver).getScreenshotAs(OutputType.FILE);
In order to store the taken screenshot into a file, the below statement is used:FileUtils.copyFile(screenshotFile, new File("path of the file you want to save the screenshot to"));
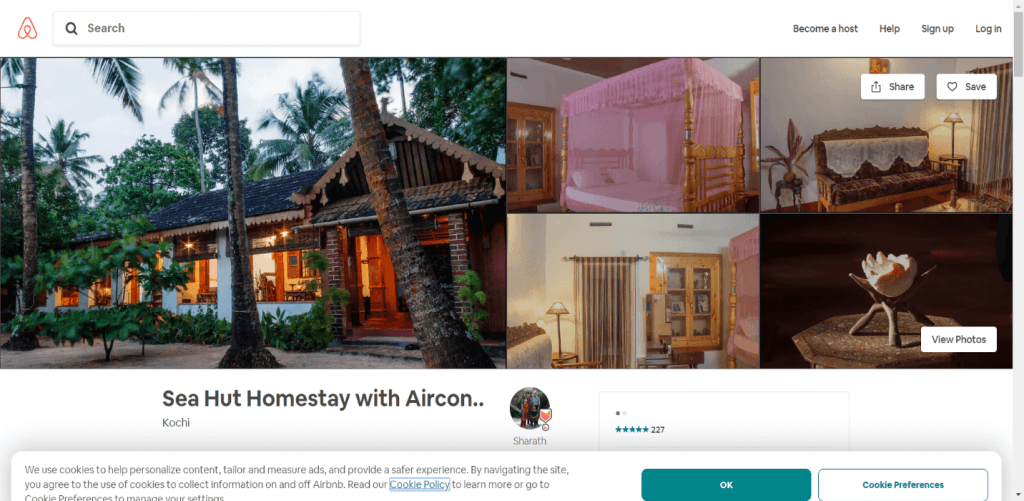
This is it! Just two statements and you will be able to take the screenshot. Let’s incorporate this step into a code snippet. The below example showcases Airbnb stay details page example where we are taking a screenshot of the viewable screen:
01 02 03 04 05 06 07 08 09 10 11 12 13 14 15 16 17 18 19 20 21 22 23 24 25 26 27 28 29 30 31 32 33 34 35 36 37 38 39 40 41 42 43 44 45 46 47 48 49 50 51 52 53 54 55 56 57 58 59 60 61 62 63 64 65 | import java.io.File;import java.io.IOException;import java.util.ArrayList;import java.util.concurrent.TimeUnit; import org.apache.commons.io.FileUtils;import org.openqa.selenium.By;import org.openqa.selenium.JavascriptExecutor;import org.openqa.selenium.OutputType;import org.openqa.selenium.TakesScreenshot;import org.openqa.selenium.WebDriver;import org.openqa.selenium.chrome.ChromeDriver;import org.testng.annotations.AfterTest;import org.testng.annotations.BeforeTest;import org.testng.annotations.Test; public class ViewableScreenshotExample { WebDriver driver; @BeforeTest public void setupUrl() { System.setProperty("webdriver.chrome.driver", ".\\Driver\\chromedriver.exe"); driver=new ChromeDriver(); driver.manage().timeouts().implicitlyWait(10, TimeUnit.SECONDS); driver.manage().window().maximize(); } @Test public void performAction() throws InterruptedException { //Scroll down the page JavascriptExecutor jse = (JavascriptExecutor)driver; jse.executeScript("window.scrollBy(0,250)", ""); //open the stay details page driver.findElement(By.xpath("//div[contains(text(), 'Sea Hut Homestay with Aircon')]")).click(); Thread.sleep(1500); //Switch to the required tab ArrayList<String> ta = new ArrayList<String> (driver.getWindowHandles()); int i=ta.size(); System.out.println(i); driver.switchTo().window(ta.get(1)); } @AfterTest public void takeScreenshot() { //take screenshot of the page File src= ((TakesScreenshot)driver).getScreenshotAs(OutputType.FILE); try { FileUtils.copyFile(src, new File("path of the file")); } catch (IOException e) { // TODO Auto-generated catch block e.printStackTrace(); } } } |
The code snippet above will take the viewable screen screenshot as below:
This is all good and awesome if you have to take a screenshot of the view that your code is testing. However, if I want to take a screenshot of the entire webpage, the above mentioned code is not enough. But we have a solution.
Capturing Full Webpage Screenshot using Automated Selenium Test Scripts
A need may arise to take screenshots of the entire screen rather than just the viewport of the browsers. Some browsers take a screenshot of the viewable port only whereas others take a screenshot of the entire screen. Earlier versions of Firefox used to take screenshots of the entire screen, unlike chrome and IE. But eventually even the latest versions of Firefox now only takes viewport screenshots. So in order to capture screenshots of the entire screen using selenium web driver scripts, we can make use of AShot().
AShot() is a webdriver screenshot utility to capture entire page screenshot and is natively supported from Selenium 3 onwards. It provides the following features:
- Helps capture entire screen and web element
- Beautify screenshot
- Provides screenshot comparison.
For more details on the utility, you can refer here.
In order to take a screenshot of the entire screen, you need to add the jar into your project. You can download the jar from here http://central.maven.org/maven2/ru/yandex/qatools/ashot/ashot/1.5.3/ashot-1.5.3.jar
Once the jars are added into the project, all you need to do is mention the below lines of code when you intend to take the full-screen screenshot:
1 2 | Screenshot screenshot=new AShot().shootingStrategy(ShootingStrategies.viewportPasting(1000)).takeScreenshot(driver);ImageIO.write(screenshot.getImage(),"PNG",new File("path of the file")); |
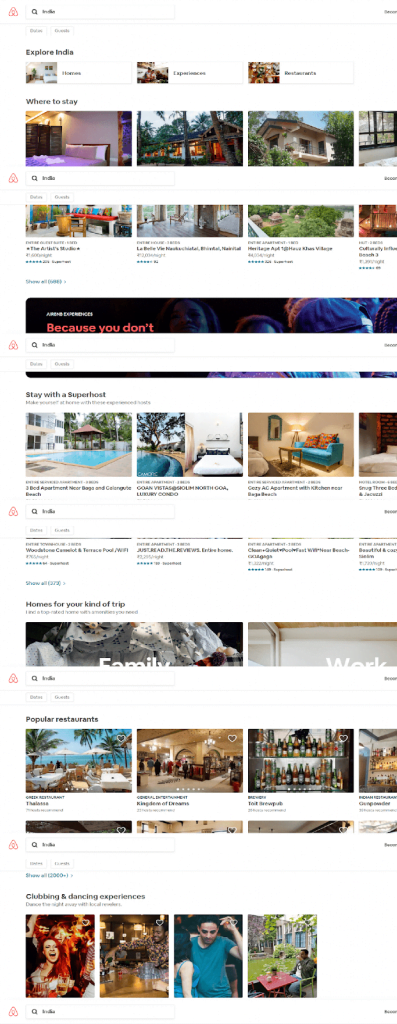
In the code below, the Ashot method shooting strategy is used by setting the viewport to full screen and taking screenshots. This code snippet below goes to Airbnb India Stays and Tours page and takes a screenshot of the full view.
01 02 03 04 05 06 07 08 09 10 11 12 13 14 15 16 17 18 19 20 21 22 23 24 25 26 27 28 29 30 31 32 33 34 35 36 37 38 39 40 41 42 43 44 45 | import java.io.File;import java.io.IOException;import java.util.concurrent.TimeUnit; import javax.imageio.ImageIO; import org.openqa.selenium.WebDriver;import org.openqa.selenium.chrome.ChromeDriver;import org.testng.annotations.Test; import ru.yandex.qatools.ashot.AShot;import ru.yandex.qatools.ashot.Screenshot;import ru.yandex.qatools.ashot.shooting.ShootingStrategies; public class EntireScreenshot { public static void main(String[] args) { // TODO Auto-generated method stub WebDriver driver; System.setProperty("webdriver.chrome.driver", ".\\Driver\\chromedriver.exe"); driver=new ChromeDriver(); driver.manage().timeouts().implicitlyWait(10, TimeUnit.SECONDS); driver.manage().window().maximize(); //take screenshot of the entire page Screenshot screenshot=new AShot().shootingStrategy(ShootingStrategies.viewportPasting(1000)).takeScreenshot(driver); try { ImageIO.write(screenshot.getImage(),"PNG",new File("path of the file")); } catch (IOException e) { // TODO Auto-generated catch block e.printStackTrace(); } driver.quit(); } } |
As you run this code, note how the code automatically scrolls down the page and takes the screenshot of the entire page. Below is the example of the taken screenshot.
Taking full pages screenshots is great, but you may encounter a use case where you are concerned with the screenshot of the desired webElement only. Your only concern will be to take a screenshot of the desired element and not the whole screen. Also, if you wish to take screenshots of the logo image or other UI specific element to check its pixilation or UI issues, all you care about is taking the webElement image rather than the whole screen image. Let dig into as how to take a screenshot of a web Element.
Taking Screenshot of Desired Web Element Using Selenium WebDriver
Taking screenshot of a desired element is also pretty easy. The main concept is to crop the full screenshot to the desired location of the webElement based on its coordinates and height-width. Here’s a code snippet below highlighting how you can take screenshot of just the logo of Amazon.com website.
01 02 03 04 05 06 07 08 09 10 11 12 13 14 15 16 17 18 19 20 21 22 23 24 25 26 27 28 29 30 31 32 33 34 35 36 37 38 39 40 41 42 43 44 45 46 47 48 49 50 51 52 53 54 55 56 57 58 59 60 | import java.awt.image.BufferedImage;import java.io.File;import java.io.IOException;import java.util.concurrent.TimeUnit; import javax.imageio.ImageIO; import org.apache.commons.io.FileUtils;import org.openqa.selenium.By;import org.openqa.selenium.OutputType;import org.openqa.selenium.Point;import org.openqa.selenium.TakesScreenshot;import org.openqa.selenium.WebDriver;import org.openqa.selenium.WebElement;import org.openqa.selenium.chrome.ChromeDriver;import org.openqa.selenium.remote.server.handler.FullscreenWindow; public class LogoScreenShotExample { public static void main(String[] args) throws IOException { // TODO Auto-generated method stub System.setProperty("webdriver.chrome.driver", ".\\Driver\\chromedriver.exe"); WebDriver driver=new ChromeDriver(); driver.manage().timeouts().implicitlyWait(10, TimeUnit.SECONDS); driver.manage().window().maximize(); //locating amazon logo WebElement logo=driver.findElement(By.id("nav-logo")); // Get entire page screenshot File screenshot = ((TakesScreenshot)driver).getScreenshotAs(OutputType.FILE); BufferedImage fullScreen = ImageIO.read(screenshot); //Find location of the webelement logo on the page Point location= logo.getLocation(); //Find width and height of the located element logo int width= logo.getSize().getWidth(); int height=logo.getSize().getHeight(); //Now the main point, which is cropping the full image to get only the logo screenshot BufferedImage logoImage= fullScreen.getSubimage(location.getX(), location.getY(), width, height); ImageIO.write(logoImage, "png", screenshot); //copy the file to the desired location FileUtils.copyFile(screenshot, new File("path of file")); } } |
Here’s the image was taken by the above code snippet of the webElement:

This is it. Isn’t it cool guys. Just find out what your test scenario wants and take the required screenshot. Nowadays we do not need to take screenshots because of so many upcoming cloud-based platforms providing support to all those screenshots and videos to your automation scripts execution.
This brings me to my last approach of taking a screenshot which eventually means not taking one �� and the tool doing its job. Well, you heard it right. Let’s look into its details
Taking Full Page Automated Screenshots On Cloud
Running tests locally is important however if you want to make sure that your website works on all browsers, even those you don’t have access to locally, you would need service like LambdaTest. LambdaTest is a cloud based selenium grid that you can use to run all your automated selenium test scripts online. The best part about LambdaTest grid, however, is that it takes automated screenshots of your webpage after the execution of each selenium command. In addition, LambdaTest platform takes a complete video of the test execution as well. All you need to do is run your scripts on this platform which provides you features like screenshots, videos, network logs, console logs and so on. Few points of consideration or pre-conditions to make your script running on the platform is:
- LambdaTest account
- LambdaTest Username, access key and URL to connect to
- Setting up the required properties to gain access to the features you need.
This is it. Now let’s run our same above-mentioned code of Airbnb Stays detail page without the need of providing the screenshot method since it captures the whole video of the execution. In the below code snippet I will be using LambdaTest username, access key, and LambdaTest Selenium Grid URL to connect to the required browser and perform actions. Notice that changing the above code into LambdaTest compatible code required only to call remote webdriver instead of local chrome webdriver, and passing on a desired-capabilities object to define which browser you need to run tests on.:
01 02 03 04 05 06 07 08 09 10 11 12 13 14 15 16 17 18 19 20 21 22 23 24 25 26 27 28 29 30 31 32 33 34 35 36 37 38 39 40 41 42 43 44 45 46 47 48 49 50 51 52 53 54 55 56 57 58 59 60 61 62 63 64 65 66 67 68 69 70 71 72 73 74 75 76 77 78 79 80 81 82 83 84 85 86 87 88 89 90 91 92 93 94 95 96 | import java.io.File;import java.io.IOException;import java.util.ArrayList;import java.util.concurrent.TimeUnit; import org.apache.commons.io.FileUtils;import org.openqa.selenium.By;import org.openqa.selenium.JavascriptExecutor;import org.openqa.selenium.OutputType;import org.openqa.selenium.Platform;import org.openqa.selenium.TakesScreenshot;import org.openqa.selenium.WebDriver;import org.openqa.selenium.chrome.ChromeDriver;import org.openqa.selenium.remote.DesiredCapabilities;import org.openqa.selenium.remote.RemoteWebDriver;import org.testng.annotations.AfterTest;import org.testng.annotations.BeforeTest;import org.testng.annotations.Test;import java.net.URL; public class LambdatestWithoutScreenShotMethod { public static final String username= "sadhvisingh24"; public static final String auth_key = "X1PLnv28q0eSqWoqaqv9STD4gPRfWnVOisEUcmlW0zg9HO3GYi"; public RemoteWebDriver driver; public static final String URL= "@hub.lambdatest.com/wd/hub"; @BeforeTest public void setupUrl() { DesiredCapabilities capability= new DesiredCapabilities(); capability.setPlatform(Platform.WIN8); capability.setBrowserName("chrome"); capability.setVersion("75.0"); capability.setCapability("build", "cross_browser"); capability.setCapability("name", "cross_browser"); capability.setCapability("network", true);//to enable network logs capability.setCapability("visual", true);//to enable screenshots capability.setCapability("video", true);//to enable video capability.setCapability("console", true);//to enable console logs try { } catch (Exception e) { System.out.println("Invalid grid URL" + e.getMessage()); } try { driver.manage().timeouts().implicitlyWait(10,TimeUnit.SECONDS); driver.manage().window().maximize(); } catch (Exception e) { System.out.println(e.getMessage()); } } @Test public void performAction() throws InterruptedException { //Scroll down the page JavascriptExecutor jse = (JavascriptExecutor)driver; jse.executeScript("window.scrollBy(0,250)", ""); //open the stay details page driver.findElement(By.xpath("//div[contains(text(), 'Sea Hut Homestay with Aircon')]")).click(); Thread.sleep(1500); //Switch to the required tab ArrayList<String> ta = new ArrayList<String> (driver.getWindowHandles()); int i=ta.size(); System.out.println(i); driver.switchTo().window(ta.get(1)); } @AfterTest public void closeSetup() { driver.quit(); } } |
The referenced screenshot below:
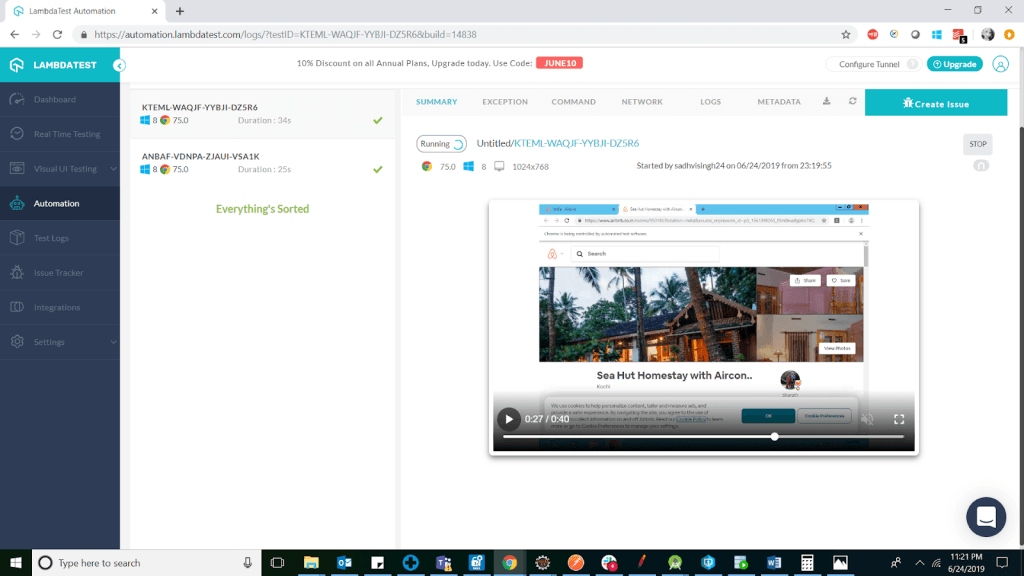
In the screenshot above, LambdaTest provides support of video where you can view the whole execution flow of your web app.

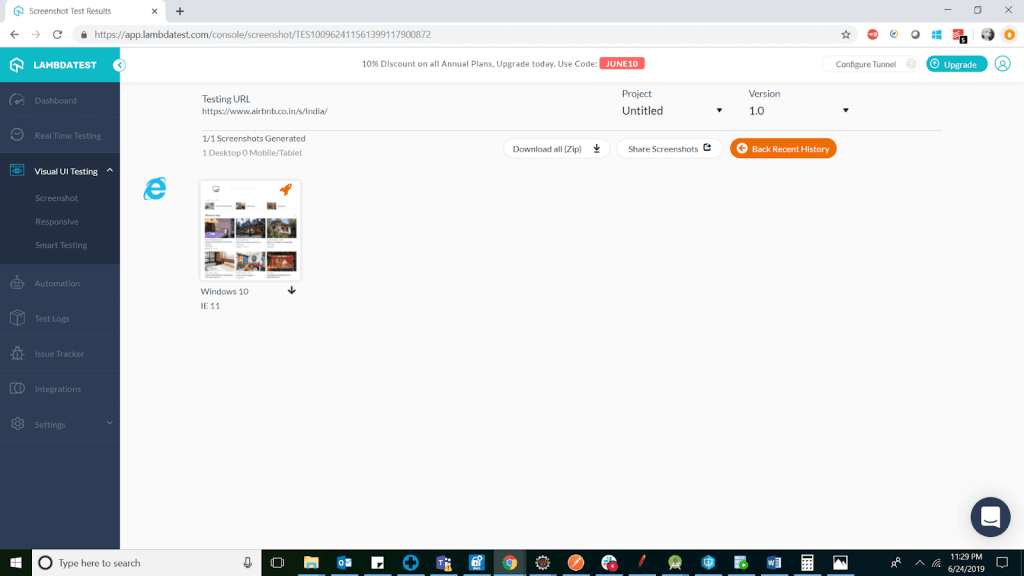
Apart from this LambdaTest also provides a standalone full paged automated screenshot feature, that can help you to take screenshot across browsers of your designated application and even compare them. LambdaTest calls this feature as ‘Screenshot testing’. You can access these screenshots as and when required and even share them with the required stakeholders and mail them as per needs. This feature comes in handy when you got to test your application across multiple browsers and versions and perform cross browser testing. You can take screenshots and compare them for any UI issues. Isn’t it miraculous and just imagine the amount of time you just saved.
- Navigate to the LambdaTest ‘Visual UI testing’ menu header and navigate to its sub-header ‘Screenshot’ as below
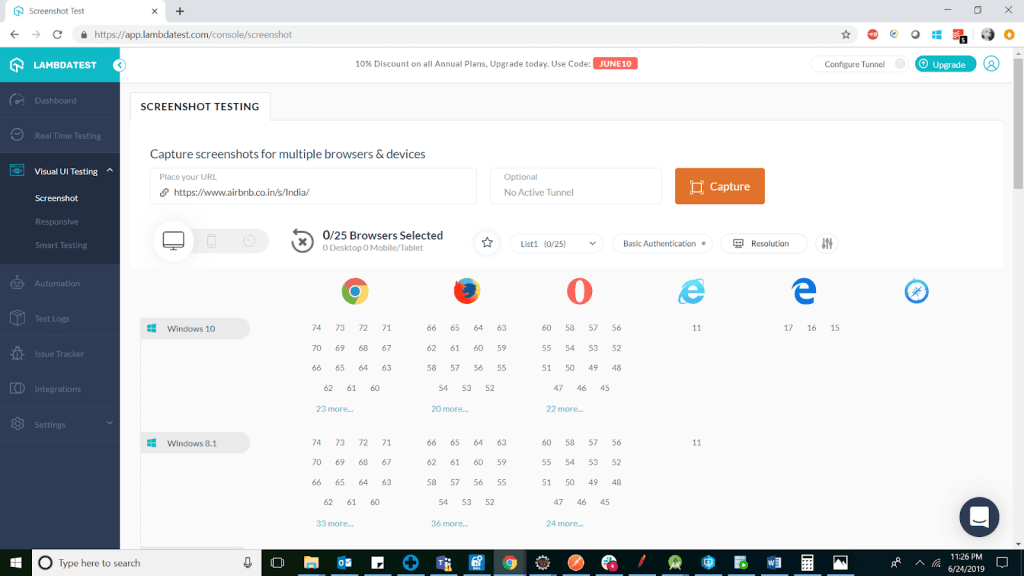
- Once you reach this page, all you need to do is place the URL you intend to test in the URL placeholder. Select the required browser and version you wish to take a screenshot on and just click on the button ‘capture’. Bingo, that’s it.
- The images to be captured will be added in the queue. Once it’s completed, you can access those images, as below:

As you saw above, we focused on all possible ways of taking screenshots in detail, so next time when you are stuck on how to take a screenshot, this article will come in handy. You can also refer to my other articles as part of this series. Happy testing.

Published on Java Code Geeks with permission by Sadhvi Singh, partner at our JCG program. See the original article here: Using Selenium Webdriver For Full Page Screenshots Opinions expressed by Java Code Geeks contributors are their own. |
