In this article we will look at Reactjs Webpack configuration for a Reactjs Application. Webpack is a hugely popular bundler. We will take a look at how we can configure it and set it up from scratch for an Application built with Reactjs. Specifically we will look at configuration of babel to transpile JSX code apart from other regular items like CSS and images.
Table Of Contents
1. Introduction
So, let us get started without further delay. To start off I have created a very simple Reactjs application from scratch with just two components. We will use Webpack to bundle this application and learn the concepts that will help you with configuration for other larger applications.
The folder structure of our basic React application is as follows. I will discuss each artifact and its contents after the image.
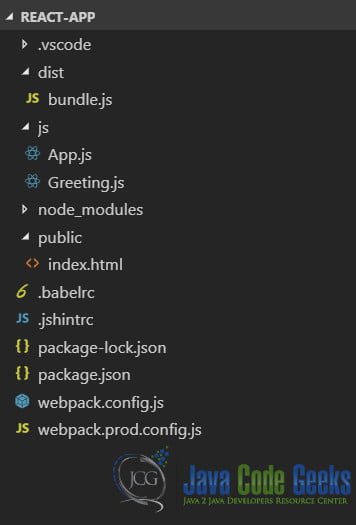
dist folder
This folder will contain our built artifacts ready to be served to the browser on request. The artifacts will include JavaScript, CSS files.
js folder
This folder contains our React code files. In our case here we have two App.js and Greeting.js. Our React app displays a simple greeting in a h1 tag.
public folder
This folder contains our Html pages. We have a single page index.html in our application.
2. Installing Webpack
To begin, we will install webpack and the webpack CLI locally and save them as dev dependencies of our project. We need to execute the following two commands one after the other to accomplish this.
> npm install webpack --save-dev
> npm install webpack-cli --save-dev
These commands will install webpack locally for our project and is the recommended way.
Now, with version 4 onwards we do not need to do anything else to use webpack. Yes, no configuration files or settings file. Webpack uses intelligent defaults for all settings, so we can just run the following command at the root of our project.
> webpack
But most projects need to handle more complex tasks like in our case we need to transpile JSX before it can execute in the browser. So, in the next section we look at how to configure webpack to perform those tasks using a configuration file.
3. Configuring ReactJS Webpack
We start off with a file called webpack.config.js. This is a plain ES6 module. One of the first settings we need to add is the mode setting with one of the values “development”, “production” or “none”. Each mode selects and sets defaults for respective environments. Where in the focus in development mode is non Hot Module Reloading and Source Maps to help debug our application in the browser. And in production mode the focus is on minimal bundle size to prime the application for performance.
There are some settings that are shared across environments though thus we will derive our production settings from the development mode settings files as we will see further in the article.
3.1 Entry Configuration
In our simple react application we have two modules, namely App.js and Greeting.js which have the following code in them.
App.js
import React from 'react';
import ReactDom from 'react-dom';
import Greeting from './Greeting';
class App extends React.Component {
    render = () => {
        return <Greeting greet="SiD" />;
    }
};
ReactDom.render(<App />, document.getElementById('root'));
Greeting.js
import React from 'react';
import '../css/greeting.style.css';
class Greeting extends React.Component {
    constructor(props) {
        super(props);
    }
    render = () => {
        return <h1>Hello { this.props.greet }</h1>;
    }
}
export default Greeting;
We will now proceed to configure the starting point or entry point of our application, which is, App.js. We will add the following to our webpack.config.js. This setting allows webpack to build its internal dependency graph of our application. Usually there is one entry point per page of an application.
module.exports = {
    mode: 'production',
    entry: { App: './js/App.js' }
}
App.js is also our root React component and thus aptly also the entry or starting module of our application.
3.2 Output Configuration
This is one of the key settings of Webpack where in we describe the output required and its destination. This setting is specified with the key output in the webpack.config.js file.
var path = require('path');
...
output: {
        filename: '[name].bundle.js',
        path: path.resolve(__dirname, 'dist'),
        publicPath: 'assets/'
    }
...
Here we tell webpack the name of the output bundle of our JavaScript code and its destination. Notice the use of the path node module to provide the exact location of our dist or distribution folder. We will serve our application out of this folder as we will later see. The publicPath setting sets the URL that will serve contents of this folder.
3.3 Loader and Plugin Configuration
Webpack uses the loaders specified to preprocess files before bundling them into final output. We use a few loaders here to accomplish two tasks, namely, Load CSS Files and transpile our JSX Code to plain JavaScript. So, let us take a look at each sequentially.
3.3.1 Loading CSS Files
We will use a loader to generate a separate bundle. But first we must use the mini-css-extract-plugin to extract our CSS from import statements in our modules. We will first install the plugin using the following command.
> npm install mini-css-extract-plugin --save-dev
Now we will import this into our settings file and configure it like so.
var MiniCssExtractPlugin = require('mini-css-extract-plugin');
...
plugins: [
        new MiniCssExtractPlugin({
            // Options similar to the same options in webpackOptions.output
            // all options are optional
            filename: '[name].css',
            chunkFilename: '[id].css',
            ignoreOrder: false, // Enable to remove warnings about conflicting order
        })
]
...
This plugin will work with the css-loader to extract the CSS styles out into a separate file. Next we need to install the css-loader and then configure both under the module.rules settings as follows:
> npm install css-loader --save-dev
After installing this loader we will add the following configuration to our webpack settings file.
...
 module: {
        rules: [
           {
                test: /\.css$/,
                exclude: /node_modules/,
                use: [{
                    loader: MiniCssExtractPlugin.loader,
                    options: {
                        // you can specify a publicPath here
                        // by default it uses publicPath in webpackOptions.output
                        publicPath: 'assets/'
                    }
                }, 'css-loader'
                ]

            }
        ]
    }
...
The object under the rules key has test key which filters the files this loader will process. And in our case here the Regular expression selects files with css extension. Also, we exclude the node_modules folder and specify MinissExtractPlugin.loader and css-loader as the loaders to use for all css files.
3.3.2 Transpiling JSX code to JavaScript
We will use babel to transpile our code to plain JavaScript. So let us first install babel using the following command:
> npm install --save-dev babel-loader @babel/core
This will install babel and babel-loader for webpack which we will configure next. We will add the babel-loader to our webpack settings file under the module.rules section. The following settings will go into the settings file.
...
module: {
        rules: [
            {
                test: /\.js$/,
                exclude: /node_modules/,
                use: [{
                    loader: 'babel-loader',
                    options: { presets: ['@babel/preset-react', '@babel/preset-env'] }
                }]
            }
        }
...
We have used two presets above, namely, @babel/preset-react for transpiling JSX and @babel/preset-env for transforms of ES2015+ syntax.
Finally we look at the html-webpack-plugin to generate index.html and add all of our bundles into it. We will then be able to run webpack and see the result in the browser.
3.3.3 Generating Html page
To generate Html page with all of our dependencies added as script tags or link tags we will use the html-webpack -plugin. To install it we need to execute the following command at the root of our application.
> npm install html-webpack-plugin --save-dev
Next we require this plugin in our webpack configuration and add it to the plugins array as
var htmlPlugin = require('html-webpack-plugin');
...
new htmlPlugin({ template: './public/index.html' })
...
The index.html file of ours will be the template. It contains the root element in which the root component of our React Application will display:
index.html
<!DOCTYPE html>
<html>
    <head>
    </head>
    <body>
        <div id="root"></div>
    </body>
</html>
4. Optimizing Bundle Size
Now that we have configured webpack using a settings file. Let us run webpack to see the output and application in action. To set things off we add the following commands to scripts in our package.json file.
"start": "webpack-dev-server --config webpack.config.js"
"build": "webpack --config webpack.config.js"
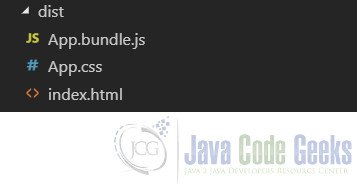
Now, when we run the following command, we should see a dist directory appear with the output bundles.
> npm run build
The output directory should have our built artifacts as shown in the image below:
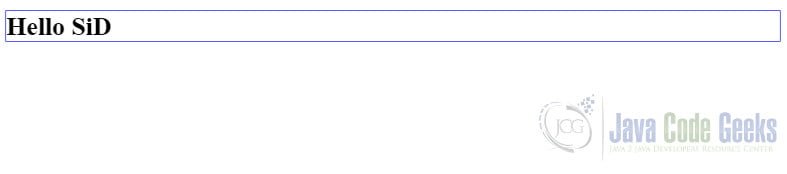
Now, when we run the following command we should be able to run the application.
> npm start
Navigating to the URL http://localhost:8080 should show the following result in the browser.
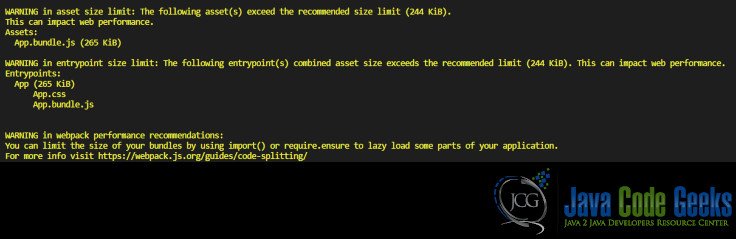
When we build our application we get notified by webpack that our bundle exceeds optimal size. And it suggests that we look at code splitting to reduce the size of our bundle. The warning looks like below:
So, let us work to refactor out the vendor files out into their own bundle to remove this warning and reduce the size of our bundle. We need to make changes to our App.js file which looks like below as of now.
App.js
import React from 'react';
import ReactDom from 'react-dom';
import Greeting from './Greeting';
class App extends React.Component {
    render = () => {
        return <Greeting greet="SiD" />;
    }
};

ReactDom.render(<App />, document.getElementById("root"));
We will move the react-dom package out into its own bundle. To do this we will dynamically import it and our code would look like below:
App.js
import React from 'react';
import Greeting from './Greeting';
class App extends React.Component {
    render = () => {
        return <Greeting greet="SiD" />;
    }
};

import(/* webpackChunkName: "react-dom" */'react-dom').then((ReactDom) => {
    ReactDom.render(<App />, document.getElementById('root'));
});
Now, when we build our application you will notice a new bundle in the dist folder named, vendor~react-dom.bundle.js. The warning we saw earlier would go away as well. Since the entry bundle size is greatly reduced.
5. Configuring Dev Server
Webpack has a dev server and can be used, as the name suggests, during development as we work on our application. It can be configured like everything else in the webpack settings file. First we need to install it though. We can do that by executing the following command at the root of our application.
> npm install webpack-dev-server --save-dev
Once the installation completes we can add the following configuration under the devServer key in the settings file.
...
devServer: {
        contentBase: path.join(__dirname, 'dist'),
        compress: true
    }
...
We are using the path node module to configure the path from where our application would be served. To do this by setting the contentBase property to the path of our built artifacts. We also set compress to true to ensure our artifacts are compressed before being sent to the browser. Our complete configuration file should now look like below:
var path = require('path');
var MiniCssExtractPlugin = require('mini-css-extract-plugin');
var htmlPlugin = require('html-webpack-plugin');
module.exports = {
    mode: 'production',
    entry: { App: './js/App.js' },
    output: {
        filename: '[name].bundle.js',
        path: path.resolve(__dirname, 'dist'),
        publicPath: 'assets/'
    },
    plugins: [
        new MiniCssExtractPlugin({
            // Options similar to the same options in webpackOptions.output
            // all options are optional
            filename: '[name].css',
            chunkFilename: '[id].css',
            ignoreOrder: false, // Enable to remove warnings about conflicting order
        }),
        new htmlPlugin({ template: './public/index.html' })
    ],
    module: {
        rules: [
            {
                test: /\.js$/,
                exclude: /node_modules/,
                use: [{
                    loader: 'babel-loader',
                    options: { presets: ['@babel/preset-react', '@babel/preset-env'] }
                }]
            },
            {
                test: /\.css$/,
                exclude: /node_modules/,
                use: [{
                    loader: MiniCssExtractPlugin.loader,
                    options: {
                        // you can specify a publicPath here
                        // by default it uses publicPath in webpackOptions.output
                        publicPath: 'assets/'
                    }
                }, 'css-loader'
                ]

            }
        ]
    },
    devServer: {
        contentBase: path.join(__dirname, 'dist'),
        compress: true
    },
    resolve: {
        extensions: ['.css', '.js', '.jsx']
    }
};
Now, to run our application using the webpack dev server. We need to run the following command that we previously configured in our package.json file.
> npm start
When we navigate to the URL http://localhost:8080, we can see the index.html page of our application as below.
This wraps up our look at configuring webpack for a Reactjs Application.
6. Download the ReactJS Webpack Source Code
That was an example on ReactJS Webpack.
You can download the full source code of this example here: Reactjs Webpack Tutorial

Nice Tutorial ! Thanks a lot