This article describes how to use Transfer Learning to classify images using Tensorflow Machine Learning platform. In Machine Learning context, Transfer Learning is a technique that enables us to reuse the model already trained and use it in another task. Image classification is the process of taking an image as input and assigning to it a class (usually a label) with the probability. This process uses deep learning models that are deep neural networks, or in more details, Convolutional Neural Networks (CNNs). A CNN is made by several layers, each of these layers are responsible for learning and recognizing a specific feature. Lower layers can recognize parts, edges and so on.
The final layers determine the image category. A modern image recognition model has millions of parameters and it requires a lot of computation power to train the model. Using Transfer Learning it is possible to retrain the last layer of the network using a custom set of images and reuse all the remaining model without changing it. Using Transfer Learning it is possible to drastically reduce the time required to train a model. The other interesting benefit ofthe Machine Learning is that we do not need a large image dataset to train the new model because almost all the model is already trained
This article covers, step by step, how to use Transfer Learning with TensorFlow.
Installing Tensorflow
The first step is setting up the environment we will use during this article. There are several ways to start using Tensorflow, the easiest and fast one is using Docker:
You can download it from this link. Once you finish the docker installation, you are ready to install Tensorflow. You can download Tensorflow using the docker hub.

Using Tag you can select the version you prefer. In this tutorial
we are using the version 1.12.0-devel. The devel distribution adds some other features that we will use later during this tutorial. To install Tensorflow docker image, type
docker pull tensorflow/tensorflow:devel-1.12.0
Wait until the installation finishes. We are ready to use Tensorflow
Image dataset
Once the Tensorflow is installed, it is time to select the dataset we want to use to train our model. There are several image dataset available. The interesting aspect is that we can use the same steps even if we change the image dataset. To create our Tensorflow model we will use a cat image dataset. We want to train our model so that it can recognizes the cat breeds. There is an interesting cat and dog image dataset available at The Oxford-IIIT Pet Dataset. This image dataset contains images of dog and cats, the perfect image dataset to train the Machine Learning model and apply the Transfer learning. Let us download the image dataset and unzip it.
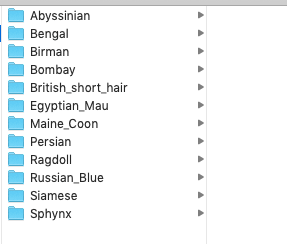
Create the directory image structure
In order to apply Transfer learning, it is necessary to group the images according to the cat breeds. Let us create a new directory calledtensor and under this one a new directory calledcat-images
The image structure should be:
Now start Tensorflow images:
docker run -it -p 6006:6006
           -v /Users/francesco/Desktop/tensor/:/tensor_flow
           your_tensorflow_docker_name
Creating a Machine Learning custom model using Tensorflow
We are ready to create the custom model. Let us clone the repository tensorflow-for-poets:
git clone https://github.com/googlecodelabs/tensorflow-for-poets-2
In this way we have the script to easily create the model. That’s all. Let us start training the model:
python tensorflow-for-poets-2/scripts/retrain.py
--model_dir=/tensor_flow/inception-v3
--output_graph=/tensor_flow/cats_retrained.pb
--output_labels=/tensor_flow/cats_labels.txt
--image_dir=/tensor_flow/cat-images/
--bottleneck_dir=/tensor_flow/cats_bottleneck
There are several important things to note:
--model_dir is where the model will be stored (in this case tensor_flow)
--output_graph is the name of the graph we will create (cats_retrained.pb)
--output_labels is the name of the labels (cats_labels.txt)
--image_dir is the position where the images are stored to train the model
--bottleneck_dir is where the bottleneck will be created
‘Bottleneck’ is an informal term we often use for the layer just before the final output layer that actually does the classification
This step requires a lot of time depending on the power of your pc and the number of iteration you will use.
Analyzing the model using Tensorflow board
Once the Machine Learning model is ready and the training process is complete, we can analyze the model. This is an important aspect because we can evaluate the model we have created. Type this command:
tensorboard --logdir /tmp/retrain_logs/
It runs the Tensorflow board. Using a browser we can open the dashboard. Type: localhost:6006 to access to the web console.
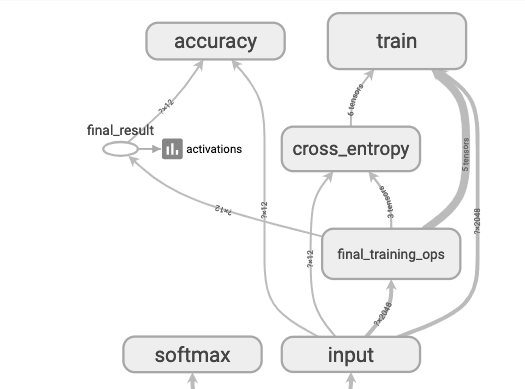
Now select graph and you will see the model:
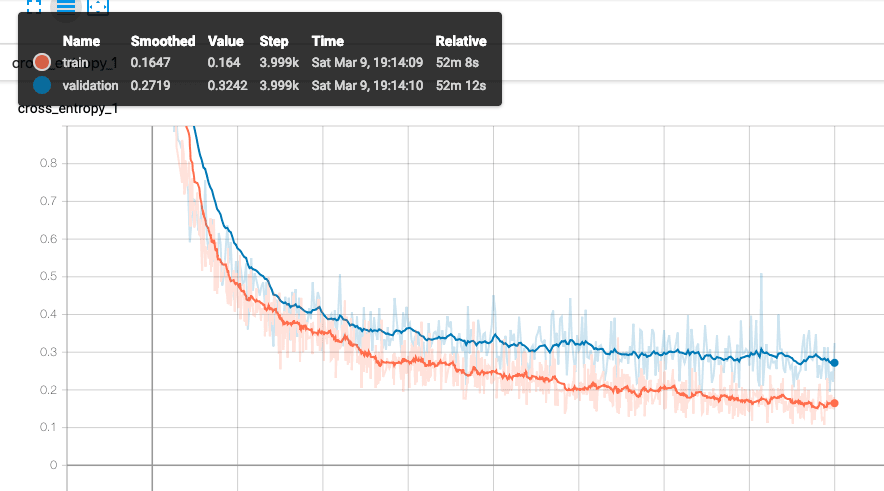
Now select SCALARS on the top menu to evaluate the model. This is the accuracy:
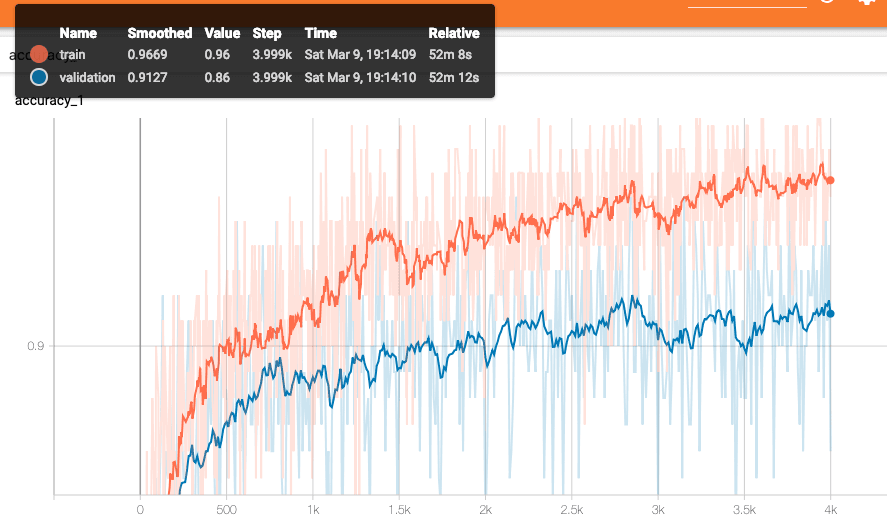
The train accuracy is the classification accuracy on images that the system used to train the model. The validation accuracy is the accuracy on the images not used in the training process. The validation accuracy is the “real” accuracy of the model. Usually it should be less than the train accuracy.
If the train accuracy is high while the validation accuracy is low, the model created is overfitting. It means that the model doesn’t generalize well on test data. In the opposite scenario, the model is underfitting so we can improve it.
The picture below shows the entropy. This curve should decrease.
How to test the Tensorflow model
Once we are satisfied with the model we can test it:
bazel-bin/tensorflow/examples/label_image/label_image
 --graph=/tensor_flow/cats_retrained.pb
 --image=/tmp/lab1.jpg
 --input_layer=Mul
 --output_layer=final_result
 --labels=/tensor_flow/cats_labels.txt
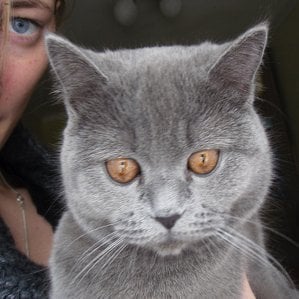
As image to test the model, we have used this one:
The result is shown below:
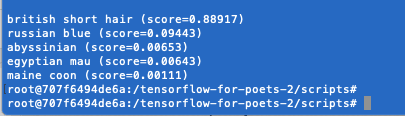
As you can see the model correctly detected the car breed.
Summary
At the end of this post, you hopefully gained the knowledge how to use Transfer Learning to create your custom model to use in Machine Learning application. If you want to use this model in other scenario, such as mobile application, you should consider using other architecture model (i.e. Mobilenet).
Published on Java Code Geeks with permission by Francesco Azzola, partner at our JCG program. See the original article here: Transfer Learning: How to classify images using Tensorflow Machine Learning Opinions expressed by Java Code Geeks contributors are their own. |
