One aspect to consider while developing an IoT project is the device power management. With the rise of Internet of Things, the optimization of the battery-operated devices is an important aspect that can make a difference. The Device Power Management in the IoT is a challenging task because a device could be always powered up and could be located everywhere. Often IoT devices are located remotely and they must use a battery to work.
IoT Device Power Management: How to implement it
The device power management in IoT involves all the steps related to the designing process and it is very important to take into account how the device will behave and how this behavior affects energy consumption. The battery capacity and the device behavior are two of the most important aspects. In more details, the device behavior can have a bad impact on energy management. Usually, we can model an IoT device power consumption using three different areas:
- Microcontroller
- Radio operations
- Sensors and actuators
A typical IoT device use case is:
- Acquiring data from sensors
- Sending and receiving data
- Controlling actuators
Usually a an IoT device uses one or more sensors to acquire information related to the environment. The data acquired are used locally or remotely to take decisions. This information are acquired using sensors and each sensor has specific power consumption. Therefore it is very important to select the sensors carefully in order to optimise power management.
An IoT device during its operations can send and receive data remotely. Usually, several IoT devices are connected to an IoT gateway that collects such information and sends them to the cloud. The sending and receiving operation is one of the most expensive tasks from the power management point of view. This operation involves the radio connection (cellular, Wi-Fi, Bluetooth, etc.).
Finally, using some specific business logic locally or remotely, an IoT device can control one or more actuators.
The microcontroller controls all the operations and it is the brain of the device and in order to work, it needs power.
Implementing power management in IoT
Now we have introduced some aspects related to the power management in an IoT device, it is time to describe how to implement it. To do it, we will describe some best practices from the development point of view covering how to write the code that takes into account the device power management.
The easiest way we use to develop an IoT application using Arduino, ESP8266 and other compatible devices is implementing the code in the loop() method. For example, when we have to acquire data from a sensor at specific time intervals we simply add the delay(..) method specifying how long the device should wait before starting again and repeat the same tasks. This approach isn’t the best one when we consider the power management aspect. There are different ways we can use to achieve a better result.
In more details, for example, an ESP8266 device has four different modes to “sleep” or save the battery:
- No sleep
- Modem sleep
- Light sleep
- Deep-sleep
This table describes these different sleep modes:
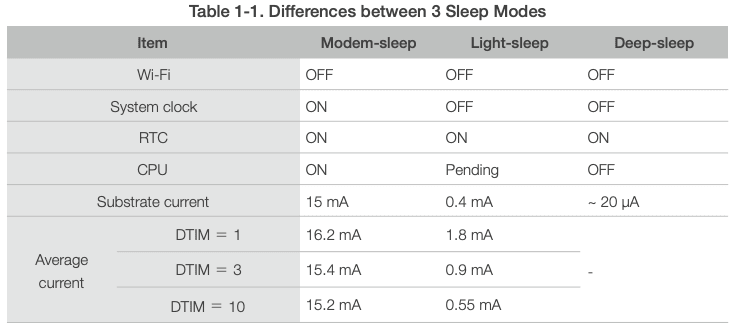
No sleep
This is the most inefficient way to use this device. It is always on.
Modem-sleep mode
This mode is enabled only when the ESP8266 is connected to a Wifi. In this mode, the ESP8266 turns off the WiFi module between two DTIM Beacon interval. The ESP8266 turns on again the WiFi module before the next Beacon. This is sleep mode is used when it is necessary to keep the CPU on.
Light-sleep mode
This is mode is very similar to the Modem-sleep mode but in this mode, ESP8266 suspends the CPU and turns off the clock. This mode is more efficient than the previous mode. In Light-sleep mode, the ESP8266 should be woken up using a GPIO pin.
Deep-sleep mode
In this mode, everything is turned off except the RTC (Real Time Clock) , so that the ESP8266 can be turned on periodically. This is the most the most efficient mode. The deep-sleep mode can be used in scenarios where the device should send data at specific intervals. This is the example of an application that uses sensors. The application reads sensor data, sends the values and the goes into deep-sleep mode.
More interesting resources:
How to use Cayenne IoT with ESP8266 and MQTT: Complete Step-by-step practical guide
Build an IoT soil moisture monitor using Arduino with an IFTTT alert system
How to use the power management in ESP8266 to reduce the power consumption
Now it is time to build a simple example describing how to use the deep-sleep mode to handle power management in IoT. Let us suppose that our application has to read the temperature and send it to a remote IoT platform. The application structure must be:
- Read data from sensor
- Send data
- Goes into the deep-sleep mode for a predefined time interval
- Repeat again from the first step
How to enable deep-sleep mode in ESP8266
The first step is enabling the deep-sleep mode. The schematic below shows how to do it:
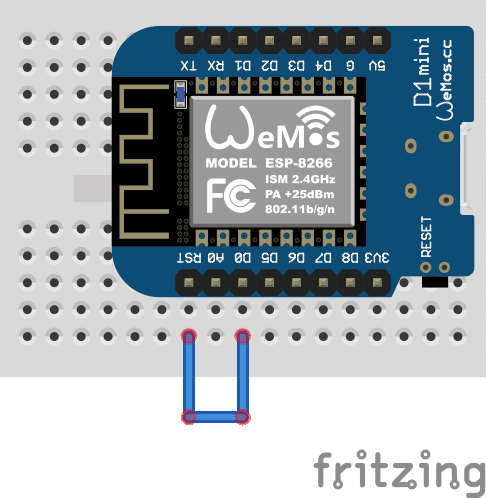
In this case, we are connecting the pin D0 to the RST.
Tip
When you upload the code to your ESP8266 do not connect D0 to RST
The ESP8266 code below, show how to do it:
#include <ESP8266WiFi.h>

const char* WIFI_SSID="---";
const char* WIFI_PWD="----";

void setup() {
  Serial.begin(9600);

  connectToWifi();
  // send data

  Serial.println("Going to deep sleep for 15 sec");
  ESP.deepSleep(15e6);
}

void loop() {
  // put your main code here, to run repeatedly:
}

void connectToWifi() {
  Serial.print("Connecting to Wifi:");
  Serial.println(WIFI_SSID);
  WiFi.begin(WIFI_SSID, WIFI_PWD);

   while (WiFi.status() != WL_CONNECTED) {
    if (WiFi.status() == WL_CONNECT_FAILED) {
      Serial.println("Error during WiFi connection- ");
      delay(10000);
    }
    delay(1000);
   }

    Serial.print("Wifi IP:");
    Serial.println(WiFi.localIP());
}
In this case, the ESP8266 goes into the deep sleep mode for 15 seconds. When it wakes up it starts from the beginning again, connecting to the WiFi and so on.
It is possible to use this approach to wake up the ESP8266 using a button to start it. We will cover it in another post.
Summary
At the end of this post, hopefully, you gained the knowledge about how to manage the power in IoT using some example. The power management is very important in IoT, so it is important to take it into account.
Published on Java Code Geeks with permission by Francesco Azzola, partner at our JCG program. See the original article here: Device Power Management in IoT Opinions expressed by Java Code Geeks contributors are their own. |

Yeah, it is really very important to consider device power management. I realized it with my own experience. I have a security camera at my house and it is working on batteries. I think that it was a great mistake to buy this camera because it is working for 8 hours maximum. I don’t know why it is working for so little time, maybe the issue in the power supplying or something related. But I don’t want to solve this issue, I think that it would be easier to buy a new complete security system and to forget about this.… Read more »
Good day. Most likely you are right because buying a security system in parts, from different manufacturers, is not so aesthetic and does not guarantee a clear and well-coordinated operation of the sensors. I think that you really should choose one brand of security system, such as ajax, which you mentioned. But everything that comes in the kit will definitely work with each other perfectly. By the way, I use this security system at work, so I can answer your question positively. Yes, it is good.