In the world of RESTful services where a lot of work actually happens behind the scenes, we often have to do much of the processing in our application which doesn’t actually affect the response which needs to be sent to a real-world user. These business decisions can be taken reactively so that they do not have any impact to a user interacting with the application. Spring Framework provides us with an excellent project, termed as Spring Reactor project which allows us to manage this background processing very well in the background. Before diving into the lesson, one thing we must note is that Reactive Programming is not same as concurrent programming.
One of the use-cases in RESTful programming for reactive behaviour is that most of the times, services are fundamentally blocking and synchronous. Reactive Programming allows us to expand beyond the scope of synchronous thread and complex orchestrations can be done without demonstrating a blocking behaviour. Let us deep dive into the lesson to understand how this reactive behaviour can be integrated into a Spring Boot-based application.
Table Of Contents
- 1. Introduction
- 2. Reactor in the JVM
- 3. Making the Spring Boot Project with Maven
- 4. Adding Maven dependencies
- 5. Project Structure
- 6. Understanding the sample application
- 7. Defining the POJO Model
- 8. Defining the Service
- 9. Defining the Event Consumer
- 10. Defining the Java Configuration
- 11. Defining the Spring Boot class
- 12. Running the project
- 13. Conclusion
- 14. Download the Source Code
1. Introduction
In this Spring Reactor lesson, we will learn how we can get started with reactive behaviour in a Spring Boot project and start producing and consuming messages in the same application itself. Apart from a simple project, we will see how Spring Reactive flow works and how requests are managed when there are several handlers for the different type of requests.
With the uprise of Microservices, the necessity of asynchronous communication between the involved services became a mainstream requirement. For communication among various services involved, we can use projects like Apache Kafka. Now, asynchronous communication is also desirable for time-consuming requests within the same application as well. This is where the actual use-case of Spring Reactor comes into play.
Please note that Reactor pattern, as demonstrated in this application is to be used only when a user doesn’t expect a response directly from the application as we only execute background jobs using this Reactor demonstration. Using Reactors are a very good choice when it is possible for developers to assign a little more heap memory to the application (depending on the number of threads this app will use) and they want to execute tasks in parallel and order of execution of tasks doesn’t really matter. This point is important actually so we will say it again by rephrasing it, it is not possible to confirm the order of execution of jobs when they are executed in parallel.
2. Reactor in the JVM
The Reactor, as stated by Spring itself, is a foundational framework for asynchronous applications on the JVM which on modest hardware, makes it possible to process over 15,000,000 events per second with the fastest non-blocking Dispatcher. As it sounds, the Reactor framework is based on the Reactor design pattern.
The most important thing about Spring Reactor is the level of abstraction this framework provides to a Java Developer developing applications using Spring. This abstraction makes implementing the functionality in our own application very easy. Let’s get started with a sample project to see how we can make use of this framework in a near to reality application. The reactor project also supports non-blocking inter-process communication (IPC) with the reactor-ipc components but its discussion is out of the scope for this lesson.
3. Making the Spring Boot Project with Maven
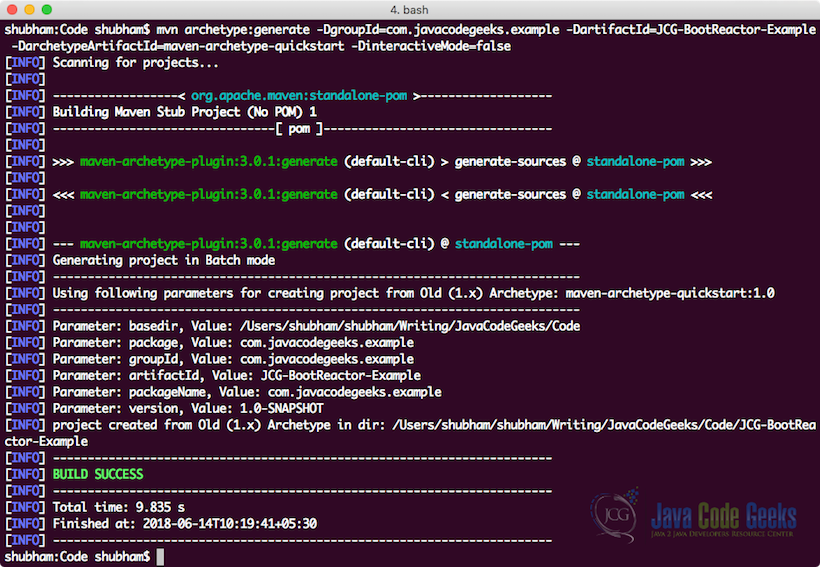
We will be using one of the many Maven archetypes to create a sample project for our example. To create the project execute the following command in a directory that you will use as workspace:
Creating a Project
mvn archetype:generate -DgroupId=com.javacodegeeks.example -DartifactId=JCG-BootReactor-Example -DarchetypeArtifactId=maven-archetype-quickstart -DinteractiveMode=false
If you are running maven for the first time, it will take a few seconds to accomplish the generate command because maven has to download all the required plugins and artifacts in order to make the generation task. Once we run this project, we will see the following output and the project will be created:
4. Adding Maven dependencies
Once you have created the project, feel free to open it in your favourite IDE. Next step is to add appropriate Maven Dependencies to the project. We will work with following dependencies in our project:
spring-boot-starter-web: This dependency marks this project as a Web project and it adds dependencies in order to create controllers and make Web-related classesreactor-bus: This is the dependency which brings all the Reactor related dependencies into the project classpathspring-boot-starter-test: This dependency collects all test related JARs into the project like JUnit and Mockito
Here is the pom.xml file with the appropriate dependencies added:
pom.xml
  <parent>
    <groupId>org.springframework.boot</groupId>
    <artifactId>spring-boot-starter-parent</artifactId>
    <version>1.5.10.RELEASE</version>
    <relativePath/> <!-- lookup parent from repository -->
  </parent>

  <properties>
    <project.build.sourceEncoding>UTF-8</project.build.sourceEncoding>
    <project.reporting.outputEncoding>UTF-8</project.reporting.outputEncoding>
    <java.version>1.8</java.version>
  </properties>

  <dependencies>

    <dependency>
      <groupId>org.springframework.boot</groupId>
      <artifactId>spring-boot-starter-web</artifactId>
    </dependency>

    <dependency>
      <groupId>io.projectreactor</groupId>
      <artifactId>reactor-bus</artifactId>
      <version>2.0.8.RELEASE</version>
    </dependency>

    <dependency>
      <groupId>org.springframework.boot</groupId>
      <artifactId>spring-boot-starter-test</artifactId>
      <scope>test</scope>
    </dependency>

  </dependencies>

  <build>
    <plugins>
      <plugin>
        <groupId>org.springframework.boot</groupId>
        <artifactId>spring-boot-maven-plugin</artifactId>
      </plugin>
    </plugins>
  </build>
Find the latest Maven dependencies on Maven Central. We have added a Maven plugin for Spring boot projects as well which help us to make this project into a runnable JAR so that the project is easy to deploy without the help of any modern tools and dependencies. The JAR we obtain from this plugin is completely ready to be deployed as an executable file.
Finally, to understand all the JARs which are added to the project when we added this dependency, we can run a simple Maven command which allows us to see a complete Dependency Tree for a project when we add some dependencies to it. This dependency tree will also show how many dependencies were added when we added some of our own dependencies in a well-placed hierarchial manner. Here is a command which we can use for the same:
Check Dependency Tree
mvn dependency:tree
When we run this command, it will show us the following Dependency Tree:
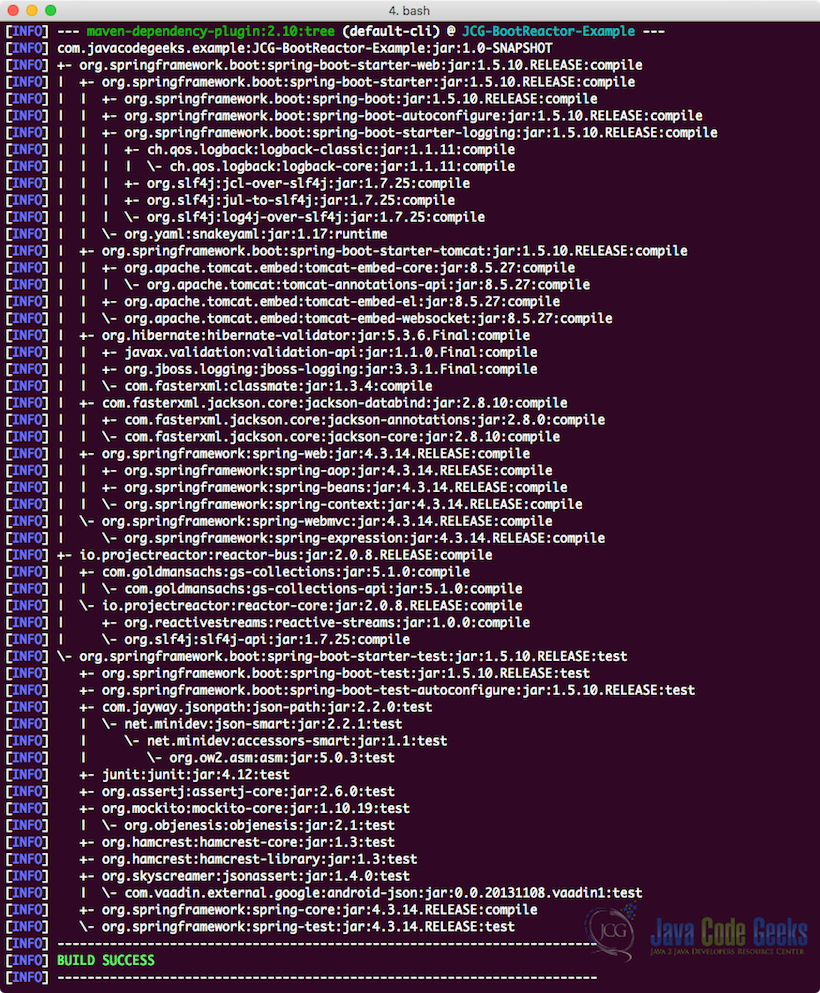
Noticed something? So many dependencies were added by just adding three dependencies to the project. Spring Boot collects all related dependencies itself and leave nothing for us in that matter. The biggest advantage is that all these dependencies are guaranteed to be compatible with each other as these dependencies are managed and provided by Spring Boot project’s pom file itself.
5. Project Structure
Before we move on and start working on the code for the project, let’s present here the project structure we will have once we’re finished adding all the code to the project so that we know where to places classes we will make in this project:
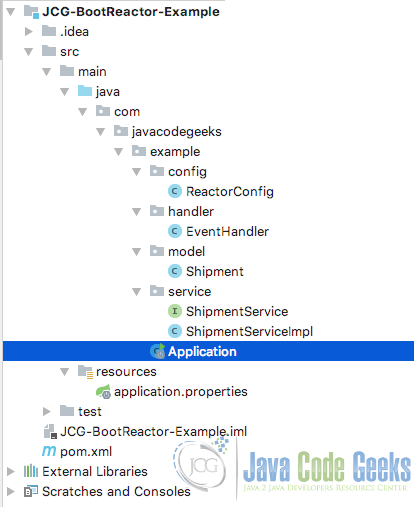
We have divided the project into multiple packages so that the principle of separation of concern is followed and code remains modular which makes the extension of the project fairly easy.
6. Understanding the sample application
To keep the aplication simple to understand and also close to a real-life situation, we will consider a scenario of a logistic application which manages the delivery of various shipments placed in the system.
This application receives updates from an external provider about the location of a shipment being delivered to the customer at a given address. Once our application receives this update, it has various operations to perform, like:
- Update location for shipment in the database
- Sending notification to user’s mobile device
- Send an email notification
- Send an SMS to user
We choose to exhibit reactive behavior for these operations as user doesn’t depend on these operations to happen in exact real-time as they are mostly background tasks which can take a little long time as well and user won’t be highly affected if the status update for a shipment is few minutes late. Let’s get started with the model creation first.

7. Defining the POJO Model
We will start by defining our POJO which represents a shipment being sent to a customer which have fields like shipmentId, currentLocation etc. Let’s define this POJO here:
Shipment.java
package com.javacodegeeks.example.model;

public class Shipment {

    private String shipmentId;
    private String name;
    private String currentLocation;
    private String deliveryAddress;
    private String status;

    //standard setters and getters
}
We have defined some basic fields here. We omitted standard getters and setters for brevity but they are necessary to be made as Jackson uses them during Serialization and Deserialization of an Object.
8. Defining the Service
We will define a basic interface which defines the contract for the functionality we will use next which will define the business logic which needs to execute once the even is being consumed by the application.
Here is the contract definition we will be using:
ShipmentService.java
package com.javacodegeeks.example.service;

import com.javacodegeeks.example.model.Shipment;

public interface ShipmentService {
    void shipmentLocationUpdate(Shipment shipment);
}
We only have one method definition in this interface as this is al we need for now. Let’s now move on to implement this service where we will actually demonstrating a sleep method which just mocks the operation behavior for this class:
ShipmentServiceImpl.java
package com.javacodegeeks.example.service;

import com.javacodegeeks.example.model.Shipment;
import org.slf4j.Logger;
import org.slf4j.LoggerFactory;
import org.springframework.stereotype.Service;

@Service
public class ShipmentServiceImpl implements ShipmentService {

    private final Logger LOG = LoggerFactory.getLogger("ShipmentService");

    @Override
    public void shipmentLocationUpdate(Shipment shipment) throws InterruptedException {
        LOG.info("Shipment data: {}", shipment.getShipmentId());

        Thread.sleep(3000);

        LOG.info("Shipment with ID: {} reached at javacodegeeks!!!", shipment.getShipmentId());
    }
}
For the illustration purposes, when this service is called with shipment details, it just provides some print statements, use a delay of 3000 milliseconds to realize the time which the operations we defined in the previous section might have taken. Note that each of those operations could have taken much more time than just 3 seconds but the application is free from that (until the threads start to pile up on the heap memory for the application which needs to be managed).
9. Defining the Event Consumer
In this section, we will finally see how we can define a consumer which listen for events shipment location updates. This consumer can be invoked by just putting an event for shipment update on the SPring’s EventBus we will define and use shortly.
EventHandler.java
package com.javacodegeeks.example.handler;

import com.javacodegeeks.example.model.Shipment;
import com.javacodegeeks.example.service.ShipmentService;
import org.springframework.beans.factory.annotation.Autowired;
import org.springframework.stereotype.Service;
import reactor.bus.Event;
import reactor.fn.Consumer;

@Service
public class EventHandler implements Consumer<Event<Shipment>> {

    private final ShipmentService shipmentService;

    @Autowired
    public EventHandler(ShipmentService shipmentService) {
        this.shipmentService = shipmentService;
    }

    @Override
    public void accept(Event<Shipment> shipmentEvent) {
        Shipment shipment = shipmentEvent.getData();
        try {
            shipmentService.shipmentLocationUpdate(shipment);
        } catch (InterruptedException e) {
            //do something as bad things have happened
        }
    }
}
This consumer service accepts the object in the event bus and informs our service class so that it can perform necessary operations asynchronously. Note that we will be defining a thread pool as well which will be used to run this consumer so that different threads can be used to run the service method call. Even if we don’t define the thread pool ourself, Spring Boot will do this for us with some fixed number of maximum threads in the pool.
The good thing about this consumer class is that it receives a Shipment object itself from the event bus and there are no conversion or casting needed to be done in the class itself which is a common area of errors and also increases the time taken for business logic to execute.
10. Defining the Java Configuration
We can define the configurations with Java in our application. Let’s do those definitions here:
ReactorConfig.java
package com.javacodegeeks.example.config;

import org.springframework.context.annotation.Bean;
import org.springframework.context.annotation.Configuration;
import reactor.Environment;
import reactor.bus.EventBus;

@Configuration
public class ReactorConfig {

    @Bean
    Environment env() {
        return Environment.initializeIfEmpty().assignErrorJournal();
    }

    @Bean
    EventBus createEventBus(Environment env) {
        return EventBus.create(env, Environment.THREAD_POOL);
    }
}
Clearly, there is nothing special here. We just initialised our thread pool with some number (default here). We just wanted to demonstrate how you can alter the number of threads if you want to, depending on your application use-case.
11. Defining the Spring Boot class
At the final stage, we will make the Spring Boot class with which we can publish a message which can be consumed by the event handler we defined earlier. Here is the class definition for the main class:
Application.java
package com.javacodegeeks.example;

import com.javacodegeeks.example.handler.EventHandler;
import com.javacodegeeks.example.model.Shipment;
import org.slf4j.Logger;
import org.slf4j.LoggerFactory;
import org.springframework.beans.factory.annotation.Autowired;
import org.springframework.boot.CommandLineRunner;
import org.springframework.boot.SpringApplication;
import org.springframework.boot.autoconfigure.SpringBootApplication;
import reactor.bus.Event;
import reactor.bus.EventBus;

import static reactor.bus.selector.Selectors.$;

@SpringBootApplication
public class Application implements CommandLineRunner {

    private final Logger LOG = LoggerFactory.getLogger("Application");

    private final EventBus eventBus;
    private final EventHandler eventHandler;

    @Autowired
    public Application(EventBus eventBus, EventHandler eventHandler) {
        this.eventBus = eventBus;
        this.eventHandler = eventHandler;
    }

    public static void main(String[] args) {
        SpringApplication.run(Application.class, args);
    }

    @Override
    public void run(String... strings) throws Exception {
        eventBus.on($("eventHandler"), eventHandler);

        //Publish messages here
        for (int i = 0; i < 10; i++) {
            Shipment shipment = new Shipment();
            shipment.setShipmentId(String.valueOf(i));
            eventBus.notify("eventHandler", Event.wrap(shipment));
            LOG.info("Published shipment number {}.", i);
        }
    }
}
We have used an interface CommandLineRunner to make this class run code with which we can test the producer and config class code we wrote. In this class, we publish a message to the specified topic and listen for it in the consumer class we defined in the same application. Note that we use Spring’s own event bus to carry the jobs and these jobs will not be put on the disk. If this application is gracefully killed using Spring Boot actuator, these jobs will be persisted on disk automatically so that they can be requeued when the application comes back up.
In the next section, we will run our project with a simple Maven command.
12. Running the project
Now that the main class definition is done, we can run our project. Running the application is easy with maven, just use the following command:
pom.xml
mvn spring-boot:run
Once we execute the above command, we will see that a message has been published and same app consumed the message in the event handler:
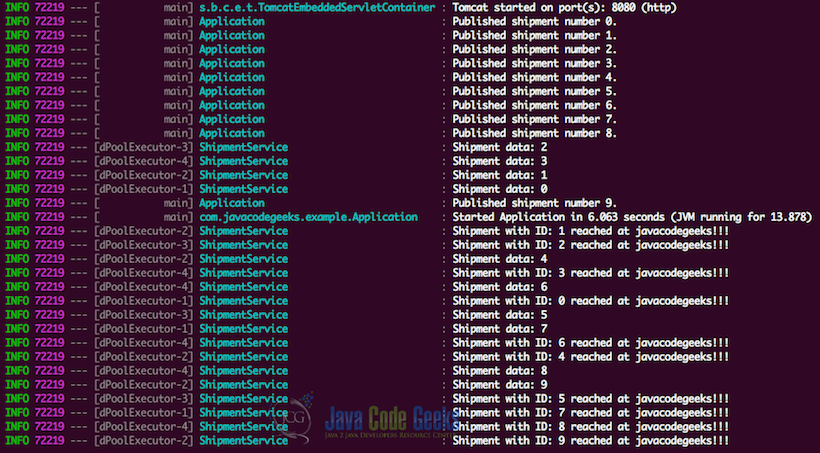
We saw that events were published when the application was started using the CommandLineRunner method we used in a non-blocking mode. Once the events were published, it was consumed by the event handler in parallel. If you take a close look at the consumer, you will notice that Spring define four threads in the thread pool to manage these events. This is the default limit on the number of threads Spring defines to manage events in parallel.
13. Conclusion
In this lesson, we looked at how easy and quick it is to construct a Spring Boot app with Reactor project integrated into it. As we already said, a well-designed reactor pattern in your application can have a throughput as high as 15,000,000 (that’s six zeroes) events per second. This shows that how efficiently the internal queue for this reactor is implemented.
In the small application we defined, we demonstrated a simple way of defining the thread pool executor which defined four threads and a consumer which make use of this thread pool to manage events in parallel. One of the most common problems faced in applications which rely on asynchronous behaviour for execution of operations is that run out of memory very soon as there are multiple threads which start to occupy heap space and create objects as they start to process. It is important to make sure that while starting the application, we assign good heap size to the application which directly depends on the size of the thread pool defined for the application.
The reactive style of programming is one of the most common programming styles which is in uprise right now as applications have started to exploit CPU cores with their parallel execution which is a very good idea to use hardware at the application level. The Reactor provides a complete non-blocking programming foundation for JVM and is also available for Groovy or Kotlin. Due to the fact that Java is not a reactive language in itself, it does not support coroutines natively. There are several JVM languages like Scala and Clojure which support reactive models better in terms of nativeness, but Java itself does not do the same (at least not until version 9).
14. Download the Source Code
This was an example of Java programming language with Spring Boot and Reactor pattern.
You can download the full source code of this example here: Reactor Example

This is all correct, i guess, but a tutorial based on Spring Boot 2 and Reactor 3 would be more relevant today – and very very different, I think.