This article describes how to build an IoT system using Arduino/ESP8266 mydevices Cayenne and MQTT. In more details, this IoT tutorial discovers how to use Arduino (or ESP8266) to send data to Cayenne using MQTT protocol. Moreover, this Arduino/ESP8266 MQTT project investigates how to use MQTT to control remote peripheral using a web interface. This is a complete step by step tutorial on building an IoT system using Cayenne and Arduino.
In more details, this IoT tutorial experiments how to use MQTT with Arduino or ESP8266 from two different points of views:
- the first where there is the need to send data from Arduino to an IoT cloud platform (i.e Cayenne)
- the second where we have to control remotely our Arduino or ESP8266
The first scenario takes place when we have to send to the cloud the data acquired from a sensor connected to Arduino (or ESP8266). This is a common scenario, and generally speaking, it happens everytime it is necessary to acquire and send data using MQTT. The other scenario happens when there is the need to remotely control a device using MQTT, in this case, we will control Arduino (or ESP8266) using MQTT protocol.
We all know the importance of the IoT nowadays and the fact that in the near future there will be always more connected devices. Home appliances, smart devices, wearable and so on will be part of our lives. It is clear then the importance of IoT (Internet of things) and the fact we have to be ready for the next future. Using this MQTT tutorial, you will acquire some important concepts that are at the base of an IoT system. In this context, MQTT protocol is widely used and it plays a vital role in enabling data exchange between devices.
We have already extensively covered how to use MQTT protocol and if you are new you should read before starting this tutorial what is MQTT and how to use it.
On the other hand, Cayenne is an IoT cloud platform that provides several cloud services as:
- Data visualization
- IoT cloud
- Alerts
We will focus our attention on data visualization and on the IoT cloud services.
How to send data from Arduino/ESP8266 to Cayenne using MQTT
In this first part of this project, we will cover how to send data from Arduino/ESP8266 to Cayenne using MQTT. To keep things simple, this IoT project uses a simple BMP280 sensor. This sensor is able to measure:
- temperature
- humidity
- pressure
The main target of this IoT project is focusing on how to use MQTT to send data from Arduino to Cayenne and we want to keep other things simple. Before delving into the description about how to connect the BMP280 sensor to Arduino, it is useful to configure the Cayenne IoT platform so that it accepts data from our IoT device.
How to connect Arduino to Cayenne
The first step is configuring a device on Cayenne platform. To do it, it is necessary to create a free account using this link.
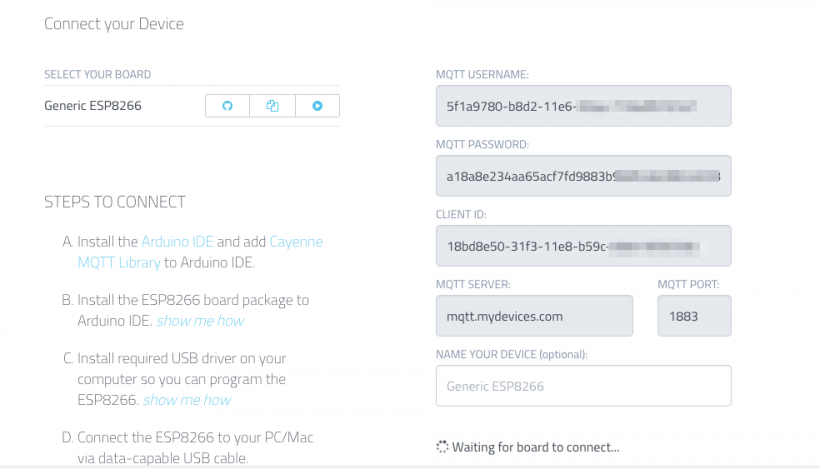
Once you are ready, move to mydevices Cayenne platform and click on “Add a new…” button. Select the “Device/Widget” and then select your IoT board. In this example, we are using ESP8266. In the end, Cayenne should show a web paging containing all the details about how to connect Arduino to Cayenne using MQTT:
In the schematics above, it is shown how to connect Wemos D1 to BMP/BME280. Anyway if you use Arduino the schematic is very similar.
Once the connections are ready, we can focus our attention on configuring the Cayenne to accept data from Arduino/ESP8266.
Configuring Cayenne for MQTT
The first step is creating a new device as shown in the picture below:
That’s all. It is time to connect our IoT device. To do it you can import the Cayenne Library into your Arduino IDE:
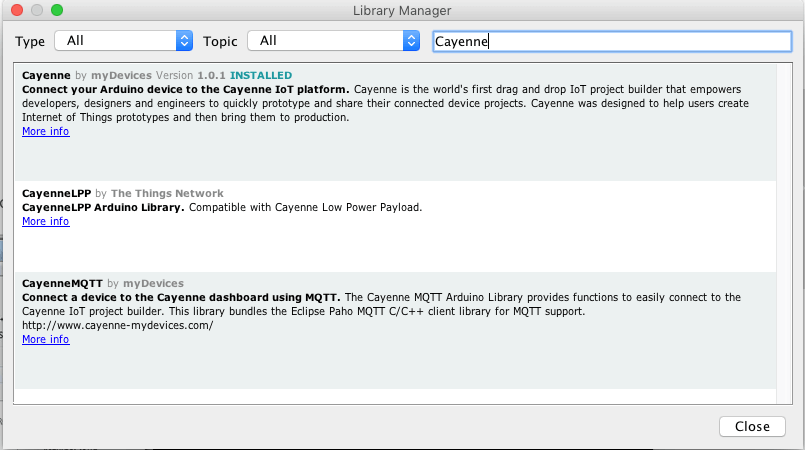
Once the library is installed, you can move to File->Examples->CayenneMQTT->Connections and you the code that matches your IoT device. The code below is for ESP8266:
//#define CAYENNE_DEBUG
#define CAYENNE_PRINT Serial
#include <CayenneMQTTESP8266.h>

// WiFi network info.
char ssid[] = "ssid";
char wifiPassword[] = "wifi_pwd";

// Cayenne authentication info. This should be obtained from the Cayenne Dashboard.
char username[] = "your usename";
char password[] = "your pwd";
char clientID[] = "your client_id";

void setup() {
Serial.begin(9600);
  Cayenne.begin(username, password, clientID, ssid, wifiPassword);
}

void loop() {
  Cayenne.loop();
}

CAYENNE_OUT_DEFAULT()
{
 // Here the data we want to send
}
Now replace in the code above, the parameters with those shown in the first picture (MQTT username, MQTT password, Client Id) and try to connect your IoT device to Cayenne MQTT. The result is below:

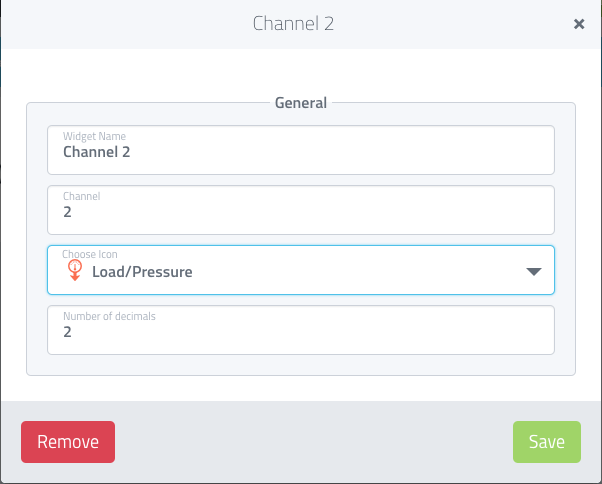
The last step before sending data is configuring the channels that is something like a virtual channel where Arduino sends data to Cayenne using MQTT. Usually, each physical quantity we want to measure should be related to a channel.
In this example, we add three different channels because Arduino sends to Cayenne Temperature, Humidity and pressure. Channels are useful when we want to create a dashboard with all the data coming from sensors. The image below shows how to add a pressure channel:
Finally, it is time to send data using MQTT to Cayenne. We have to modify the source code so that Arduino/ESP8266 reads data from sensors and send these values to Cayenne. The source code is quite simple:
....
CAYENNE_OUT_DEFAULT() {
  Cayenne.virtualWrite(0, millis() / 1000);
  Cayenne.celsiusWrite(1, temp);
  Cayenne.virtualWrite(2, press);
  Cayenne.virtualWrite(3, hum);
}
That’s all now we can see the live data or in other words, the data coming from sensors connected to Arduino:
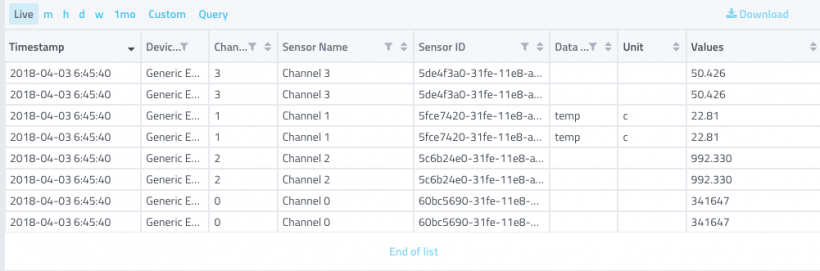
You can notice the virtual channels used in the Arduino source code.
How to control Arduino/ESP8266 from Cayenne using MQTT
In this second part of this IoT project based on Arduino and Cayenne, we use the MQTT to remotely control ESP8266 (or Arduino). In this example, a Neopixel bar is connected to ESP8266. The target is controlling the colors using MQTT through a web interface (Cayenne interface). This example can be further expanded and it is possible to connect other kinds of peripherals. The image below shows the Cayenne dashboard that will control the RGB LEDs in the Neopixel bar:
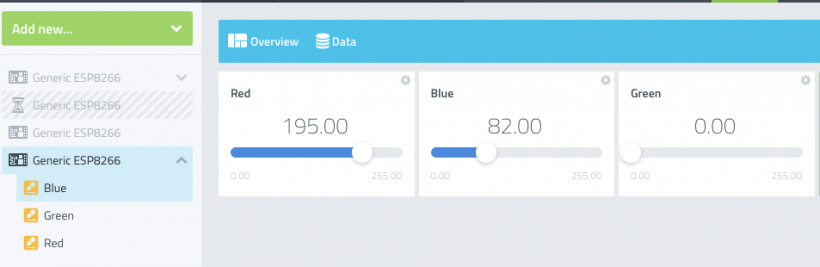
As you can notice, there are three different sliders that control the Red, Green, and Blue color components.
How to connect ESP8266 to RGB LEDs
The first step is connecting the Neopixels to the ESP8266. Notice that if you use an Arduino board the connections are almost the same. The picture below shows the schematic:
![]()
There are only three wires:
- Vcc (5v)
- GND (Ground)
- Signal (ESP8266 D1 pin)
To control the RGB LEDs, it is necessary to import the neopixel library and add the following code to the sketch:
#include <Adafruit_NeoPixel.h>
#define PIN            D1
#define NUMPIXELS      8

Adafruit_NeoPixel pixels = Adafruit_NeoPixel(NUMPIXELS, PIN,</pre>
<pre>                           NEO_GRB + NEO_KHZ800);

void updateLeds() {
  for (int i=0; i < NUMPIXELS;i++
    pixels.setPixelColor(i, pixels.Color(red,green,blue));
    pixels.show();
}
The code is very simple, it is necessary to define the data pin (D1 in this example) and the number of pixels supported by the neopixel bar.
How to configure Cayenne dashboard using MQTT
This is the last step of this IoT project. In this step, we will create the Cayenne dashboard that sends data to ESP8266 using MQTT. The IoT Cayenne dashboard has to contain three diffferent sliders that represent the three color components. The picture below shows how to add the slider to the Cayenne dashboard:
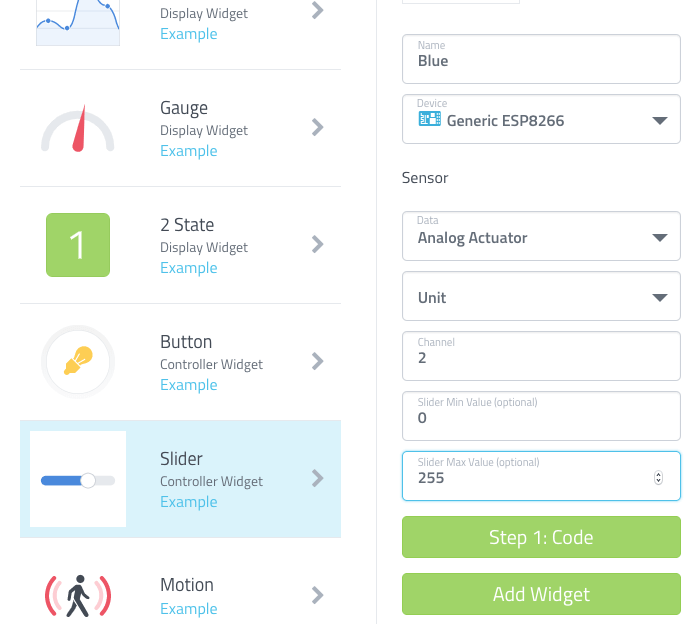
It is important to notice to select the right channel for each color component:
- Red (channel 1)
- Green (channel 2)
- Blue (channel 3)
You have to repeat this step for all the three color components. In the end, you will get the Cayenne dashboard shown above.
From the code point of view, we can reuse the code shown in the previous steps and modify it:
void setup() {
  Serial.begin(9600);
  Cayenne.begin(username, password, clientID, ssid, wifiPassword);
  pixels.begin();
}

void loop() {
  Cayenne.loop();
}

CAYENNE_OUT_DEFAULT() { }

CAYENNE_IN(RED_CHANNEL) {
   red = getValue.asInt(); // 0 to 255
   CAYENNE_LOG("Channel %d,  value %d", RED_CHANNEL, red);
   updateLeds();
}
CAYENNE_IN(BLUE_CHANNEL) {
   blue = getValue.asInt(); // 0 to 255
   CAYENNE_LOG("Channel %d,  value %d", BLUE_CHANNEL, blue);
   updateLeds();
}

CAYENNE_IN(GREEN_CHANNEL) {
 green = getValue.asInt(); // 0 to 255
 CAYENNE_LOG("Channel %d,  value %d", GREEN_CHANNEL, green);
 updateLeds();
}
There are three different CAYENNE_IN one for each channel. In each channel, the sketch handles the new value sent using MQTT. Every time, the ESP8266 receives a new value from the Cayenne IoT dashboard through the MQTT it updates the RGB LEDs to reflect the new color components.
Summary
At the end of this post, you hopefully gained the knowledge of how to integrate Arduino/ESP822 and Cayenne using MQTT. You have built an IoT system that uses sensors that measure physical quantities and send data to the cloud using MQTT protocol. In the second part, we have explored how to control peripherals connected to ESP8266 (or Arduino) using MQTT. Through the IoT Cayenne dashboard, the ESP8266 selects the RGB LEDs color exploiting the data sent using MQTT. This IoT project can be further expanded and you can apply the same principles to different scenarios and handle different sensors or peripherals.
| Published on Java Code Geeks with permission by Francesco Azzola, partner at our JCG program. See the original article here: How to build an IoT system using Arduino/ESP8266 mydevices Cayenne and MQTT Opinions expressed by Java Code Geeks contributors are their own. |
