1. About Netbeans IDE
Netbeans IDE, started as a student project known as Xelfi in the past, is a popular IDE developed with the goal to create a Delphi like IDE for Java. First developed in 1996, it has grown into a full fledged IDE for Enterprise scaled software development. With its excellent integrated abilities like the connection manager, integrated Glassfish server and resource managers, Netbeans IDE makes development quite easy for novice developers. This article has been created with the goal to guide every developer on how to take the most out of Netbeans IDE and its features.
Table Of Contents
- 1. About Netbeans IDE
- 2. Installing Netbeans IDE
- 3. Understanding Netbeans IDE interface
- 4. Working with Netbeans IDE
- 4.1. Creating first project in Netbeans IDE
- 4.2 Build the first project
- 4.3 Execute and Debug the first project
- 4.4 Versioning in Netbeans IDE
- 4.5 Refactoring class names & variable names
- 4.6 Formatting code and organising imports
- 4.7 Enhancing Netbeans IDE with the power of plugins
- 4.8 Useful shortcuts
- 4.9 Netbeans IDE preferences
- 4.10 Managing Working sets
- 4.11 Configuring Database connections
- 4.12 Exceptional features
- 4.1. Creating first project in Netbeans IDE
- 5. Conclusion
2. Installing Netbeans IDE
2.1 Prerequisites
For the tutorial, we would be downloading Netbeans IDE for Java EE. This would require Java 8 pre-installed to prevent any roadblocks during the tutorial. The Java installation version could be verified by using the command java --version in the command prompt or terminal depending on your OS.
2.2 Download and Install Netbeans IDE
Netbeans IDE is available in various flavours shown below. For the purpose of this tutorial, we would proceed with the download of Java EE version of Netbeans IDE 8.2. The download list could be found here. It is available for all the popular operating systems and unlike other IDEs, there is also an OS independent version of Netbeans available for download. For now, we will proceed with the download of OS specific version.

Once downloaded, the installation process is quite straightforward. Simply run the setup and follow the installation process. Once installed, start the IDE. It might take a while to load all the modules. Once loaded, you should be welcomed by this screen if everything went perfect with the installation.

Let us now get started with learning about using the Netbeans IDE.
3. Understanding Netbeans IDE interface
Netbeans IDE has an extremely minimalistic design when compared to the likes of it. The toolbar initially contains limited number of buttons. Their use has been described below.

- File operations buttons: The first group of buttons marked in Red indicate the buttons for file operations. The first button is used to create new files. The second button is dedicated to creation of new project. The third button is used to open up a file or a project as the need be. The fourth button is used to save all the changes files as and when required.
- Actions Undo-Redo buttons: The buttons are utilised to undo or redo the changes while developing the code.
- Build, Run and Debug controls: These controls are used when a project requires to be built or executed. The first button in the group marked blue is used for building the project. A build process involves complete process of compilation, linking and bytecode or executable file creation. The second button is a Clean & Build button. It clears the files generated from previous build and recreates all the compiled versions of files. The next button is used to execute a project with the default configuration while the button beside it allows you to debug when necessary. The last button is a profiling execution button. It allows to execute the project in a profiling mode.
In addition to toolbar, you could see three tabs in the left panel – Projects, Files & Services. Of these, currently only Services tab contains a few objects depending on your version and flavour of IDE. Netbeans provides with numerous really useful features like these services.
The services tab holds a list of Databases, sample RESTful services, Servers, Repositories, Test drivers and others. These services allow you to get an interface to test these components and interact with them right away. We will be looking at these as we proceed.
4. Working with Netbeans IDE
4.1 Creating first project in Netbeans IDE
Let us start with the creation of first project. To start with the first project, either navigate to File -> New Project or simply press the New Project button as described above. It should open up a small window as shown below.

For the tutorial purpose, we will proceed with Java Application. Select Java application in the right side panel and click Next. The next step asks for the selection of project name, location and folder. Select the necessary details and click next. The below image shows these details filled in.

On click of Finish, you should be able to see that your main class is automatically created. The project shows up in the Projects window and the MainClass shows up in the editor. A snapshot of how it appears is shown below.

Edit the MainClass as shown below to start understanding the basic control to run our first program.
MainClass.java
package com.javacodegeeks;

/**
 *
 * @author abhishekkothari
 */
public class MainClass {

    /**
     * @param args the command line arguments
     */
    public static void main(String[] args) {
        System.out.println("Hello there! Welcome to Java Code Geeks")
    }

}
Now click the save button or Navigate to File -> Save to save the file. We have intentionally missed out a semicolon in the above code. When you paste the code in your editor, you would see a red line below the System.out.println("Hello there! Welcome to Java Code Geeks") statement. The red line indicates an error in the statement. Netbeans automatically builds the code in the backend to identify any potential compilation issues in advance. To know more about the error, simply hover over the red mark on the left side of the editor. It will show a tooltip like the one shown below to help you understand the error.

With the tooltip, Netbeans also provides hints. Simply press Alt+Enter. It will take you to the end of the line and suggest what needs to be done. In this manner, Netbeans plays the role of an IDE by dynamically helping you solve the problems. Place a semicolon at the end of the line with error.
4.2 Build the first project
Once the code is ready, the next step is to build and execute the project. In the top bar, you would be able to see two buttons to build the project. The buttons are Build and Clean & Build respectively. To explain the purpose of both the buttons, one needs to have a basic understanding of what happens when a project is built.
In case of Java, on building the project, it compiles the Java files into Class files. These files are placed inside a folder named bin in the corresponding project folder. The Clean & Build button clears these class files and recompiles the complete project code again while the Build button, simply compile the files that are necessary. The project can also be built using the shortcuts for these buttons.
Build: F11
Clean & Build: Shift+F11
These tasks can also be executed by navigating to the Run->Build Project & Run->Clean Build Project menu items respectively. Another possible way is to right click the project and select the relevant option.
4.3 Execute and Debug the first project
Once the project is built successfully, the code would be ready to execute. To execute the project, there are numerous ways. The simplest way is the shortcut key F6. It runs the code with its default configurations. Another possible way out is to use the green play button to execute the code. On executing the code, it should display the output as shown below.

This is how you could run any simple Java project in Netbeans IDE. Let us further modify the code to include a little more lines.
MainClass.java
package com.javacodegeeks;

import java.util.Scanner;

/**
 *
 * @author abhishekkothari
 */
public class MainClass {

    /**
     * @param args the command line arguments
     */
    public static void main(String[] args) {
        Scanner in = new Scanner(System.in);
        String name = in.next();
        sayHello(name);
    }

    private static void sayHello(String name){
        System.out.println("Hello "+name);
    }

}
Now, we will understand the process of debugging. Debugging is to execute the code step by step to analyse possible causes of error. In order to debug the code from a specific line, we need to add a breakpoint. To add a breakpoint, simple click on the line number on the left side of the editor as shown below.

In order to start with the debugging process, press the debugging button shown below or use the shortcut Ctrl+F5.

Once the debugging is started, the code stops at the statement where you’ve marked for debugging. There are 5 useful operations in case of debugging each of which are described below.
- Step Over(Shortcut-F8): Steps over the current statement and ignores any expression or function call that might exist within the statement.
- Step Over expression(Shortcut-Shift+F8): As the name suggests, it simply steps over an expression within the statement and allow you to check the value after expression evaluation.
- Step Into(Shortcut-F7): Steps into the function call and jumps to the first line of respective function call within the statement.
- Step Out(Shortcut-Cmd/Ctrl+ F7): Steps out of a function once stepped into it.
- Run to cursor(Shortcut-F4): Runs the code to till the statement where cursor points to currently.
The buttons are shown in the image below. Use the button to run through the code step by step.

The Debugging process is provided with a bunch of windows to help solve the problem faster. The list of these windows could be found by navigating to Window -> Debugging as shown below.

The variables window allows to track the changes that take place in the variables of the code being debugged while watch allows to keep a watch on the variables as well as expressions. Call Stack and Loaded classes window allows to keep track of the debugging flow when jumping files within the project. Breakpoints window displays the list of breakpoints in the complete project. Sessions & threads provide a list of running threads for the current debugging session. Sources and debugging windows are used to view the relevant sources and debugging flow.
4.4 Versioning in Netbeans IDE
Unlike Eclipse IDE, Netbeans comes pre-packaged with support for a variety of versioning systems as shown in the figure below. Using these features is quite straightforward.

In order to initialise the repository for any type of versioning from the above, just navigate to Git/Mercurial/Subversion->Initialize Repository to create a repository for current project. Likewise, use the clone option to clone a remote repository. Once an initialized or cloned repository is being used, other options for the versioning operations are automatically added.
4.5 Refactoring class names & variable names
Refactoring is the process of making a global change for a specific item. The simplest refactoring operation is renaming a specific keyword or identifier. For instance, if you wish to change the name of the java class that has been created, we need to change the class name as well as java file. With Netbeans refactoring, change at one instance is automatically reflected at the other instances.
In order to use refactoring for renaming, select the class name MainClass and navigate to Refactor->Rename or simply use the relevant shortcut (Ctrl+R for MacOS). A small dialog opens up asking for the new name. Enter the new name and notice the change that takes place.

As it can be seen in the image below, the class name as well as file name has been changed. It does not merely change these. In case there are any object initialised as this class, their initialization code will also be updated right away.

There are a bunch of refactoring operations each with their significance. For instance, move and safe delete focus on finding all the instances of the class usage and change them as per the operation between done. Safe delete helps in identifying the potential places where the errors might take place.
4.6 Formatting code and organising imports
Formatting the code is an important operation when it comes to large code files. With Netbeans, this is quite simple. You can format the code using simple shortcuts or by navigating to Source -> Format. The shortcut keys is mentioned in the menu itself. For Mac OSx, the shortcut key is Ctrl+Shift+F.
In large codes, we tend to use multiple imports and keep modifying the code frequently. In addition to that, the developers often have the habit of pasting the code from various forums. In such a case, one faces the situation of too many missing imports. In both the above cases, we need to do a simple task of Organising the imports. Organising imports basically removes the unused imports and adds the necessary imports for the code to compile. In case of ambiguity in imports, the import organiser also queries the desired import from the developer.
To organise imports, simply navigate to Source->Organise imports and the necessary operation will be performed.
4.7 Enhancing Netbeans IDE with the power of plugins
Netbeans with its modular component based architecture has a great scope of enhancement. Netbeans IDE can be easily enhanced with additional plugins at any point of time just like Eclipse IDE. The process of adding features to Netbeans IDE is quite simple.
Navigate to Tools -> Plugins. It will open up a window similar to the one shown below.
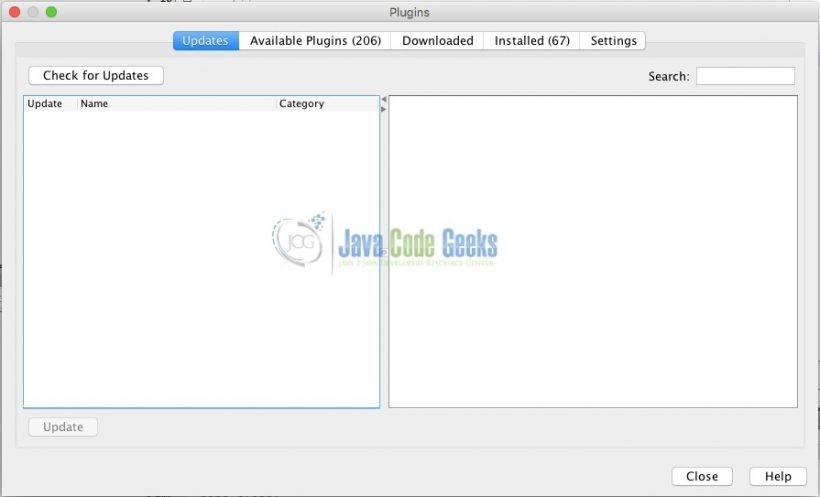
The available plugins tab provides a list of plugins already available in the Netbeans Repository but not yet installed onto the current Netbeans Installation. It can also be used to added different programming language support in the future. The downloaded tab allows you to install any third party Netbeans plugins that might be available. For instance, HTML5 funpack plugin can be easily download as a .nbm file and installed using the downloaded plugin tab. Any plugins that are installed could be found in the installed tab. One can remove or update the installed plugins from the same window.
4.8 Useful shortcuts
When it comes to IDE, certain shortcut come in handy in order to speed up the development process. This section discusses some of the most useful shortcuts for the development process. All these shortcuts could be found in the Navigate menu. The shortcut keys mentioned below might differ from version to version. The relevant shortcut keys can be found from the Navigate menu.
- Find a file: This is a shortcut frequently used by developers working on medium to large scale projects. In Netbeans IDE, its quite simple to find files using the Find a File window. To open up this window, use the shortcut key Ctrl+Shift+O to find and open up a file instantly.
- Find a type: A type is either a class or interface in case of Java files. Type search is useful when trying to find a specific class from a third party jar or compiled code files. The type search can be done using the shortcut Cmd/Ctrl + O.
- Go to symbol: This option is useful to jump directly to a specific function call or a variable declaration in any of the project files at any point of time. It display a list of occurrence of the specific symbol within the Netbeans core files and your project files. The shortcut key for this is Ctrl + Shift + Cmd/Alt + O.
4.9 Netbeans IDE preferences
Netbeans IDE preferences allows you to customize your experience with the Netbeans IDE. Netbeans preferences panel could be opened by navigating to Netbeans -> Preferences for MacOS and Tools -> Preferences in case of other operating systems namely, Windows or Linux. The window that shows up will be as shown below:

There’s a lot of things to explore within these preferences. However, we’ll explore just the most important preferences for a developer.
The first tab – General is visible above. It contains simple settings which would be necessary for a web project. It can be used to configure the web browser, proxy settings and decide whether to allow usage reporting to Netbeans or not.
The second tab – Editor contains extremely important options. The image below shows the first important tab in the Editor settings – Formatting. When coding long files, it becomes clumsy to work without a well-formatted code. The Formatting preferences allow you to customize the format settings including the space and tab size for every language. The settings can be selectively changed for a specific language or collectively changed for all the languages together.

The next important setting is the Code Templates preferences. Netbeans IDE provides a bunch of pre-programmed Code templates to speed up your development. Code templates are short letter combinations programmed to auto-create prefixed code. The image below shows the code templates window. The important configuration to note here is Expand Template On. It specifies how you would prefer to use the code template.

The code templates can be edited at any time. It is also possible to add new code templates as an when required or organise it better by removing unnecessary templates. The code templates also allow use of variables to be replaced later.
The third tab – Fonts & Colors is used to configure how Netbeans IDE looks. When a developer has to work for long term on an IDE, it is important that the visual is pleasing to the eye and the fonts are rightly sized to allow understanding of the code. Netbeans provides with a bunch of preset themes to speed up the process. However, we can also add other themes by downloading the presets from third party sites or creating our own presets. These settings could be specific to a language as well as global as needed.
The fourth tab – KeyMap is an extremely important tab to speed up your development. It allows you to configure the shortcuts for endless list of tasks. Unlike any other IDE, it provides an option to view the list as HTML to comfortably view the list of shortcuts. Every shortcut can be assigned with unique key combinations. If the combination is duplicate, it will automatically remove the shortcut key combination from the previous shortcut.

In a large organisations, it is preferable to have the same set of combinations working across all the systems. In order to make it possible, Netbeans allows you to save the configuration in case the shortcuts need to be replicated on multiple systems. This is possible using the Export and Import options shown above.
The remaining tabs allow you to configure language specific settings like the Build tools, compiler directories and other tools.
4.10 Managing Working sets
A working set is list of projects that you currently wish to work with. The below window shows the projects window with multiple projects in it. Let us consider that for now, we need to work only on the first two projects and rest two of the projects are just a distraction.

To manage this selection of projects, close the projects that are unnecessary. Once closed, right click in the project window and select Project Groups. In the project groups window that opens up, select New Group. Give the group a name of your choice as shown below:

Now, to verify the task completed fine, reopen the closed projects projects using File -> Open Project. Once the projects are opened, right click in the projects windows and reopen the project groups window. In the project groups window, select the newly created group. This should close the previously closed projects.
4.11 Configuring Database connections
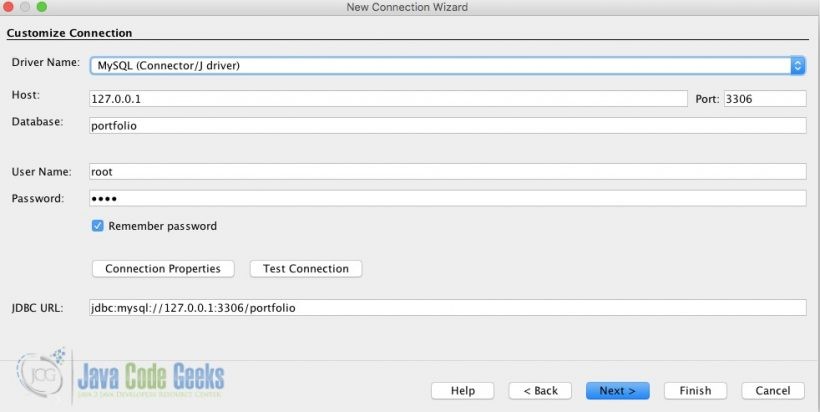
Netbeans IDE is an all-in-one development environment in real sense. It provides with an integrated interface to manage database connections, test REST services, Servers and numerous other services shown in the figure below. To connect to a database, simply right click Databases and select new connection.

Select the type of database and driver location in the window that opens up and click next. Enter the database details and click finish to complete the database configuration. If the connection is successful, a relevant DB connection will be added to the databases tree. The steps are shown below.

These connections can be used to interact with the database at any time. It is possible to execute and test queries within the IDE.
4.12 Exceptional features
Few of the exceptional features that would come in handy with Netbeans IDE is the visual editor for JavaFX and HTML projects. For instance, create a new HTML file. Once the new HTML file is created, navigate to Window -> IDE Tools -> Palette. It opens up a window of components as shown below.
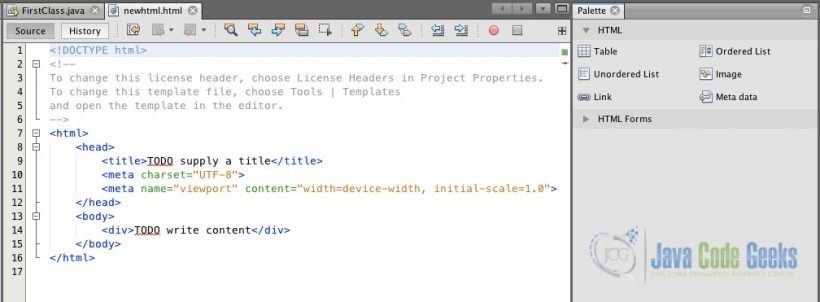
The components can be easily dragged and dropped onto the editor window on the left. On adding the code to the left, it generates the component code automatically in the editor window. This allows to easily put down multiple components on the page rapidly. Once the components are put in, open up the properties window to visual edit all the possible HTML properties for each component. The properties window automatically links to the current component and displays its properties dynamically as shown under.

5. Conclusion
Netbeans IDE proves to be a really handy tool when it comes to creation and management of large projects. The tutorial discussed in detail about all the basic steps that would be required to start with Netbeans IDE and make your development experience comfortable. We started with the installation of the IDE and the understanding of the user interface. Then we proceeded towards creating projects and customizing the interface further.

It would have been beneficial to show how to build a Maven project in NetBeans. The process is slightly different when selecting the type of project to create, and at least initially a user has to enter a groupId and artifactId.