1. A little about Eclipse
Eclipse has been around for years now as an extremely popular IDE for multiple programming languages. With its excellent plugin based architecture, Eclipse is quite a good tool to ease the development tasks. To be the most utilized IDE in today’s world, it takes a lot of efforts and tools. Eclipse is a combination of numerous plugins put together for the same purpose. In this tutorial, I would cover the major pre-packaged components of the Eclipse User Interface and help you get started with using Eclipse as an IDE.
Table Of Contents
- 1. A little about Eclipse
- 2. Installing Eclipse
- 3. Welcome to Eclipse IDE
- 3.1. Important terminologies for Eclipse
- 3.2 Eclipse User Interface
- 3.3 Creating first project
- 3.4 Modifying files and running the project
- 3.5 Debugging an application in Eclipse
- 3.6 Customising and Extending the abilities of Eclipse
- 3.7 Switching Eclipse Perspective
- 3.8 Save custom perspective
- 3.9 Various Explorers for Files
- 3.10 Search Functionality in Eclipse
- 3.11 Managing Working Sets
- 3.12 Managing Code Templates
- 3.13 Creating new code templates
- 3.14 Refactoring
- 3.1. Important terminologies for Eclipse
- 4. Conclusion
2. Installing Eclipse
2.1 Prerequisites
The latest Eclipse IDE installer requires Java version 8 or later installed on your system. Hence, it is a pre-requisite to setup Java 8 or later before getting started with installation.
2.2 Installing Eclipse
Installing Eclipse has got quite simple these days with a single setup file irrespective of the programming language you are interested in. As you would see further, the setup when executed, it allows you to choose the IDE version that you need depending on your choice for programming language. Once selected, it takes care of the rest. To download the eclipse installer, head over to this link.
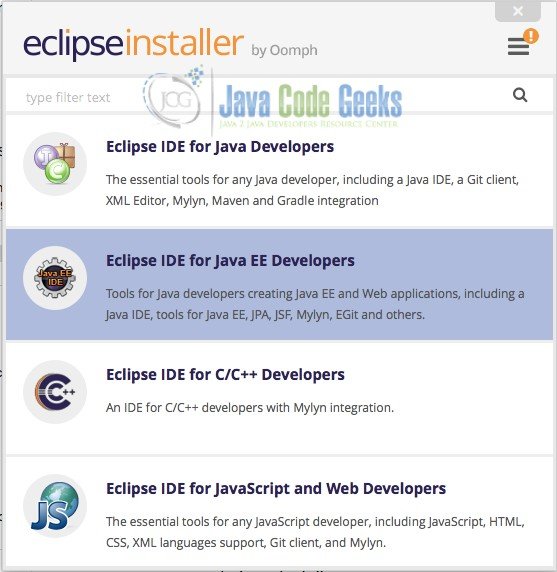
Once the setup has been download, execute the file. The setup process is almost similar for all the operating systems. Hence, I would cover the same using Mac OS here. On opening up the setup, it was show options for variable available Eclipse IDE. Choose the Java IDE as shown below.
3. Welcome to Eclipse IDE
Once installed, it’s time to get started using Eclipse IDE. There is a potential challenge that you might face while trying to run Eclipse. This challenge is an error showing Unable to start Java Virtual Machine. If at all you encounter such an error, there are two possible reasons for the same:
- Missing Java Home Environment variable: If you installed JDK/JRE using portable versions of the same, there are chances that you missed to declare JAVA_HOME environment variable. Eclipse is not able to find JVM because of this reason.
- Missing JDK/JRE: To check whether JRE or JDK is installed on your system, simply open up terminal/command prompt and enter
java -version. If the JDK/JRE is installed, the corresponding version will be displayed. If the version shows up, then Eclipse probably did not find it.
Ultimately, there is a common solution to it. The solution is too add the path to the VM in eclipse.ini file. Once added, Eclipse will income JVM from the mentioned path. The file can be found in different ways in Mac OS and Linux or Windows.
In case of MacOS, generally you won’t need to do this. However, if required, you could open up the Eclipse.app package and navigate to Contents->Eclipse->eclipse.ini.
In case of Linux or Windows OS, the file could be found in the installation directly of Eclipse easily.
The VM path can be added in the first two lines as shown below:
eclipse.ini
-vm
/usr/bin/
-startup
../Eclipse/plugins/org.eclipse.equinox.launcher_1.4.0.v20161219-1356.jar
--launcher.library
../Eclipse/plugins/org.eclipse.equinox.launcher.cocoa.macosx.x86_64_1.1.550.v20170928-1359
-product
org.eclipse.epp.package.jee.product
-showsplash
org.eclipse.epp.package.common
--launcher.defaultAction
openFile
--launcher.defaultAction
openFile
--launcher.appendVmargs
-vmargs
-Dosgi.requiredJavaVersion=1.8
-Dosgi.instance.area.default=@user.home/eclipse-workspace
-XX:+UseG1GC
-XX:+UseStringDeduplication
--add-modules=ALL-SYSTEM
-XstartOnFirstThread
-Dorg.eclipse.swt.internal.carbon.smallFonts
-Dosgi.requiredJavaVersion=1.8
-Xms256m
-Xmx1024m
--add-modules=ALL-SYSTEM
-Xdock:icon=../Resources/Eclipse.icns
-XstartOnFirstThread
-Dorg.eclipse.swt.internal.carbon.smallFonts
Alright, now that you’ve got Eclipse started. Let us proceed to understand about the Eclipse Terminologies and User Interface.
3.1 Important terminologies for Eclipse
Before proceeding to the understanding of Eclipse user Interface, it is important to understand a few terms related to Eclipse that we would be using day-in day-out.
Workspace: As soon as you launch eclipse, it asks you to select a workspace unless you mark the checkout “Do not ask again” in the selection window. A workspace in Eclipse is the location where all the projects and files being created will be stored. Thus, we can call workspace to be a collection of projects grouped into a folder.
Views: Every small and big window in Eclipse is a view. Eclipse allows you to customize the size and position of every view as per your requirement.
Perspective: Eclipse has a smart grouping of windows as required for every purpose. Eclipse uses the term Perspective for the same. A perspective is available for almost every purpose, for instance, Java, Debug, Java EE, Javascript, Plug-in Development and others. It is also possible to customize each of these as per user’s need.
Action Set: Eclipse displays set of buttons in the form of toolbar. The collection of such buttons for an action set. Each action, for instance, run a program, debug, search and others, have their set of buttons defined. These sets can be moved along the toolbar and arranged as per user convenience.
Plugin: Eclipse is popular for its plug-in based architecture. Eclipse can be extended with a set of plug-ins available easily in the market. These plugin sit in the eclipse directory and provide support within the Eclipse UI. For instance, a versioning extension EGit can be added to Eclipse to enable easy file versioning within Eclipse itself. Such extensions are known as plugins.
3.2 Eclipse User Interface
On opening up Eclipse IDE for the first time, you would be asked to select a workspace location. Choose a convenient folder to store your projects. It can be changed later if needed. Once the workspace location is selected, click OK and Eclipse would take a while to get started. Once started, you should see a welcome screen as shown below.
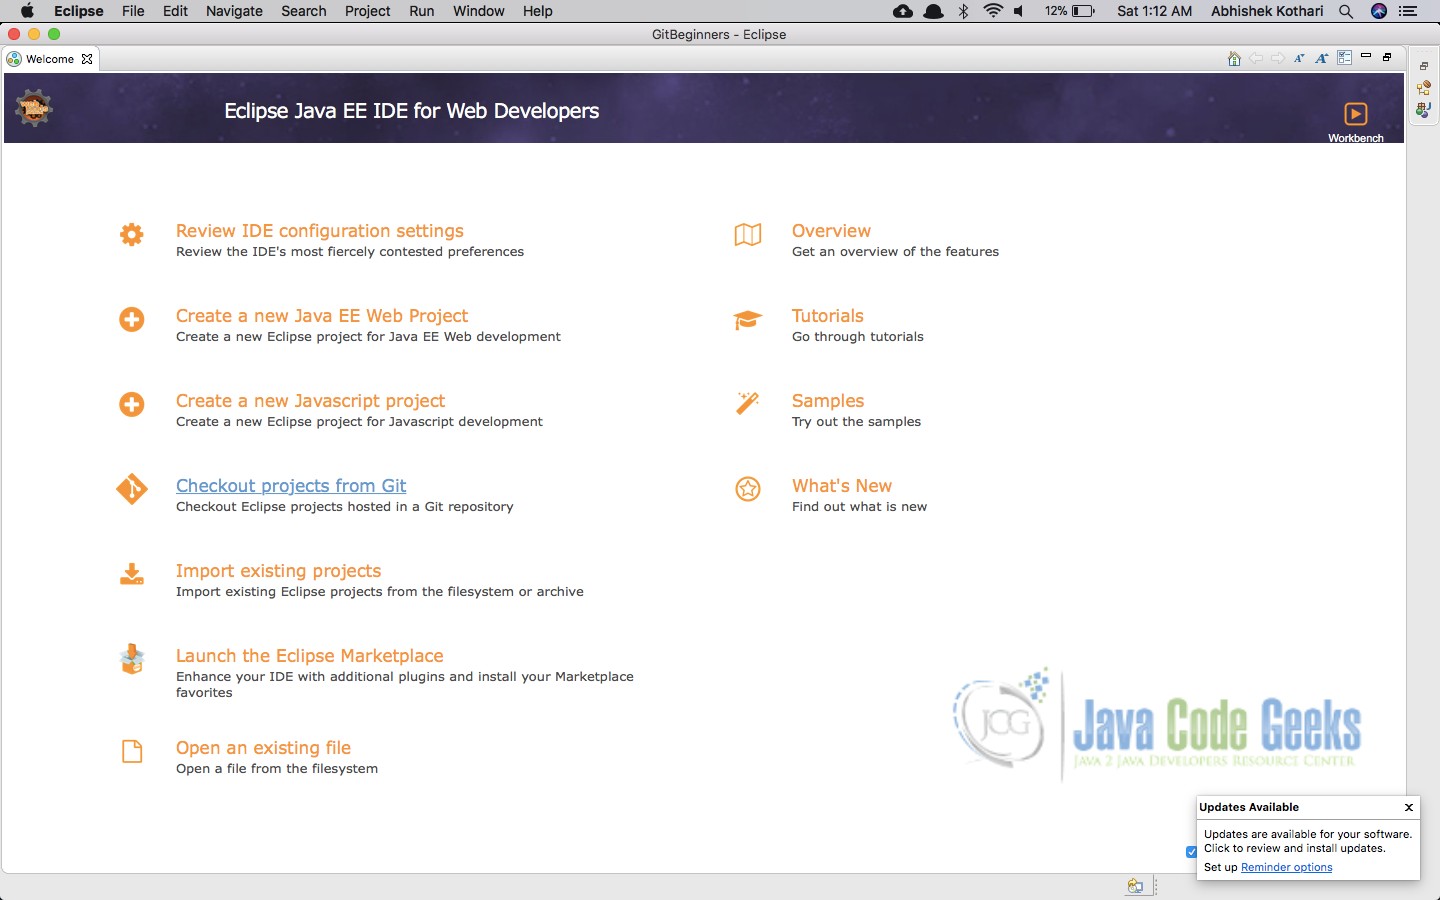
It present you with certain good links to get started. However, we would right away proceed to get acquainted with the user interface. On clicking the x icon on the Welcome tab, it would close the tab. You should be able to see the screen below given that you have installed Java IDE.

There are some group of buttons annotated with colorful rectangles. They will be discussed further in the article. However, prior to that let us understand how Eclipse is structured.
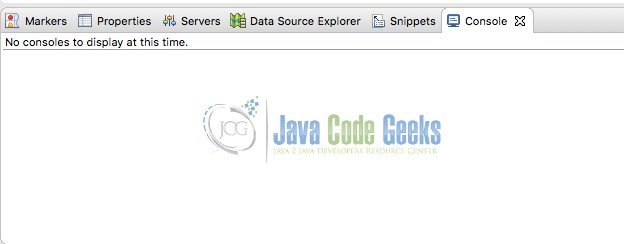
Eclipse user interface contains multiple tabbed windows with the application window. Each tab is called view. A collection of views form a perspective. Eclipse IDE supports any numbers of perspectives as per your need. You could configure the tabs to be shown or hidden based on the perspective selection. To show a particular view, you need to navigate to Window -> Show View and then choose the window you would like to see. For instance, let us select Console. A console tab shows up as shown below.

In order to save the perspective, simply navigate to Window -> Perspective -> Save Perspective. In case you do not wish to play with default perspectives, you could choose Save Perspective As and create a custom perspective for your use.
Moving further, lets discuss about what those group of buttons are and how do we manage them.
- Red box: The buttons enclosed in red are the file menu options. It allows you to performs operations like New File, New Project, Save file & Save all. Eclipse has an elaborate list of project and file types predefined to provide you with basic templates of the relevant files.
- Green box: The green box encloses the buttons related to code debug. The first button in the box allows to open the console to check logs for application debugs. The second button allows to skip the breakpoints during debug. Rest of the button form the set of play, pause and other related debug features like skipping to cursor, moving to next statement or moving into a statement.
- Yellow box: The yellow box encloses buttons related to running the code in various modes. Eclipse IDE supports execution of code in multiple modes namely Debug Mode, Normal run, Profiler mode and Custom mode.
- Blue box: The blue box encloses the buttons used to move the cursor logically forward or backward. For instance, eclipse provides link to files in Java classes. When we press Ctrl+ Click on the classname, eclipse automatically takes us to the class. Now suppose we wish to return back to the actual position from where the click took place, the back button here would help. Similarly, the forward button takes to the next position where the cursor was.
These set of buttons could be easily moved around and placed in an order as per your preference. It is also possible to add other set of buttons as required. This shall be discussed in the further sections
3.3 Creating first project
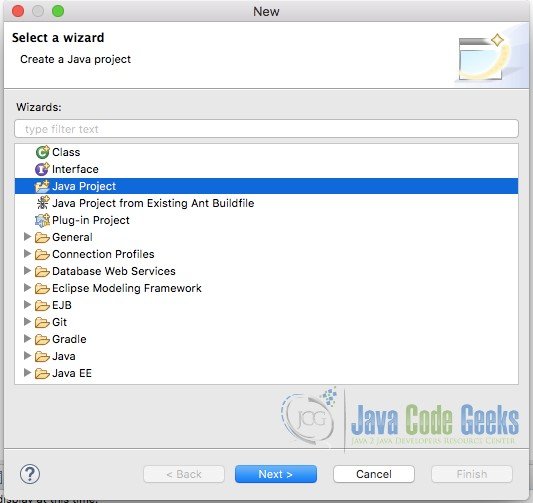
Here we would proceed with a sample Java application to understand the creation of projects in Eclipse. To create first project in Eclipse, go to the File->New menu(Shortcut: Cmd/Ctrl+N) or press the down arrow in the first button in the set of buttons. This will open up a list of project types that could be created.

Depending upon your usage these options dynamically keep changing. Let us select Other and choose Java Project from the window that opens up.
The next window that opens up will ask you to input the project name and choose the JRE to be used for the particular java project. Click Next and in the next window click Finish. The first project has been created successfully. Let us proceed with the creation of a demo Java file.
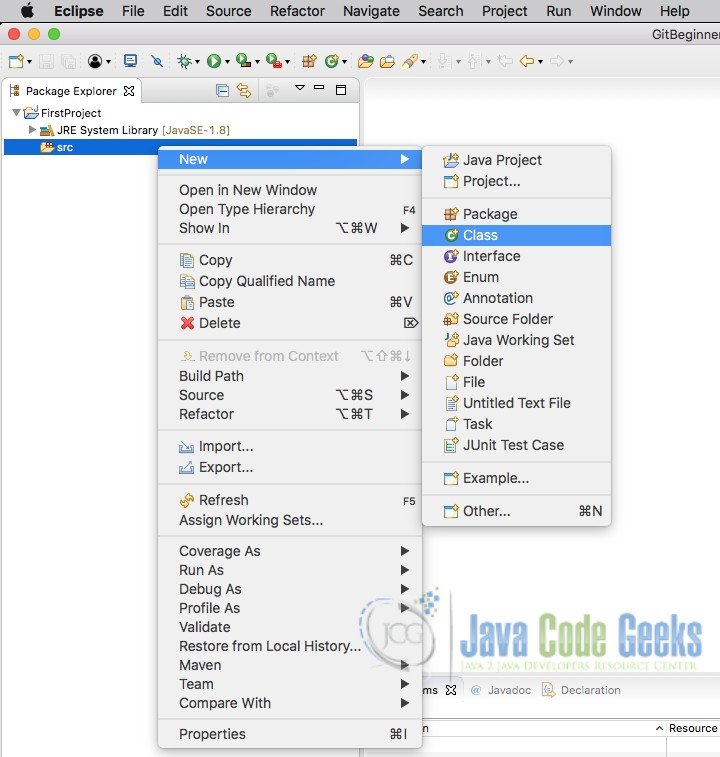
Open up the project and select the src folder shown in the project. This is a default folder that gets created. Now, right click the folder and navigate to New -> Class file. This will open up a small window and ask for the classname, package and superclasses. There are also some other options to generate code based on template. Check the first checkbox as shown in figure below to generate the main function. Keep the package and class name as shown in image below to keep up with this tutorial.

On clicking Finish, you would be able to see that eclipse automatically creates the package directory as mentioned in the above image and a java file with some basic code in it including the public static void main function. In this manner, whenever you create a specific type of file, Eclipse IDE tries to provide certain amount of template code for you to start with. To understand this better, let us create an HTML file in the same way.
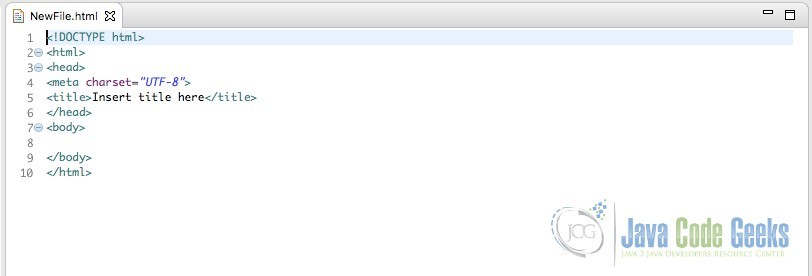
On creation of HTML file, you would be able to see that the HTML file contains a template code as shown in image above. This is not really a relevant file. Hence, let us now delete it. To delete the file, there are two possible ways:
- Right click the file and choose to delete the file.
- Select the file and press delete on your keyboard – Does not work on Macbook due to lack of Backspace
3.4 Modifying files and running the project
Now, let us proceed with putting in some code into the created Java file. Copy the below code and paste it into the Java file created by you.
FirstClass.java
package com.javacodegeeks;
public class FirstClass {
public static void main(String[] args) {
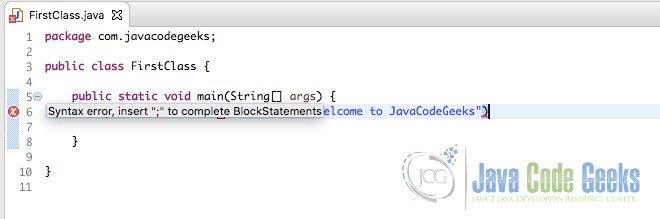
System.out.println("Hello There! Welcome to JavaCodeGeeks")
}
}
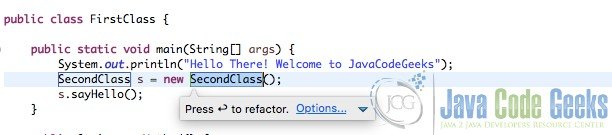
The code below contains a minor error of a missing semicolon in the code. Hence, when you paste the code in your java file, you would be seeing a red mark on the line containing the error. To know more about the error, simply click on the red cross shown on the left side of editor window. A tooltip will show up as shown below.
To resolve the error, simply put a semicolon at the end of the statement. This should resolve the error. Once you put the semicolon, you should see the Save buttons shine out indicating that there are unsaved files. Moreover, the package explorer also shows a * on the file.
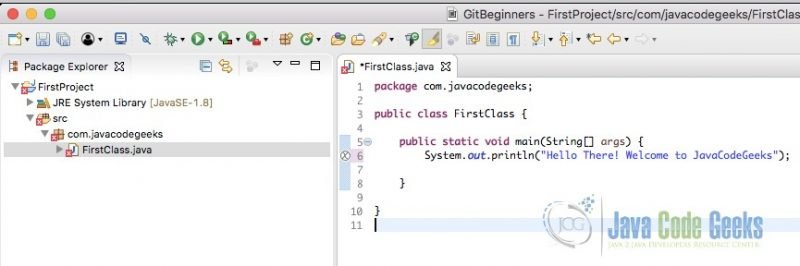
The red mark on the file does not go off until the file has been saved. To save the file, click the second icon or the third icon. The second icon basically saves just the file(Shortcut: Cmd/Ctrl + S) which is selected while the third icon does the job of saving all the files(Shortcut: Cmd/Ctrl + Shift + S). On saving the file, Eclipse automatically compiles the file and checks for any possible errors. Let us now run the project. There are several ways to run the file. However, for this tutorial, we’ll keep it simple. We’ll be using the green coloured button which appears similar to a play button.
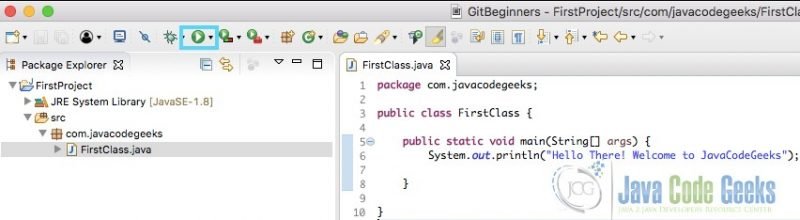
Press the icon to run the file. You should be able to see the console window with the output Hello There! Welcome to JavaCodeGeeks. With this, you have your first application running successfully.
3.5 Debugging an application in Eclipse
This is an important process for every developer creating lengthy codes. Eclipse IDE allows you to debug the code line by line.
In order to understand debug better, we will create one more class with the code shown below. We would also explore an excellent feature that Eclipse IDE provides. While typing the below code, type syso and press Ctrl+Space. Eclipse will generate list of suggestion that you would like to do. Just double click sysout and you will see Eclipse IDE automatically generates the code for it. This feature comes in handy when one needs to code at a rapid pace.
SecondClass.java
package com.javacodegeeks;
public class SecondClass {
	public void sayHello() {
		System.out.println("Hello from Second Class");
	}
}
Now, modify the first java file as shown below:
FirstClass.java
package com.javacodegeeks;

public class FirstClass {

	public static void main(String[] args) {
		System.out.println("Hello There! Welcome to JavaCodeGeeks");
		SecondClass s = new SecondClass();
		s.sayHello();
	}

}
The code basically calls the function sayHello from the class SecondClass. We would add a debug point to the statement SecondClass s = new SecondClass();. To add a breakpoint, simply double click the line number on the left side. It should show a small blue dot indicating a debug point. Now, click the bug icon just to the left of the Run button used before. Eclipse will ask whether you wish to open a Debug Perspective. As discussed earlier, Eclipse has a predefined set of windows for every task. Hence, it automatically asks whether you would like to open the Debug related windows. Click Yes and you should be able to see the line with debug point highlighted.
To move to the next line, there are two ways.
- Click the icon marked with Blue box in image below.
- Use the default shortcut key – F6
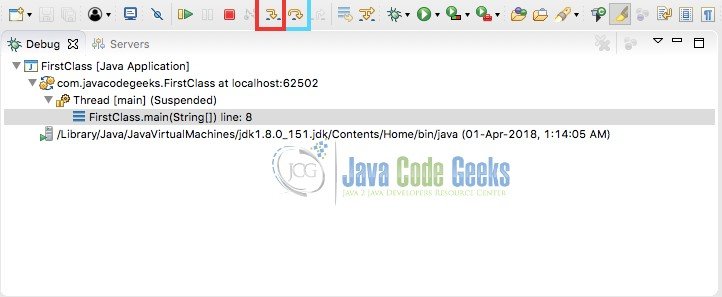
This will take you to the next line. Now, you are at the line where the function from SecondClass is called. It is possible to go into the function using the icon marked using red box or using the shortcut key F5. Try to Step into the call and you will be taken directly to the first line in the function. At any point of time, you can get the code to run until next breakpoint by pressing the green play button to the left of these buttons. To stop the debugging and execution of the code altogether, you could use the red button similar to a stop icon.
3.6 Customising and Extending the abilities of Eclipse
Eclipse has no limit to its capabilities. New functionalities can easily be added using Eclipse plugins and the UI can be easily configured to suit your requirements. To customise the visual appearance, you could easily drag the windows around, add windows or remove as needed. It is also possible to customise the set of buttons that show up in the top bar.
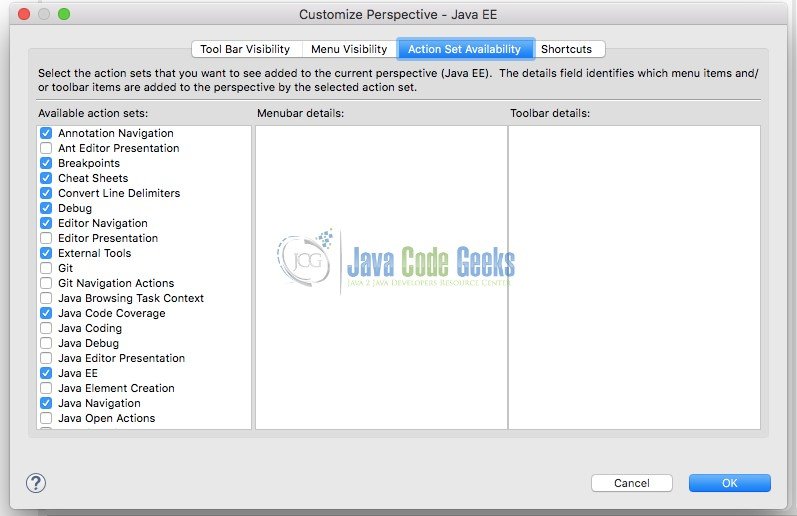
To add some more button sets to the toolset as per your need, navigate to Window -> Perspective -> Customize Perspective. It should open up a window as shown below. You could select various toolbars and features to display in the toolbar as per your need.
In order to extend the abilities of Eclipse, it is possible to install extensions or plugins using various update sites and also the market place. Eclipse has an elaborate list of extensions that can be installed. You could checkout the Eclipse plugin marketplace here. In order to understand how to install extensions to Eclipse, checkout the Section 2 of this article.
3.7 Switching Eclipse Perspective
As discussed in the terminologies, it is easily possible to switch between different perspectives. After the debug in the previous section, your Eclipse windows should be appearing quite disarranged. To get them into order for development, you need to switch to Java perspective back again. This can be done in two ways.
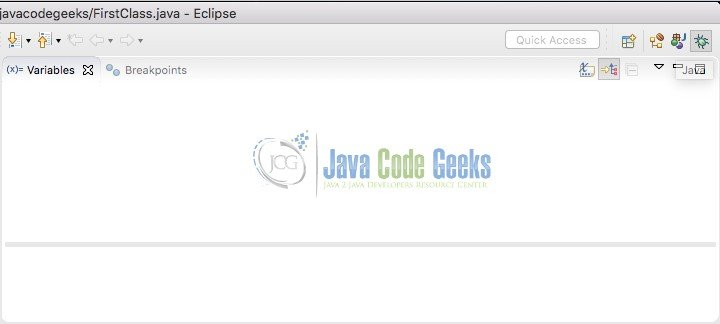
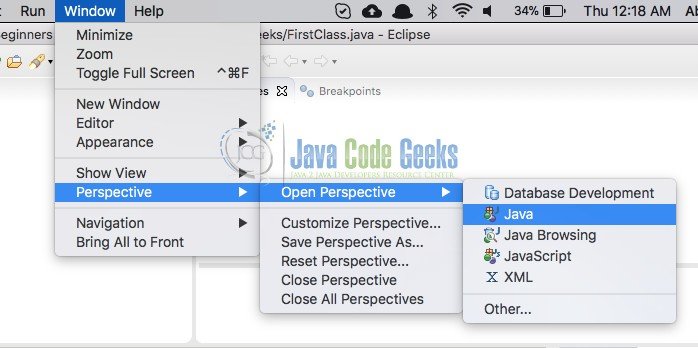
- Look for an icon on the top right corner of the Eclipse. One of them should have a tooltip Java. Click the button to switch back to Java perspective.

Java Perspective Shortcut - In case you are unable to find the button, you could navigate to Window ->Perspective -> Open Perspective -> Java

Java Perspective
3.8 Save custom perspective
You would have noticed that there are certain windows like Tasks, Outline or Problems windows which you might not use frequently. Thus, you would prefer not to see them in the Java perspective. This is possible by overwriting the Java perspective. To do so, close the windows which appear to be extra.

Once you have closed the unnecessary windows, navigate to Window -> Perspective -> Save Perspective as.
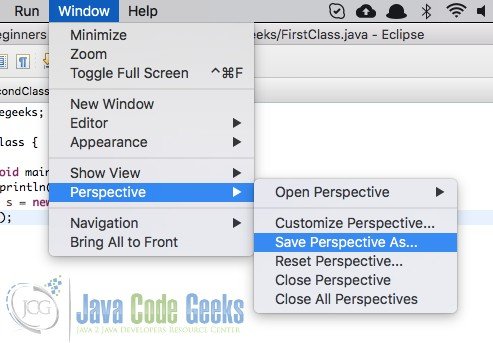
Enter Java when prompted for the perspective name. This will generate a warning confirming whether you wish to overwrite the current settings of the perspective. On confirming, the Java perspective gets overwritten. This can be verified by switching the perspective to debug and switching back to Java.
3.9 Various Explorers for Files
Eclipse provides 3 different explorers to view the files and folder structure in different ways. The explorers are:
- Project Explorer
- Package Explorer
- Navigator

Project Explorer displays the project specific view. It varies depending on the project type. Currently for Java Project, you would find project and package explorer to be quite similar. It is only project specific items that get added to Project Explorer as the projects change.
Navigator is a detailed view of the complete workspace directly. Navigator view displays every folder in the directory separately.
3.10 Search Functionality in Eclipse
Eclipse also provides a diverse search functionality with a bunch of filtering options. The image below shows the search window that can be opened by clicking the small rocket like icon on the toolbar.
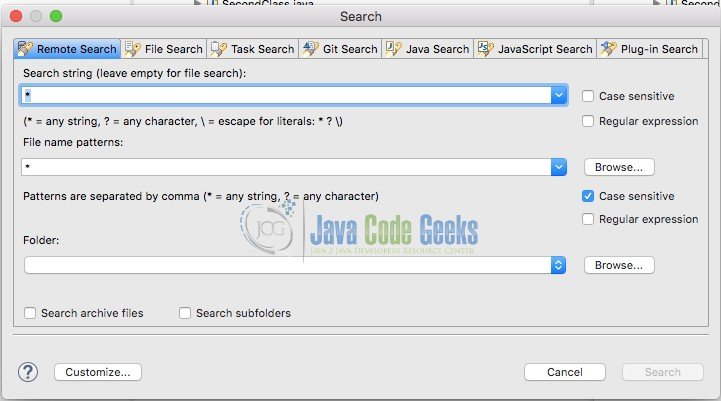
The first type, Remote Search, is used to find a specific word from any file in the selected folder. Eclipse is able to read every plain text as well as binary file and look for the specific word in those files.
The second type, File Search, is dedicated to search specific text or pattern from the files in the workspace or working set.
The third type, Task Search, is used to find a task with specific ID and user relation with the task. It is possible to select the user relation among Owner, Reporter, Cc, Comments or a QA contact.
The next search, Git Search, is specific to search file content in Git repository.
The next search type, Java Search, is the most important for Java developers. It has an extensive list of filters which allow you to select what exactly do you wish to find – Method, object, class, field and others.
The sixth type, Javascript search, is quite similar to Java search discussed above. It automatically filters the files to check only for JS files.
The last type of search is the Plugin Search. As discussed in the terminology section, eclipse allows you to have plugins. With this type of search you could manage to search for plugins within the workspace or working set.
3.11 Managing Working Sets
A workset in Eclipse is the set of projects in the project that you wish to work with at any point of time. Generally, when you build an enterprise level web application, you distribute the files across multiple projects to modularize it as per the functionality. The image below shows a bunch of projects in the workspace. These are just copies of the first project created to demonstrate Working Set management.

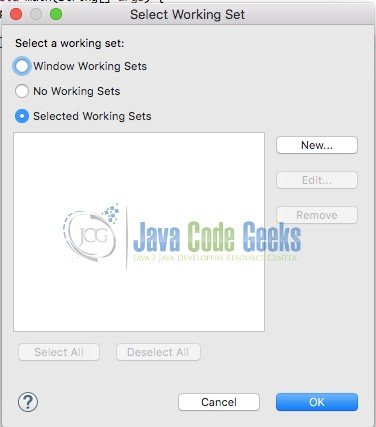
Managing working set is basically limiting the number of projects that are being shown in the explorer. It also allows you to deploy a selected set of projects when creating web applications. In order to manage the working set, click the small downward arrow annotated with a red circle in the image below. In the pop-down menu that opens up, click Select Working Set. It should open up a small window asking for the type of working set. In order to manage the list of project, select Selected working set and click the New button. In case you had any previous working set created, they should be pre-listed in the white box.
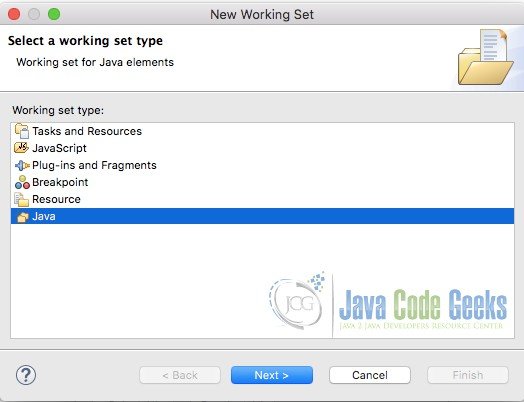
In the New Window, depending upon your type of projects, you could select the Type of working set you need. Here we would proceed by selecting Java.
Now, you would be able to see a list of Java projects on the left hand side. Select the projects you wish to see when this working set is active. After selecting the project, click Add to move the projects to the right and click Finish.
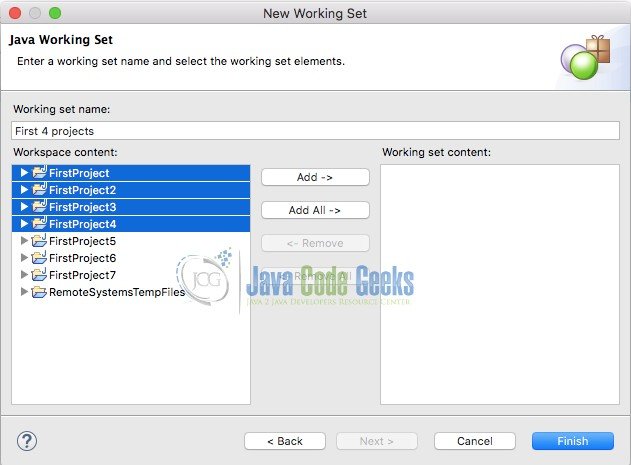
Once done, you should be able to see just 4 projects or the selected projects in the package explorer window. This can be changed by repressing the down pointing arrow and clicking Deselect Working Set as shown in image below. You can also create different working sets and select another as and when required.

3.12 Managing Code Templates
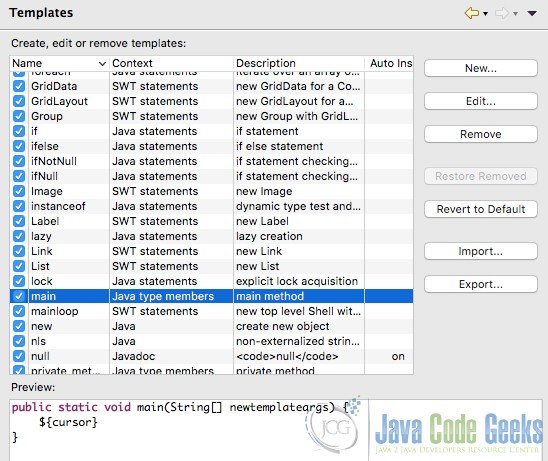
Code templating is one of the amazing features that Eclipse provides. To try it out, in your class, just type main and press Ctrl+Space. This is a default shortcut for getting suggestions for auto complete. You should see a suggestion main method as shown in the image below.
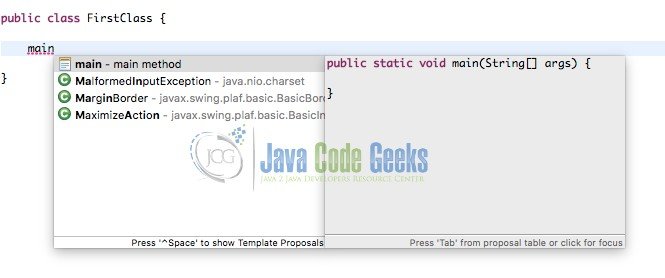
On double clicking the suggestion, it would automatically create the code shown in the grey box above. This is made possible by Code templates. To find out the code templates and create some of your own, navigate to Eclipse -> Preferences in case of MacOS. For Windows & Linux, you should find the Preferences menu link in the Window menu. It opens up a preferences window. In the search box on the left, type Template as shown below.
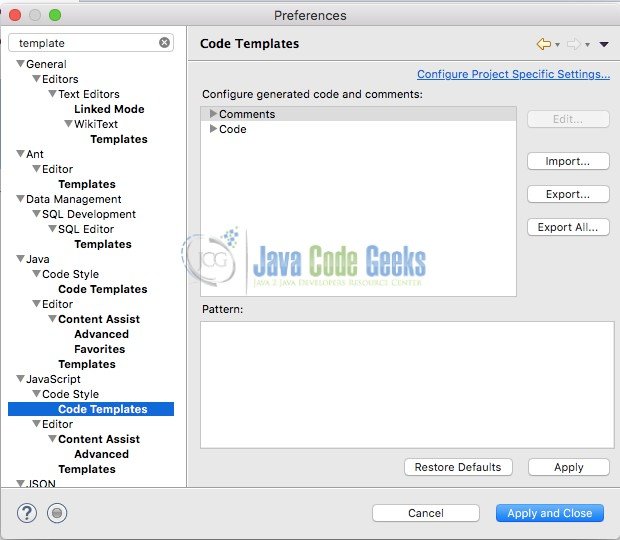
As you select Code Templates for a specific language (selected for Javascript as shown above), you should be able to find code templates here. However, there is one more section containing some default code templates. This section is the Editor->Templates section for every language listed in preferences. As it can be clearly seen, the main method is available in this list of templates. It can be easily edited by double clicking on the same. For instance, I have edited the method template as shown below.
The same could be verified by checking the suggestion box in the editor again as discussed above.
3.13 Creating new code templates
In large scale projects, developers often waste time in writing few lines of code that are common in each method. To avoid this, Eclipse allow you to create pre-defined code templates that can be created and saved with an alias. For instance, let us create a method that prints some log at the starting and end of method.
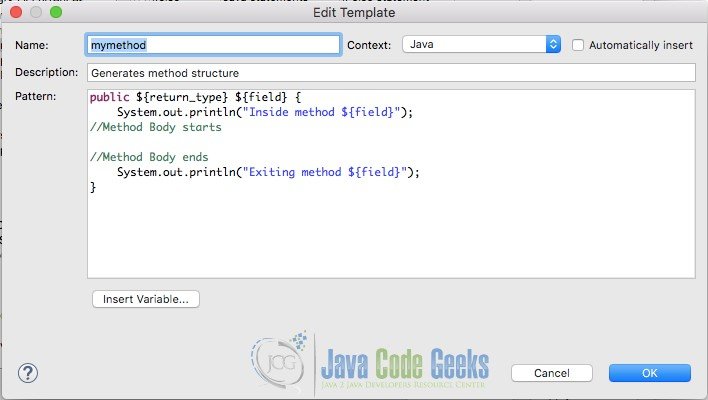
- Click new in the window shown above. It will open up a dialog box as shown below.

New Method Template Fill in the details as shown in the image above. Here ${return_type} & ${field} are variables. They will be used to simplify method creation as shown further.
- Click OK, press Apply & Close in the parent window. Now, in the Eclipse editor window, type
mymethodand press Ctrl+Space to use Content assist for applying the method template - On pressing the shortcut combination, you should be able to see the suggestion as shown below.

Content Assist for Method Stub - Double click the suggestion highlighted above. It will generate the code as shown in the window above. There will be borders surrounding
return_typeandfield. The cursor should automatically be present at thereturn_type. Update the return type as per your need and press Tab. On pressing the tab key, the cursor shifts to the next box,field. Now, as you change the method name, you would see that the same is impacted in theSystem.outstatements also where thefieldvariable name is used. In this manner, a method with two logging statements is created by just few clicks.
- Click new in the window shown above. It will open up a dialog box as shown below.

3.14 Refactoring
Refactoring is an extremely important feature of Eclipse. In a large project, when you plan to change the name of a variable, method or a class, there are numerous places where the changes might be required. It is not an easy task to find and replace each occurrence of the keyword. Find and Replace all feature does solve the issue sometimes. However, it is not able to distinguish between words containing similar text. With refactor, it is possible to automatically replace all the occurrences within the context of that keyword.
To refactor a variable, method or class name, simply select the word and click Ctrl/Cmd+Alt + R. Now, just like the boxes in the above method stub generation, you would see bordered boxes around the word wherever it is present. Just change the word to something different. It will replace the change on every occurrence.
4. Conclusion
The article has elaborately discussed the basic operations you would need to do in Eclipse. However, this is not the end. There are numerous features of Eclipse you could explore and several extensions that would make your life easier while coding. Eclipse by far has kept up the pace with the technologies and hence it is the best choice for an open-source IDE with its extensive plugin library and customizable interface.

Hi,
This is much-needed information for every java learner, I found that installing Eclipse IDE is pretty much easy. Thanks.