1. What is EGit ?
GIT is a popular versioning system used widely across the software development sector. Despite being a popular versioning system, it isn’t really easy to work with when it comes to using the command line interface for versioning. To solve this difficulty, the developers came up with creative GUI based tools called the GIT clients. GIT clients provide a graphical interface to execute the commands without actually typing them. In addition to that, they also provide interfaces to visualise the branching of files, and projects as well as compare them.
However, even the GIT client pose a problem. Most of the developers prefer to use IDEs like Eclipse, Netbeans or IntelliJ to code. With GIT client running as a separate tool in addition to the IDE, it becomes difficult to manage the files within and outside the workspace. One would continuously need to keep switching between IDE and GIT client to manage versioning. EGit is the answer to this problem.
EGit is a plugin for Eclipse IDE. EGit is a GIT versioning management plugin available for free in the Eclipse Plugin repository. EGit provides a fully integrated solution for enabling GIT versioning in the project. It integrates into Eclipse and allows a whole bunch of features ranging from Git Repository cloning to Git Pull, Push, Merge, Rebase, Commit and Reset. It also provides an easy branch management solution to manage branching locally as well as on the remote repository.
2. Installing EGit
Pre-requisites
EGit could be easily installed just like any other plugin. The details about installing EGit are discussed further.
Below are detailed steps of installing GIT using the update URL provided here:
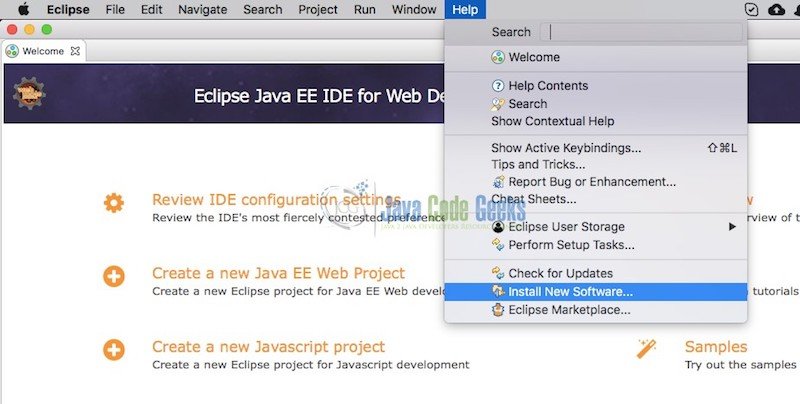
- Copy the update site URL from the provided link and navigate to Help -> Install Software in Eclipse

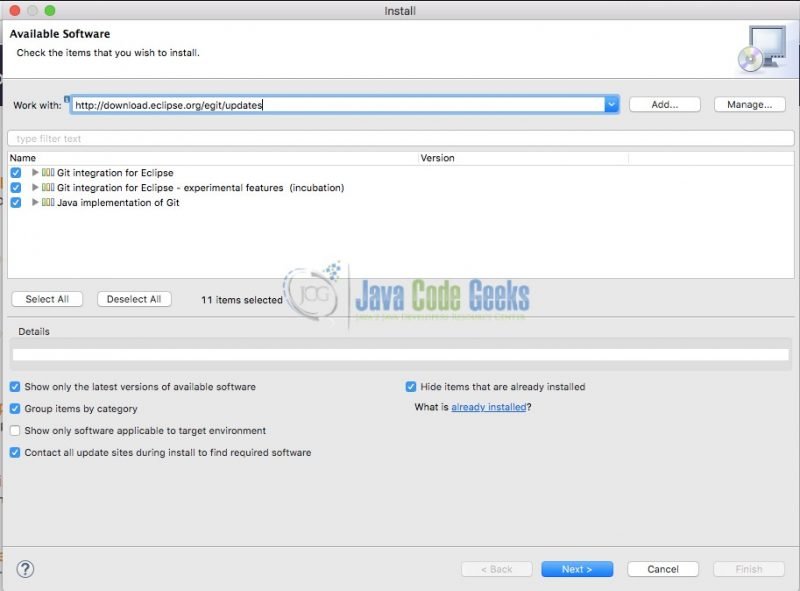
Eclipse Install Software - Paste in the URL as shown in the figure below and press Enter

Enter Update URL - Select all the components to get a full pack of features provided by EGit as shown in the image above
- Proceed by pressing Next and accepting the license agreement
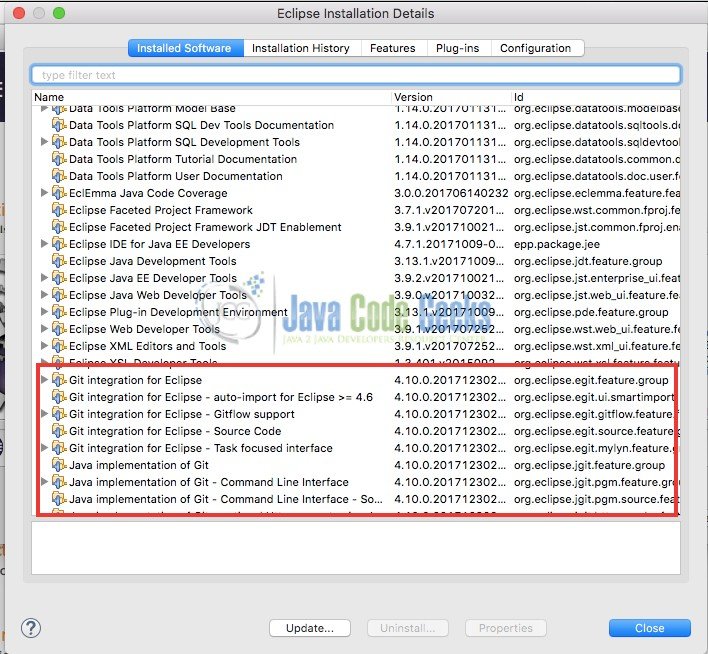
Once the installation is completed, Eclipse would require a restart to load the features fully. Hence, restart Eclipse and check the installation status by navigating to Eclipse/Help -> About Eclipse and press the Installation Details button. The window that opens up should display a list of tools that are currently installed into Eclipse. Check for “GIT Integration For Eclipse” in the list to ascertain that EGit has been installed successfully.
3. Working with EGit
In order to get started with EGit, there are a few configurations to be done that will make it easy to work with the files and GIT repository. Let’s get the configurations done before getting start with a demo repository.
3.1 Adding the GIT toolbar to your current perspective
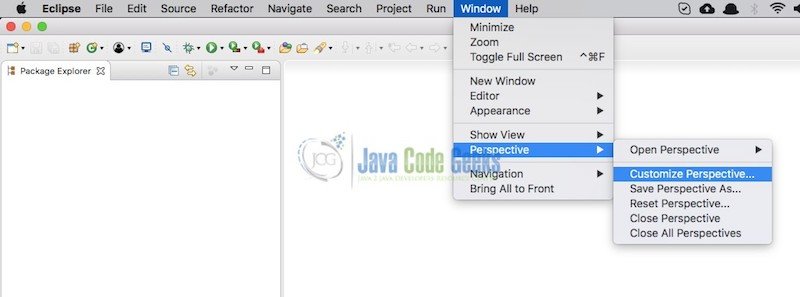
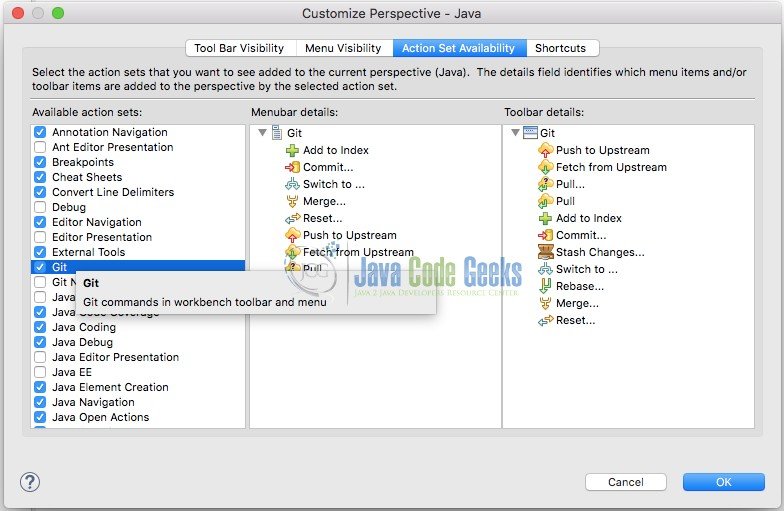
The GIT toolbar contains buttons for the most basic operations like Pull, Push, Commit, Reset and few others. The toolbar would make it easier to manage the files rather than navigating each time through the popup menu. In order to enable GIT toolbar, navigate to Window -> Perspective -> Customize Perspective.
Select the GIT tool in Action Set Mapping section to display all the available GIT toolbar options.
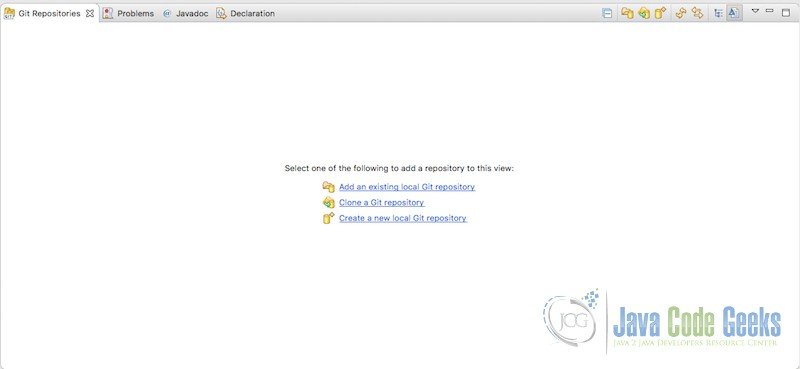
Once selected, the GIT toolbar should be visible in the main window of Eclipse. Now we can proceed to clone a GIT repository. In order to clone a GIT repository, we need to open up GIT Repository view. Open the GIT repository view using Window -> Show View -> Other. Search for GIT repositories and click OK. A window similar to the one below will be shown.
3.2 Cloning GIT Repository
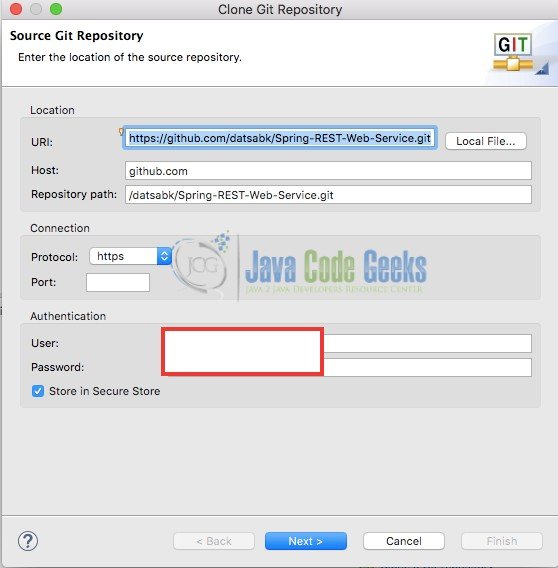
In order to clone the GIT repository, click the Clone a GIT repository link in the window shown above. Copy the URL of your remote repository and paste it into the window that opens up as shown below. EGit supports all the popular communication protocols namely https, http, ftp, git, ssh, sftp and file. Enter the remote repository Username and Password and click Next.
The next window will list the branches that are available for the corresponding repository. As of now, there is only master branch pushed on to the repository. Select the branch that you need to clone into your local workspace and click next. Select the directory to store the project and click Finish. It might take up some time to clone the repository and download the files to your local system. Once the repository is cloned, it will appear in the Git Repositories window.
3.3 Importing the project
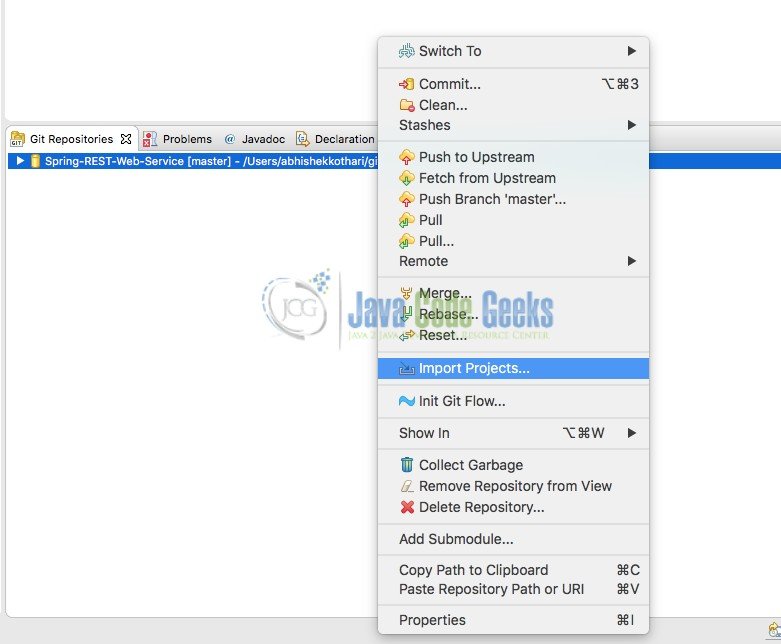
If the repository cloned above contains projects compatible with Eclipse, the project could be imported easily by right clicking and selecting Import Projects from the popup menu as shown in the image below.
The project will appear in the Package Explorer/Project Explorer if the corresponding window is open. The project is now connected to the remote repository and all the operations that could be done using GIT command line tools can now be done directly from Eclipse IDE.

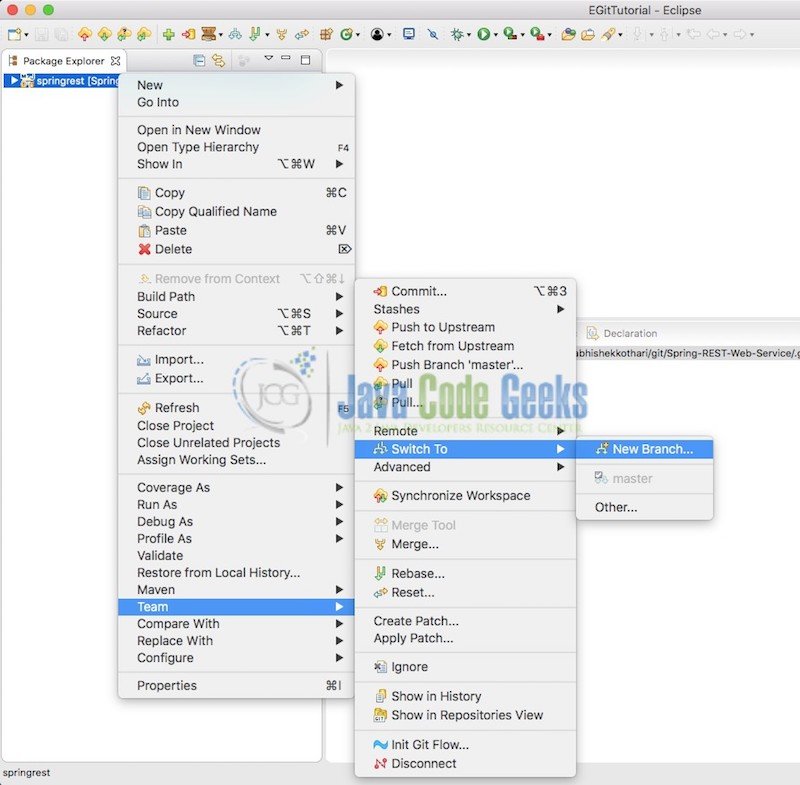
3.4 Creating a new branch
Once the project is imported, the developer usually starts working on a task by creating a separate branch. A new branch can be easily created by right clicking the project and navigating to Team -> Switch To -> New Branch. This will open up a new window asking for the branch name. Enter the branch name and press Finish to switch to this new branch.
This new branch is saved locally and will not be available on the remote repository until it is pushed to the repository. The developer can freely start work on the current branch and commit the changes as and when required.
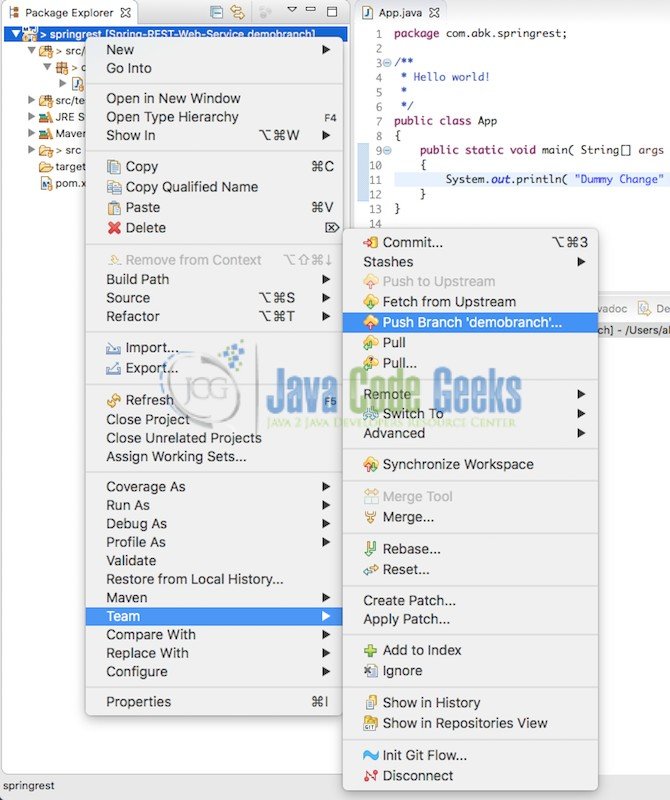
3.5 Pushing the branch to the remote repository
The branch can be immediately pushed to the remote repository by following the navigation shown in the image below.
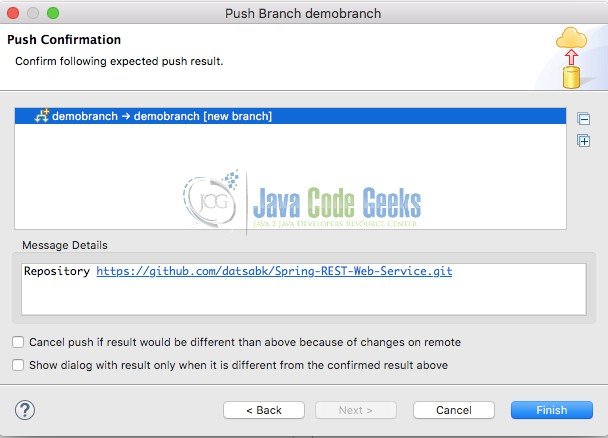
Once pushed, the branch will be available on the remote repository for others to clone. Whenever a new repository is pushed, the Push results window that opens up, will indicate that a new branch has been created on the remote repository as shown in the image below.
The developer can begin with the changes in the files now. Whenever a file gets changed, EGit keeps tracking the changes just like GIT tools.
3.6 Tracking the file changes and Committing the files
The files for which the code has been changed can be easily viewed from the GIT Staging window. To open the Git Staging window, follow the steps similar to opening the GIT repositories view. Navigate to Window -> Show View -> Other -> Git Staging
The GIT staging will contain a list of files that contain the changes. There are 3 main sections in the GIT staging window.

- Un-staged Changes: The files which have been changed but not yet added to the Index for committing the files
- Staged Changes: The files which have been changed and are ready to be committed
- Commit Message: Message to be added during commit to inform the team and keep a track about what changes are being committed.
One would often need to view the changes done to the files compared to the existing files in the remote repository. This is the right place to view the changes in the files. In order to compare the files with the last committed file, just double click the file in this window. It will open up the Eclipse comparison tool to display the changes that have taken place so far compared to the previously committed version.
The files can also be compared with the HEAD revision by navigating to Compare With -> Head Revision by right clicking the file in the package/project explorer. Once the code changes reach a logical end, the developer can commit the changes locally by adding the files to the Index and clicking the Commit button in the GIT staging window shown above.
In order to add the files to the index, there are two possible ways:
- Right click the project and navigate to Team -> Commit: This method will add all the un-ignored files containing changes to the index for committing. The same process can be followed for specific file or packages too. It would ultimately open up the GIT staging window.
- Open the Git Staging window by following the instruction discussed above. In the un-staged changes section, right click the file which you need to add to index or commit and select Add to Index. This will move the file from Unstaged changes to the Staged changes area.
Once the files are ready to be committed, add the description for the commit and click the Commit button. This will commit the changes to the local repository.
3.7 Pushing the changes to the remote repository
In order to make the changes available at the remote repository, there are two ways:
- Select the Commit and Push button from the GIT staging window instead of Commit button. This will push the changes along with committing them.
- Right click the project in Package/Project explorer. Navigate to Team -> Push to Upstream. This will push the committed changes to the remote repository.
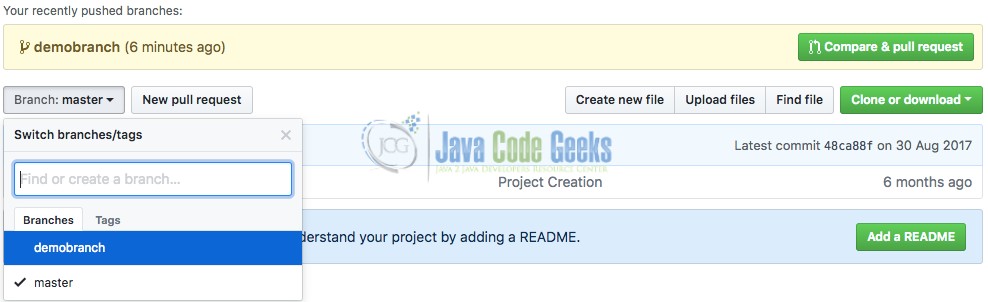
Once pushed, the changes can be viewed in the remote repository as shown in the image below.
3.8 Pulling the latest changes
There are two scenarios where one might need to pull the changes from the remote repository.
- There might be scenarios where certain changes get committed to the branch directly from the repository or by other developers. In such cases, the developer working with the branch cannot push the files until the developer has pulled the latest changes.
- The developer might be looking to take the latest changes from a master branch or a parent branch in order to enhance corresponding features or use the newly developed features in the current branch
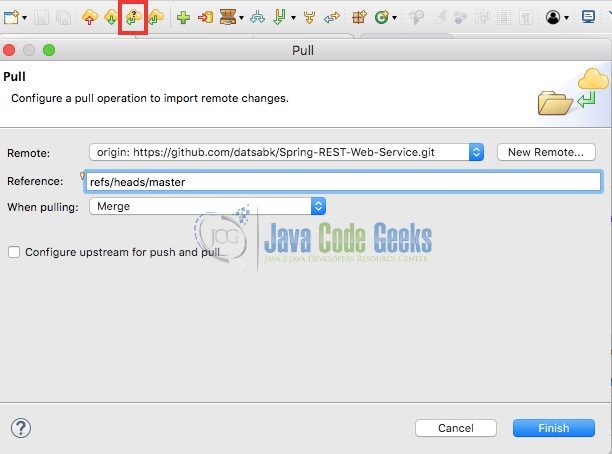
In the first case, the developer can click the pull symbol from the GIT toolbar as shown in the image below.

In the second case, the changes are required to be pulled in from other branch. To pull the changes from the other branch, one needs to click the Pull icon with a ? symbol on it. It opens up a window asking for the name of branch from which the changes needs to be pulled in. Enter the name of the branch and click Finish. The latest changes will be Merged/Rebased depending on the selection of the option from the select box.
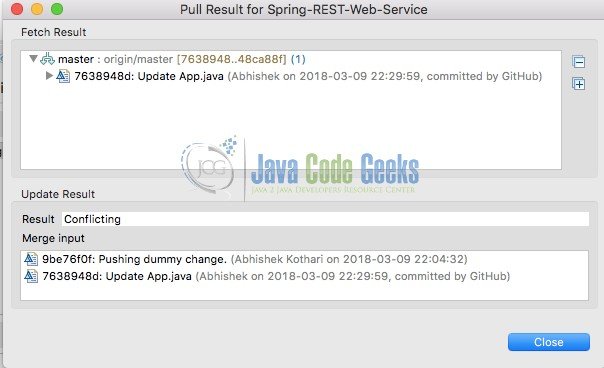
Generally, the tool manages to merge the changes to your files easily. However, in case of any conflict, EGit will display a conflicting status for the pull and the project label will get a small red dot on it indicating conflicted files.
In such a case, there are two ways to resolve the conflict:
- Edit the file manually and commit the corresponding changes
- Use the Merge tool by right clicking the file and navigating to Team -> Merge Tool
Once the changes are pushed to the repository, the conflict symbol will disappear automatically.
3.9 View file history and compare changes
When versioning is involved, it is common to compare the file with a different branch or a previous or HEAD version. With EGit, this can be done by merely navigating through the menu after right clicking on the corresponding file. The image shown below explains the same.
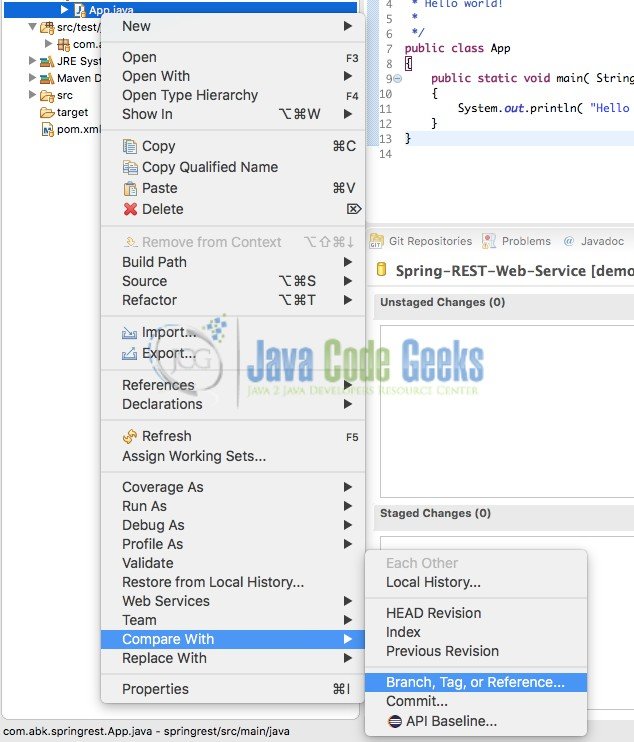
Compare with HEAD Revision: Compares the current file state with the available version on the remote repository
Compare with Index: Compares the current file state with the file state of the Indexed file. This is useful to check incremental changes
Compare with Previous Revision: Compares the file with the previous revision pushed to the repository
Compare with Branch/Tag/Reference: Allows you to select a specific branch, tag or reference head to compare the current file state with
Compare with Commit: Compares the current file state with the last committed version of the file
4. Conclusion
The article covers all the basic operations necessary to work with the EGit plugin in Eclipse. The plugin is the easiest way to avoid managing multiple tools for the GIT versioning and project development. With EGit, the complete workflow is integrated into a single IDE and this certainly makes it easier to view the changes and track them visually. To top it all, EGit is a free tool available under GNU Public licensing and hence does not cost you a fortune to use it.
