Artik IoT platform is an end-to-end IoT platform that helps us to build awesome IoT project. It is an open platform that enables different devices to connect to the cloud. Using Artik IoT, connected devices or sensors send data to the cloud. Application, services or other connected devices use this information according to their business requirements. As you may already know, Internet of things is the next technological revolution that will have a huge impact on our life, so it is important to know how to use this platform. Before reading this tutorial, it is important you have a complete overview of what is Internet of things and how it will impact our future.
This tutorial wants to provide a step by step description about how to implement an IoT project using Artik IoT platform. It will explore:
- how to configure a device
- how to create the IoT data model in Artik IoT
- how to write an application that sends data to this IoT platform
Artik IoT platform overview
This IoT platform supports several data exchange paradigms and provides different SDKs depending on the developing language we prefer.
The main features provided by Artik IoT are:
- Data driven development
- Real-time data using Websocket
- Different data and device support
Artik is a well structured IoT platform and before starting using it, I recommend you to read the article about how to use IoT platform to have an overview. Moreover, Artik is a well-documented platform with useful and interesting example and you can have more information at this link. An interesting aspect of this platform is the cloud API that enables external devices to connect to this platform and exchanging data.
Configure the device in Artik
First of all, it is necessary to have an account to configure the device. The account is free. This tutorial is based on Raspberry Pi but the process of configuring the device is device agnostic. Once you are logged in, in the Samsung Artik IoT dashboard, you have to click on the device and start configuring it:
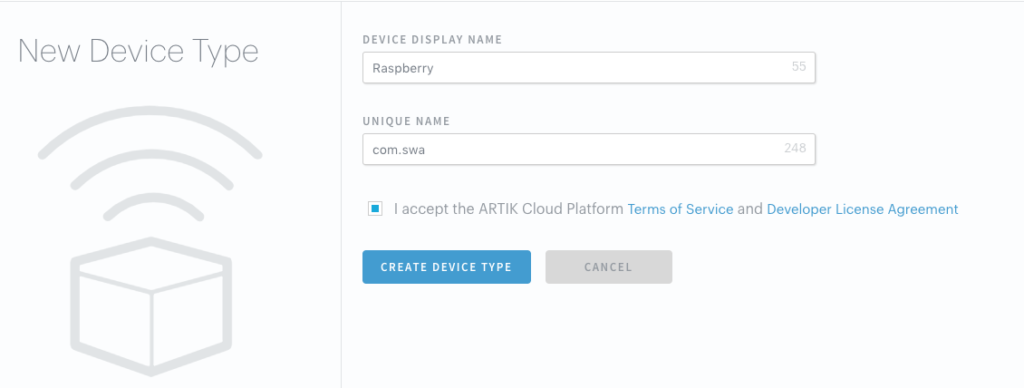
It is important you add a unique name so that your device can be identified. That’s all, you have created your first device ready to send data. The next step is configuring the data model using the Manifest.
Implement Artik IoT data model
This is an important aspect because it is necessary to configure in Artik the variables we want to handle in our IoT project. These variables are sent by the device to the cloud and they represent the parameter we measure using the sensors.
Raspberry Pi, in this project, uses two sensors (to make the project simple):
- DHT11
- BMP180
The first sensor, DHT11, measures the temperature and humidity while the second one, BMP180, measures the temperature and the pressure. Later in this post, we cover how to connect them to Raspberry. By now, it is important to know that Raspberry sends three different parameters:
- Temperature
- Humidity
- Pressure
These are the variable we have to configure in Artik IoT cloud platform. The steps to configure them are described below:
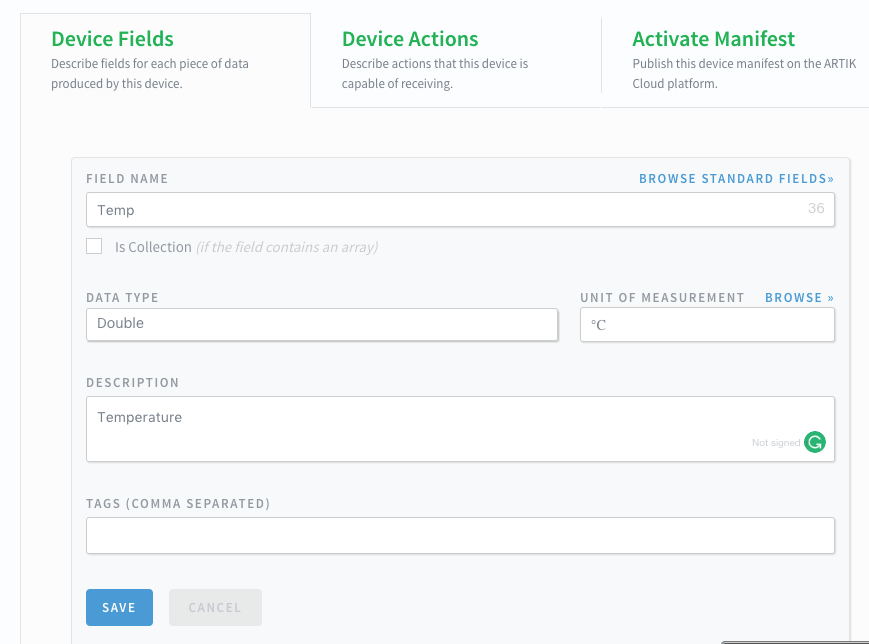
In this case, we add the temperature field that will hold the temperature values coming from the DHT11 sensor. To add the other parameters you can repeat the same steps. At the end you will have:
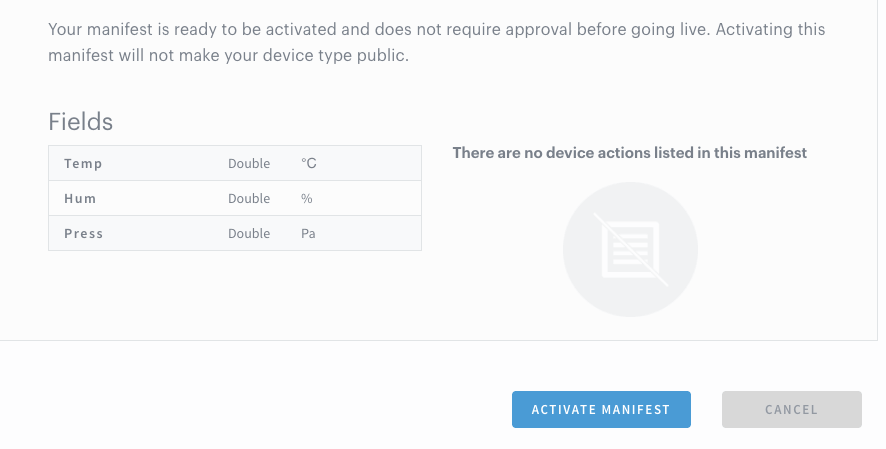
Now you can activate your manifest!!!
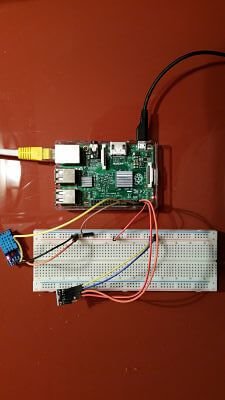
How to connect Raspberry to sensors
The configuration steps are now completed, the next step is connected Raspberry to sensors. Be aware of the wiring otherwise, you could damage your device or sensors. The connection between Raspberry and the two sensors is shown in the pictures below:
To use these sensors is important you install wiringPi library. The code used to send data to Artik IoT platform is written in NodeJS but you could use other languages too. Before reading sensors values, it is necessary to install two NodeJS libraries:
- raspi-sensors
- node-dht-sensor
These two libraries help you to read easily sensor data. First of all, let us import them:
var sensor = require('node-dht-sensor');
var RaspiSensors = require('raspi-sensors');
Now we can read the sensors:
var BMP180 = new RaspiSensors.Sensor({
  type: 'BMP180',
  address: 0x77
 }, 'BMP180');

 BMP180.fetchInterval(function(err, data) {

  if (data.type == 'Temperature') {
    console.log("Temperature ["+data.value+"]");
  }
  else if (data.type == 'Pressure') {
     console.log("Pressure ["+data.value+"]");
     var data = {"Press": data.value };
   }
}, 5);
While to read DHT11, you have to write:
setInterval(function() {
  var readout = sensor.read();
  console.log('Temp:' + readout.temperature.toFixed(2)
    + "Hum:" + readout.humidity.toFixed(2));
}, 2000);
That’s all. The next step is sending the data to the Artik IoT.
Send Raspberry data to the cloud
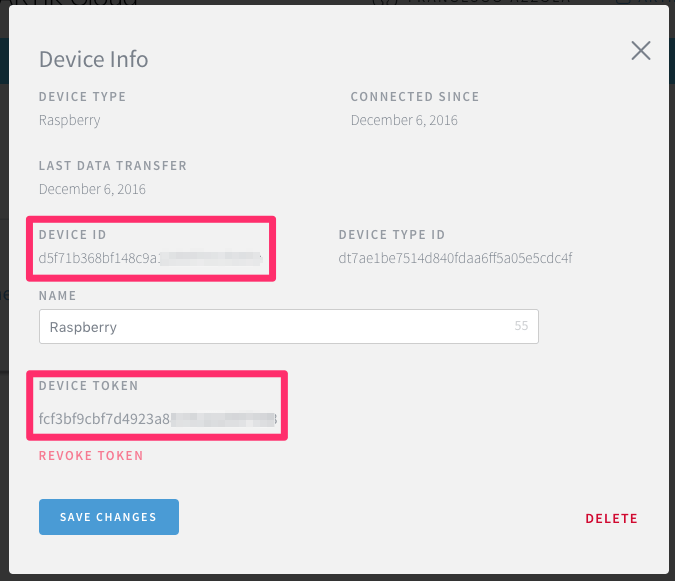
Finally, we are ready to send the sensor data to the cloud. It is important to notice that the device must be authenticated before it can send data. To do it, we need to use a secret token and the device Id that we get from the cloud IoT platform clicking on the device we have created previously.
First, let’s connect using Websocket:
var artikUrl=</code><code class="js string">"wss:api.artik.cloud/v1.1/websocket?ack=true";
function connect() {
// connecting
  ws = new WebSocket(artikUrl);
  ws.on('open', function() {
    console.log("Connected...");
    registerDevice();
  });
  ws.on('message', function(data, flags) {
    console.log("Message [" + data + "]");
  });
  ws.on('close', function() {
    console.log("Websocket is closed");
  });
}
As you can notice as soon as the connection is established we register the device.
// Register the Raspberry device first
function registerDevice() {
 try {
  console.log("Registering device..");
  var message = '{"sdid": "d5f71b368bf148xxx","type": "register",
    "Authorization": "bearer fcf3bf9cbf7d49xxx","cid":"1983274" }';
  console.log("Message: " + message);
  ws.send(message, {mask:true});
  console.log("Device registered");
 }
 catch(e) {
  console.error("Exception while sending data...");
 }
}
Finally, the method to send the data:
function sendMessage(message) {
  console.log("Sending data to artik...");
  try {
   var payload = '{"sdid": "d5f71b368bf148c9xxxxx", "ts":"' + Date.now().toString() + '","data":'
                  + JSON.stringify(message) + '}';
   console.log("Message: " + payload);
   ws.send(payload, {mask:true});
   console.log("Message sent");
  }
  catch(e) {
    console.error("Exception while sending data...");
    console.log(e.toString());
  }
}
Where sdid is the device id used before and the data is the JSON message holding the values coming from the sensors.
The last step is creating the message. We do it as soon as we get the data from the sensor, for example for the temperature we have:
var data = {"Temp": readout.temperature.toFixed(2),
               "Hum": readout.humidity.toFixed(2)};
We do the same thing for the pressure.
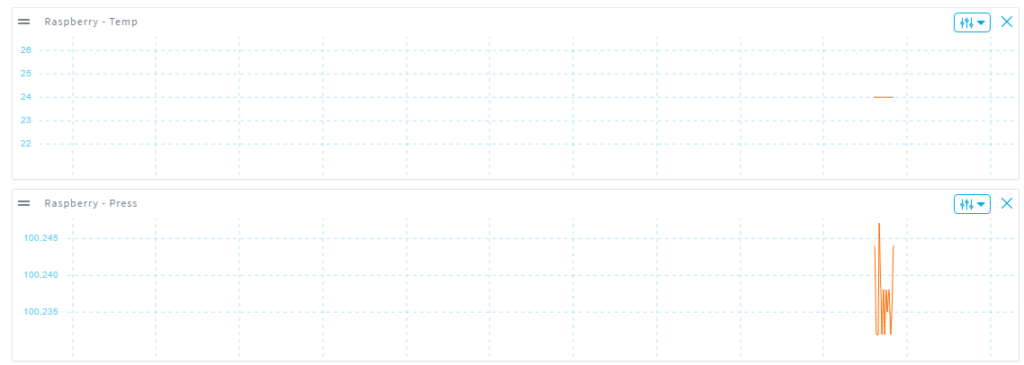
var data = {"Press": data.value };As soon as you start the NodeJS app, it begins sending data to the Artik IoT platform. Accessing to the Artik IoT dashboard you can verify the data and create charts:
At the end of this post, you gained the knowledge about Artik IoT platform and how to use it to develop a complete IoT project.
| Reference: | Create stunning IoT project with Artik IoT platform and Raspberry from our JCG partner Francesco Azzola at the Surviving w/ Android blog. |
