1. Introduction
Welcome to the 5th tutorial of the OpenMap series of Tutorials. OpenMap is a free open source Java GIS library.
Here is a list of previous tutorials:
- In the first tutorial we created a basic OpenMap GIS application that displays a map with one shape layer, loaded from the filesystem, inside a
JFrame. That tutorial was based oncom.bbn.openmap.app.example.SimpleMap. - In the second tutorial we extended our basic application to use the
MapHandler. - In the third tutorial we saw how to take advantage of
BeanContexttechnology to declare our classes in anopenmap.propertiesfile and build a whole application declaratively. - The fourth tutorial explained map layers.
In this tutorial we will talk about how to build a 3-tier GIS application based on OpenMap. We will take a break from exploring new OpenMap features and will mainly review what we ‘ve learned in the previous tutorials.
2. Requirements and Architectural Overview
Here comes your boss or your customer with some requirements. In the first sprint (e.g. Scrum), the application should be able to:
- read/write data from/to a database
- display the data on a GIS map
- interact with the data and display their properties
- move geographical data to different locations and save them back to the database
- create/update/delete map data
Quite simple you might say and you move on to sketch a draft 3-tier architecture of your application:
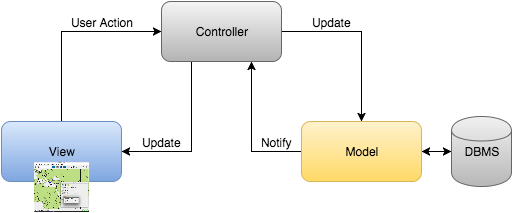
Figure 1: 3-tier architecture
The 3-tier architecture follows the Model-View-Controller (MVC) architectural pattern. A Model is created from the database (backend). Our View is the OpenMap GIS application that we have built in the previous tutorials that is capable of displaying the data as points, lines, polygons etc. And the Controller wires everything up.
A similar architecture is the Model-View-ViewModel (MVVM) which we also discuss briefly.
3. Technologies
3.1 The backend
The back-end is mainly the database, or more correctly, the Database Management System (DBMS). Here you have a choice of:
* Relational databases (Oracle, MySQL, Postgresql, MS SQL Server, Sqlite, Hsqldb, JavaDB etc.) with or without geospatial extensions. Geospatial extensions exist for MySQL, Postgresql, Oracle, SQLite; MS SQL Server 2008 comes with built-in spatial extensions.
* Object-based spatial databases
* No-SQL databases with spatial support (e.g. CassandraDB, CouchDB, MongoDB, Neo4j, etc.)
A spatial database, or geodatabase is optimized to store and query data that represent objects defined in a geometric space. Most spatial databases allow representing simple geometric objects such as points, lines and polygons and spatial indices according to the OpenGIS specifications. You don’t need to have a GeoSpatial database to build a GIS application, though, but using one has benefits.
3.2 The model
How do you access the database to retrieve data to use to your Java application? Here is a list of possible technologies you can use:
- SQL queries to the database i.e. Java Database Connectivity or JDBC. This is the traditional way (but we are in 2016!). You need to “speak” SQL to query your database and retrieve your data in
ResultSets, not very handy when your application follows the Object-Oriented model (unless your database is Object-Oriented or Object-Relational, too). - Object-relational mapping e.g. Java Persistence API (JPA). This is the modern way to map you database tables to Java objects. NetBeans provides a nice JPA mapping wizard for you.
- Functional mapping. If you are a Java 8 guy, and you like lambdas, then why not using λ-expressions and the Stream API instead of SQL queries or JPA? Speedment is a Java library that makes this dream a reality. Here is a comparison between SQL and the Stream API in order to query data.
3.3 The controller
The last question is how do you wire the view to the model? The key issue here is to have loose coupling between the various components. Loose coupling allows you to replace any of the layers of your application with another technology without (or with limited changes) affecting the other layers. There are a number of solutions e.g.:
- Java 6
ServiceLoader - NetBeans Lookup API
- Dukescript (MVVM). One of the benefits of using DukeScript for a client-server application is code reuse. You can use the same model classes on the client and the server. Here is a tutorial that maps JPA and Dukescript.
4. Build our application
I won’t explore all these technologies here. Feel free to look at the references at the end of this article.
In this article we shall see how to build an MVC GIS application using JPA for the model and the NetBeans Lookup API for the controller. In future articles we shall see alternative technologies such as Speedment to replace JPA and Dukescript to replace MVC with MVVM.
4.1 Our view
We have already created an OpenMap application in my previous articles. Let’s review and refactor it.
Our OpenMap application consists of the following file hierarchy:
openmapDMSCoordInfoFormatterDemoLayerMyDrawingToolOpenMap
openmap.properties
Let’s refactor it like so:
openmapOpenMap.javaopenmap.controlleropenmap.modelopenmap.viewDMSCoordInfoFormatter.javaDemoLayer.javaMyDrawingTool.java
openmap.properties
Don’t forget to update the paths in openmap.properties, too. The above package structure depicts the Model-View-Controller (MVC) design pattern.
In NetBeans (but also in other IDEs) you can easily apply refactorings (like move a file or folder to another folder or rename a file/folder) by right-clicking on a file/folder and select a refactoring under the sub-menu Refactor.
Add a cities layer (from the original openmap.properties of OpenMap):
Listing 1 – openmap.properties – cities layer
# These layers are turned on when the map is first started.  Order
# does not matter here...
openmap.startUpLayers=demo cities graticule shapePolitical

# Layers listed here appear on the Map in the order of their names.
openmap.layers=demo cities graticule shapePolitical
...
###
# LocationLayer that holds cities.  The palette for this layer lets
# you turn on the names and declutter matrix, if you want.  The
# declutter matrix can get expensive at small scales.
cities.class=com.bbn.openmap.layer.location.LocationLayer
cities.prettyName=World Cities
cities.locationHandlers=csvcities
cities.useDeclutter=false
cities.declutterMatrix=com.bbn.openmap.layer.DeclutterMatrix

csvcities.class=com.bbn.openmap.layer.location.csv.CSVLocationHandler
csvcities.prettyName=World Cities
csvcities.locationFile=resources/map/cities.csv
csvcities.csvFileHasHeader=true
csvcities.locationColor=FF0000
csvcities.nameColor=008C54
csvcities.showNames=false
csvcities.showLocations=true
csvcities.nameIndex=0
csvcities.latIndex=5
csvcities.lonIndex=4
csvcities.csvFileHasHeader=true
and don’t forget to copy cities.csv to resources/map.
Run the application again to see that the new layer is shown.
4.2 Our database schema
Our database schema is shown in the following listing. It mainly consists of a Supplier table. We want to show our Suppliers as GeoPoints on the map.
Here are the steps to create an SQLite database in NetBeans (you may choose any DBMS you like):
- Right-click on
Libraries - Select Add JAR/Folder… from the popup menu
- Navigate to the folder where you downloaded SQLite from and select
sqlite-jdbc-xxx.jar - Choose Copy to Libraries Folder and click Open. The driver should be displayed under Libraries.
- Click on Window → Services menu to display the Services tab.
- Expand the Databases node
- Right-click on Drivers node and select New Driver
- Click on Add
- Navigate to the location where you downloaded the
sqlite-jdbc-xxxx.jarfile from the SQLite web site; Driver class should beorg.sqlite.JDBCand Name →SQLite - Click on OK.
SQLiteshould be listed underDrivers - Right-click on Databases and select
New Connection… - Select the
SQLitedriver and click Next - Provide a JDBC URL, e.g.
jdbc:sqlite:C:\db\suppliers.sqlite-3and click Finish. Your connection should be displayed under Databases. - Right-click on it and select
Connect… - Right-click on Tables and select
Execute Command… - Enter the following SQL statement and click on
Run SQLbutton:
Listing 2 – Supplier table
CREATE TABLE supplier (
SID             INTEGER           PRIMARY KEY,
NAME               VARCHAR2 (30)     NOT NULL,
CITY               VARCHAR2 (30)     NOT NULL,
TYPE            VARCHAR2 (10)     NOT NULL
CONSTRAINT TYPE CHECK (TYPE IN ('GROSS','RETAIL')),
LATITUDE        NUMBER (12,10)    NOT NULL
CONSTRAINT LATITUDE CHECK (LATITUDE BETWEEN -90.0000000000 AND 90.0000000000),
LONGITUDE           NUMBER (13,10)    NOT NULL
CONSTRAINT LONGITUDE CHECK (LONGITUDE BETWEEN -180.0000000000 AND 180.0000000000),
CONSTRAINT UID UNIQUE (SID, NAME, LATITUDE, LONGITUDE)
)
Verify that the new table has been created and listed under Tables. You may add same sample data into the table:
Listing 3 – Sample data
INSERT INTO supplier (NAME, CITY, TYPE, LATITUDE, LONGITUDE)
VALUES ('HP', 'ATHENS', 'GROSS', 38.1216011, 23.65486336);
INSERT INTO supplier (NAME, CITY, TYPE, LATITUDE, LONGITUDE)
VALUES ('DELL', 'BRUSSELS', 'RETAIL', 50.83704758, 4.367612362);
INSERT INTO supplier (NAME, CITY, TYPE, LATITUDE, LONGITUDE)
VALUES ('APPLE', 'LONDON', 'RETAIL', 51.48791122, -0.177998126);
INSERT INTO supplier (NAME, CITY, TYPE, LATITUDE, LONGITUDE)
VALUES ('TOSHIBA', 'PARIS', 'GROSS', 48.88155365, 2.432832718);
Don’t forget to disconnect from the database before continuing. Since SQLite is a standalone database, it is mainly a file in the filesystem. Only one application can access it at a time. If you connect to it from the Services tab and you try to access it from the OpenMap application at the same time, you will get an exception that the database is locked. This is not the case for ‘real’ DBMSs like Postgresql or MS SQL Server where concurrent access is possible.
4.3 Build your Model
Let’s build a JPA model from the above schema. NetBeans provides very good JPA support:
- Right-click on
openmap.model - Select
New → Other → Persistence → Entity Classes from Databaseand click Next - Select your Database Connection (the
suppliers.sqlite-3) - Select the
supplierstable from the Available Tables and click on Add to move it to the Selected Tables. - Click on Next.
- In step 3, check only the Generate Named Query Annotations for Persistent Fields and click on Next.
- In step 4, uncheck all check boxes and click on Finish.
The wizard created a new class, Suppliers and an unnecessary SupplierPK, under openmap.model. It also created the file META-INF/persistence.xml which contains connection information about the database:
Listing 4 – persistence.xml
<?xml version="1.0" encoding="UTF-8"?>
<persistence version="2.1" xmlns="http://xmlns.jcp.org/xml/ns/persistence" xmlns:xsi="http://www.w3.org/2001/XMLSchema-instance" xsi:schemaLocation="http://xmlns.jcp.org/xml/ns/persistence http://xmlns.jcp.org/xml/ns/persistence/persistence_2_1.xsd">
  <persistence-unit name="OpenMapPU" transaction-type="RESOURCE_LOCAL">
    <provider>org.eclipse.persistence.jpa.PersistenceProvider</provider>
    <class>openmap.model.Supplier</class>
    <properties>
      <property name="javax.persistence.jdbc.url" value="jdbc:sqlite:C:\db\suppliers.sqlite3"/>
      <property name="javax.persistence.jdbc.user" value=""/>
      <property name="javax.persistence.jdbc.driver" value="org.sqlite.JDBC"/>
      <property name="javax.persistence.jdbc.password" value=""/>
    </properties>
  </persistence-unit>
</persistence>
Because of the schema (see Listing 2) that contains a definition of a primary key, the wizard generates a SupplierPK class for the primary key. This is not needed, so delete this class and remove this field and its references from Supplier class. Modify your Supplier class to be like in the following listing:
Listing 5 – Supplier.java
package openmap.model;

import java.io.Serializable;
import javax.persistence.Basic;
import javax.persistence.Column;
import javax.persistence.Entity;
import javax.persistence.GeneratedValue;
import javax.persistence.GenerationType;
import javax.persistence.Id;
import javax.persistence.NamedQueries;
import javax.persistence.NamedQuery;
import javax.persistence.Table;
import javax.persistence.Transient;

/**
 *
 * @author ikost
 */
@Entity
@Table(name = "supplier")
@NamedQueries({
    @NamedQuery(name = "Supplier.findAll", query = "SELECT s FROM Supplier s"),
    @NamedQuery(name = "Supplier.findBySid", query = "SELECT s FROM Supplier s WHERE s.sid = :sid"),
    @NamedQuery(name = "Supplier.findByName", query = "SELECT s FROM Supplier s WHERE s.name = :name"),
    @NamedQuery(name = "Supplier.findByCity", query = "SELECT s FROM Supplier s WHERE s.city = :city"),
    @NamedQuery(name = "Supplier.findByType", query = "SELECT s FROM Supplier s WHERE s.type = :type"),
    @NamedQuery(name = "Supplier.findByLatitude", query = "SELECT s FROM Supplier s WHERE s.latitude = :latitude"),
    @NamedQuery(name = "Supplier.findByLongitude", query = "SELECT s FROM Supplier s WHERE s.longitude = :longitude")})
public class Supplier implements Serializable {

    private static final long serialVersionUID = 1L;
    @Id
    @GeneratedValue(strategy = GenerationType.IDENTITY)
    @Basic(optional = false)
    @Column(name = "SID")
    private int sid;
    @Basic(optional = false)
    @Column(name = "NAME")
    private String name;
    @Basic(optional = false)
    @Column(name = "CITY")
    private String city;
    @Basic(optional = false)
    @Column(name = "TYPE")
    @Enumerated(EnumType.STRING)
    private String type;
    @Basic(optional = false)
    @Column(name = "LATITUDE")
    private double latitude;
    @Basic(optional = false)
    @Column(name = "LONGITUDE")
    private double longitude;

    public enum TYPE {GROSS, RETAIL};

    public Supplier() {
    }

    public Supplier(int id) {
        this.sid = id;
    }

    public Supplier(int id, String name, String city,
    TYPE type, double latitude, double longitude) {
        this.sid = id;
        this.name = name;
        this.city = city;
        this.type = type;
        this.latitude = latitude;
        this.longitude = longitude;
    }

    public int getSid() {
        return sid;
    }

    public void setSid(int sid) {
        this.sid = sid;
    }

    public String getName() {
        return name;
    }

    public void setName(String name) {
        this.name = name;
    }

    public String getCity() {
        return city;
    }

    public void setCity(String city) {
        this.city = city;
    }

    public TYPE getType() {
        return type;
    }

    public void setType(TYPE type) {
        this.type = type;
    }

    public double getLatitude() {
        return latitude;
    }

    public void setLatitude(double latitude) {
        this.latitude = latitude;
    }

    public double getLongitude() {
        return longitude;
    }

    public void setLongitude(double longitude) {
        this.longitude = longitude;
    }

    @Override
    public int hashCode() {
        return sid;
    }

    @Override
    public boolean equals(Object object) {
        if (!(object instanceof Supplier)) {
            return false;
        }
        Supplier other = (Supplier) object;
        if (this.sid != other.sid) {
            return false;
        }
        return true;
    }

    @Override
    public String toString() {
        return "openmap.model.Supplier[ sid =" + sid + " ]";
    }

}
JPA 2.1 provides mapping support for enums (see type field in the above listing).
4.4 Build your Controller
NetBeans makes it easy to generate a controller for you model, too.
- Right-click on
openmap.controller - Select
New → Other → Persistence → JPA Controller Classes from Entity Classesand click Next - Select
Supplierfrom the list of Available Entity Classes and click Add to move it to the list of Selected Entity Classes. - Click on Next.
- In step 3, fix the package to be
openmap.controller. - Click on Finish.
The wizard created SupplierJpaController as well as 3 exception files. Now, the view can access this controller in order to perform actions to the model.
Listing 6 – SupplierJpaController.java
package openmap.controller;

import java.io.Serializable;
import java.util.List;
import javax.persistence.EntityManager;
import javax.persistence.EntityManagerFactory;
import javax.persistence.Query;
import javax.persistence.EntityNotFoundException;
import javax.persistence.criteria.CriteriaQuery;
import javax.persistence.criteria.Root;
import openmap.controller.exceptions.NonexistentEntityException;
import openmap.model.Supplier;

/**
 *
 * @author ikost
 */
public class SupplierJpaController implements Serializable {

    public SupplierJpaController(EntityManagerFactory emf) {
        this.emf = emf;
    }
    private EntityManagerFactory emf = null;

    public EntityManager getEntityManager() {
        return emf.createEntityManager();
    }

    public void create(Supplier supplier) {
        EntityManager em = null;
        try {
            em = getEntityManager();
            em.getTransaction().begin();
            em.persist(supplier);
            em.getTransaction().commit();
        } finally {
            if (em != null) {
                em.close();
            }
        }
    }

    public void edit(Supplier supplier) throws NonexistentEntityException, Exception {
        EntityManager em = null;
        try {
            em = getEntityManager();
            em.getTransaction().begin();
            supplier = em.merge(supplier);
            em.getTransaction().commit();
        } catch (Exception ex) {
            String msg = ex.getLocalizedMessage();
            if (msg == null || msg.length() == 0) {
                int id = supplier.getSid();
                if (findSupplier(id) == null) {
                    throw new NonexistentEntityException("The supplier with id "
                                                         + id + " no longer exists.");
                }
            }
            throw ex;
        } finally {
            if (em != null) {
                em.close();
            }
        }
    }

    public void destroy(int id) throws NonexistentEntityException {
        EntityManager em = null;
        try {
            em = getEntityManager();
            em.getTransaction().begin();
            Supplier supplier;
            try {
                supplier = em.getReference(Supplier.class, id);
                supplier.getSid();
            } catch (EntityNotFoundException enfe) {
                throw new NonexistentEntityException("The supplier with id "
                                                    + id + " no longer exists.", enfe);
            }
            em.remove(supplier);
            em.getTransaction().commit();
        } finally {
            if (em != null) {
                em.close();
            }
        }
    }

    public List<Supplier> findSupplierEntities() {
        return findSupplierEntities(true, -1, -1);
    }

    public List<Supplier> findSupplierEntities(int maxResults, int firstResult) {
        return findSupplierEntities(false, maxResults, firstResult);
    }

    private List<Supplier> findSupplierEntities(boolean all, int maxResults, int firstResult) {
        EntityManager em = getEntityManager();
        try {
            CriteriaQuery cq = em.getCriteriaBuilder().createQuery();
            cq.select(cq.from(Supplier.class));
            Query q = em.createQuery(cq);
            if (!all) {
                q.setMaxResults(maxResults);
                q.setFirstResult(firstResult);
            }
            return q.getResultList();
        } finally {
            em.close();
        }
    }

    public Supplier findSupplier(int id) {
        EntityManager em = getEntityManager();
        try {
            return em.find(Supplier.class, id);
        } finally {
            em.close();
        }
    }

    public int getSupplierCount() {
        EntityManager em = getEntityManager();
        try {
            CriteriaQuery cq = em.getCriteriaBuilder().createQuery();
            Root<Supplier> rt = cq.from(Supplier.class);
            cq.select(em.getCriteriaBuilder().count(rt));
            Query q = em.createQuery(cq);
            return ((Long) q.getSingleResult()).intValue();
        } finally {
            em.close();
        }
    }
}
In this example we have only one domain object Supplier but in a real application you will have many domain objects. A common solution is to create a Facade that will only expose the methods needed to the view and hide the rest. In the following we show how to create a loosely coupled Facade IDBManager using NetBeans Lookup API (see references).
Listing 7 – IDBManager.java
package openmap.controller;

import java.util.List;
import openmap.model.Supplier;

/**
 * A facade of our controllers.
 *
 * @author ikost
 */
public interface IDBManager {
    List getSuppliers();
}
Click on the blob on the left side of IDBManager and select Implement Interface. Modify the DBManager implementation as in the following listing to transform it to a service provider:
Listing 8 – DBManager.java
package openmap.controller;

import java.util.List;
import javax.persistence.EntityManagerFactory;
import javax.persistence.Persistence;
import openmap.model.Supplier;
import org.openide.util.lookup.ServiceProvider;

@ServiceProvider(service = IDBManager.class)
public class DBManager implements IDBManager {

    private final EntityManagerFactory emf;
    private final SupplierJpaController suppliers;

    public DBManager() {
        emf = Persistence.createEntityManagerFactory("OpenMapPU");
        suppliers = new SupplierJpaController(emf);
    }

    @Override
    public List getSuppliers() {
        return suppliers.findSupplierEntities();
    }
}
The line @ServiceProvider(service = IDBManager.class) does all the magic. This line adds DBManager to the default lookup. We shall see how we can access DBManager from our view in the next section. In order to make it work, you need to add a dependency to org-openide-util-lookup.jar if NetBeans didn’t add it automatically.
- Right-click on
Libraries - Select Add JAR/Folder… from the popup menu
- Navigate to and select
<NetBeans_Installation>/platform/lib/org-openide-util-lookup.jar - Choose Copy to Libraries Folder and click Open.
- Clean and build your project for the changes to take effect.
But what is a lookup? A lookup is a map with class objects as keys and sets of instances of these class objects as values, i.e.
Lookup = Map<Class, Set<Class>>, e.g. Map<String, Set<String>> or Map<Provider, Set<Provider>>. NetBeans provides a number of methods to access the default lookup:
Provider provider = Lookup.getDefault().lookup(Provider.class);
provider.aMethod();
or if you have more than one implementations of Provider:
Collection providers = Lookup.getDefault().lookupAll(Provider.class);
for (Provider provider : providers) { ... }
As you can see from the above code examples, the client has no idea about which implementation it uses; it only knows the interface. Loose coupling!
The above code adds the services to the default lookup. The client looks in the default lookup for the interface. The default Lookup is a Lookup that evaluates the service declarations in the META-INF/services folder. It is callable through the Lookup.getDefault() method. If you are interested in more details, Netbeans creates a text file package.Provider inside build/classes/META-INF/services/ folder which contains the fully qualified names of the implementation classes. By asking for a service interface in this way, you receive instances of implementing classes registered in the META-INF/services folder.
Of course there are other lookups in NetBeans Rich Client Platform instead of the default lookup, but these are outside the scope of this article.
4.5 Build your View
Finally, we need to create a new layer that will display our suppliers on the map, and declare it inside openmap.properties in order to add it to the map. If you followed the previous tutorials, it should be easy by now how to do it. Let’s build SupplierLayer.java step-by-step:
Listing 9 – SupplierLayer.java
package openmap.controller;
public class SupplierLayer extends OMGraphicHandlerLayer {

    private static final String LOOKUP_OBJECT = "Lookup Object";

    public SupplierLayer() {
        // This is how to set the ProjectionChangePolicy, which
        // dictates how the layer behaves when a new projection is
        // received.
        setProjectionChangePolicy(new StandardPCPolicy(this, true));
        setRenderPolicy(new BufferedImageRenderPolicy());
        // Making the setting so this layer receives events from the
        // SelectMouseMode, which has a modeID of "Gestures". Other
        // IDs can be added as needed.
        setMouseModeIDsForEvents(new String[]{"Gestures"});
    }

    /**
     * Called from the prepare() method if the layer discovers that its
     * OMGraphicList is {@code null}.
     *
     * @return new {@code OMGraphicList} with {@code OMGraphics{ that you always
     * want to display and reproject as necessary.
     */
    public OMGraphicList init() {
        final IDBManager dbManager = Lookup.getDefault().lookup(IDBManager.class);
        final List suppliers = dbManager.getSuppliers();
        // This layer keeps a pointer to an OMGraphicList that it uses
        // for painting. It's initially set to null, which is used as
        // a flag in prepare() to signal that the OMGraphcs need to be
        // created. The list returned from prepare() gets set in the
        // layer.
        // This layer uses the StandardPCPolicy for new
        // projections, which keeps the list intact and simply calls
        // generate() on it with the new projection, and repaint()
        // which calls paint().
        OMGraphicList omList = new OMGraphicList();

        // Add suppliers as OMPoints.
        for (Supplier supplier : suppliers) {
            OMPoint omSupplier = new OMPoint(supplier.getLatitude(),
                    supplier.getLongitude(), 3);  // radius
            omSupplier.putAttribute(OMGraphicConstants.LABEL,
                       new OMTextLabeler(supplier.getName(), OMText.JUSTIFY_LEFT));
            omSupplier.putAttribute(LOOKUP_OBJECT, supplier);
            omSupplier.setLinePaint(Color.BLUE);
            omSupplier.setSelectPaint(Color.ORANGE);
            omSupplier.setOval(true);
            omList.add(omSupplier);
        }

        return omList;
    }

    /**
     * This is an important Layer method to override. The prepare method gets
     * called when the layer is added to the map, or when the map projection
     * changes. We need to make sure the OMGraphicList returned from this method
     * is what we want painted on the map. The OMGraphics need to be generated
     * with the current projection. We test for a null OMGraphicList in the
     * layer to see if we need to create the OMGraphics. This layer doesn't
     * change it's OMGraphics for different projections, if your layer does, you
     * need to clear out the OMGraphicList and add the OMGraphics you want for
     * the current projection.
     *
     * @return
     */
    @Override
    public synchronized OMGraphicList prepare() {
        OMGraphicList list = getList();

        // Here's a test to see if it's the first time that the layer has been
        // added to the map. This list object will be whatever was returned from
        // this method the last time prepare() was called. In this
        // example, we always return an OMGraphicList object, so if it's null,
        // prepare() must not have been called yet.
        if (list == null) {
            list = init();
        }

        /*
         * This call to the list is critical! OMGraphics need to be told where
         * to paint themselves, and they figure that out when they are given the
         * current Projection in the generate(Projection) call. If an
         * OMGraphic's location is changed, it will need to be regenerated
         * before it is rendered, otherwise it won't draw itself. You generally
         * know you have a generate problem when OMGraphics show up with the
         * projection changes (zooms and pans), but not at any other time after
         * something about the OMGraphic changes.
         *
         * If you want to be more efficient, you can replace this call to the
         * list as an else clause to the (list == null) check above, and call
         * generate(Projection) on all the OMGraphics in the init() method below
         * as you create them. This will prevent the
         * OMGraphicList.generate(Projection) call from making an additional
         * loop through all of the OMGraphics before they are returned.
         */
        list.generate(getProjection());

        return list;
    }

    /**
     * Query that an OMGraphic can be highlighted when the mouse moves over it.
     * If the answer is true, then highlight with this OMGraphics will be
     * called.
     *
     * @param omg
     * @return
     */
    @Override
    public boolean isHighlightable(OMGraphic omg) {
        return true;
    }

    /**
     * Query that an OMGraphic is selectable. Examples of handing selection are
     * in the EditingLayer. The default OMGraphicHandlerLayer behavior is to add
     * the OMGraphic to an OMGraphicList called selectedList. If you aren't
     * going to be doing anything in particular with the selection, then return
     * false here to reduce the workload of the layer.
     *
     * @param omg
     * @return
     * @see com.bbn.openmap.layer.OMGraphicHandlerLayer#select
     * @see com.bbn.openmap.layer.OMGraphicHandlerLayer#deselect
     */
    @Override
    public boolean isSelectable(OMGraphic omg) {
        return true;
    }

    /**
     * Query for what tooltip to display for an OMGraphic
     * the mouse is over.
     *
     * @param omg
     * @return
     */
    @Override
    public String getToolTipTextFor(OMGraphic omg) {
        String ttText = null;
        if (omg instanceof OMPoint) {
            OMPoint point = ((OMPoint) omg);
            Object attribute = point.getAttribute(OMGraphicConstants.LABEL);
            if (attribute != null && attribute instanceof OMTextLabeler) {
                OMTextLabeler labeler = (OMTextLabeler) attribute;
                ttText = labeler.getData();
            }
        }
        return ttText;
    }

    @Override
    public Component getGUI() {
        JPanel panel = PaletteHelper.createPaletteJPanel("Suppliers Layer");
        JCheckBox chkShowLabels = new JCheckBox("Show/Hide Labels", true);
        chkShowLabels.addItemListener((ItemEvent e) -> {
            OMGraphicList omSuppliers = getList();
            for (OMGraphic omSupplier : omSuppliers) {
                if (chkShowLabels.isSelected()) {
                    omSupplier.putAttribute(OMGraphicConstants.LABEL,
                            new OMTextLabeler(
                            ((Supplier) omSupplier.getAttribute(LOOKUP_OBJECT)).getName(),
                                    OMText.JUSTIFY_LEFT));
                } else {
                    omSupplier.removeAttribute(OMGraphicConstants.LABEL);
                }
            }
            repaint();
        });
        panel.add(chkShowLabels);
        return panel;
    }
}
In the init() method we retrieve the list of Suppliers from the DBManager using the defaultLookup. The we loop through all Suppliers and create an OMPoint out of each one of them. The point’s label is created by setting the attribute OMGraphicConstants.LABEL. We do a trick, by adding the supporting Supplier to the map of OMPoints’ attributes with the key "Lookup Object"; we shall need it later. (Don’t confuse it with NetBean’s Lookup; we just name it in a similar way to show that it resembles NetBeans’s Lookup but it has nothing to do with it; you could have named it anything else). Finally, each point is added to the returned OMGraphicList.
The getGUI() method is called by the Layers dialog box when you click on the Tools button (see following figure):
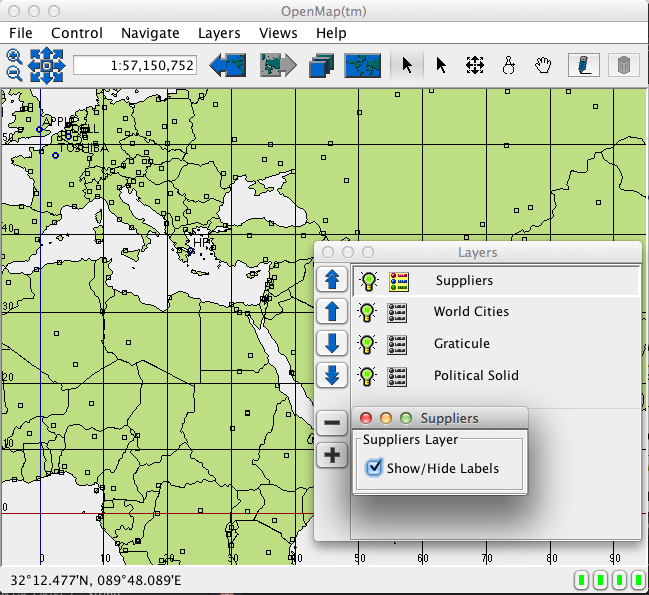 Figure 2 – Suppliers layer
The method creates a new panel with a check box to display/hide the layer’s labels. A Supplier‘s label is the Supplier‘s name which is retrieved from the map of attributes of OMPoint in order to set with it the OMGraphicConstants.LABEL attribute. When the check box is checked, the label is visible, otherwise the attribute is removed. The layer is repaint()ed. Unfortunately, the repaint() doesn’t work 100%; you need to zoom or resize the map for the labels to be displayed again.
Next, we would like to display a popup menu when we right-click on a Supplier in order to display its properties. From the previous tutorial, you know that we need to override getItemsForOMGraphicMenu() method. If you want to display a popup menu when you right-click anywhere on the layer, override the following method getItemsForMapMenu():
Listing 10 – SupplierLayer.java (cont.)
@Override
public List getItemsForOMGraphicMenu(OMGraphic omg) {
    final OMGraphic chosen = omg;
    List menuItems = new ArrayList<>();
    JMenuItem mnuProperties = new JMenuItem("Properties")
        mnuProperties.addActionListener((ActionEvent ae) -> {
            //...
        });

        menuItems.add(mnuProperties);
        return menuItems;
}

/**
  * This method is called mnuCreate a right mouse click is detected over the map
  * and not over an OMGraphic. You can provide a List of components to be
  * displayed in a popup menu. You have to do the wiring for making the list
  * components do something, though.
  *
  * @param me
  * @return
  */
@Override
public List getItemsForMapMenu(MapMouseEvent me) {
    List l = new ArrayList<>();
    JMenuItem mnuCreate = new JMenuItem("Create New Supplier");
    mnuCreate.addActionListener((ActionEvent ae) -> {
       fireRequestMessage("Create New Supplier");
    });
    l.add(mnuCreate);

    return l;
}
We are missing the form to display the data. We ‘ll do a quick hack here, to show you another NetBeans wizard, but fe free to build your own dialog box using Matisse or as you know.
- Create a new package
openmap.view.properties - Right-click on it and select New → Other → Swing GUI Forms → Master/Detail Sample Form and click Next
- Name it SuppliersPropertiesDialogBox and click Next
- Choose your Database Connection, the Supplier table, and exclude
SIDfield from the Columns to Include. - Click Finish.
The wizard has created a master/detail form, but we only need the detail part. Customize it as shown in the following figure.
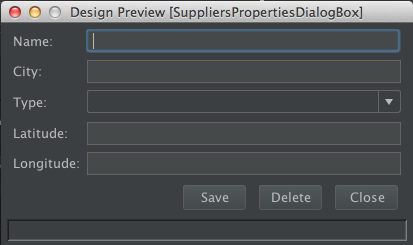 Figure 3 – Suppliers Properties dialog box
Select each of the text fields and the Delete button, click on Binding (Properties area) and remove any reference to the master table from enabled and text properties.
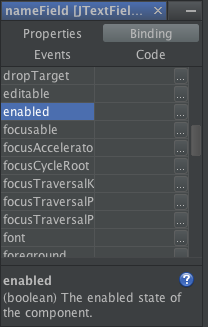 Figure 4 – Remove bindings
Change Type text field to a combo box since type is constrained only to the enum values 'GROSS' and 'RETAIL'.
- Right-click on the combo box and select
Customize Code… - Click on the second default code combo box and change it to custom property.
- Change the code to the following and click OK:
cmbType.setModel(new javax.swing.DefaultComboBoxModel<>(Supplier.TYPE.values()));
- Click on the combo box again and in the Properties click on Code
- Set Type Parameters to
<Supplier.TYPE>
Add a label (lblStatus) at the bottom. Make it opaque. When the transaction with the database is successful, it will be coloured green, otherwise red. This is a nice feedback to the user to make sure that his/her modifications are persisted.
The dialog box is coupled to an entity manager to retrieve the data to display, but this is a bad design in general. Remove all references to the entity manager as well as to the master table and convert it to a JDialog. To avoid an java.lang.IllegalArgumentException: GroupLayout can only be used with one Container at a time, add all components to a JPanel
- Resize the dialog box in Design view
- Drag a Panel on top from the Palette (Swing Containers)
- Change the panel’s variable name to
panel - Set its layout to
Free Design - Select all widgets from the Navigator and drag them inside the new panel; their layout should remain as before.
- Select the
JDialogin the Navigator and set its size property to[400, 230]. Uncheck Resizable property.
The source code should look like:
Listing 11 – SuppliersPropertiesDialogBox.java
public class SuppliersPropertiesDialogBox extends JDialog {
    private final Supplier supplier;
    private final IDBManager dbManager;

    public SuppliersPropertiesDialogBox(Supplier s) {
        dbManager = Lookup.getDefault().lookup(IDBManager.class);
        initComponents();
        supplier = s;
        setData(supplier);
    }

    @SuppressWarnings("unchecked")
    private void btnCloseActionPerformed(java.awt.event.ActionEvent evt) {
        this.setVisible(false);
    }

    private void btnDeleteActionPerformed(java.awt.event.ActionEvent evt) {
          try {
            dbManager.delete(supplier);
            lblStatus.setBackground(Color.green);
        } catch (Exception ex) {
            Logger.getLogger(SuppliersPropertiesDialogBox.class.getName())
            .log(Level.SEVERE, null, ex);
            lblStatus.setBackground(Color.red);
        }
    }

    private void btnSaveActionPerformed(java.awt.event.ActionEvent evt) {
        try {
            dbManager.save(getData());
            lblStatus.setBackground(Color.green);
        } catch (Exception ex) {
            Logger.getLogger(SuppliersPropertiesDialogBox.class.getName())
            .log(Level.SEVERE, null, ex);
            lblStatus.setBackground(Color.red);
        }
    }

    public void setData(Supplier supplier) {
        txtName.setText(supplier.getName());
        txtCity.setText(supplier.getCity());
        txtLatitude.setText(String.valueOf(supplier.getLatitude()));
        txtLongitude.setText(String.valueOf(supplier.getLongitude()));
        cmbType.setSelectedItem(supplier.getType());
    }

    public Supplier getData() {
        supplier.setName(txtName.getText());
        supplier.setCity(txtCity.getText());
        supplier.setLatitude(Double.valueOf(txtLatitude.getText()));
        supplier.setLongitude(Double.valueOf(txtLongitude.getText()));
        supplier.setType(Supplier.TYPE.valueOf(cmbType.getSelectedItem().toString()));
        return supplier;
    }

   // initComponents() generated method omitted ...
}
As you see, we refer to DBManager to handle the data. We need to add these new methods to it:
Listing 12 – IDBManager.java
public interface IDBManager {
    List getSuppliers();
    void delete(Supplier supplier) throws Exception;
    void save(Supplier supplier) throws Exception;
}
and their implementations:
Listing 13 – DBManager.java
    @Override
    public void delete(Supplier supplier)  throws Exception {
        try {
            suppliers.destroy(supplier.getSid());
        } catch (NonexistentEntityException ex) {
            Logger.getLogger(DBManager.class.getName())
            .log(Level.SEVERE, null, ex);
            throw ex;
        }
    }

    @Override
    public void save(Supplier supplier)  throws Exception {
        Supplier s = suppliers.findSupplier(supplier.getSid());
        if (s == null) {
            suppliers.create(supplier);
        } else {
            try {
                suppliers.edit(supplier);
            } catch (Exception ex) {
                Logger.getLogger(DBManager.class.getName())
                .log(Level.SEVERE, null, ex);
                throw ex;
            }
        }
    }
SupplierLayer can now be modified as:
Listing 14 – SupplierLayer.java
    @Override
    public List getItemsForOMGraphicMenu(OMGraphic omg) {
        List menuItems = new ArrayList<>();
        JMenuItem mnuProperties = new JMenuItem("Properties");
        mnuProperties.addActionListener((ActionEvent ae) -> {
            SuppliersPropertiesDialogBox dlgProperties =
                    new SuppliersPropertiesDialogBox(
                (Supplier)omg.getAttribute(LOOKUP_OBJECT));
            dlgProperties.setVisible(true);
        });
        menuItems.add(mnuProperties);
        return menuItems;
    }
Finally,
- Clean and build your application and then run it
- Click on the Layer Controls button and make World Cities layer not visible; this way your mouse clicks on the map won’t select cities but suppliers
- Right-click on a supplier on the map and select Properties from the popup menu; the dialog box of the following figure will be displayed; when you click on Save you get a green feedback that your changes were persisted successfully.
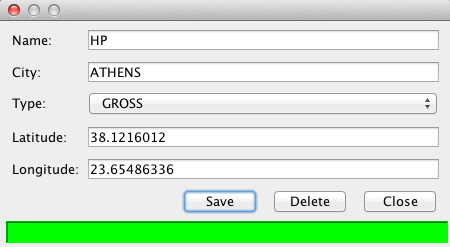 Figure 5 – Supplier properties dialog box
Well done! You have built most of the functionality and your design allows you to do modifications without the need to change all layers.
Here is a list of TODOs for you to try:
- Format the latitude/longitude text fields in the above dialog box to be human readable i.e. of the form
xxºyy’zzz"N|S,xxxºyy’zzz"E|W- hints: use
DMSCoordInfoFormatterthat we showed in the previous article to format the latitude/longitude double values; - you may use separate textfields for the hours/minutes/seconds of the latitude and longitude so that the user can easily type new values without messing up with the special characters;
- make sure that the
OMPointis displayed in its new position after the changes have been saved; you need to add aPropertyChangeListenerinSupplierLayerto listen for changes inSupplier:
Listing 15 – SupplierLayer.java (cont.)
- hints: use
    private final PropertyChangeListener listener = (PropertyChangeEvent evt) -> {
        if (evt.getPropertyName().equals("latitude") || evt.getPropertyName().equals("longitude")) {
            Supplier supplier = (Supplier) evt.getSource();
            OMGraphicList list = getList();
            for (OMGraphic omPoint : list) {
                if (omPoint.getAttribute(LOOKUP_OBJECT).equals(supplier)) {
                    ((OMPoint) omPoint).set(supplier.getLatitude(), supplier.getLongitude());
                    break;
                }
            }
            repaint();
        }
    };

    public OMGraphicList init() {
       // ...
       // Add suppliers as OMPoints.
        for (Supplier supplier : suppliers) {
          // ...
          supplier.addPropertyChangeListener(listener);
          omList.add(omSupplier);
        }
        // ...
    }
For the above to work you need to transform Supplier to an observable:
Listing 16 – Supplier.java (cont.)
public class Supplier implements Serializable {

    @Transient
    private final PropertyChangeSupport changeSupport = new PropertyChangeSupport(this);
    // ...
    public void setSid(int sid) {
        int oldSid = this.sid;
        this.sid = sid;
        changeSupport.firePropertyChange("sid", oldSid, sid);
    }
    // ...

    public void setName(String name) {
        String oldName = this.name;
        this.name = name;
        changeSupport.firePropertyChange("name", oldName, name);
    }
    // ...
    public void setCity(String city) {
        String oldCity = this.city;
        this.city = city;
        changeSupport.firePropertyChange("city", oldCity, city);
    }
    // ...
    public void setType(TYPE type) {
        TYPE oldType = this.type;
        this.type = type;
        changeSupport.firePropertyChange("type", oldType, type);
    }
    // ...
    public void setLatitude(double latitude) {
        double oldLatitude = this.latitude;
        this.latitude = latitude;
        changeSupport.firePropertyChange("latitude", oldLatitude, latitude);
    }
    // ...
    public void setLongitude(double longitude) {
        double oldLongitude = this.longitude;
        this.longitude = longitude;
        changeSupport.firePropertyChange("longitude", oldLongitude, longitude);
    }
    // ...
    public void addPropertyChangeListener(PropertyChangeListener listener) {
        changeSupport.addPropertyChangeListener(listener);
    }

    public void removePropertyChangeListener(PropertyChangeListener listener) {
        changeSupport.removePropertyChangeListener(listener);
    }
- Add drag functionality, i.e. the user should be able to drag a supplier on the map to a new position
- Use the tips in the previous article;
- Implement the
DrawingToolRequestorinterface - Define and initialize an instance of
DrawingToolinfindAndInit() - Override
select()anddrawingComplete()methods
- Add the Create New Supplier functionality (method
getItemsForMapMenu()inSupplierLayer). TheSuppliersPropertiesDialogBoxshould be displayed with the latitude/longitude fields already populated with the coordinates where the user clicked on the map; then the user should fill in the other fields and the new supplier should be added to the database - When you click on the
Drawing Tool Launcherbutton you are able to add many types of graphics on the layer, which might not be what you want. Since we want ourSupplierlayer to only displayOMPoints, modifyopenmap.componentsto leave onlyomdrawingtoolandompointloaderas we already did in the previous article - Another problem you might encounter is that when you right-click on an
OMPoint, a different popup menu appears than the one you created viagetItemsForOMGraphicMenu().com.bbn.openmap.tools.drawing.OMDrawingToolcontains a linedt.setBehaviorMask(OMDrawingTool.QUICK_CHANGE_BEHAVIOR_MASK).OMDrawingTooldefines a number of behaviour masks as explained in the previous tutorial. As a workaround, we created our ownOMDrawingTool.
Conclusion
In this tutorial we created a 3-tier standalone application that retrieved data from a relational database, using JPA, and displayed them as an OpenMap’s layer. We saw how to loosely couple the view with the controller using NetBeans Lookup API.
You should have gotten an idea about how to develop such applications, but don’t use this code in real and especially critical applications, as is. The code is buggy and neither efficient nor thread-safe (e.g. see com.bbn.openmap.layer.location.LayerLocationLayer on how to retrieve the data from the database in a different thread).
There are other technologies you could use to replace the various tiers e.g.:
- Replace JPA with a pure Java 8 lambda framework to access the database (Speedment)
- Use DukeScript to glue JPA to your view
E.g. since your view depends on IDBManager and not on a specific implementation (like the EntityManager of JPA) it is isolated of any changes of the model (as long as Suppliers’ and IDBManagers’ methods don’t change). Then you can replace JPA with Speedment, for example, without any change in your view.
If time and space allows, we might investigate those in a future article.
References
- OpenMap’s Developers Guide
- OpenMap Developers Hints
- Bauer et. al. (2016), Java Persistence with Hibernate, 2nd Ed., Manning.
- Coehlo H., Kiourtzoglou B., Java Persistence API Mini Book, JavaCodeGeeks.
- Epple T. (2009), “NetBeans Lookups Explained!”, DZone
- Epple T. (2016), “JPA and Dukescript“
- Goncalves A. (2013), Beginning Java EE 7, Apress.
- Keith M. & Schincariol M. (2013), Pro JPA 2 – Mastering the Java™ Persistence API, 2nd Ed., APress.
- Kostaras I. blog, “Loose coupling”
