1. Introduction
In the previous tutorial we saw how the MapHandler can wire up various components together (more specifically classes that derive from MapHandlerChild). We saw how we could do this programmatically, but there is also another way, declaratively, using the openmap.properties.
The sample OpenMap application is configured with an openmap.properties file. The contents of this properties file specify which components are created and added to the application framework, including the layers. New applications can be configured without recompilation, simply by modifying the openmap.properties file in a text editor. Components that have been written with an understanding of the framework can be added to the application simply by adding them to this properties file. Also, components written to use properties will be given their settings in order to initialize themselves properly. Layers that rely on the location of data files or servers, for instance, usually have properties that let those locations be set at run-time.
2. openmap.properties
The openmap.properties file has an openmap.components property that lists all the components that make up the application. To change the components that comprise your application, simply edit this list. If you want your component to be told of the BeanContext, make it a BeanContextChild. It will get added to the MapHandler so that other components can find it, if it is on the openmap.components property list. If you are creating your own components programmatically, simply add the BeanContextChild component to the MapHandler yourself, as we saw in Listing 2 of the previous article.
The LayerHandler creates the layers available for the map based on the openmap.layers property in the openmap.properties file. Modifying the openmap.layers property lets you add and remove layers from the application. OpenMap layers’ properties that can be set are listed in the layer’s JavaDocs.
The PropertyHandler (com.bbn.openmap.PropertyHandler) uses the openmap.properties file to configure the application. It can be told which file to read properties from, or left to its own to find an openmap.properties file in the Java classpath and in the application user’s home directory. It uses the openmap.components property which contains a marker name list for objects as already mentioned. Each member of the list is then used to look for another property (markername.class) which specifies the classes to be instantiated.
Listing 1: openmap.properties with openmap.components property
# Marker name list that defines the general components to use in the
# application, OTHER than layers. Order is important
openmap.components=layerHandler

# These layers are turned on when the map is first started.  Order
# does not matter here...
openmap.startUpLayers=graticule shapePolitical

# Layers listed here appear on the Map in the order of their names.
openmap.layers=graticule shapePolitical

### Key components
layerHandler.class=com.bbn.openmap.LayerHandler

### Graticule layer
graticule.class=com.bbn.openmap.layer.GraticuleLayer
graticule.prettyName=Graticule

### ShapeFile layers
shapePolitical.class=com.bbn.openmap.layer.shape.ShapeLayer
shapePolitical.prettyName=Political Solid
shapePolitical.lineColor=000000
shapePolitical.fillColor=BDDE83
shapePolitical.shapeFile=resources/map/shape/dcwpo-browse.shp
shapePolitical.spatialIndex=resources/map/shape/dcwpo-browse.ssx
Listing 1 shows the updated openmap.properties. Here openmap.components is initialised with one component (layerHandler) and openmap.layers with two layers (shapePolitical and graticule).
If the PropertyHandler is given a MapHandler, it will load the components it creates into it after they are created. Intelligent components (MapHandlerChildren) are smart enough to wire themselves together. Order does matter for the openmap.components property, especially for components that get added to lists and menus. Place the components in the list in the order that you want components added to the MapHandler.
When the OpenMap application is creating objects from the openmap.components property, the marker name on that list becomes the property prefix for components. The ComponentFactory, which creates the components on behalf of the PropertyHandler, checks to see if the component is a PropertyConsumer, and if so it calls setProperties(prefix, properties) on it to let the component configure itself.
Listing 2 shows an initial application that uses the above. (The code is based on com.bbn.openmap.app.OpenMap).
- In NetBeans, right-click on the openmap package and create a new Java class. Name it
OpenMap. - Copy the contents of Listing 2 inside this class.
Listing 2: OpenMap application that uses an openmap.properties file
public class OpenMap {
    /** The main panel of the application. */
    private MapPanel mapPanel;

    /**
     * Schedule creation of this application's GUI in the event-dispatching
     * thread.
     *
     * @param args
     */
    public static void main(String[] args) {
        SwingUtilities.invokeLater(() -> {
            OpenMap.create("./openmap.properties").showInFrame();
        });
    }

    /** Passes a null property handler. Use {@code create()} instead. */
    public OpenMap() {
        this((PropertyHandler) null);
    }

    /**
     * Configures the map pane with this property handler.
     *
     * @param propertyHandler
     */
    private OpenMap(PropertyHandler propertyHandler) {
        configureMapPanel(propertyHandler);
    }

    /**
     * Factory method.
     *
     * @param propertiesFile path to {@code openmap.properties}
     * @return new {@code OpenMap} instance
     */
    public static OpenMap create(String propertiesFile) {
        return new OpenMap(configurePropertyHandler(propertiesFile));
    }

    /**
     * Given a path to a properties file, try to configure a
     * {@code PropertyHandler} with it. If the properties file is not valid, the
     * returned {@code PropertyHandler} will look for the
     * {@code openmap.properties} file in the classpath and the user's home
     * directory.
     *
     * @param propertiesFile path to {@code openmap.properties}
     * @return the respective {@code PropertyHandler} or an empty one if an
     * error occurs
     * @throws MalformedURLException, IOException
     */
    private static PropertyHandler configurePropertyHandler(String propertiesFile) {
        try {
            return new PropertyHandler.Builder().setPropertiesFile(propertiesFile).build();
        } catch (MalformedURLException murle) {
            Logger.getLogger(OpenMap.class.getName()).log(Level.WARNING, murle.getMessage(), murle);
        } catch (IOException ioe) {
            Logger.getLogger(OpenMap.class.getName()).log(Level.WARNING, ioe.getMessage(), ioe);
        }
        return new PropertyHandler();
    }

    /** @return the MapHandler */
    public MapHandler getMapHandler() {
        return mapPanel.getMapHandler();
    }

    /**
     * If there is no {@code OpenMapFrame} specified in the properties file, we
     * need to create one and configure it from the current properties.
     */
    private void showInFrame() {
        MapHandler mapHandler = getMapHandler();
        OpenMapFrame omf = (OpenMapFrame) mapHandler.get(OpenMapFrame.class
        );
        if (omf == null) {
            omf = new OpenMapFrame(Environment.get(Environment.Title));
            PropertyHandler propertyHandler = (PropertyHandler) mapHandler.get(PropertyHandler.class
            );
            if (propertyHandler != null) {
                // Use the default property prefix for the default window
                // property settings.
                omf.setProperties("openmap", propertyHandler.getProperties());
            }
            getMapHandler().add(omf);
        }
        omf.setDefaultCloseOperation(WindowConstants.EXIT_ON_CLOSE);
        omf.setVisible(true);
    }

    /**
     * Creates the components in the main application thread. If any of these
     * components need to update their GUI, they should pass a {@code Runnable}
     * object to the {@code SwingUtilities.invokeLater(Runnable)} method, and it
     * will be updated accordingly.
     *
     * @param propertyHandler
     */
    private void configureMapPanel(PropertyHandler propertyHandler) {
        BasicMapPanel basicMapPanel = new BasicMapPanel(propertyHandler, true);
        basicMapPanel.create();
        mapPanel = basicMapPanel;
    }
}
The main() method calls a static create() method in the EDT. The create() method calls the constructor passing the openmap.properties file path. The method configurePropertyHandler() creates a new PropertyHandler() out of this properties file. The constructor passes this property handler to configureMapPanel() which uses it to create a MapPanel. The second parameter allows you to delay creation of the MapPanel until the create() method is called. Here you could have used BasicMapPanel basicMapPanel = new BasicMapPanel(propertyHandler, false); without the need to call create(). You may also use an OverlayMapPanel instead of a BasicMapPanel (see Listing 3).
Listing 3: configureMapPanel() method initialises OverlayMapPanel
private void configureMapPanel(PropertyHandler propertyHandler) {
    mapPanel = new OverlayMapPanel(propertyHandler, false);
}
Finally, showInFrame() method initialises an OpenMapFrame with the properties with prefix “openmap”, adds it to the map handler and shows it. You don’t need to define anything else, no LayerHandler, no MouseDelegator; all these are defined in the openmap.properties.
You may simplify showInFrame() Listing 4 method by getting rid of the if block if you add the OpenMapFrame inside the openmap.components Listing 5. Two more components have been added, too, mouseDelegator and onMouseMode.
Listing 4: Simplified showInFrame() method
   private void showInFrame() {
      MapHandler mapHandler = getMapHandler();
      OpenMapFrame omf = (OpenMapFrame) mapHandler.get(OpenMapFrame.class);
      omf.setDefaultCloseOperation(WindowConstants.EXIT_ON_CLOSE);
   }
Listing 5: openmap.properties with openmap.components property
# Marker name list that defines the general components to use in the
# application, OTHER than layers. Order is important
openmap.components=openMapFrame layerHandler mouseDelegator mouseMode

# These layers are turned on when the map is first started.  Order
# does not matter here...
openmap.startUpLayers=graticule shapePolitical

# Layers listed here appear on the Map in the order of their names.
openmap.layers=graticule shapePolitical

### Key components
layerHandler.class=com.bbn.openmap.LayerHandler
mouseDelegator.class=com.bbn.openmap.MouseDelegator
openMapFrame.class=com.bbn.openmap.gui.OpenMapFrame
mouseMode.class=com.bbn.openmap.event.OMMouseMode

### Graticule layer
graticule.class=com.bbn.openmap.layer.GraticuleLayer
graticule.prettyName=Graticule

### ShapeFile layers
shapePolitical.class=com.bbn.openmap.layer.shape.ShapeLayer
shapePolitical.prettyName=Political Solid
shapePolitical.lineColor=000000
shapePolitical.fillColor=BDDE83
shapePolitical.shapeFile=resources/map/shape/dcwpo-browse.shp
shapePolitical.spatialIndex=resources/map/shape/dcwpo-browse.ssx
You may find a list of available properties to set here.
3. Extending our application
It is as easy to extend the application by only modifying openmap.properties! We already saw in Listing 5 how to add mouse event support to the map. Let’s see what other functionality is available! The OpenMap architecture supports the management of the distribution of MouseEvents and MouseMotionEvents, directing them to components in the application. Layers and other tool components can use these events to interpret and respond to user gestures over the map, displaying more information about map features, modifying the location of the features, or configuring tools for analysis queries.
MapMouseModes describe how MouseEvents and MouseMotionEvents are interpreted and consumed. The MouseDelegator is responsible for controlling which MapMouseMode is the MouseListener and MouseMotionListener to the MapBean. The MouseDelegator manages a list of MouseModes, and knows which one is ‘active’ at any given time. It listens for events from the MapBean, which tells it which layers have been added to the map. When it gets that list of layers, it asks each layer for their MapMouseListener, and adds those MapMouseListeners to the MapMouseModes specified by the listener. When a MouseEvent gets fired from the MapBean to the active MapMouseMode, the mode starts providing the MouseEvent to its MapMouseListeners. Each listener is given the chance to consume the event. A MapMouseListener is free to act on an event and not consume it, so that it can continue to be passed on to other listeners. The MapMouseListeners from the upper layers of the map are given a chance to consume the MouseEvent before the lower ones. A layer can implement the MapMouseListener interface, or it can delegate that responsibility to another object, or can just return null if it’s not interested in receiving events (the Layer default).
The InformationDelegator (com.bbn.openmap.InformationDelegator) is a central component used for communicating messages to the user. The InformationDelegator listens to the MapBean for messages on when the active layers change, and connects itself to those layers in order to respond to their requests for tooltips over the map, for presentation of information text in different text areas, for dialog messages to be popped up, and for handling requests to display information in a browser. As a MapPanelChild, it usually asks to be placed underneath the map. The InformationDelegator by default only has two text areas that it uses to place concise information around the map, one for coordinate information usually provided by the MapMouseModes, and one for information about data on the map that the user is gesturing over. More text areas can be programmatically added to the InformationDelegator, with requests directing new information to be displayed in those areas.
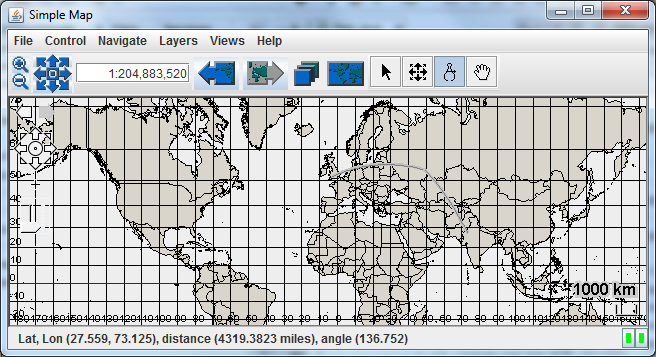
As an exercise, add an InformationDelegator instance to your application by modifying openmap.properties accordingly. Simply run it to see a window similar to the one of Figure 1.

The ToolPanel is a JtoolBar that OpenMap places right above the map. The ToolPanel uses the MapHandler to locate objects that implement the Tool interface, simply adding them to itself as it finds them. The OMToolComponent is a convenience class that implements the Tool, PropertyConsumer and LightMapHandlerChild interfaces, allowing any derived class to appear in the ToolPanel, be configured with properties, and find other components in the MapHandler. Some OMToolComponents include:
- The
NavigatePanelprovides a set of arrows used to pan the map in 8 different directions. It uses theMapHandlerto find theMapBean, which listens forPanEvents from theNavigatePanelbuttons. - The
ZoomPanelprovides a pair of buttons for zooming in and out. - The
ScaleTextPanelprovides a text field for directly setting the current scale. - The
ProjectionStackToolprovides two buttons which keep track of aProjectionStackused to revert back to past projection settings and then forward to the most current projection settings. In order for theProjectionStackToolto work with theMapBeanprojections, acom.bbn.openmap.proj.ProjectionStackobject must also be added to theMapHandler. - The
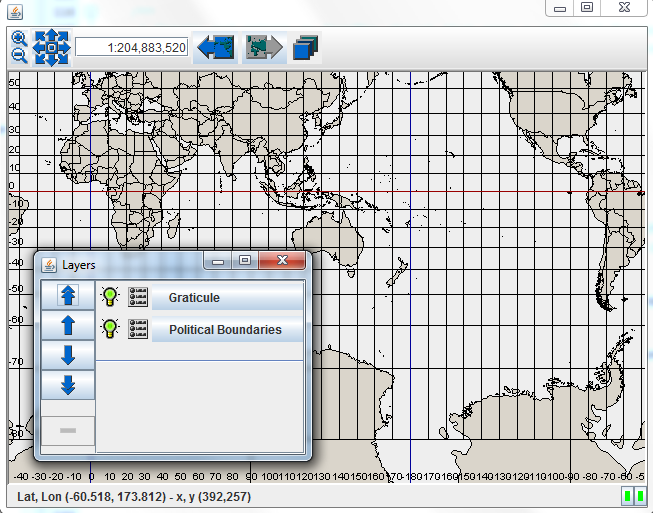
LayersPanelbrings up a window which you can use to set layers visible or not as well as to configure the layers’properties. You can also re-order the layers.
Listing 6 shows how to add the above widgets to openmap.properties. The result is shown in Figure 2.
Listing 6: openmap.properties with openmap.components property
# Marker name list that defines the general components to use in the
# application, OTHER than layers. Order is important
openmap.components=openMapFrame informationDelegator projectionstack toolBar zoompanel navpanel scalepanel projectionstacktool layersPanel layerHandler mouseDelegator mouseMode

# ...

### Key components
layerHandler.class=com.bbn.openmap.LayerHandler
informationDelegator.class=com.bbn.openmap.InformationDelegator
mouseDelegator.class=com.bbn.openmap.MouseDelegator
openMapFrame.class=com.bbn.openmap.gui.OpenMapFrame
mouseMode.class=com.bbn.openmap.event.OMMouseMode
toolBar.class=com.bbn.openmap.gui.ToolPanel
navpanel.class=com.bbn.openmap.gui.NavigatePanel
scalepanel.class=com.bbn.openmap.gui.ScaleTextPanel
zoompanel.class=com.bbn.openmap.gui.ZoomPanel
projectionstack.class=com.bbn.openmap.proj.ProjectionStack
projectionstacktool.class=com.bbn.openmap.gui.ProjectionStackTool
layersPanel.class=com.bbn.openmap.gui.LayersPanel

# ...
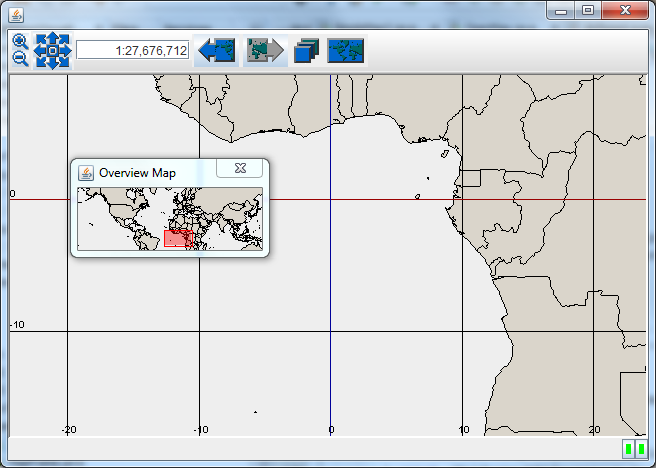
The OverviewMapHandler provides a smaller, zoomed-out map to show what the main MapBean is displaying. It can be directly added to any other component, but thanks to the Tool interface, it provides a button which brings up the overview map in a separate window. It is more difficult to configure as you can see in Listing 7.
Listing 7: openmap.properties with OverviewMapHandler
# Marker name list that defines the general components to use in the
# application, OTHER than layers. Order is important
openmap.components=openMapFrame informationDelegator projectionstack toolBar zoompanel navpanel scalepanel projectionstacktool layersPanel overviewMapHandler layerHandler mouseDelegator mouseMode

# ...

# ###
# Properties defined for the overview map handler.
# ###
overviewMapHandler.class=com.bbn.openmap.gui.OverviewMapHandler
# marker name list defining background layers used on overview map.
# The layers are defined as any other layer is below, look
# for 'overviewLayer' properties.  This is a space-separated list of
# marker names.
overviewMapHandler.overviewLayers=overviewLayer
# how zoomed out to keep the overview map versus the main map
overviewMapHandler.overviewScaleFactor=10f
# when to stop zooming in
overviewMapHandler.overviewMinScale=10000000f
# the layer to use to render on top, showing where the main map covers.
overviewMapHandler.overviewStatusLayer=com.bbn.openmap.layer.OverviewMapAreaLayer
overviewMapHandler.lineColor=ffff0000
overviewMapHandler.fillColor=66ff0000
# ###

### Layer used by the overview handler
overviewLayer.class=com.bbn.openmap.layer.shape.ShapeLayer
overviewLayer.prettyName=Overview
overviewLayer.shapeFile=resources/map/shape/dcwpo-browse.shp
overviewLayer.spatialIndex=resources/map/shape/dcwpo-browse.ssx
overviewLayer.lineColor=ff000000
overviewLayer.fillColor=DAD5CB

# ...
You need to define the layer to use as well as the OverviewMapAreaLayer, i.e. the red rectangle that defines the zoomed area (see Figure 3).
- The
AddLayerPanelwidget allows certain layers/plugins to be added to the application dynamically. Only certain layers/plugins have been updated to be able to work with theInspectorto set their initial parameters. Theaddlayermarker name was added to theopenmap.componentslist, and this component looks for theopenmap.addableLayersproperty to figure out what layers to make available for dynamic addition. To add a layer to this list, create a unique marker name for a generic instance of the layer, and then supply the<layername>.classfield and<layername>.prettyName(see Listing 8) for that object. Theclassname will be the type of the layer/plugin created by theLayerAddPanel, and itsprettyNamewill be the generic description of the layer presented to the user. The user will have an opportunity to change that name when the layer gets created (see Figure 4).
Listing 8: openmap.properties with addLayer component
# Marker name list that defines the general components to use in the
# application, OTHER than layers. Order is important
openmap.components=openMapFrame informationDelegator projectionstack toolBar zoompanel navpanel scalepanel projectionstacktool addlayer layersPanel layerHandler mouseDelegator mouseMode

# ...

# Define the class for the component listed in the openmap.components list:
addlayer.class=com.bbn.openmap.gui.LayerAddPanel

# Define a list of addable layers:
openmap.addableLayers=shape grat utmgrid rpf shispi eipi wmsp epi

# Define the properties of the addable layers:
shape.class=com.bbn.openmap.layer.shape.ShapeLayer
shape.prettyName=Shape Layer
grat.class=com.bbn.openmap.layer.GraticuleLayer
grat.prettyName=Graticule Layer
utmgrid.class=com.bbn.openmap.plugin.UTMGridPlugIn
utmgrid.prettyName=UTM Grid Overlay
rpf.class=com.bbn.openmap.layer.rpf.RpfLayer
rpf.prettyName=RPF Layer
shispi.class=com.bbn.openmap.plugin.shis.SHISPlugIn
shispi.prettyName=Simple Http Image Server (SHIS) Plugin
eipi.class=com.bbn.openmap.plugin.earthImage.EarthImagePlugIn
eipi.prettyName=Earth Image Plugin
wmsp.class=com.bbn.openmap.plugin.wms.WMSPlugIn
wmsp.prettyName=WMS Layer
epi.class=com.bbn.openmap.plugin.esri.EsriPlugIn
epi.prettyName=Shape Layer with Attributes

# ...

- The
com.bbn.openmap.gui.menu.MenuListobject is responsible for creatingMenus and providing them access to otherMapHandlercomponents. TheMenuListis capable of providing aJMenuBaror aJMenucontaining its menus and maintaining the defined order of the menus. TheAbstractOpenMapMenuis a JMenu abstract class that has been enhanced withPropertyConsumerandLightMapHandlerChildmethods. TheOMBasicMenuis an extension of theAbstractOpenMapMenuthat has the ability to have itsMenuItems and separators defined in a properties file. If it has anyMenuItems that extend theMapHandlerMenuItemclass, it will automatically take care of giving them access to objects found in theMapHandler.
The changes are shown in Listing 9. The menus are declared in menulist.menus property. Note that the order in which menu objects are added is important except from helpMenu which is always adjusted to be last. If you run the application, however, you will notice that there is no menu! A bug? Do the following workaround. Remove openMapFrame from the openmap.components property list, and add back the code from Listing 2. You should now see the menu bar (see Figure 5).
Listing 9: openmap.properties with menulist component
# Marker name list that defines the general components to use in the
# application, OTHER than layers. Order is important
openmap.components=openMapFrame informationDelegator projectionstack menulist toolBar zoompanel navpanel scalepanel projectionstacktool addlayer layersPanel layerHandler mouseDelegator mouseMode

# ...
# ###################################################
# Menu configuration, defining the menu items listed in the
# openmap.components list.

menulist.class=com.bbn.openmap.gui.menu.MenuList
menulist.menus=fileMenu controlMenu navigateMenu layersMenu gotoMenu helpMenu
fileMenu.class=com.bbn.openmap.gui.FileMenu
controlMenu.class=com.bbn.openmap.gui.ControlMenu

# INTERNATIONALIZATION
# To get the BasicI18n class to create the internationalization property
# files after you have set the Debug statements described above, you can add this
# toolMenu to the menulist.menus list above:
toolMenu.class=com.bbn.openmap.gui.menu.OMBasicMenu
toolMenu.prettyName=Tools
toolMenu.mnemonic=T
toolMenu.items=i18ndump
i18ndump.class=com.bbn.openmap.gui.menu.I18nFileCreateMenuItem

###
# Adding a menu item to toggle on/off the OMControlPanel if it is
# added to the openmap.components list.
controlMenu.items=controlPanelToggle
controlPanelToggle.class=com.bbn.openmap.gui.menu.ControlPanelToggleMenuItem
###

navigateMenu.class=com.bbn.openmap.gui.NavigateMenu
layersMenu.class=com.bbn.openmap.gui.LayersMenu
gotoMenu.class=com.bbn.openmap.gui.GoToMenu
gotoMenu.addDefaults=true

# ...

#...
### Add your own views to the GoToMenu
#gotoMenu.views=Argentina India United_States
#Argentina.latitude=-39.760445
#Argentina.longitude=-65.92294
#Argentina.name=Argentina
#Argentina.projection=Mercator
#Argentina.scale=5.0E7
#India.latitude=20.895763
#India.longitude=80.437485
#India.name=India
#India.projection=Mercator
#India.scale=3.86688E7
#United_States.latitude=38.82259
#United_States.longitude=-96.74999
#United_States.name=United States
#United_States.projection=Mercator
#United_States.scale=5.186114E7
###

helpMenu.class=com.bbn.openmap.gui.DefaultHelpMenu
helpMenu.items=helpUserMenuItem
helpUserMenuItem.class=com.bbn.openmap.gui.UserGuideMenuItems
helpUserMenuItem.class=com.bbn.openmap.gui.menu.WebSiteHelpMenuItem

# End menu item definitions
# ###################################################

# ...

- Adding a
MouseModeButtonPanelis easy, too (see Listing 10). The four modes:SelectMouseMode,PanMouseMode,DistanceMouseModeandNavMouseMode2have been added to it. Note that themouseMode.classhas been moved here from the### Key componentspart. You may see the result in Figure 6.
Listing 10: openmap.properties with mouseModePanel component
# Marker name list that defines the general components to use in the
# application, OTHER than layers. Order is important
openmap.components=menulist informationDelegator projFactory projectionstack toolBar zoompanel navpanel scalepanel projectionstacktool addlayer layersPanel overviewMapHandler layerHandler mouseDelegator mouseModePanel selectMouseMode navMouseMode distanceMouseMode panMouseMode

# ...

# Mouse handling components
mouseModePanel.class=com.bbn.openmap.gui.MouseModeButtonPanel
selectMouseMode.class=com.bbn.openmap.event.SelectMouseMode
distanceMouseMode.class=com.bbn.openmap.event.DistanceMouseMode
panMouseMode.class=com.bbn.openmap.event.PanMouseMode
panMouseMode.azPanningShapefile=resources/map/shape/dcwpo-browse.shp
# Floating number between 0-1, with 1 being opaque, default .5
panMouseMode.opaqueness=1
# True/false, to leave old map up behind panned version.
panMouseMode.leaveShadow=false
# There's a NavMouseMode, too.  This one defines boxes from center
navMouseMode.class=com.bbn.openmap.event.NavMouseMode2
nullMouseMode.class=com.bbn.openmap.event.NullMouseMode
# Mouse mode
mouseMode.class=com.bbn.openmap.event.OMMouseMode
mouseMode.azPanningShapefile=resources/map/shape/dcwpo-browse.shp

# ...
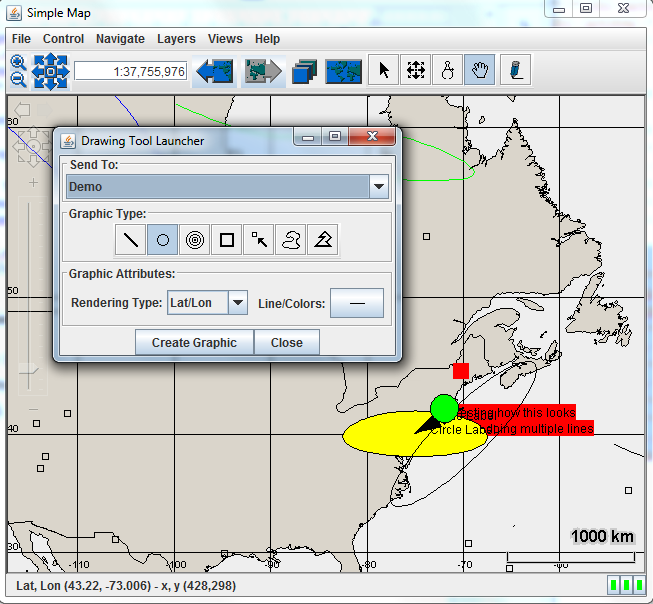
As a last component of our exhibition of the OpenMap widgets, we will see how we can draw on the map. We need to add a special layer on which we can draw, i.e. one of type OMGraphicHandlerLayer (see Listing 11).
Listing 11: openmap.properties with drawing layers
# These layers are turned on when the map is first started.  Order
# does not matter here...
openmap.startUpLayers=demo graticule shapePolitical
# Layers listed here appear on the Map in the order of their names.
openmap.layers=demo graticule shapePolitical

# ...

###
# Demo layer - the layer's palette has a bunch of buttons to call
# the Drawing Tool.
demo.class=com.bbn.openmap.layer.DemoLayer
demo.prettyName=Demo

# ...
Then, we need to add the available tools, as shown in Listing 12. The result is shown in Figure 7.
Listing 12: openmap.properties with drawing tools
openmap.components=menulist informationDelegator projFactory projectionstack toolBar zoompanel navpanel scalepanel projectionstacktool addlayer layersPanel overviewMapHandler layerHandler mouseDelegator mouseModePanel selectMouseMode navMouseMode distanceMouseMode panMouseMode omdtl omdrawingtool omlineloader omcircleloader omrectloader ompointloader omsplineloader ompolyloader

# ...

# Drawing tool parts
omdtl.class=com.bbn.openmap.tools.drawing.OMDrawingToolLauncher
omcircleloader.class=com.bbn.openmap.tools.drawing.OMCircleLoader
omdecsplineloader.class=com.bbn.openmap.tools.drawing.OMDecoratedSplineLoader
omdistloader.class=com.bbn.openmap.tools.drawing.OMDistanceLoader
omdrawingtool.class=com.bbn.openmap.tools.drawing.OMDrawingTool
omlineloader.class=com.bbn.openmap.tools.drawing.OMLineLoader
ompointloader.class=com.bbn.openmap.tools.drawing.OMPointLoader
ompolyloader.class=com.bbn.openmap.tools.drawing.OMPolyLoader
omrectloader.class=com.bbn.openmap.tools.drawing.OMRectLoader
omscalingrasterloader.class=com.bbn.openmap.tools.drawing.OMScalingRasterLoader
omsplineloader.class=com.bbn.openmap.tools.drawing.OMSplineLoader

# ...
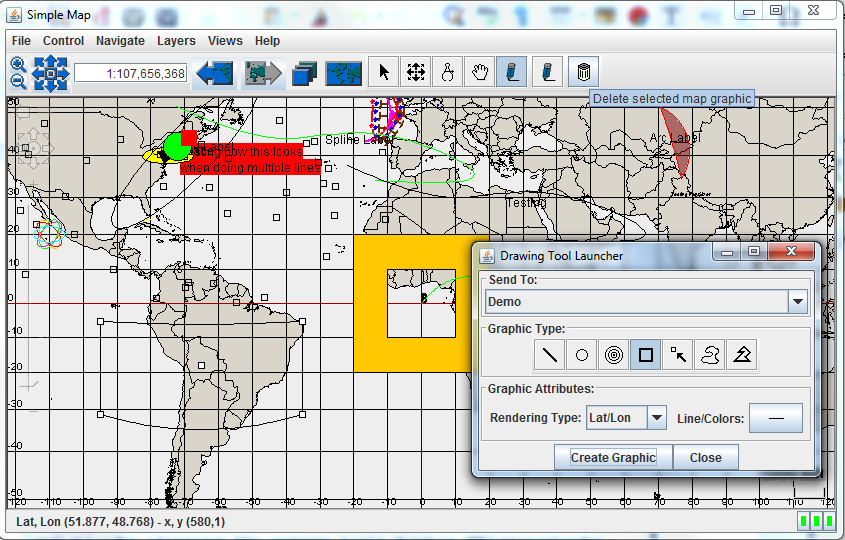
And of course, if we can draw, why not being able to delete our drawings. Perform the modifications of Listing 13 to see the result in Figure 8.
Listing 13: openmap.properties with delete button
openmap.components=menulist informationDelegator projFactory projectionstack toolBar zoompanel navpanel scalepanel projectionstacktool addlayer layersPanel overviewMapHandler layerHandler mouseDelegator mouseModePanel selectMouseMode navMouseMode distanceMouseMode panMouseMode omdtl omdrawingtool omlineloader omcircleloader omrectloader ompointloader omsplineloader ompolyloader deleteButton

# ...

# Drawing tool parts
omdtl.class=com.bbn.openmap.tools.drawing.OMDrawingToolLauncher
omcircleloader.class=com.bbn.openmap.tools.drawing.OMCircleLoader
omdecsplineloader.class=com.bbn.openmap.tools.drawing.OMDecoratedSplineLoader
omdistloader.class=com.bbn.openmap.tools.drawing.OMDistanceLoader
omdrawingtool.class=com.bbn.openmap.tools.drawing.OMDrawingTool
omlineloader.class=com.bbn.openmap.tools.drawing.OMLineLoader
ompointloader.class=com.bbn.openmap.tools.drawing.OMPointLoader
ompolyloader.class=com.bbn.openmap.tools.drawing.OMPolyLoader
omrectloader.class=com.bbn.openmap.tools.drawing.OMRectLoader
omscalingrasterloader.class=com.bbn.openmap.tools.drawing.OMScalingRasterLoader
omsplineloader.class=com.bbn.openmap.tools.drawing.OMSplineLoader
deleteButton.class=com.bbn.openmap.gui.OMGraphicDeleteTool

# ...
4. Conclusion
In this tutorial we learned about many of the OpenMap widgets by adding them step by step to the openmap.properties file. New applications can be configured there without recompilation. BeanContextChild components defined in the openmap.components property list are automatically wired together by the MapHandler. Define the layers comprising the map using the openmap.layers property list. The LayerHandler builds the map based on this list. Here is a list of the widgets we learned: OpenMapFrame, LayerHandler, MouseDelegator, OMMouseMode, InformationDelegator, ToolPanel, LayersPanel, OverviewMapHandler, AddLayerPanel, MenuList, MouseModeButtonPanel, drawing tools and DeleteButton.
In the next tutorial we shall go into more depth into the internals of OpenMap learning about layers.

Thanks a lot for this great tutorial!
Was easy to follow and now I understand a lot better Openmap than when I had just read the dev guide.
Sorry you can ignore my previous comment. The problem was coming from one of my Layer to which I had added “implements MapMouseListener”, once I deleted that the toolTips behave normally. Thanks again for the tuto!