1. Introduction
In the first tutorial we created a basic OpenMap GIS application that displays a map with one shape layer, loaded from the filesystem, inside a JFrame. That tutorial was based on com.bbn.openmap.app.example.SimpleMap. We used the following OpenMap classes in that tutorial: MapBean, PropertyHandler, ShapeLayer, com.bbn.openmap.util.SwingWorker.
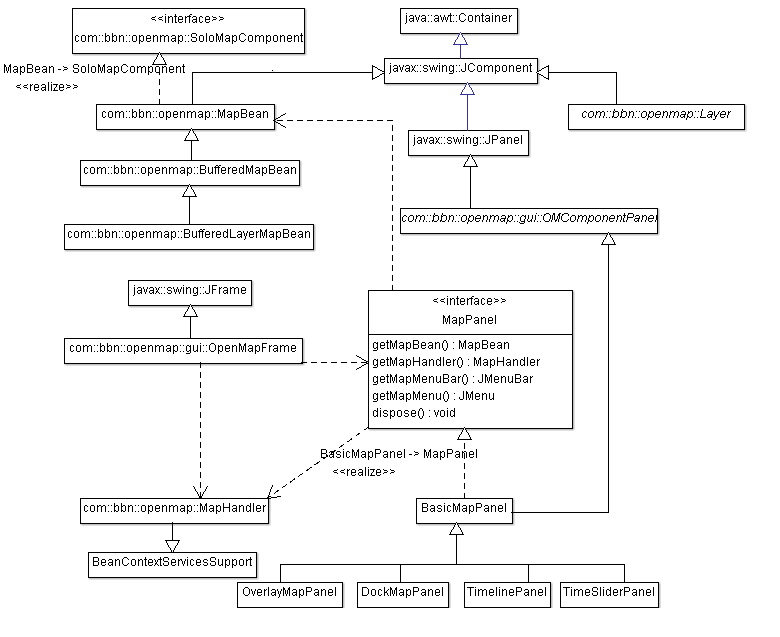
We added a MapBean to a JFrame. However, OpenMap provides its own JFrame, OpenMapFrame, which can hold a MapPanel. The MapPanel is an interface (see Figure 1) describing a component that contains a MapBean, MapHandler, menu widgets and all the other components connected to make an OpenMap map widget. A MapPanel is a self-contained OpenMap Swing component. It is expected that the MapPanel will extend from java.awt.Container, otherwise it might not be automatically added to the OpenMapFrame if it is found in the MapHandler (we talk about MapHandler later in this article).
The com.bbn.openmap.BufferedMapBean extends the MapBean by forcing its layers to paint their map features into a buffered image. This drawing buffer is then rendered whenever the Java AWT thread is called to paint the Layers. This dramatically increases performance since it avoids the (potentially expensive) Layer painting process. If a layer requests to be painted, then the drawing buffer is regenerated by the Layers and painted into the map window.
The com.bbn.openmap.BufferedLayerMapBean extends the BufferedMapBean with a special internal image buffer that holds all layers that have been designated as ‘background’ layers. This buffer is especially useful when some layers are animating moving map features and the map is getting repainted often. Using a separate buffered image for background layers greatly reduces the amount of time and work needed to render the map, increasing the rate at which the map can be updated. By default, the OpenMap application uses the BufferedLayerMapBean instead of the MapBean due to this increased performance.
2. OpenMapFrame and MapPanel
Let’s see how we can modify our MapFrame from the previous tutorial to take advantage of the above OpenMap classes:
- Modify
MapFrameso that it extendsOpenMapFrameinstead ofjavax.swing.JFrame. - Fix imports (Ctrl+I). Optionally, you may execute the application to make sure that it runs as before.
- Switch to the Design view by clicking on the Design button.
- Select and delete the
MapBeaninstance (from the Navigate window). - Drag a
BasicMapPanelonto theOpenMapFramefrom the OpenMap palette group. - Rename it to
mapPanel. - Change its layout direction to Center from the Properties window.
- Back to Source view, modify the line
mapBean.add(shapeLayer);tomapPanel.getMapBean().add(shapeLayer);.
The result is shown in Listing 1 (assuming that you chose the last implementation from Tutorial 1).
As an exercise, replace BasicMapPanel with OverlayMapPanel in step 5 above. The various MapPanels (see Figure 1) contain a BufferedLayerMapBean so you don’t need to do anything else to increase performance.
Listing 1: MapFrame Basic OpenMap application
public class MapFrame extends OpenMapFrame {

   /** Creates new form MapFrame */
   public MapFrame() {
      super("Simple Map");
      initComponents();
      initMap();
   }

  @SuppressWarnings("unchecked")
   private void initComponents() {
      mapPanel = new com.bbn.openmap.gui.BasicMapPanel();
      setDefaultCloseOperation(javax.swing.WindowConstants.EXIT_ON_CLOSE);
      getContentPane().add(mapPanel, java.awt.BorderLayout.PAGE_END);

      pack();
   }

   /** @param args the command line arguments */
   public static void main(String args[]) {

      /* Create and display the form */
      java.awt.EventQueue.invokeLater(
          () -> new MapFrame().setVisible(true)
      );
   }

   // Variables declaration - do not modify
   private com.bbn.openmap.gui.BasicMapPanel mapPanel;
   // End of variables declaration

   private void initMap() {
      CompletableFuture.supplyAsync(() -> getShapeLayer())
           .thenAcceptAsync(
                shapeLayer -> {
                   // Add the political layer to the map
                   mapPanel.getMapBean().add(shapeLayer);
                   MapFrame.this.revalidate();
      });
   }
   // ...
}
3. MapHandler
The MapHandler is a java.beans.beancontext.BeanContext which can be thought of as a big bucket that can have objects added to or removed from it. The benefit of having a BeanContext object as the center of the architecture is that it sends events to listeners when its object membership changes. Any java.beans.beancontext.BeanContextMembershipListener added to a BeanContext will receive these events, and can use the events to set up or serve connections with the objects being added or removed.
The MapHandler can be thought of as a map, complete with the MapBean, Layers, and other management components that are contained within it. It can be used by those components that need to get a handle to other objects and services. It can be used to add or remove components to the application, at run-time, and all the other objects added to the MapHandler get notified of the addition/removal automatically.
Let’s see how we could take advantage of the MapHandler. The modified initMap() is shown in Listing 2. As already mentioned, one can think of MapHandler as a big bucket where objects can be added to or removed from it. We get the MapHandler from the MapPanel. To be able to add layers to it, we need to add a LayerHandler to the MapHandler. We add the shapeLayer as well as a GraticuleLayer to it. The order is important, i.e. the layer added last is the one appearing on top. Finally, we need to add the OpenMapFrame to the MapHandler. The MapHandler is the substance that glues all these together. Check com.bbn.openmap.app.example.SimpleMap2, too.
The reason that the MapHandler exists, as opposed to simply using the BeanContext, is that it is an extended BeanContext that keeps track of SoloMapComponents (com.bbn.openmap.SoloMapComponents). SoloMapComponent is an interface that can be used on an object to indicate that there is only one instance of that component type in the BeanContext at a time. For instance, the MapBean is a SoloMapComponent, and there can be only one MapBean in a MapHandler at a time (a Highlander!). A MapHandler has a com.bbn.openmap.SoloMapComponentPolicy that tells it what to do if it gets into a situation where duplicate instances of SoloMapComponents are added. Depending on the policy, the MapHandler will reject the second instance of the SoloMapComponent (com.bbn.openmap.SoloMapComponentRejectPolicy) or replace the previous component (com.bbn.openmap.SoloMapComponentReplacePolicy).
Listing 2: initMap() using MapHandler
private void initMap() {
   try {
      // Get the default MapHandler the BasicMapPanel created.
      MapHandler mapHandler = mapPanel.getMapHandler();
      // Set the map's center
      mapPanel.getMapBean().setCenter(new LatLonPoint.Double(38.0, 24.5));
      // Set the map's scale 1:120 million
      mapPanel.getMapBean().setScale(120000000f);
      /*
       * Create and add a LayerHandler to the MapHandler. The LayerHandler
       * manages Layers, whether they are part of the map or not.
       * layer.setVisible(true) will add it to the map. The LayerHandler
       * has methods to do this, too. The LayerHandler will find the
       * MapBean in the MapHandler.
       */
       mapHandler.add(new LayerHandler());

       CompletableFuture.supplyAsync(() -> getShapeLayer())
          .thenAcceptAsync(
             shapeLayer -> {
                  // Add the political layer to the map
                  mapHandler.add(shapeLayer);
                  mapHandler.add(new GraticuleLayer());
                  MapFrame.this.revalidate();
             });
         // Add the map to the frame
         mapHandler.add(this);
    } catch (MultipleSoloMapComponentException msmce) {
         // The MapHandler is only allowed to have one of certain
         // items. These items implement the SoloMapComponent
         // interface. The MapHandler can have a policy that
         // determines what to do when duplicate instances of the
         // same type of object are added - replace or ignore.

         // In this example, this will never happen, since we are
         // controlling that one MapBean, LayerHandler,
         // MouseDelegator, etc is being added to the MapHandler.
      }
}
However, many things are missing from this basic application. E.g. no actions on the map, like zoom in/out, pan etc., can be performed. But they can be easily added with the help of the MapHandler. Simply add the relevant handlers to the MapHandler inside the try-catch block of initMap() as shown in Listing 3. You can now zoom in/out with the middle mouse wheel and pan the map with the left mouse button.
Listing 3: initMap() with the addition of mouse events
private void initMap() {
   //...
   // Add MouseDelegator, which handles mouse modes (managing mouse
   // events)
   mapHandler.add(new MouseDelegator());
   // Add OMMouseMode, which handles how the map reacts to mouse
   // movements
   mapHandler.add(new OMMouseMode());
   //...
}
So far we have seen how to use: MapBean, MapHandler, LayerHandler, PropertyHandler, ShapeLayer, GraticuleLayer, OpenMapFrame.
4. openmap.properties
However, OpenMap is even more flexible than that. With the help of BeanContext technology, we can define the components that consist our application in a properties file, openmap.properties. We have already created an openmap.properties in our application that contains properties for ESRI shape layers. The properties file can contain properties scoped for a particular component. Scoping is performed using a property prefix, so the properties can be defined as:
prefix.property=value
Let’s begin by prefixing our existing properties and see what modifications are required in our code.
shapePolitical.prettyName=Political Solid
shapePolitical.lineColor=000000
shapePolitical.fillColor=BDDE83
shapePolitical.shapeFile=resources/map/shape/dcwpo-browse.shp
shapePolitical.spatialIndex=resources/map/shape/dcwpo-browse.ssx
PropertyHandler has support for prefixes as shown in bold in Listing 5. In the next tutorial we shall see how useful is property scoping. Since the next part will be quite extensive, better to break it here.
Listing 5: PropertyHandler with prefixes support
private ShapeLayer getShapeLayer() {
   PropertyHandler propertyHandler = null;
   try {
      propertyHandler = new PropertyHandler.Builder().setPropertiesFile("./openmap.properties").setPropertyPrefix("shapePolitical").build();
   } catch (IOException ex) {
      Logger.getLogger(MapFrame.class.getName()).log(Level.SEVERE, null, ex);
   }
   //ShapeLayer:
   ShapeLayer shapeLayer = new ShapeLayer();
   if (propertyHandler != null) {
        shapeLayer.setProperties(propertyHandler.getPropertyPrefix(), propertyHandler.getProperties(propertyHandler.getPropertyPrefix()));
   }
   return shapeLayer;
}
5. Conclusion
In this tutorial we learned how to use: MapBean, MapHandler, LayerHandler, PropertyHandler, ShapeLayer, GraticuleLayer, OpenMapFrame. We also saw the flexibility provided by the openmap.properties file. New applications can be configured there without recompilation. In the next tutorial we shall see how to do this without the need to recompile our application.
