This article is part of our Academy Course titled Redis a NoSQL key-value store.
This is a crash course on Redis. You will learn how to install Redis and start up the server. Additionally, you will mess around with the Redis command line. More advanced topics follow, such as replication, sharding and clustering, while the integration of Redis with Spring Data is also explained. Check it out here!
Table Of Contents
1. Introduction
The amount of data we are dealing with is growing exponentially every single day. Very often we are facing hardware limits for a single box when the necessary data cannot fit in memory and even the physical storage is not enough anymore. Over the years those problems led the industry to develop data sharding (or data partitioning) solutions which allow to overcome such a limits.
In Redis, data sharding (partitioning) is the technique to split all data across multiple Redis instances so that every instance will only contain a subset of the keys. Such a process allows mitigating data grown by adding more and more instances and dividing the data to smaller parts (shards or partitions). Not only that, it also means that more and more computation power is available to handle your data, effectively supporting horizontal scaling.
Although, not everything is a win-win solution, there are trade-offs to consider: by splitting the data across many instances, the problem of looking up the particular key (or keys) becomes an issue. That is where the sharding (partitioning) scheme comes into picture: data should be sharded (partitioned) following some consistent or fixed rules so the write and read operations for the same key should go to the Redis instance which holds (owns) this key.
The material of this tutorial is based on excellent Redis documentation related to sharding and partitioning: http://redis.io/topics/partitioning
2. When to Use Sharding (Partitioning)
According to Redis documentation (http://redis.io/topics/partitioning) you should consider to shard (partition) your data if you want to:
- manage much larger databases, using the memory of many computers (otherwise you are limited to the amount of memory a single computer can support)
- scale the computational power across multiple CPUs, multiple computers and utilize their network bandwidth
If you think you do not have data scaling problem now, you may have it in very near future so better to be prepared and think ahead (please refer to Planning for Sharding (Partitioning)). But before doing so, please take into account the complexities and disadvantages that sharding (partitioning) puts on the table:
- Operations involving multiple keys are usually not supported. For instance it is not possible to directly perform the intersection between two sets (
SINTER) if they are stored in keys that are mapped to different Redis instances. - Transactions involving multiple keys mapped to different Redis instances are not possible.
- The partitioning is the key-based, so it is not possible to shard (partition) a dataset with a single huge key (very big sorted set or list).
- Backup and persistent management is much more complicated: you have to deal with multiple RDB / AOF files, backup involves aggregation (merging) of the RDB files from many instances.
- Adding and removing instances at runtime can causes data misbalancing unless you have planned for that (see please Planning for Sharding (Partitioning)).
3. Sharding (Partitioning) Schemes
There are several battle-proved sharding (partitioning) schemes which could be used with Redis, depending on your data patterns.
- range partitioning
It is accomplished by mapping ranges of objects into specific Redis instances. For example, let’s assume we are storing some user data and every user has its unique identifier (ID). In our partitioning scheme, we could define that users from with ID from 0 to 10000 will go into instance Redis 1, while users with ID from 10001 to 20000 will go into instance Redis 2 and so forth. The disadvantage of this scheme is that the mapping between ranges and instances should be maintained and there should be as many such mappings as kinds of the objects (users, products, …) which are kept in Redis. - hash partitioning
This scheme works for any key but involves hash function: this function should map a key name into some number. Assuming we have such a function (let’s call ithash_func), such a scheme works like this:- take the key name and map it to a number using the
hash_func - map the resulting number into Redis instance (for example, using divide by module operation)
The choice of hash function is very important. The good hash function ensures that the keys are spread evenly across all Redis instances so it doesn’t build up too much on any individual instance.
- take the key name and map it to a number using the
- consistent hashing
It’s an advanced form ofhash partitioning, widely used by many solutions for data sharding (partitioning).
4. Sharding (Partitioning) Implementations
From implementation standpoint, there are several possible implementations for data sharding (partitioning), depending on architecture on the application:
- client side partitioning
The clients directly select the right instance to write or read a given key. - proxy assisted partitioning
The clients send requests to a proxy that supports Redis protocol, instead of sending requests directly to the right Redis instances. The proxy will make sure to forward the requests to the right Redis instances accordingly to the configured partitioning scheme, and will send the replies back to the clients (the most known implementation isTwemproxyfrom Twitter, https://github.com/twitter/twemproxy). - query routing
The clients send the query to a random Redis instance and the instance will make sure to forward the query to the right one. The hybrid form of query routing assumes that client gets redirected to the right instance (but the query is not directly forwarded from one Redis instance to another) and will be covered in part 5 of the tutorial, Redis Clustering.
5. Planning for Sharding (Partitioning)
As we mentioned before, once you start to use data sharding (partitioning) across many Redis instances, adding and removing instances at runtime could be difficult. The one technique you often may employ with Redis is referred as Presharding (http://redis.io/topics/partitioning).
The idea of presharding is to start with a lot of instances since the beginning (but have single or very small number of actual nodes / servers). The number of instances may vary and could be quite big since the start (32 or 64 instances could be sufficient to most use cases). It is totally possible to have 64 instances of Redis running on a single server as Redis is extremely lightweight.
In this way as the data storage needs grow and more Redis nodes / servers are required to handle it, it is possible to simply move instances from one server to another. For example, if you have a single server and add additional one, the half of the Redis instances from the first server should be moved to the second one. This trick may continue up to the point when you have one Redis instance per server / node.
One thing to keep in mind though: if you use Redis as in memory cache for your data (not as a persistent data store), you may not need to use presharding. Consistent hashing implementations are often able to handle new or removed instances at runtime. For example, if the preferred instance for a given key is not available, the key will be picked up by other instances. Or, if you add a new instance, part of the new keys will be stored on this new instance.
6. Sharding (Partitioning) and Replication
Sharding (partitioning) the data across many instances doesn’t solve data safety and redundancy problem. If a one of the shards (partitions) dies due to hardware failure and you don’t have a backup to restore data from, it means you lost your data forever.
That is why sharding (partitioning) goes side by side with replication. If you use Redis as persistent data store, it is a good idea to have at least one replica configured for every shard (partition) on a different server / node. It may double your capacity requirements but to have your data safe is much more important.
The configuration for replication is not any different from what we have covered in part 3 of the tutorial, Redis Replication.
7. Sharding (Partitioning) with Twemproxy
Twemproxy (also known as nutcracker), developed and open-sourced by Twitter (https://github.com/twitter/twemproxy), is widely used, very fast and lightweight proxy for Redis. Although it has many features, the ones we are going to look at are related to its capability to add sharding (partitioning) to Redis:
- shard data automatically across multiple servers
- supports multiple hashing modes including consistent hashing and distribution
Twemproxy (nutcracker) is pretty easy to install and configure. The latest release as of this tutorial is 0.3.0 and can be downloaded from http://code.google.com/p/twemproxy/downloads/list. Installation is pretty straightforward.
- Download
wget http://twemproxy.googlecode.com/files/nutcracker-0.3.0.tar.gz
- Unpack the archive
tar xfz nutcracker-0.3.0.tar.gz
- Build (the only preinstalled packages you need are
gccandmake).cd nutcracker-0.3.0 ./configure make
- Install
sudo make install
By default, twemproxy (nutcracker) will be located at /usr/local/sbin/nutcracker. Having it installed, the most important (however, quite simple) part is its configuration.
Twemproxy (nutcracker)uses YAML as a configuration file format (http://www.yaml.org/). Among many settings supported by twemproxy (nutcracker) we will pick the ones relevant to sharding (partitioning).
| Setting | listen: name:port | ip:port |
| Description | The listening address and port (name:port or ip:port) for this server pool. |
| Example | listen: 127.0.0.1:22121 |
Table 1
| Setting | hash: <function> |
| Description | The name of the hash function. Possible values are:
– one_at_a_time – md5 (http://en.wikipedia.org/wiki/MD5) – crc16 (http://en.wikipedia.org/wiki/Cyclic_redundancy_check) – crc32 (crc32 implementation compatible with libmemcached) – crc32a (correct crc32 implementation as per the spec) – fnv1_64 (http://en.wikipedia.org/wiki/Fowler–Noll–Vo_hash_function) – fnv1a_64 (http://en.wikipedia.org/wiki/Fowler–Noll–Vo_hash_function) – fnv1_32 (http://en.wikipedia.org/wiki/Fowler–Noll–Vo_hash_function) – fnv1a_32 (http://en.wikipedia.org/wiki/Fowler–Noll–Vo_hash_function) – hsieh (http://www.azillionmonkeys.com/qed/hash.html) – murmur (http://en.wikipedia.org/wiki/MurmurHash) – Jenkins (http://en.wikipedia.org/wiki/Jenkins_hash_function) |
| Example | hash: fnv1a_64 |
Table 2
| Setting | distribution: <mode> |
| Description | The key distribution mode (see please http://en.wikipedia.org/wiki/Consistent_hashing). Possible values are:
– ketama – modula – random |
| Example | distribution: ketama |
Table 3
| Setting | redis: true |false |
| Description | A boolean value that controls if a server pool speaks Redis or Memcached protocol. As we will use only Redis, this setting should be set to true. Defaults to false. |
| Example | redis: true |
Table 4
| Setting | auto_eject_hosts: true | false |
| Description | A boolean value that controls if server should be ejected temporarily when it fails consecutively server_failure_limit times. Defaults to false. |
| Example | auto_eject_hosts: false |
Table 5
| Setting | server_retry_timeout: <milliseconds> |
| Description | The timeout value in milliseconds to wait for before retrying on a temporarily ejected server, when auto_eject_host is set to true. Defaults to 30000 milliseconds. |
| Example | server_retry_timeout: 30000 |
Table 6
| Setting | server_failure_limit: <number> |
| Description | The number of consecutive failures on a server that would lead to it being temporarily ejected when auto_eject_host is set to true. Defaults to 2. |
| Example | server_failure_limit: 2 |
Table 7
| Setting | servers:
– name:port:weight | ip:port:weight – name:port:weight | ip:port:weight |
| Description | A list of server address, port and weight (name:port:weight or ip:port:weight) for particular server pool. |
| Example | servers:
– 127.0.0.1:6379:1 – 127.0.0.1:6380:1 |
Table 8
We will build a simple topology with three Redis instances (server pool) and configure twemproxy (nutcracker) in front of them as is shown on the picture below:
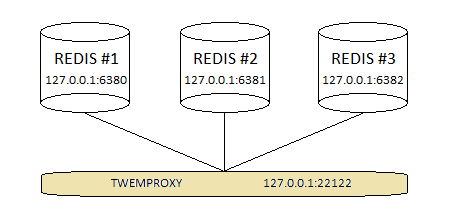
The conf/nutcracker.yml file from twemproxy (nutcracker) distribution is a good start to look for a different configuration examples. As for the demonstration, we will start off with following sharded server pool, reflecting the topology shown above.
File nutcracker-sharded.yml:
sharded:
    listen: 127.0.0.1:22122
    hash: fnv1a_64
    distribution: ketama
    auto_eject_hosts: true
    redis: true
    server_retry_timeout: 2000
    server_failure_limit: 2
    servers:
       - 127.0.0.1:6380:1
       - 127.0.0.1:6381:1
       - 127.0.0.1:6382:1
The sharded server pool uses ketama consistent hashing for key distribution with the key hasher set to fnv1a_64.
Before starting the twemproxy (nutcracker), we should have all three Redis instances up and running on ports 6380, 6381 and 6382.
redis-server --port 6380
redis-server --port 6381
redis-server --port 6382
After that, the instance of twemproxy (nutcracker) with the sample configuration could be started using command:
nutcracker -c nutcracker-sharded.yml

The simplest way to verify sharding (partitioning) in action is to connect to twemproxy (nutcracker), store couple of key / value pairs and then try to get all stored keys from every Redis instance: each key should be returned by one and only one instance, others should return (nil). Although, querying the same keys from twemproxy (nutcracker) will always result to previously stored value. As per our sample configuration, twemproxy (nutcracker) is listening on port 22122 and can be connected using regular redis-cli tool. The three keys userkey, somekey and anotherkey will be set to some values.
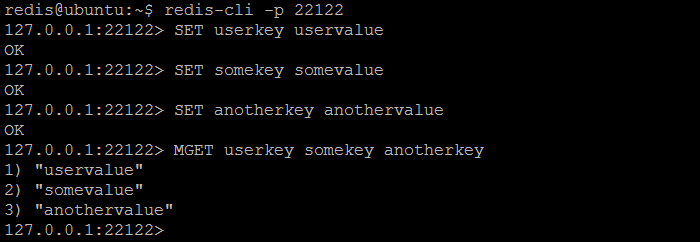
Now, if we query each individual Redis instance from our twemproxy (nutcracker) server pool, some of the keys (userkey, somekey, anotherkey) will be resolved by some instances but not by others.


userkey stored

somekey and anotherkey stored
The interesting question could be asked: why the keys are stored in this way? The answer is the configured hash function: the keys are distributed consistently across all Redis instances in the server pool. But in order to have the balanced (even or random) distribution, the configured hash function should be very carefully chosen with respect to key naming patterns used by application. As our example demonstrates, the keys are not evenly distributed across all instances (first instance has nothing, second one has one key and third one has two keys).
The last note of caution: though twemproxy (nutcracker) does support Redis protocol, not all commands are supported due to limitation discussed in When to Use Sharding (Partitioning) section.
For more details about twemproxy (nutcracker) please refer to https://github.com/twitter/twemproxy, it has great, up-to-date documentation available.
8. What’s next
In this section we have covered only one way how to tackle sharding (partitioning) in Redis. In part 5 coming next, Redis Clustering, we will discover the alternative solutions.

Last thing first, glad your clustering discussion points out it’s experimental. Note that does not use consistent hashing and you should ask why. Moreover, it’s worthwhile reviewing the comments related to that five-year mission that concluded with a failed experiment. I believe that distributed clustering is probably better left with distributed computing and networking model experts (e.g., Twemproxy developers) versus computer hobbyists. Now, you mention that if you’re using Redis as an in-memory cache that you will not need to shard the data. Can you offer a rational explanation for that claim? It comes across as nonsense to anybody with… Read more »
Hi Rick, Thanks a lot for your comments. As you may notice, this is not a general discussion about distributed systems, clustering or/and consistent hashing but just an article about Redis way to tackle the problem. Does it work or not, is it failed experiment or not – it is what it is and this is how Redis does it. With respect to your comment “Now, you mention that if you’re using Redis as an in-memory cache that you will not need to shard the data.”, I am wondering where exactly did you find this statement in the article? The… Read more »