This article is part of our Academy Course titled Redis a NoSQL key-value store.
This is a crash course on Redis. You will learn how to install Redis and start up the server. Additionally, you will mess around with the Redis command line. More advanced topics follow, such as replication, sharding and clustering, while the integration of Redis with Spring Data is also explained. Check it out here!
Table Of Contents
1. Introduction
This final part of the tutorial is dedicated to newest and coolest but still experimental (not ready for production) feature of Redis – clustering. The material of this part is heavily based on Redis documentation sections, http://redis.io/topics/cluster-tutorial and http://redis.io/topics/cluster-spec. Redis clustering (or simply Redis Cluster) is a distributed Redis deployment which is aiming to tackle the following principal goals:
- ability to automatically split the dataset among multiple nodes
- ability to provide high performance and linear scalability
- ability to retain all the writes originating from clients connected with the majority of the nodes (write safety/consistency)
- ability to survive the network partitions where the majority of the master nodes are reachable and there is at least a reachable slave for every master node that is no longer reachable (availability)
Redis Cluster is the alternative (but much more advanced) solution to data sharding (partitioning) which we have seen in part 4 of this tutorial, Redis Sharding (but instead of using third-party tools, all the functionality is provided by Redis itself with the additional configuration). In order to be highly available, Redis Cluster is also heavily relies on master – slave replication which we have seen in part 3 of the tutorial, Redis Replication.
2. Redis Clustering Limitations
First and foremost, all features related to Redis Cluster are in experimental mode, not ready for production usage just yet.
Building any highly available distributed system is very hard but Redis is trying to make it possible. There are a couple of limitations to be aware of and trade-offs to make, some of them we have already mentioned but it worth to repeat them here as well.
Firstly, commands dealing with multiple keys are not supported by the Redis Cluster (SINTER, SUNION, …). Such functionality would require moving data between Redis nodes which is going to make Redis Cluster not able to provide acceptable performances and predictable behavior under load. In general all the operations where keys are not available in the Redis node processing the command are not implemented.
Secondly, Redis Cluster does not support multiple databases like the standalone version of Redis. There is only one database 0 and SELECT is not allowed.
Thirdly, the nodes in the Redis Cluster do not proxy commands to the right nodes storing a given key but instead they redirect clients to the right nodes serving a given range of the key space (a hybrid form of so-called query routing). Eventually, clients obtain an up-to-date representation of the cluster topology and, knowing which node serves which subset of keys, may directly contact the right nodes in order to send a given command (effectively falling back to client side partitioning).
3. Sharding (Partitioning) Scheme
As we already know from part 4, Redis Sharding, there are a couple of data sharding (partitioning) schemes used for splitting the data with consistent hashing being the most advanced and widely used. Redis Cluster does not use consistent hashing but a different form of data split with every key being a part of what is called a hash slot.
There are 16384 hash slots in Redis Cluster and to compute what is the hash slot of a given key, the CRC16 function (http://en.wikipedia.org/wiki/Cyclic_redundancy_check) of the that key is calculated, and then the modulo of 16384 is applied to its result.
Every node in a Redis Cluster is responsible of a subset of the hash slots. As an example, let’s consider a cluster with four Redis nodes #1, #2, #3 and #4. That may give us the following hash slots distribution:
- Redis node #1 contains
hash slotsfrom 0 to 4096 - Redis node #2 contains
hash slotsfrom 4097 to 8192 - Redis node #3 contains
hash slotsfrom 8193 to 12288 - Redis node #4 contains
hash slotsfrom 12289 to 16383
Such a sharding (partitioning) scheme allows to change the topology (add and remove nodes) of the cluster easily. For example, if there is a need to add a new node #5, some hash slots from nodes #1, #2, #3 and #4 should be moved to node #5. Similarly if there is need to remove node #3 from the cluster, the hash slots served by node #3 should be moved to nodes #1 and #2. When the node #3 becomes empty, it could be removed from the cluster permanently.
Now the best part: because moving the hash slots from the one node to another does not require stopping the ongoing operations, adding and removing nodes (or changing the percentage of hash slots hold by the nodes) does not require any downtime.
Later in this tutorial we will get back to this example and build the actual cluster with three Redis master nodes (each backed by one slave). While Redis Cluster is operating, we will add and remove some nodes to see how hash slots could be redistributed live.
3.1 Keys hash tags
Very interesting feature supported by Redis sharding (partitioning) scheme is so called key hash tags. Hash tags are a technique to ensure that two (or more) keys are allocated in the same hash slot.
In order to support hash tags, the hash slot is computed in a different way. If the key contains a “{…}” pattern then only the substring between “{“ and “}” is hashed in order to obtain the hash slot (in case of the multiple occurrences of “{“ or” “}” in the key name, some rules are taken place and are described at http://redis.io/topics/cluster-spec).
Twemproxy (nutcracker) which we played with in part 4, Redis Sharding, also allows to configure hash tags to be used for keys hashing, following the same set of rules.
4. Redis Clustering in Nutshell
In the Redis Cluster all the nodes are holding some part of global keyset (shard or partition). Additionally, each node holds the state of the cluster including hash slots mappings so to redirect clients to right node for the given key. All nodes in the Redis Cluster are also able to auto-discover other nodes, detect nodes which are unreachable or don’t work as expected, and perform slave nodes to master election when required.
As for implementation details described at http://redis.io/topics/cluster-spec, all nodes in the cluster are connected using a TCP with a binary protocol (the cluster bus) so that every node is connected to every other node in the cluster using the cluster bus (it means that in the Redis Cluster of N nodes, every node has N – 1 outgoing TCP connections, and N – 1 incoming TCP connections). These TCP connections are kept alive all the time. Nodes use a gossip protocol (http://en.wikipedia.org/wiki/Gossip_protocol) to spread the cluster state, to discover new nodes, to make sure all nodes are working properly, and to propagate publish/subscribe messages across the cluster.
Every node in the Redis Cluster has a unique ID (name). The node ID (name) is the hex representation of a 160 bit random number, obtained the first time a node is started. The node will save its ID (name) in the node configuration file (by default, nodes.conf), and will use the same ID (name) forever (or at least as long as the node configuration file is not removed).
The node ID (name) is used to identify every node across the whole Redis Cluster. It is possible for a given node to change its IP address without any need to also change its ID (name). The cluster is also able to detect the change in IP or/and port and broadcast this information using the gossip protocol running over the cluster bus. Additionally, every node has some other associated with it information that all the other nodes in the Redis Cluster should know:
- the IP address and TCP port where the node is located
- a set of flags (master, slave, …)
- a set of
hash slotsserved by the node (see please Sharding (Partitioning) Scheme) - last time the ping packet was sent using the cluster bus
- last time the pong packet was received in reply
- the time at which the node was flagged as failing
- the number of slaves of this node
- the master node ID (name), if this node is a slave (or zeroes if it is a master node)
Some of this information is available using the CLUSTER NODES command (see please section Redis Cluster Commands).
5. Consistency, availability and scalability
Redis Cluster is a distributed system. Good distributed systems are scalable and are able to provide better performance at scale. But still, in any distributed system any component can fail at any time and the system should provide some guarantees in case such failures happen (especially if it is a data store). In this section we will just briefly look through some high-level trade-offs Redis makes with respect to consistency, availability and scalability. Much deeper insights and details could be found at http://redis.io/topics/cluster-spec and http://redis.io/topics/cluster-tutorial. Please note that Redis Cluster evolves very rapidly and some guarantees discussed in this section may not hold true anymore.
5.1 Consistency
Redis Cluster is not able to guarantee strong consistency but it tries hard to retain all the writes that are performed by the clients. Unfortunately, it is not always possible. Because Redis Cluster uses asynchronous replication between master and slave nodes, there are always time windows when it is possible to lose writes during network partitions. If the master node dies without the write reaching the slave nodes, the write is lost forever (in case the master is unreachable for a long period of time and one of its slaves is promoted to become a master).
5.2 Availability
Redis Cluster is not available in the minority side of the network partition. In the majority side of the network partition assuming that there are at least the majority of masters and a slave for every unreachable master, the Redis cluster is still available. It means that Redis Cluster can survive failures of a few nodes in the cluster, but it cannot survive the large network partitions. For the example, let us consider the Redis cluster with N master nodes (M1, M2, M3) and N slave nodes (S1, S2, S3, with every master having exactly one slave node). If any single master node becomes unreachable (let us assume it is M2) because of network partition, the majority of the cluster will still remain available (and S2 will be promoted to become a master). Later, if any other master or slave node becomes unreachable (except S2) the cluster will still be available. However note that if node S2 fails for some reason, Redis Cluster is not able to continue to operate anymore (because both master M2 and slave S2 are not available).
5.3 Scalability
We already know from section Sharding (Partitioning) Scheme that Redis Cluster nodes do not forward commands to the right node for a given key but redirect clients instead. The clients eventually obtain a complete mapping which nodes serve which subset of keys and may directly contact the right nodes. Because of that, Redis Cluster is able to scale linearly (adding more nodes leads to better performance) as all supported operations are handled exactly in the same way as in the case of a single Redis instance with no additional overhead.
6. Installing Redis with Clustering Support
Redis Cluster is currently available in unstable releases only. The latest unstable release at the moment of writing is 3.0.0-beta1 and can be downloaded from http://redis.io/download. Please note that only Linux distributions are provided, Windows port is not available yet.
The installation of Redis distribution with the clustering is no different from the regular Redis installation described in the part 1 of the tutorial, Redis Installation and follows the same steps:
wget https://github.com/antirez/redis/archive/3.0.0-beta1.tar.gz
tar xf 3.0.0-beta1.tar.gz
cd redis-3.0.0-beta1/
make
make test
sudo make install
After the last step, the usual Redis executables will be installed in /usr/local/bin folder.
7. Configuring Redis Cluster
Redis Cluster cannot be created using normal Redis instances and regular configuration. Instead, a couple of empty Redis instances should be running in special cluster mode. In order to do that, the instance should be run with cluster-specific configuration (the cluster-enabled directive should be set to “yes” in the configuration file) so to enable the cluster-specific features and commands.
The minimal set of settings required to run some Redis instance with cluster mode support includes the following ones.
cluster-enabledyes (default: no)
Enables Redis cluster mode for this instancecluster-config-file nodes.conf(default: nodes.conf)
The path to a file where the configuration of this instance is stored. This file should be never touched and is simply generated at startup by the Redis Cluster instances and updated every time it is needed (see please section Redis Clustering in Nutshell)cluster-node-timeout5000
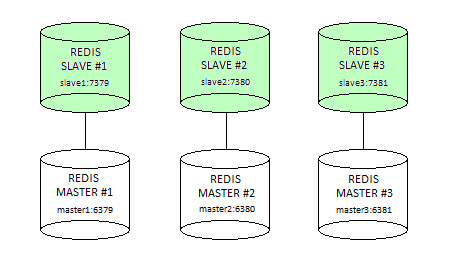
The timeout (in milliseconds) after which a non-responding instance is considered to be failing by the failure detection algorithm. As we mention in section Sharding (Partitioning) Scheme, we are going to configure and run a live Redis cluster with three Redis master nodes (master1,master2,master3) each backed by Redis slave node (slave1,slave2,slave3) as shown on a picture below.
Along the way we will explore most of the Redis cluster features but before that let us start with configuration for masters and slaves. To keep the configuration simple enough, we will start with bare minimum settings required for cluster to operate normally.
7.1 Configure Redis Cluster master nodes
The minimal configuration for Redis master nodes looks like that:
- Redis node
master1(redis-master1.conf)port 6379 cluster-enabled yes cluster-config-file nodes.conf cluster-node-timeout 5000 appendonly yes - Redis node
master2(redis-master2.conf)port 6380 cluster-enabled yes cluster-config-file nodes.conf cluster-node-timeout 5000 appendonly yes - Redis node
master3(redis-master3.conf)port 6381 cluster-enabled yes cluster-config-file nodes.conf cluster-node-timeout 5000 appendonly yes
Having configuration files ready, we can start our Redis master nodes one by one providing the configuration as command line parameter.
- redis-server redis-master1.conf

Figure 2. Redis master1 node is running in cluster mode - redis-server redis-master2.conf

Figure 3. Redis master2 node is running in cluster mode - redis-server redis-master3.conf

Figure 4. Redis master3 node is running in cluster mode
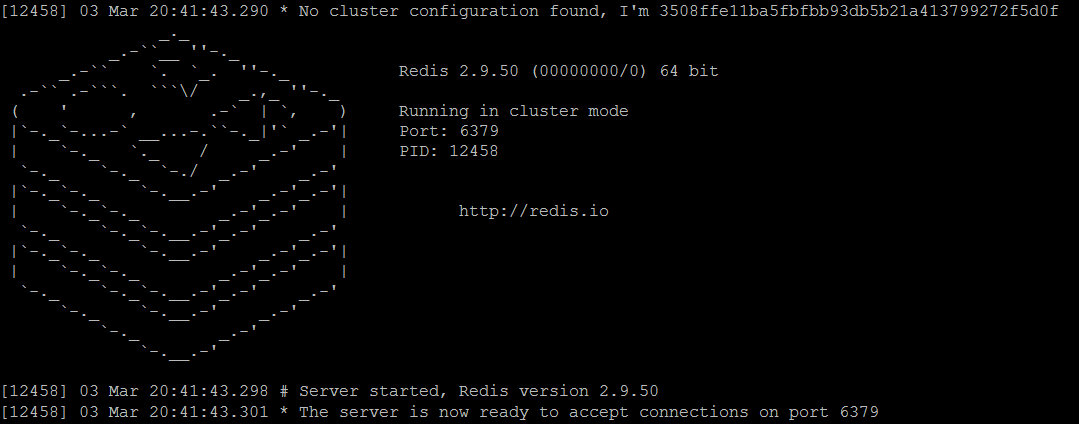
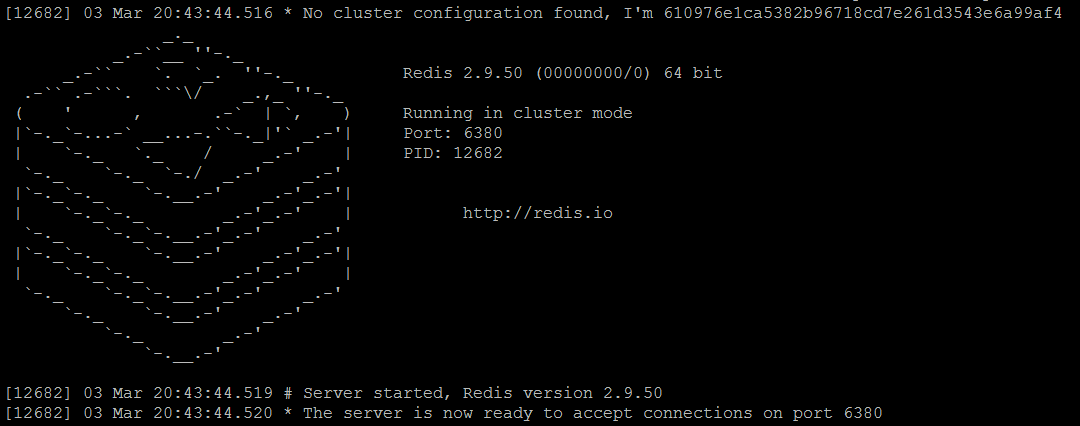
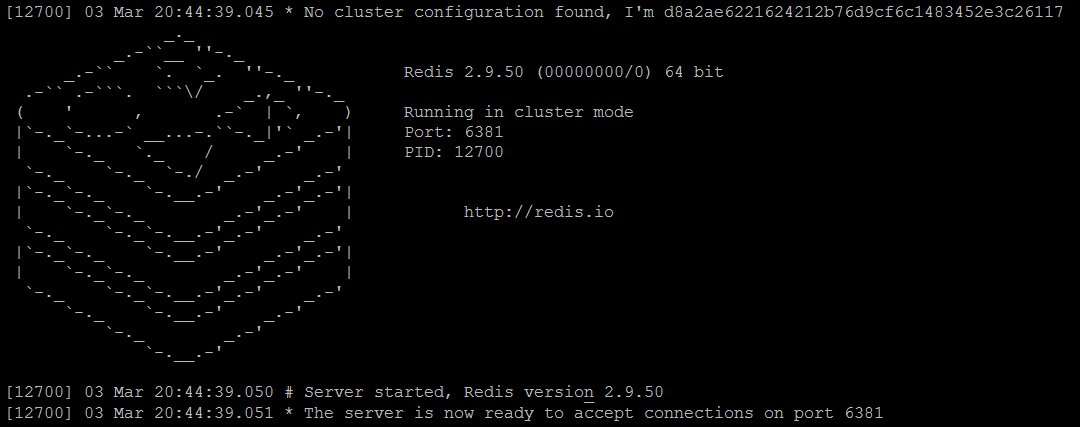
Comparing to console output of the standalone Redis instances, there are a couple of well-noticeable differences:
- upon start, each node generates its
unique ID(name) as we discussed in Redis Clustering in Nutshell, please note that this value will be generated only at first run and then reused - every instance is running in
cluster mode - also, for every running instance there is a file
nodes.confcreated with currentnode ID(name) and some additional information
At this moment we have three Redis master nodes running in a cluster mode but actually not yet forming a cluster (every Redis master node sees only itself but not others). To verify that, we can run CLUSTER NODES command (see please Redis Cluster Commands section) on each instance individually and observe it is really the case.

In order to form a cluster, the Redis nodes (running in cluster mode) should be connected together by CLUSTER MEET command (see please Redis Cluster Commands section). Unfortunately, the command accepts IP addresses only but not hostnames. In our topology master1 has IP address 192.168.1.105, master2 has 192.168.2.105 and master3 has 192.168.3.105. Having IP addresses, let us issue the command against master1 node.

CLUSTER MEET command
Now, if we rerun CLUSTER NODES command, the result should be quite different.

CLUSTER NODES on each Redis master node confirms that each node sees all other nodes (effectively forming a cluster).
CLUSTER NODES on each Redis master node confirms that each node sees all other nodes (effectively forming a cluster).
CLUSTER NODES on each Redis master node confirms that each node sees all other nodes (effectively forming a cluster).
The output of the CLUSTER NODES command is looking a bit cryptic and requires some explanation what each column means.
| Column 1 | Node ID (name) |
| Column 2 | IP:port of the node |
| Column 3 | Flags: master, slave, myself, fail, … |
| Column 4 | If it is a slave, the Node ID (name) of the master |
| Column 5 | Time of the last pending PING still waiting for a reply |
| Column 6 | Time of the last PONG received |
| Column 7 | Configuration epoch for this node (see the please http://redis.io/topics/cluster-spec) |
| Column 8 | Status of the link to this node |
| Column 9 | Hash slots served |
Table 1
The last column, Hash Slots served, is not set in the output and there is a reason why: we have not assigned hash slot to the master nodes yet and that is what we are going to do now. Hash slots could be assigned to the nodes by using CLUSTER ADDSLOTS (see please Redis Cluster Commands) command on a particular cluster node (and unassigned using CLUSTER DELSLOTS respectively). Unfortunately, it is not possible to assign hash slot ranges (like 0-5400) but instead each hash slot (out of total 16384) should be assigned individually. One of the simplest ways to overcome this limitation is to use a bit of shell scripting. As we have only three Redis master nodes in the cluster, the range of 16384 hash slots could be split like this:
- Redis node
master1containshash slots0 – 5400for slot in {0..5400}; do redis-cli -h master1 -p 6379 CLUSTER ADDSLOTS $slot; done; - Redis node
master2containshash slots5401 – 10800for slot in {5400..10800}; do redis-cli -h master2 -p 6380 CLUSTER ADDSLOTS $slot; done; - Redis node
master3containshash slots10801 – 16383for slot in {10801..16383}; do redis-cli -h master3 -p 6381 CLUSTER ADDSLOTS $slot; done;
If we rerun CLUSTER NODES command once more, the last column will be filled with appropriate hash slots served by each master node (exactly matching the hash slot ranges we have assigned to the nodes before).

CLUSTER NODES shows hash slots served by each master node
7.2 Configure Redis Cluster slave nodes and replication
To make our Redis cluster complete, we need to add to each running Redis master node exactly one slave node. Though part 3 of this tutorial, Redis Replication, covers replication configuration well enough, the Redis cluster does it differently. From the beginning, the procedure to run and configure slaves is no different from the master one (the only difference is the port number).
- Redis node
slave1(redis- slave1.conf)port 7379 cluster-enabled yes cluster-config-file nodes.conf cluster-node-timeout 5000 appendonly yes - Redis node
slave2(redis-slave2.conf)port 7380 cluster-enabled yes cluster-config-file nodes.conf cluster-node-timeout 5000 appendonly yes - Redis node
slave3(redis-slave3.conf)port 7381 cluster-enabled yes cluster-config-file nodes.conf cluster-node-timeout 5000 appendonly yes
Let us start all three slave instances followed by CLUSTER MEET command so every node will join our running Redis cluster.
redis-server redis-slave1.conf
redis-server redis-slave2.conf
redis-server redis-slave3.conf
As CLUSTER MEET requires IP address, our slave1 has IP address 192.168.4.105, slave2 has 192.168.5.105 and slave3 has 192.168.6.105.
redis-cli -h master1 -p 6379 CLUSTER MEET 192.168.4.105 7379
redis-cli -h master1 -p 6379 CLUSTER MEET 192.168.5.105 7380
redis-cli -h master1 -p 6379 CLUSTER MEET 192.168.6.105 7381
As always, using CLUSTER NODES command we can see the current nodes in the Redis cluster (with total of six). The output shows all nodes as being masters.

CLUSTER NODES shows all six nodes as masters
To configure the replication, the new CLUSTER REPLICATE command should be executed on each Redis slave by providing master Node ID (name). Following tables summarize all the required pieces for replication together (by consulting the result of CLUSTER NODES command output).
| Master Host | master1 |
| Master Node ID | 3508ffe11ba5fbfbb93db5b21a413799272f5d0f |
| Slave Node | slave1 |
| redis-cli -h slave1 -p 7379 CLUSTER REPLICATE 3508ffe11ba5fbfbb93db5b21a413799272f5d0f | |
Table 2
| Master Host | master2 |
| Master Node ID | 610976e1ca5382b96718cd7e261d3543e6a99af4 |
| Slave Node | slave2 |
| redis-cli -h slave2 -p 7380 CLUSTER REPLICATE 610976e1ca5382b96718cd7e261d3543e6a99af4 | |
Table 3
| Master Host | master3 |
| Master Node ID | d8a2ae6221624212b76d9cf6c1483452e3c26117 |
| Slave Node | slave3 |
| redis-cli -h slave3 -p 7381 CLUSTER REPLICATE d8a2ae6221624212b76d9cf6c1483452e3c26117 | |
Table 5
At this point our Redis cluster is configured properly and has the topology we have intended to create. The CLUSTER NODES command shows all the slaves connected to masters.

CLUSTER NODES shows master and slave nodes connected together
As we can see, all nodes are healthy, connected and have the right roles assigned (masters and slaves).
7.3 Verifying Redis Cluster is working properly
As always in case of Redis, the best way to ensure Redis cluster works as expected is to issue some commands using redis-cli. Please note, because nodes in the cluster do not proxy commands but redirect clients instead (see please Sharding (Partitioning) Scheme), the client must support such a protocol and that is why redis-cli should be run with -c command line option (with cluster support):
redis-cli -h master1 -p 6379 -c
Let us try to set stored keys (using SET command) and query them afterwards (using GET command). Because we have distributed hash slots among three nodes, the keys will also be distributed across all those nodes. The first key with name some-key is stored on the master1 node itself, which we are connected to.

Figure 11. Setting a key some-key which will be stored on master1
But if we try to store the key with name some-another-key, the interesting thing is going to happen: the redis-cli is telling us that the value will be stored on the node with IP address 192.168.3.105 (master3) which holds the hash slot this key belongs to.

Figure 12. Setting a key some-another-key which will be stored on master3
Please notice that after the command execution the redis-cli is automatically redirected to the node 192.168.3.105 (master3). Once we are on cluster node 192.168.3.105 (master3), we can verify that hash slot really contains the key some-another-key by issuing CLUSTER GETKEYSINSLOT command.

Figure 13. Verifying that hash slot 15929 contains key some-another-key
We also may verify that Redis slave node slave3 has replicated the key some-another-key from the master (master3) and returns its value.

slave3) replicated the keys from the master (master3)
7.4 Adding and removing nodes to the running Redis Cluster
We already mentioned in section Sharding (Partitioning) Scheme that Redis cluster could be reconfigured without downtime and usually involves hash slots migration. Let us add yet another master node master4 (with IP address 192.168.7.105) to the cluster and migrate the slot 15929 from the node master3 to master4 (it is the hash slot containing the key some-another-key). Her is Redis node master4 (redis- master4.conf) configuration:
    port 6384
    cluster-enabled yes
    cluster-config-file nodes.conf
    cluster-node-timeout 5000
    appendonly yes
redis-server redis-master4.conf
redis-cli -h master1 -p 6379 CLUSTER MEET 192.168.7.105 6384

master4 has joined the cluster
The migrating hash slots procedure includes following stages:
- On the cluster node which owns the specific
hash slot(master3), the commandCLUSTER SETSLOT slot MIGRATINGshould be executed, where is theNode IDof the new nodemaster4(which is d8095be33a2b9d06affcb5583f7150b1341f4c96).redis-cli -h master3 -p 6381 CLUSTER SETSLOT 15929 MIGRATING d8095be33a2b9d06affcb5583f7150b1341f4c96When a slot is marked as
MIGRATING, the node will accept all the requests for queries that are about thishash slot, but only if the given key exists, otherwise the query is forwarded to the node that is target of the migration. - On the cluster node which should become a new owner of the specific
hash slot(master4), the commandCLUSTER SETSLOT slot IMPORTING, where is theNode IDof current ownermaster3(which is d8a2ae6221624212b76d9cf6c1483452e3c26117).redis-cli -h master4 -p 6384 CLUSTER SETSLOT 15929 IMPORTING d8a2ae6221624212b76d9cf6c1483452e3c26117 - At this point, all the keys from
hash slotshould be migrated usingMIGRATEcommand (see please http://redis.io/commands/migrate) from the current ownermaster3to new ownermaster4. As we have only one key, it is easy.redis-cli -h master3 -p 6381 MIGRATE master4 6384 some-another-key 0 0
- Lastly, when
hash slotbecomes empty (which could be verified by issuingCLUSTER GETKEYSINSLOTcommand), it could be assigned to the new node (master4).redis-cli -h master3 -p 6381 CLUSTER SETSLOT 15929 NODE d8095be33a2b9d06affcb5583f7150b1341f4c96
Though it is quite useful to have an understanding what is going on in details, doing such a procedure manually is hard and error-prone. But Redis Cluster package provides a handy utility called redis-trib and located in src folder of the Redis distribution. It is written in Ruby and may be very helpful by simplifying the management of your Redis cluster (see please http://redis.io/topics/cluster-tutorial for more details).
8. Redis Cluster Commands
Redis Cluster adds an additional set of commands solely dedicated to cluster management, monitoring and configuration. Those commands have not been covered in part 2 of the tutorial, Redis Commands, as they are not available yet in stable releases. Also, there is not enough documentation on them available at Redis web site but at least we can describe each command briefly (many of them you have already seen in action).
| Command | CLUSTER SETSLOT slot NODE <node-id> |
| Description | Assigns hash slot to a node. The command should be issued on the node owning this hash slot and hash slot should not contain any keys (should be empty). |
Table 6
| Command | CLUSTER SETSLOT slot IMPORTING <node-id> |
| Description | Marks the hash slot as being imported from <node-id>. The <node-id> should be the owner of this hash slot. |
Table 7
| Command | CLUSTER SETSLOT slot MIGRATING <node-id> |
| Description | Marks the hash slots as being migrated to <node-id>. The command should be issued on the node owning this hash slot. |
Table 8
| Command | CLUSTER NODES |
| Description | Shows current set of nodes in the Redis Cluster. |
Table 9
| Command | CLUSTER ADDSLOTS slot1 [slot2] … [slotN] |
| Description | Assigns hash slots to Redis node. |
Table 10
| Command | CLUSTER DELSLOTS slot1 [slot2] … [slotN] |
| Description | Removes hash slots assignments from the Redis node. |
Table 11
| Command | CLUSTER MEET ip port |
| Description | Adds a node to the Redis cluster. |
Table 12
| Command | CLUSTER FORGET <node-id> |
| Description | Removes a node from the Redis cluster. |
Table 13
| Command | CLUSTER REPLICATE <master-node-id> |
| Description | Makes this node a replica of the master node <master-node-id>. |
Table 14
| Command | CLUSTER GETKEYSINSLOT slot count |
| Description | Returns the key names from any particular hash slot limiting the output to count number of keys. If the node this command is executing on is not an owner if the slot, the command returns no results. |
Table 15
9. Redis Sentinel
Another great but still experimental feature of Redis is Redis Sentinel. It is a system designed to help managing live Redis instances with following goals in mind:
- monitoring: Sentinel constantly checks if your master and slave instances are working as expected
- notification: Sentinel is able to notify if something is wrong with one of the monitored Redis instances
- automatic failover: If some master node is not working as expected, Sentinel can start a failover process where one of its slaves is promoted to master
Redis Sentinel is a very promising feature but it is currently being developed in the unstable branch of the Redis source code. It is not a part of Redis distributions yet.
For more details please look at http://redis.io/topics/sentinel.
10. What’s next
In this section we have covered a very appealing and highly demanded feature of Redis, clustering. Even though it is still in development, the feature is stable enough to start playing with it. In the next, the last part of the tutorial, we will cover the programmatic Java API for accessing Redis in different deployment scenarios.

Very deep introduction to Redis Cluster, perfect for newcomers! It will be shared in our next RedisWeekly (http://redisweekly.com) next friday!
Thanks a lots … u totally solved my problem, neat n clean doc …. thanks again keep it up.
Thanks for great tutorial
I faced a problem useing CLUSTER MEET
It’s give OK but when trying to run CLUSTER NODES I find
877025317c9f145df8e023a644868bf909870ce9 10.128.0.5:7002 handshake – 1475410526931 0 0 disconnected
and suddenly gone.
any help
Hi Marwan,
Thank you very much for your comment. I think this discussion https://groups.google.com/forum/#!topic/redis-db/IzunKQUM0Is can spot some light on your question. Thank you!
Best Regards,
Andriy Redko
Thanks for the post. But I guess this wont support failover. I mean when one of the master is down its slave wont become master automatically. This cant be achieved with this. Please correct me if I am wrong.
Hi Rishi,
Thank you for your comment. Right, this is my understanding as well, nonetheless Redis clustering has quite improved since the article was published (please take a look at http://redis.io/topics/cluster-tutorial). However, Redis Sentinel does provide the automatic failover (please check it out if it fits your use case, http://redis.io/topics/sentinel).
Thank you!
I think you need 3 redis instances per shard for failover to work.
Great explanation !!! … If we restart redis server using command eg: “redis-server redis-master1.conf”, will nodes get isolated ? I faced this situation after restart redis server, all master and slave nodes got disconnected from cluster. Again, I had to execute CLUSTER MEET command to reform the cluster..
Please correct me if I made anything wrong here.
Hi Balu,
Thank you for you comment. That’s right, at least for the version of the Redis used in the article, automatic failover could be done with a help of Redis Sentinel, but the Redis cluster itself did not support it and needed manual intervention.
Thank you.
Best Regards,
Andriy Redko
Thanks for the response Andriy. Is latest redis cluster version not supporting automatic failover ?
Hi Balu,
It seems like it is still a feature offered by Redis Sentinel only: https://redis.io/topics/sentinel
Thanks.
Best Regards,
Andriy Redko