Sign Up for FREE on http://DCHQ.io to get access to out-of-box multi-tier Java, Ruby, Python, and PHP templates along with application lifecycle management functionality like monitoring, container updates, scale in/out and continuous delivery.
Background
Java developers and DevOps professionals have long struggled to automate the deployment of enterprise Java applications. The complex nature of these applications usually meant that application dependencies and external integrations had to be re-configured each time an application was deployed in DEV/TEST environments.
Many solutions advertised the “model once, deploy anywhere” message for application deployments. In reality, however there were always intricacies that made it very difficult to re-use an application template across both an on-premise vSphere virtual environment and an AWS environment, for example.
https://www.youtube.com/watch?v=5mC00VO-Nts
Disclaimer — This is still work in progress. This blog is meant for DEV/TEST environments.
More recently, however, Docker containers popularized the idea of packaging application components into Linux Containers that can be deployed exactly the same on any Linux host as long as Docker Engine is installed.
Unfortunately containerizing enterprise Java applications is still a challenge mostly because existing application composition frameworks do not address complex dependencies, external integrations or auto-scaling workflows post-provision. Moreover, the ephemeral design of containers meant that developers had to spin up new containers and re-create the complex dependencies & external integrations with every version update.
DCHQ, available in hosted and on-premise versions, addresses all of these challenges and simplifies the containerization of enterprise Java applications through an advance application composition framework that extends Docker Compose with cross-image environment variable bindings, extensible BASH script plug-ins that can be invoked at request time or post-provision, and application clustering for high availability across multiple hosts or regions with support for auto scaling.
Once an application is provisioned, a user can monitor the CPU, Memory, & I/O of the running containers, get notifications & alerts, and perform day-2 operations like Scheduled Backups, Container Updates using BASH script plug-ins, and Scale In/Out. Moreover, out-of-box workflows that facilitate Continuous Delivery with Jenkins allow developers to refresh the Java WAR file of a running application without disrupting the existing dependencies & integrations.
In this blog, we will go over the end-to-end deployment automation of a Docker-based WebLogic Cluster. We will cover:
- Building the application template for WebLogic Cluster that can re-used on any Linux host running anywhere
- Provisioning & auto-scaling the underlying infrastructure on any cloud (with Rackspace being the example in this blog)
- Deploying the WebLogic Cluster on the Rackspace Cloud Servers
- Deploying the Shopping Cart Java WAR File on the Admin Server
- Accessing the In-Browser Terminal for Running Containers
- Enabling the Continuous Delivery Workflow with Jenkins to update the WAR file of the running applications when a build is triggered
- Monitoring the CPU, Memory & I/O of the Running Containers
Building the Application Template for the Oracle WebLogic 12c Cluster
Once logged in to DCHQ (either the hosted DCHQ.io or on-premise version), a user can navigate to Manage > Templates and then click on the + button to create a new Docker Compose template.
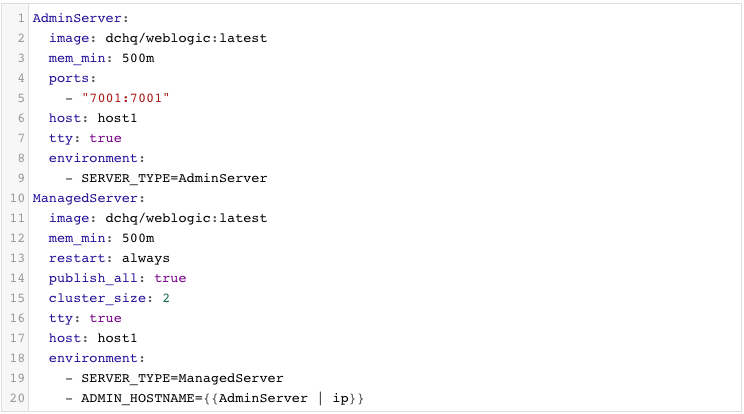
We have created a WebLogic Cluster application template using a custom image we built leveraging Radu Dobrinescu’s image (radudobrinescu/wls12c:2.0).
You will notice that the cluster_size parameter allows you to specify the number of containers to launch (with the same application dependencies). We use this to define the Managed Server cluster size.
The host parameter allows you to specify the host you would like to use for container deployments. That way you can ensure high-availability for your application server clusters across different hosts (or regions) and you can comply with affinity rules to ensure that the database runs on a separate host for example. Here are the values supported for the host parameter:
- host1, host2, host3, etc. – selects a host randomly within a data-center (or cluster) for container deployments
- <IP Address 1, IP Address 2, etc.> — allows a user to specify the actual IP addresses to use for container deployments
- <Hostname 1, Hostname 2, etc.> — allows a user to specify the actual hostnames to use for container deployments
- Wildcards (e.g. “db-*”, or “app-srv-*”) – to specify the wildcards to use within a hostname
Additionally, a user can create cross-image environment variable bindings by making a reference to another image’s environment variable. In this case, we have made one binding in this caes: ADMIN_HOSTNAME={{AdminServer | ip}} – in which the Admin Server host IP is resolved dynamically at request time and is used to ensure that the Managed Servers can establish a connection with the Admin Server.
Here is a list of supported environment variable values:
- {{alphanumeric | 8}} – creates a random 8-character alphanumeric string. This is most useful for creating random passwords.
- {{<Image Name> | ip}} – allows you to enter the host IP address of a container as a value for an environment variable. This is most useful for allowing the middleware tier to establish a connection with the database.
- {{<Image Name> | container_ip}} – allows you to enter the container name of a container as a value for an environment variable. This is most useful for allowing the middleware tier to establish a secure connection with the database (without exposing the database port).
- {{<Image Name> | container_private_ip}} – allows you to enter the internal IP of a container as a value for an environment variable. This is most useful for allowing the middleware tier to establish a secure connection with the database (without exposing the database port).
- {{<Image Name> | port _<Port Number>}} – allows you to enter the Port number of a container as a value for an environment variable. This is most useful for allowing the middleware tier to establish a connection with the database. In this case, the port number specified needs to be the internal port number – i.e. not the external port that is allocated to the container. For example, {{PostgreSQL | port_5432}} will be translated to the actual external port that will allow the middleware tier to establish a connection with the database.
- {{<Image Name> | <Environment Variable Name>}} – allows you to enter the value an image’s environment variable into another image’s environment variable. The use cases here are endless – as most multi-tier applications will have cross-image dependencies.
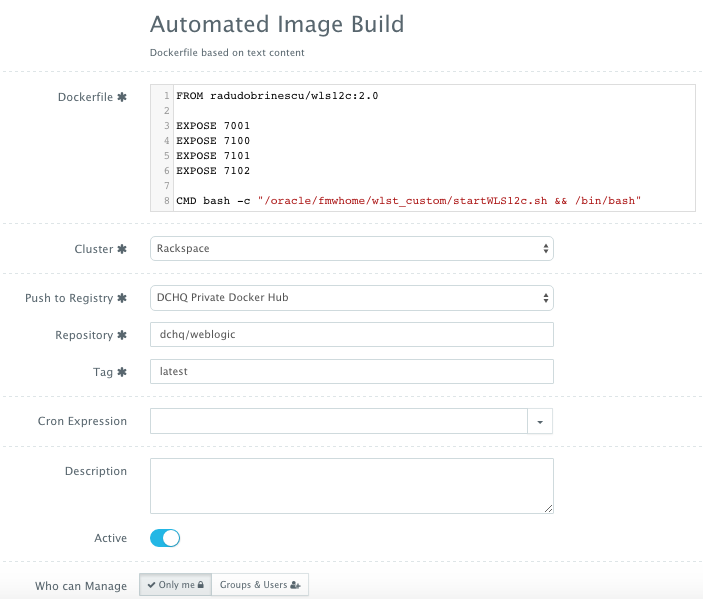
The actual building of the Docker WebLogic image can be automated through DCHQ as well. A user can click on Automate > Image Build and then click on the + button. A user can create an image using either a Dockerfile or a private/public GitHub project that has a Dockerfile.
The image we create for WebLogic was built using Radu Dobrinescu’s image (radudobrinescu/wls12c:2.0) (https://hub.docker.com/r/radudobrinescu/wls12c/). We made a couple of modifications to the image in our own Dockerfile and then pushed the new image to our own repository (dchq/weblogic:latest). The building of images can be scheduled using a cron expression. Moreover, a user can use {{timestamp}} in the tag name in order to create unique tag names with every new build. That way a user can revert back to older images for backup.
Provisioning & Auto-Scaling the Underlying Infrastructure on Any Cloud
Once an application is saved, a user can register a Cloud Provider to automate the provisioning and auto-scaling of clusters on 13 different cloud end-points including vSphere, OpenStack, CloudStack, Amazon Web Services, Rackspace, Microsoft Azure, DigitalOcean, HP Public Cloud, IBM SoftLayer, Google Compute Engine, and many others.
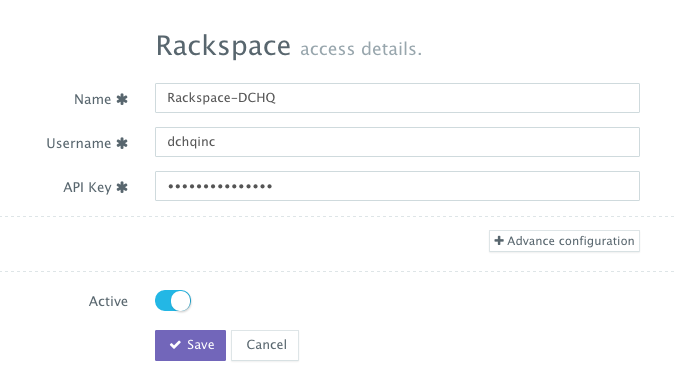
First, a user can register a Cloud Provider for Rackspace (for example) by navigating to Manage > Repo & Cloud Provider and then clicking on the + button to select Rackspace. The Rackspace API Key needs to be provided – which can be retrieved from the Account Settings section of the Rackspace Cloud Control Panel.
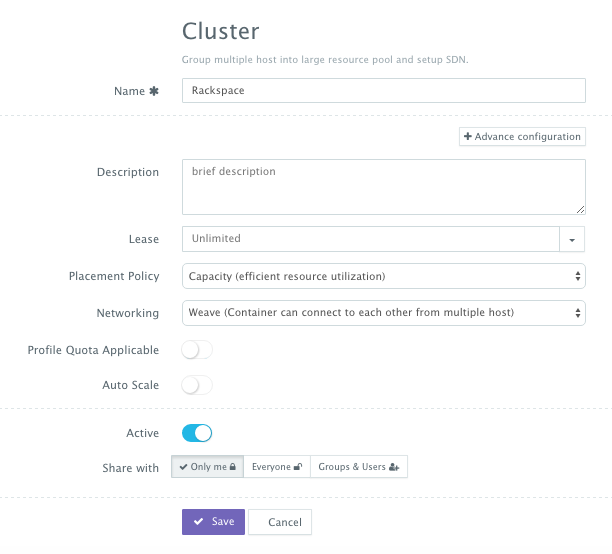
A user can then create a cluster with an auto-scale policy to automatically spin up new Cloud Servers. This can be done by navigating to Manage > Clusters page and then clicking on the + button. You can select a capacity-based placement policy and then Weave as the networking layer in order to facilitate secure, password-protected cross-container communication across multiple hosts within a cluster.
A user can now provision a number of Cloud Servers on the newly created cluster by navigating to Manage > Hosts and then clicking on the + button to select Rackspace. Once the Cloud Provider is selected, a user can select the region, size and image needed. A Cluster is then selected and the number of Cloud Servers can be specified.
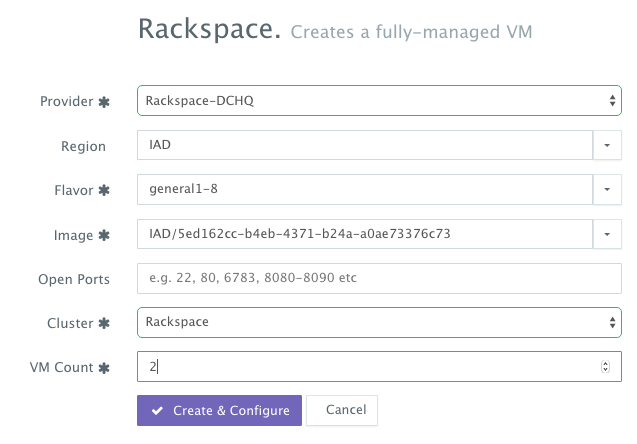
Deploying the WebLogic Cluster to the Rackspace Cloud Servers
Once the Cloud Servers are provisioned, a user can deploy a multi-tier, Docker-based Java applications on the new Cloud Servers. This can be done by navigating to the Self-Service Library and then clicking on Customize to request a multi-tier application.
A user can select an Environment Tag (like DEV or QE) and the Rackspace Cluster created before clicking on Run.

Once the WebLogic Cluster is provisioned, a user can access the Admin Server Console to make sure that the Managed Servers are discovered and running. The URL would be http://<admin_server_host_ip>:7001/console. The default credentials would be weblogic/welcome1.

Deploying the Shopping Cart Java WAR File using the Plug-in Framework
Once the WebLogic Cluster is up and running, a user can execute a BASH script plug-in to deploy a Java WAR File on one of the servers. In this case, we simply invoked a plug-in to deploy the Shopping Cart application on the Admin Server. From the Actions menu, a user can select Plug-ins and then select the container(s) on which the plug-in will be executed. A user can then search for the plug-in and override the arguments exposed.
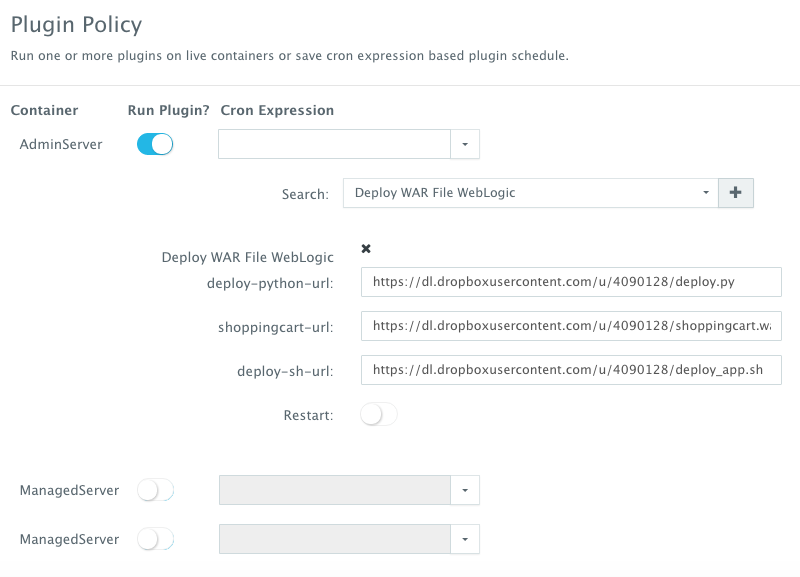
In this simple plug-in, we’re grabbing three files from a remote, accessible server in order to deploy the application.
- deploy.py
- deploy_app.sh
- shoppingcart.war
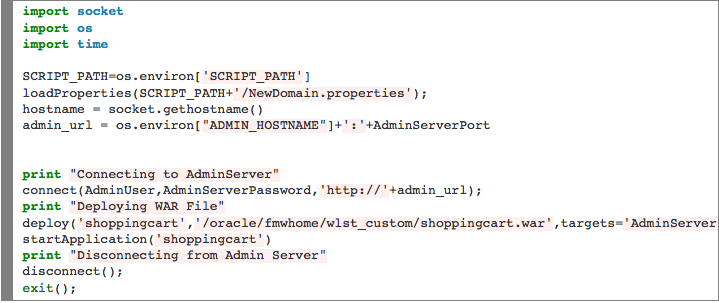
Here are the actual files used:
deploy.py
———————
deploy_app.sh
———————

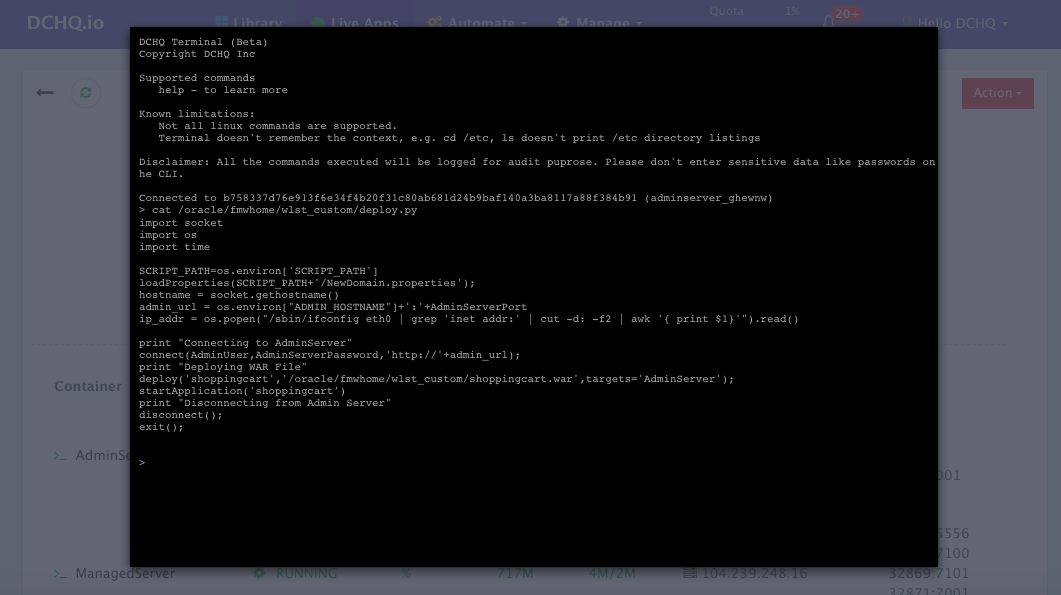
Accessing the In-Browser Terminal for the Running Containers
A command prompt icon should be available next to the containers’ names on the Live Apps page. This allows users to enter the container using a secure communication protocol through the agent message queue. A white list of commands can be defined by the Tenant Admin to ensure that users do not make any harmful changes on the running containers.
In this case, we used the command prompt to make sure that the deploy.py file was indeed downloaded to the Admin Server. By doing a simple cat /oracle/fmwhome/wlst_custom/deploy.py – we were able to verify that the file indeed exists on that container.
We then accessed the Admin Server Console and navigated to Deployments to make sure the Shopping Cart application was indeed deployed.
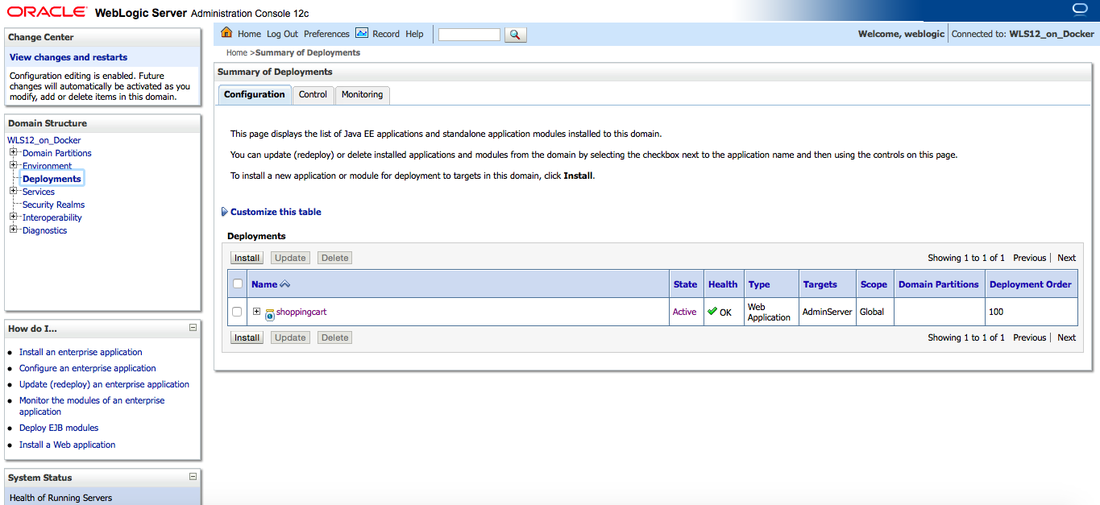
Finally, we accessed the actual application on http://<admin_server_host_ip>:7001/shoppingcart

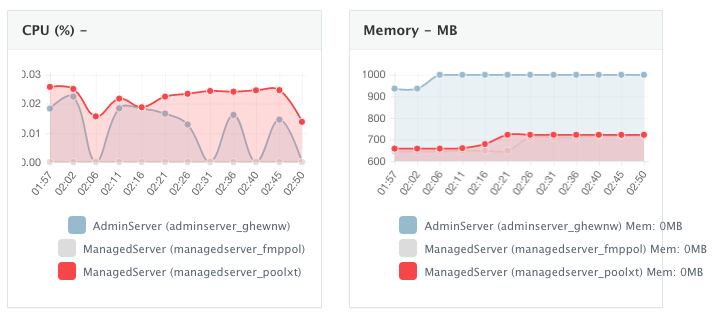
Monitoring the CPU, Memory & I/O Utilization of the Running Containers
Once the application is up and running, our developers monitor the CPU, Memory, & I/O of the running containers to get alerts when these metrics exceed a pre-defined threshold. This is especially useful when our developers are performing functional & load testing.
A user can perform historical monitoring analysis and correlate issues to container updates or build deployments. This can be done by clicking on the Actions menu of the running application and then on Monitoring. A custom date range can be selected to view CPU, Memory and I/O historically.
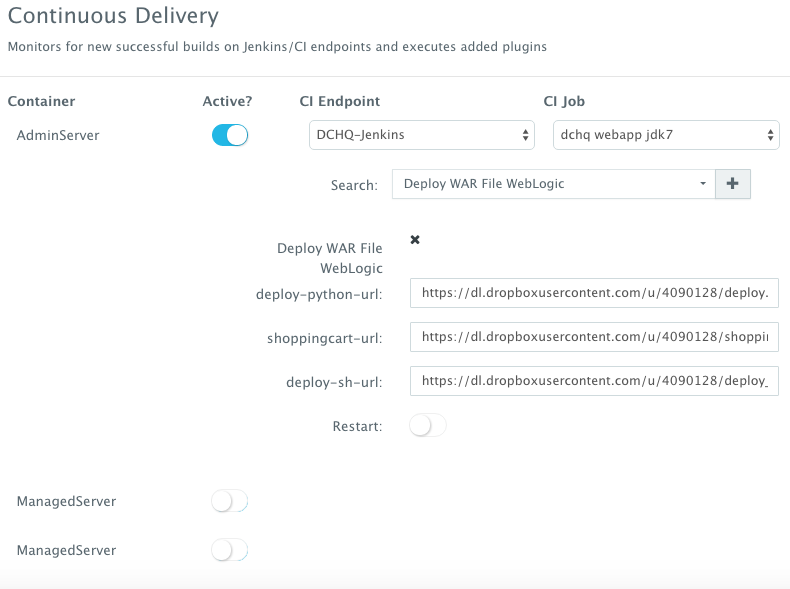
Enabling the Continuous Delivery Workflow with Jenkins to Update the WAR File of the Running Application when a Build is Triggered
For developers wishing to follow the “immutable” containers model by rebuilding Docker images containing the application code and spinning up new containers with every application update, DCHQ provides an automated build feature that allows developers to automatically create Docker images from Dockerfiles or private GitHub projects containing Dockerfiles.
However, many developers may wish to update the running application server containers with the latest Java WAR file instead. For that, DCHQ allows developers to enable a continuous delivery workflow with Jenkins. This can be done by clicking on the Actions menu of the running application and then selecting Continuous Delivery. A user can select a Jenkins instance that has already been registered with DCHQ, the actual Job on Jenkins that will produce the latest WAR file, and then a BASH script plug-in to grab this build and deploy it on a running application server. Once this policy is saved, DCHQ will grab the latest WAR file from Jenkins any time a build is triggered and deploy it on the running application server.
Note that the BASH script plug-in can be customized to ensure that the right sequence of steps is taken for the WebLogic Server. For example, a user may wish to use a specific deployment plan or run some scripts before un-deploying and then deploying the new WAR file.
Developers, as a result will always have the latest Java WAR file deployed on their running containers in DEV/TEST environments.
Conclusion
Containerizing enterprise Java applications is still a challenge mostly because existing application composition frameworks do not address complex dependencies, external integrations or auto-scaling workflows post-provision. Moreover, the ephemeral design of containers meant that developers had to spin up new containers and re-create the complex dependencies & external integrations with every version update.
DCHQ, available in hosted and on-premise versions, addresses all of these challenges and simplifies the containerization of enterprise Java applications through an advance application composition framework that facilitates cross-image environment variable bindings, extensible BASH script plug-ins that can be invoked at request time or post-provision, and application clustering for high availability across multiple hosts or regions with support for auto scaling.
Sign Up for FREE on http://DCHQ.io or download DCHQ On-Pemise to get access to out-of-box multi-tier Java application templates along with application lifecycle management functionality like monitoring, container updates, scale in/out and continuous delivery.
| Reference: | Deployment Automation of Docker WebLogic Cluster on Any Cloud from our JCG partner Amjad Afanah at the DCHQ.io blog. |
