If you’ve ever watched a high-traffic Java service crawl under database load, you’ve already felt the problem that distributed caching solves. NCache is an in-memory, distributed cache built by Alachisoft that supports Java, .NET, Python, and Node.js clients. What makes it especially appealing for getting started is that the entire server runs as a Docker container — no host installation, no native packages, no network configuration headaches on your dev machine.
In this article we’ll go from zero to a working Java application that connects to an NCache server container, adds objects to the cache, reads them back, and removes them. Along the way, we’ll cover Docker setup, Maven dependency management, the NCache native Java API, and the JCache (JSR-107) API. Everything here runs on a standard developer workstation.
Prerequisites: Docker Desktop (or Docker Engine on Linux), Java 11 or later, and Maven 3.8+. That’s the entire list — no NCache install on your host required.
What Is NCache, and Why Use It?
NCache is a distributed, in-memory key-value store that sits between your Java application and your database. When a request arrives, the application checks the cache first. If the data is there — a cache hit — it returns immediately without touching the database. If not — a cache miss — the application fetches the data, stores it in the cache, and returns it. Subsequent requests for the same data hit the cache instead.
Furthermore, NCache scales horizontally. You can add more cache server nodes to a cluster, and the data is distributed and replicated automatically. This matters as soon as you move beyond a single application instance. Additionally, NCache ships with a full JCache (JSR-107) provider, meaning your application can use the standard JCache API while NCache handles the distributed layer underneath.
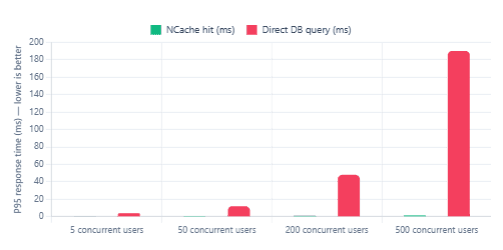
Typical Response Time: Cache Hit vs. Database Query
Choosing Your NCache Edition
Before pulling a Docker image it’s worth understanding the three editions NCache ships, because they map to different Docker image tags and different Maven artifacts.
| Edition | Docker tag | Maven artifact | Best for |
|---|---|---|---|
| Community (Open Source) | latest-java | ncache-community-client | Evaluation, dev/QA, open-source projects |
| Professional | professional-java | ncache-client (Professional) | Production, single-region deployments |
| Enterprise | enterprise-java | ncache-client (Enterprise) | Multi-region, WAN replication, full feature set |
For this walkthrough we’ll use the Community edition, which is freely available and fully functional for development. It runs on Ubuntu 22.04 inside the container and supports Java clients over the standard TCP port. The Enterprise and Professional editions offer a 60-day free trial with no feature restrictions if you want to test advanced functionality such as WAN replication or data protection.
Step 1 — Pull and Run the NCache Container
Open a terminal and pull the latest NCache Java Linux image from Docker Hub:
docker pull alachisoft/ncache:latest-java
Next, run the container. For a local development setup, the simplest approach is port-forwarding mode, which exposes the management and client ports to your host machine. This is the recommended approach on macOS and Windows, where Docker Desktop uses a Linux VM internally.
docker run --name ncache -itd \
  -p 8251:8251 \
  -p 9800:9800 \
  -p 8300:8300 \
  -p 8301:8301 \
  alachisoft/ncache:latest-java
Here’s what each port does:
| Port | Purpose |
|---|---|
| 8251 | NCache Management Center (web UI) |
| 9800 | NCache client-to-server communication |
| 8300 | Cluster inter-node communication (TCP) |
| 8301 | Cluster inter-node communication (UDP) |
Verify the container is running:
docker ps --filter "name=ncache"
You should see the container listed with status Up. If you’re on a native Linux host, you can also run with --network host instead of explicit port mappings — that’s the configuration recommended by NCache for Linux production deployments since it avoids NAT overhead.
Static IPs matter in multi-node setups. For a single-node dev container, dynamic IPs are fine. However, if you ever add a second container to form a cluster, Docker’s default bridge network reassigns IPs on restart and breaks inter-node communication. At that point, create a custom Docker network with a fixed subnet — as detailed in the NCache Docker Linux docs.
Step 2 — Register the Container and Create a Cache
NCache requires a licence registration before it will serve clients. Navigate to the Management Center in your browser at http://localhost:8251. On first launch you’ll see a registration modal. Click Start Free Trial and fill in your name, company, and email address.
Alternatively, you can register directly from the command line without opening a browser:
docker exec -it ncache \
  /opt/ncache/bin/tools/register-ncacheevaluation \
  -firstname Jane \
  -lastname Dev \
  -company MyCompany \
  -email jane@mycompany.com \
  -key YOUR_EVAL_KEY
Once registered, return to the Management Center and create a new cache. From the left panel choose Caches → Create New Cache. Name it demoCache, leave the topology as Replicated for now, and click Finish. Then start it using the Start button. You should see its status change to Running.
Tip: The cache name you set here must match exactly what you use in your Java client code. It is case-sensitive.
demoCacheanddemocacheare different caches.
Step 3 — Set Up Your Maven Project
Create a standard Maven project with Java 11 as the compiler target. Add the NCache Community client dependency to your pom.xml. The latest release on Maven Central is 5.3.6:
<?xml version="1.0" encoding="UTF-8"?>
<project xmlns="http://maven.apache.org/POM/4.0.0"
         xmlns:xsi="http://www.w3.org/2001/XMLSchema-instance"
         xsi:schemaLocation="http://maven.apache.org/POM/4.0.0
             http://maven.apache.org/xsd/maven-4.0.0.xsd">

  <modelVersion>4.0.0</modelVersion>
  <groupId>com.example</groupId>
  <artifactId>ncache-demo</artifactId>
  <version>1.0-SNAPSHOT</version>

  <properties>
    <maven.compiler.source>11</maven.compiler.source>
    <maven.compiler.target>11</maven.compiler.target>
  </properties>

  <dependencies>

    <!-- NCache Community Java client -->
    <dependency>
      <groupId>com.alachisoft.ncache</groupId>
      <artifactId>ncache-community-client</artifactId>
      <version>5.3.6</version>
    </dependency>

  </dependencies>
</project>
If you need the Enterprise or Professional client instead, swap the artifactId to ncache-client — those JARs require a licence key but expose additional APIs such as continuous queries and data groups.
Step 4 — Define a Serializable Domain Class
All objects stored in NCache must implement java.io.Serializable. This is how the cache serialises your objects to bytes for storage and transmission across the wire. Let’s define a simple Product class:
package com.example.model;

import java.io.Serializable;

public class Product implements Serializable {

    private static final long serialVersionUID = 1L;

    private String productId;
    private String name;
    private double price;

    public Product() {}

    public Product(String productId, String name, double price) {
        this.productId = productId;
        this.name      = name;
        this.price     = price;
    }

    // Getters
    public String getProductId() { return productId; }
    public String getName()      { return name; }
    public double getPrice()     { return price; }

    @Override
    public String toString() {
        return "Product{id='" + productId + "', name='" + name
               + "', price=" + price + "}";
    }
}
The serialVersionUID field is particularly important here. Without it, Java generates one dynamically based on the class structure. If you change the class fields after objects are already in the cache, the generated UID changes and deserialisation will throw an InvalidClassException. Declaring it explicitly keeps that under your control.
Step 5 — Connect and Perform CRUD Operations (NCache API)
NCache provides two Java APIs: its own native Cache / CacheManager API, and the standard JCache (JSR-107) API. We’ll cover both, starting with the native API since it exposes the full NCache feature set including expiration, locking, and dependency tracking.
The entry point is CacheManager.getCache(), which returns a Cache instance connected to the server. Create a main class as follows:
package com.example;

import com.alachisoft.ncache.client.Cache;
import com.alachisoft.ncache.client.CacheManager;
import com.alachisoft.ncache.client.CacheConnectionOptions;
import com.alachisoft.ncache.client.ServerInfo;
import com.alachisoft.ncache.runtime.caching.CacheItem;
import com.alachisoft.ncache.runtime.util.TimeSpan;
import com.example.model.Product;

import java.util.Collections;

public class NCacheDemo {

    public static void main(String[] args) throws Exception {

        // --- 1. Configure the connection ---
        CacheConnectionOptions options = new CacheConnectionOptions();
        // Point the client at our Docker container host + client port
        options.setServerList(Collections.singletonList(
            new ServerInfo("localhost", 9800)
        ));

        // --- 2. Open the cache ---
        Cache cache = CacheManager.getCache("demoCache", options);
        System.out.println("Connected. Cache count before: " + cache.getCount());

        // --- 3. INSERT ---
        Product laptop = new Product("P001", "Laptop Pro 15", 1299.99);
        String key = "Product:" + laptop.getProductId();

        CacheItem item = new CacheItem(laptop);
        // Optional: set a 10-minute absolute expiration
        item.setAbsoluteExpiration(TimeSpan.fromMinutes(10));

        cache.insert(key, item);
        System.out.println("Inserted: " + key);

        // --- 4. GET ---
        Product fetched = cache.get(key, Product.class);
        if (fetched != null) {
            System.out.println("Retrieved: " + fetched);
        } else {
            System.out.println("Cache miss for key: " + key);
        }

        // --- 5. UPDATE (insert overwrites) ---
        Product updated = new Product("P001", "Laptop Pro 15 Max", 1499.99);
        CacheItem updatedItem = new CacheItem(updated);
        cache.insert(key, updatedItem);
        System.out.println("Updated: " + cache.get(key, Product.class));

        // --- 6. REMOVE ---
        cache.remove(key, Product.class);
        System.out.println("Removed. Cache count after: " + cache.getCount());

        // --- 7. Close the connection ---
        cache.close();
    }
}
A few things worth noting here. First, cache.insert() handles both add and update — it overwrites any existing value at that key. If you want a strict add-only operation that throws if the key already exists, use cache.add() instead. Second, TimeSpan.fromMinutes(10) sets an absolute expiration, meaning the item expires exactly ten minutes after insertion regardless of access. NCache also supports sliding expiration, where the expiry window resets on each access.
Step 6 — The Same Operations via the JCache API
If you’d rather write vendor-neutral code that could theoretically swap to a different JCache provider later, NCache ships a full JCache (JSR-107) provider. The API is slightly different — notably, Cache.put() returns void rather than the previous value — but the semantics are equivalent for basic operations.
package com.example;

import javax.cache.Cache;
import javax.cache.CacheManager;
import javax.cache.Caching;
import javax.cache.configuration.MutableConfiguration;
import javax.cache.expiry.CreatedExpiryPolicy;
import javax.cache.expiry.Duration;
import javax.cache.spi.CachingProvider;
import com.example.model.Product;

import java.util.concurrent.TimeUnit;

public class JCacheDemo {

    public static void main(String[] args) {

        // NCache auto-discovers as the JCache provider on the classpath
        CachingProvider provider = Caching.getCachingProvider();
        CacheManager manager    = provider.getCacheManager();

        // Configure: typed cache with 5-minute creation expiry
        MutableConfiguration config =
            new MutableConfiguration()
                .setTypes(String.class, Product.class)
                .setExpiryPolicyFactory(
                    CreatedExpiryPolicy.factoryOf(
                        new Duration(TimeUnit.MINUTES, 5)
                    )
                );

        // Get or create the cache
        Cache cache = manager.getCache("demoCache");
        if (cache == null) {
            cache = manager.createCache("demoCache", config);
        }

        // PUT
        Product phone = new Product("P002", "SmartPhone X", 899.00);
        cache.put("Product:P002", phone);
        System.out.println("Put: Product:P002");

        // GET
        Product result = cache.get("Product:P002");
        System.out.println("Got: " + result);

        // REMOVE
        boolean removed = cache.remove("Product:P002");
        System.out.println("Removed: " + removed);

        manager.close();
    }
}
The JCache API uses manager.getCache() to retrieve a pre-existing cache, or manager.createCache() to create one programmatically. Notice that when using JCache, NCache auto-registers itself as the CachingProvider via the standard Java ServiceLoader mechanism — there’s nothing extra to configure. As long as the ncache-community-client JAR is on the classpath, the Caching.getCachingProvider() call finds it automatically.
Step 7 — Build and Run
Make sure your NCache container is still running, then build and execute from your project root:
# Build the project
mvn clean package -q

# Run the native API demo
mvn exec:java -Dexec.mainClass="com.example.NCacheDemo"

# Or run the JCache demo
mvn exec:java -Dexec.mainClass="com.example.JCacheDemo"
For the exec:java goal to work, add the exec-maven-plugin to your pom.xml under <build><plugins>:
<plugin>
  <groupId>org.codehaus.mojo</groupId>
  <artifactId>exec-maven-plugin</artifactId>
  <version>3.2.0</version>
</plugin>
If the connection to localhost:9800 is refused, confirm the container is running with docker ps and that the port mapping is active with docker inspect ncache | grep -A5 Ports. A common mistake on macOS is running the container with --network host, which works on Linux but has no effect on macOS — use the explicit -p port flags instead.
What to Explore Next
Getting CRUD operations working is only the starting point. Once you’re comfortable with the basics, the next areas worth exploring are expiration policies, cache topologies, and Spring integration — each one unlocks significantly more value from the cache layer.
| Topic | Why it matters | Where to look |
|---|---|---|
| Sliding expiration | Keeps hot objects alive; evicts cold ones automatically | item.setSlidingExpiration(TimeSpan.fromMinutes(5)) |
| Cache topologies | Replicated vs Partitioned vs Partition-Replica — each trades latency for redundancy differently | NCache Docs |
| Spring integration | Use @Cacheable, @CachePut, @CacheEvict with NCache as the provider | Spring Data Cache |
| Read-Through / Write-Through | NCache can read from or write to your database automatically on miss/update | Caching Strategies |
| Docker Compose cluster | Run two containers as a distributed cache on a single machine for testing | Docker Deployment Overview |
Note on production sizing: NCache recommends at least SO-16 (16 GB RAM, 8 vCPU) for a production cache node handling moderate traffic. For a dev container on your laptop, the defaults are fine, but keep this in mind before sizing your cloud instances.
What We Learned
We pulled the NCache Java Linux image from Docker Hub and started a cache server container with a single command, registered it for free evaluation, and created a named cache through the Management Center web UI. From there, we set up a Maven project with the ncache-community-client 5.3.6 dependency, built a serializable domain class, and walked through full CRUD operations using both the native NCache Java API and the standard JCache (JSR-107) API.
We also covered the key practical details that trip people up — the static IP requirement for multi-node clusters, the distinction between insert() and add(), the JCache void put() behaviour, and the difference between absolute and sliding expiration. With the server running in Docker and the client connected via localhost:9800, the path from here to a Spring-integrated, production-grade caching layer is a straightforward next step.
