Microservices architecture helps in building an application as a suite of multiple fine-grained smaller services. Each of these services run in its own process and are independently deployable. They may have been developed in different programming languages and may use different data storage techniques and communicate with each other via lightweight mechanisms like RESTful APIs, message queues etc. Now that services(API clients) need to know how to interact with each other, there is a need of API documentation that should be clear, informative and easy to go through.
OpenAPI makes documenting these RESTful services very easy and can be done by adding few annotations to a Spring based project. Besides rendering documentation, it allows the API consumers to interact with the APIs without having their own implementation logic in place. Also, it can be used to generate the API client libraries for over 50+ languages. In this post, I’ll cover how to use OpenAPI to generate REST API documentation and Java clients for a Spring Boot project.
Our sample application implements a set of REST endpoints to expose the employees and departments resources of an organization. Following is the UML model of the sample application we will look at:

Following controller exposes the Rest APIs:
01 02 03 04 05 06 07 08 09 10 11 12 13 14 15 16 17 18 19 20 21 22 23 24 25 26 27 28 29 30 31 32 33 34 35 36 37 38 39 40 41 42 43 44 45 46 47 48 49 50 51 52 53 54 55 56 57 58 59 60 61 | package com.xyz.openapi.server.controller;import com.xyz.openapi.server.model.Department;import com.xyz.openapi.server.model.Employee;import io.swagger.v3.oas.annotations.tags.Tag;import org.springframework.beans.BeanUtils;import org.springframework.web.bind.annotation.*;import java.util.ArrayList;import java.util.List;import java.util.Optional;import java.util.UUID;import java.util.stream.Collectors;@RestController@RequestMapping("/api")public class OrganizationController { private List<Employee> employees = new ArrayList<>(); @GetMapping(value = "/employees") public EmployeeList getAllEmployees(@RequestParam(required = false) String deptId) { List<Employee> employees = this.employees.stream() .filter(emp -> deptId == null || (deptId != null && emp.getDepartment() != null && emp.getDepartment().getId().equals(deptId))) .collect(Collectors.toList()); return EmployeeList.of(employees); } @GetMapping(value = "/employees/{id}") public Employee getEmployee(@PathVariable String id) { Optional<Employee> optional = employees.stream() .filter(emp -> emp.getId().equals(id)) .findAny(); if(optional.isEmpty()) { throw new IllegalArgumentException("Employee does not exist for id: "+id); } return optional.get(); } @PostMapping(value = "/employees") public String createEmployee(@RequestBody Employee emp){ emp.setId(UUID.randomUUID().toString()); employees.add(emp); return emp.getId(); } @PutMapping(value = "/employees") public String updateEmployee(Employee updatedEmp){ employees.stream() .filter(e -> updatedEmp.getId().equals(e.getId())) .findFirst() .map(emp -> { BeanUtils.copyProperties(updatedEmp, emp); return emp; }) .orElseThrow(); return updatedEmp.getId(); } // Few other APIs for Department resource follows here} |
To add OpenAPI to our project, the following dependency has to be added to gradle:
1 2 | // OpenAPI Documentationdependency("org.springdoc:springdoc-openapi-ui:1.5.8") |
Now add the OpenAPI configuration to the project:
01 02 03 04 05 06 07 08 09 10 11 12 13 14 | @Configurationpublic class SwaggerConfiguration { @Bean public OpenAPI openAPI() { Contact contact = new Contact(); contact.setEmail("help@xyz.com"); contact.setName("XYZ Support"); return new OpenAPI() .info(new Info().title("Employee APIs").description("Description here..") .version("1.0").contact(contact) .license(new License().name("2015-2021 XYZ LLC All Rights Reserved"))); }} |
Now when we run the application, the API documentation can be accessed at http://localhost:8080/swagger-ui/. Here is a snapshot of how it looks like:
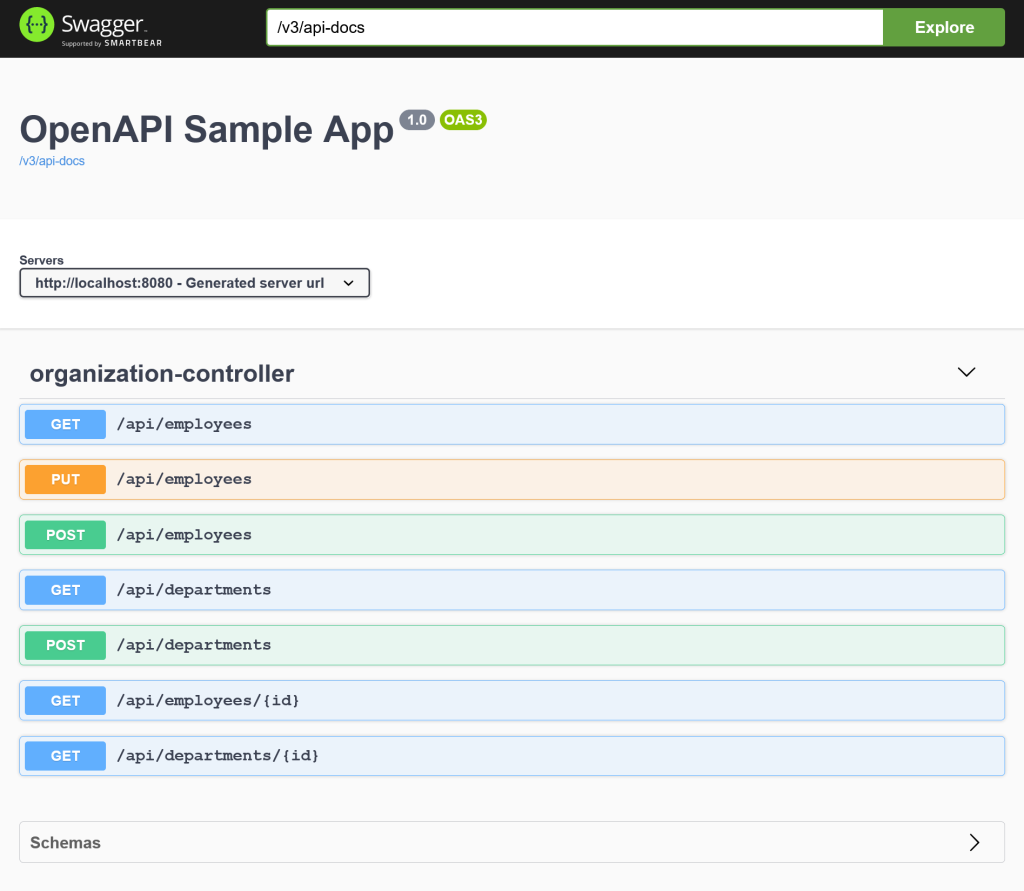
The schemas section of the documentation lists all the model classes(and their structure) involved in the API transactions. Following is the schema for the sample application:

We can annotate the APIs with Schema definitions to have more control over the API documentation generation process. In the below code snippet, we have made use of the following annotations:
1. Operation: Define additional properties for the API Operation.
2. ApiResponses: Container for repeatable ApiResponse annotation
3. ApiResponse: The annotation may be used at method level or as field of Operation to define one or more responses of the Operation.
4. Schema: The annotation may be used to define a Schema for a set of elements of the OpenAPI spec, and/or to define additional properties for the schema. It is applicable e.g. to parameters, schema classes (aka “models”), properties of such models, request and response content, header.
01 02 03 04 05 06 07 08 09 10 11 12 13 14 15 16 17 18 19 20 21 22 23 24 25 26 27 | @RestController@RequestMapping("/api")@Tag(name = "Organization Controls", description = "API Endpoints to operate on Employee and Departments")public class OrganizationController { private List<Employee> employees = new ArrayList<>(); private List<Department> departments = new ArrayList<>(); @GetMapping(value = "/employees") @Operation(summary = "If departmentId is not passed, get all employees. Otherwise get employees from specific department.") @ApiResponses({ @ApiResponse(responseCode = "200", content = { @Content(schema = @Schema(implementation = EmployeeList.class)) }), @ApiResponse(responseCode = "500", content = { @Content(schema = @Schema(implementation = ErrorResponse.class)) }) }) public EmployeeList getAllEmployees(@RequestParam(required = false) String deptId) { List<Employee> employees = this.employees.stream() .filter(emp -> deptId == null || (deptId != null && emp.getDepartment() != null && emp.getDepartment().getId().equals(deptId))) .collect(Collectors.toList()); return EmployeeList.of(employees); } // More methods here} |
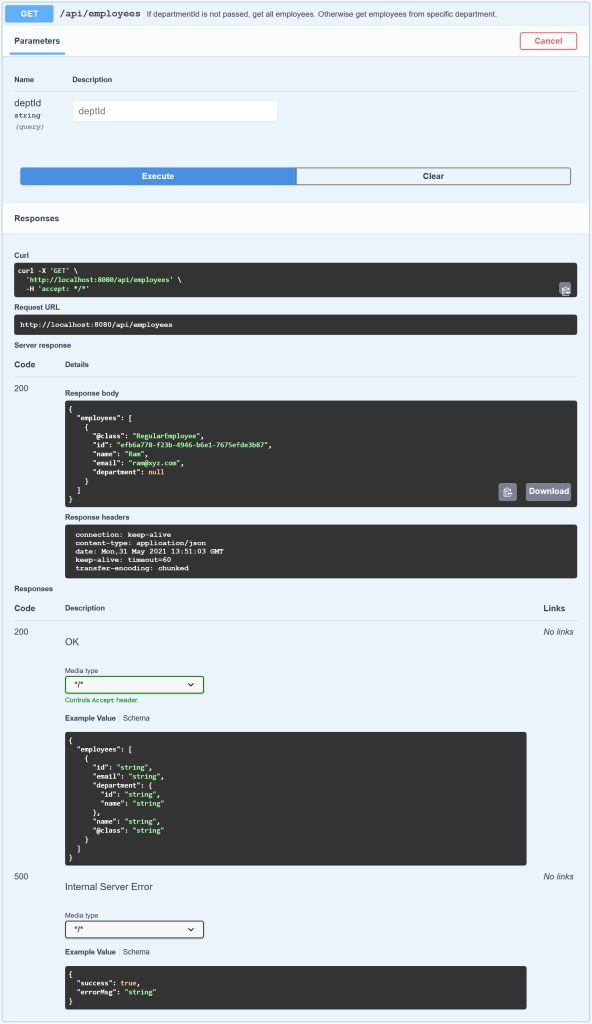
After adding the above annotations, here is how the API documentations looks like:

One more benefit of OpenAPI documentation is that the APIs can be executed on UI directly
Now that the documentation is ready, the next step is to generate Java API clients. We will use OpenAPI generator gradle plugin for this purpose. The other services can simply use the API client once generated, instead of writing their own client, to interact with API. The generated client encapsulates the logic of making REST calls to the exposed APIs behind the scenes. In order to do this, we need to add the following plugin to gradle:
01 02 03 04 05 06 07 08 09 10 11 12 13 14 15 16 17 18 19 20 21 22 23 24 25 26 27 28 29 | plugins { id "org.openapi.generator" version "5.1.0"}openApiGenerate { // The input specification to validate. Can be accessed at http://localhost:8080/v3/api-docs inputSpec.set("$rootDir/api-docs.json") // The output target directory into which code will be generated outputDir.set("$rootDir/thinclient") groupId.set("com.xyz.openapi") id.set("openapi-thinclient") version.set("0.0.1-SNAPSHOT") // Package for generated API classes apiPackage.set("com.xyz.openapi.thinclient.api") // Root package for generated code invokerPackage.set("com.xyz.openapi.thinclient.invoker") // All the model classes being used in API will be in this package modelPackage.set("com.xyz.openapi.thinclient.model") // Language in which client has to be generated. Please refer: https://openapi-generator.tech/docs/generators/java/ generatorName.set("java"); // REST API library to use. For Ex: jersey1, jersey2, okhttp-gson etc library.set("resttemplate") // A map of options specific to a generator. To see the full list of generator-specified parameters, please refer to [generators docs](https://github.com/OpenAPITools/openapi-generator/blob/master/docs/generators.md). configOptions.put("serializationLibrary", "jackson")} |
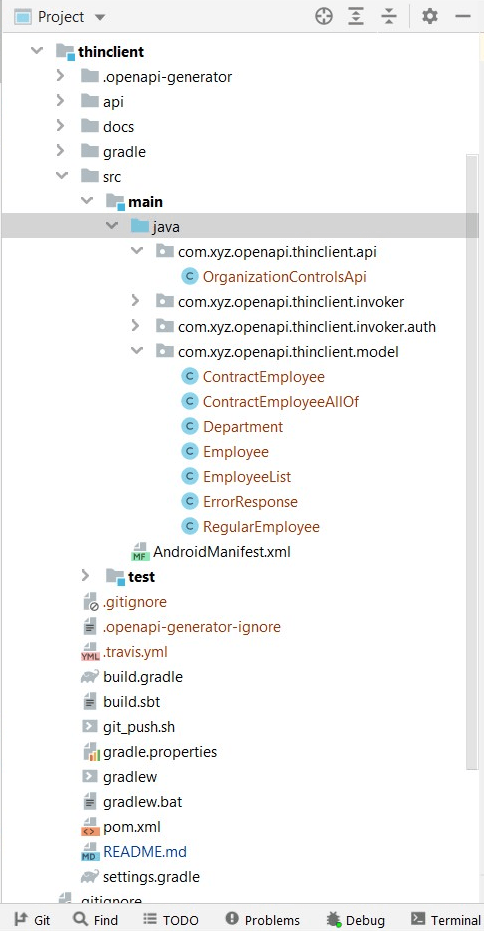
Now we can run gradle openApiGenerate to generate the classes in the path configured above in gradle configuration. Here is the structure of generated API client generated:
We can now publish the generated client to repository so that it can be used like any other dependency in the other micro-services. Also, gradle openApiGenerators lists all the languages in which the client can be generated. So, we can generate the client in the language of our choice from the specified list.
You can find the source code for this post on GitHub
Published on Java Code Geeks with permission by Prasanth Gullapalli, partner at our JCG program. See the original article here: Rest API Documentation and Client Generation with OpenAPI Opinions expressed by Java Code Geeks contributors are their own. |
