Selenium has always been a first choice for automation developers to automate their web application. Locating dynamic web elements have historically been dolorous for automation testers which brings the scope of XPath in picture.
Xpath is one of the most preferable locator provided by Selenium. Locators are Selenium commands used to locate a GUI web element present in the web page Document Object Model(DOM) structure. Below are few locators supported by Selenium to locate web elements:
- ID
- XPath
- Name
- Class Name
- CSS Selector
- Linktext
- Partial Linktext
- Tag Name
- DOM Locator
Though ID and CSS locators are said to be the best and fast locators. However, it is sometimes difficult to locate a web element even with ID, Name and CSS; in such case different methods of XPath in selenium play a vital role to locate the dynamic element.
In this article, we would be more focusing on how to deal with dynamic XPath’s. Dynamic XPath are also known as Custom XPath. Before moving ahead, let’s have a quick look at the definition of XPath and different types of XPath in selenium.
What is XPath in Selenium?
XPath is a standard strategy supported by Selenium to locate web elements. It provides the path expression to navigate through elements and attributes in an XML document. XPath is defined as XML Path that helps to query the XML documents.
General syntax of XPath: //Tagname[@AttibuteName = ‘value’]
The above syntax defines four components:
- Double forward slash(//) – Denote the current node
- Tagname – Defines the tagname for the element to be located
- AttributeName – Defines an attribute of the tag defined in the starting of the XPath
- Value – Represents the value of an attribute defined
Types of XPath in Selenium
- Absolute XPath: It provides the path expression from root node to the desired element node. The drawback of this XPath type is, if there is a change of any node/tag between the defined XPath expression, the whole XPath will fail to find an element. Absolute XPath always begins with a single forward slash i.e. ‘/’.
Example: /html/body/div[1]/header/div/div[1]/div[3]/div/form/div[3]/div[1]/input
- Relative XPath: It provides the path being generated from the middle of the HTML DOM structure. It doesn’t need to start from a root node. It is said to be more reliable with a less chance of a script to be broken. Relative XPath begins with a double forward slash(//).
Example: //*[@id=”twotabsearchtextbox”]
Various methods for handling XPath
Though the browser allows us to inspect web elements and get XPath from DOM directly, but still as an automation tester, we must know how to create our own dynamic XPath. Let’s have a look at various methods for creating dynamic XPath in Selenium.
Note: Open the DOM of the web page by directing to inspect elements and press CTRL + F to open the DOM search field and try to create XPath on the same search field. If your created XPath is correct then the particular tag or element to be located would get yellow highlighted.
- Basic XPath –
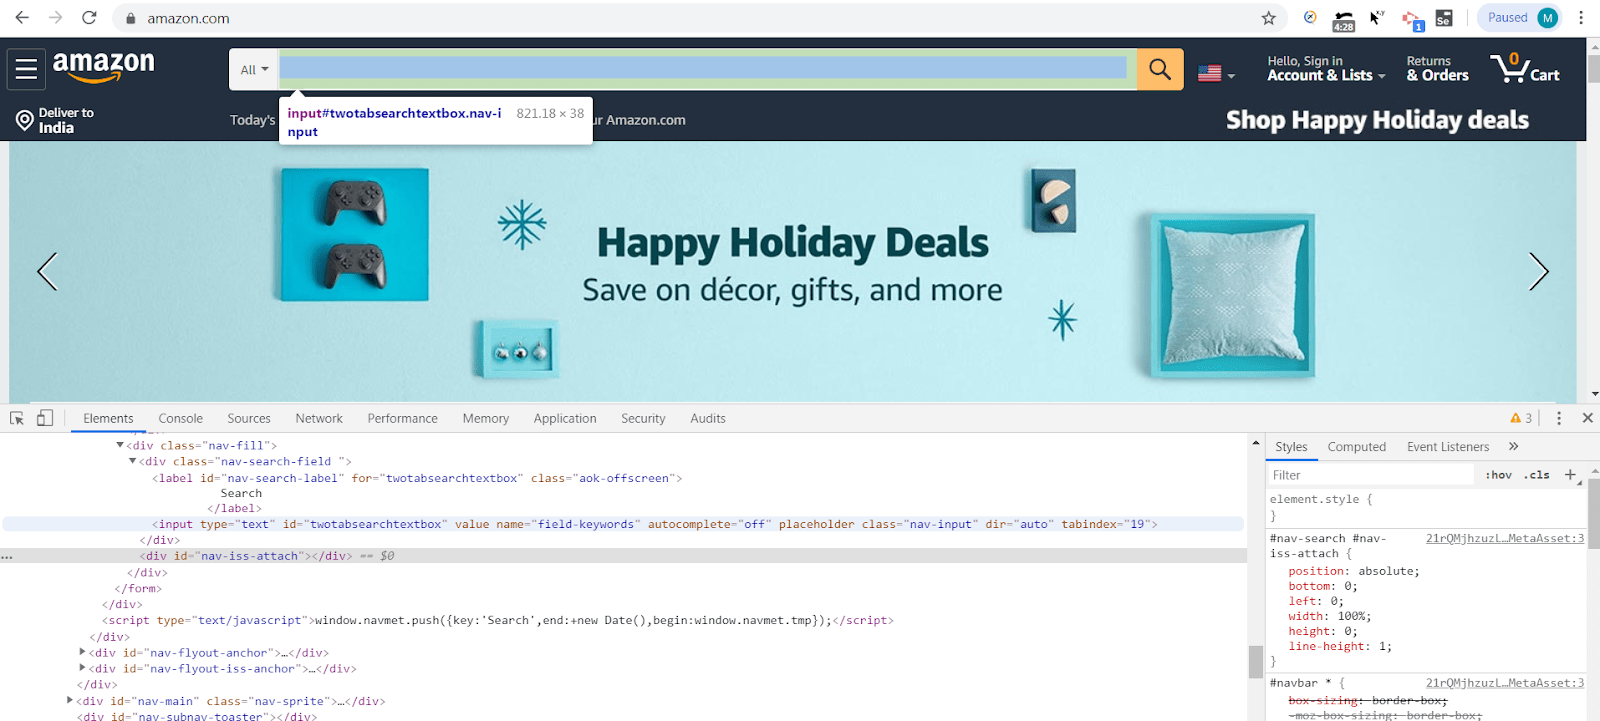
Open Image in new tab for better view of DOM
This is one of the straightforward methods to create XPath. In the above screenshot the light blue highlighted tag of DOM represents the search field of Amazon web application. To locate this search field, below are few valid XPath that can be used:
- //input[@id=’twotabsearchtextbox’]
- //input[@name=’field-keywords’]
- //*[@id=’twotabsearchtextbox’]
In the first XPath, we have used the “id” attribute and in second XPath, we have used “name” as an attribute. These types of XPath are very common and follow the exact syntactic approach defined above. In the third XPath, we have used asterisk(*) that would search id=’twotabsearchtextbox’ in any HTML tag present in DOM structure. Using of asterisk(*) is only recommended when you use ID as an attribute since ID is always unique.
2) Using multiple attributes with ‘and’ & ‘or’ –
This method is just an extension of the previous method with the use of logic operators. You might find a case where different HTML tags have similar attributes with similar values. Using such attributes in your XPath might throw an error or can take you to a different web element than expected. For such cases, you can use multiple attributes for forming a single XPath that satisfies all conditions.
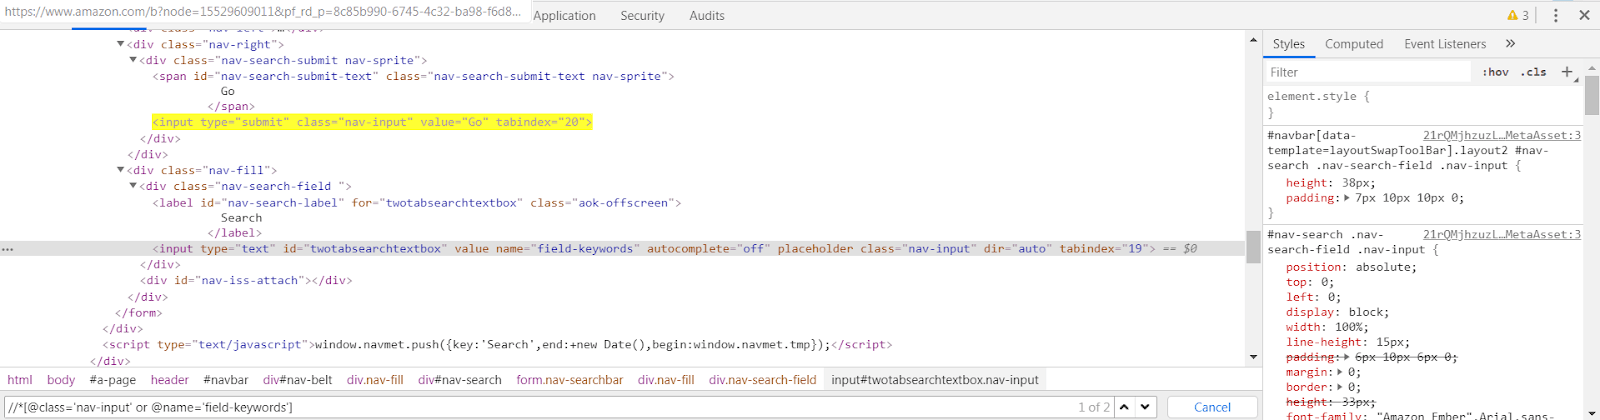
Let’s refer to the same above screenshot for locating Amazon search field with following XPath:
- //*[@class=’nav-input’ and @name=’field-keywords’]
- //*[@class=’nav-input’ or @name=’field-keywords’]
If you see the DOM of https://amazon.com web page, you would see that the class=’nav-input’ is used multiple times in different HTML tags. So, when we use the “name” attribute along with “class” attribute using “and” keyword, it would point to the correct element that is the Amazon search field.
However, using ‘or’ keyword in the same expression as in the second XPath, would lead you to two different elements as shown in the below screenshot(showing “1 of 2” in the search field means 2 elements available for the same XPath). “OR” keyword would point to number of elements having attributes class=’nav-input’ or name=’field-keywords’
- Contains() – This method is basically used in XPath to locate an element using partial value of an attribute. It is most preferable in cases where attribute values are dynamic in nature. Suppose you have an attribute in DOM whose value is “tata-007” and the last 3 digits are very dynamic and changes every time the page is refreshed. In such a case, we can only use the partial value such as “tata” to locate an element.
For ex: In the below screenshot of https://apple.com, we need to locate a top-bar element “Mac”. Though we have a class=’ac-gn-link ac-gn-link-mac’ given in DOM for element Mac, but still we can use only partial value of class attribute in order to locate.
- //a[contains(@class,’link-mac’)]
- //a[contains(@class,’link-ipad’)]
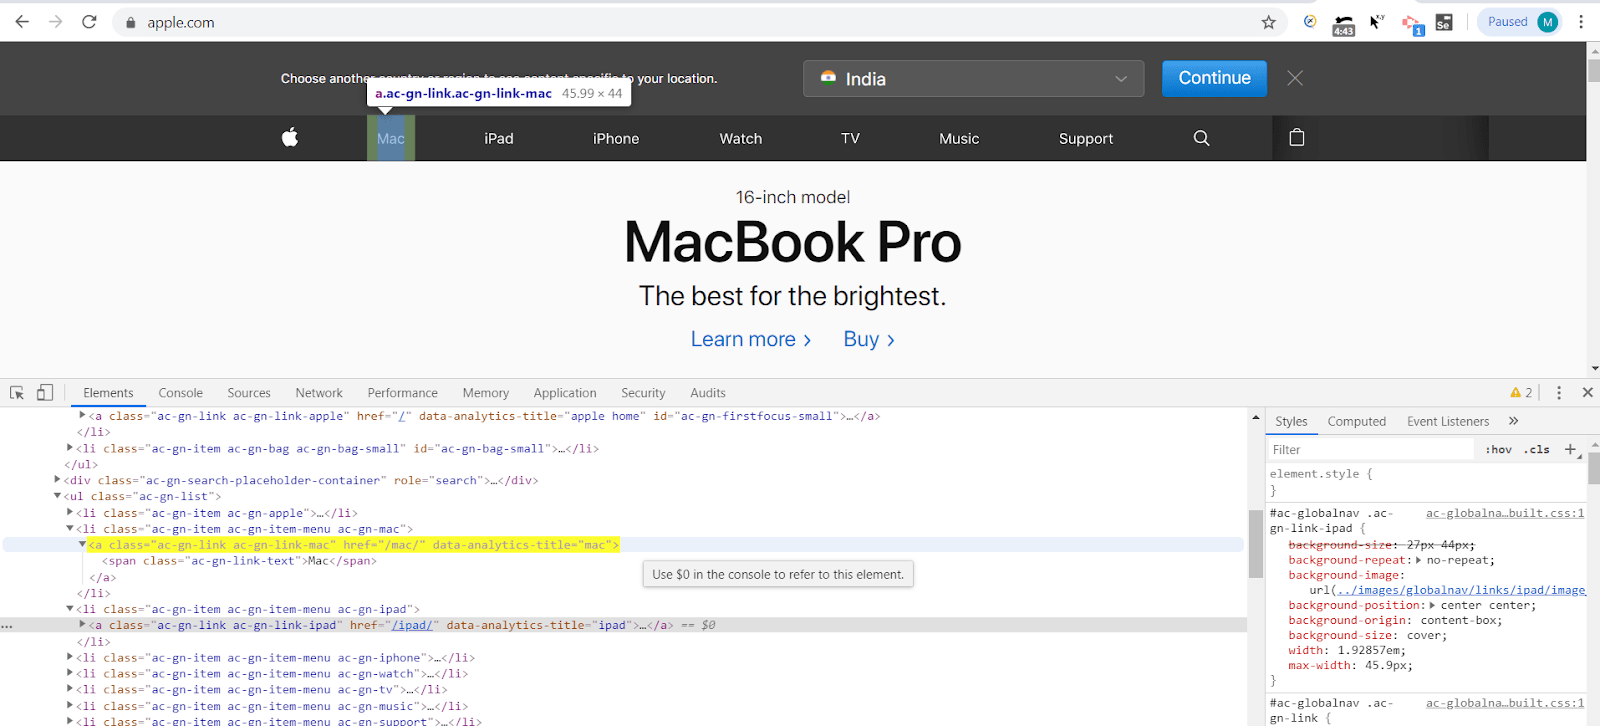
In the first XPath, we have only used ‘link-mac’ which is a partial value of class=’ac-gn-link ac-gn-link-mac’. Similarly, to locate the iPad on the same web page, we have class=’ac-gn-link ac-gn-link-ipad’ in our DOM, however to use only a partial value, in the second XPath, we have just used ‘link-ipad’.
4) Text() – This approach can be used when we need to locate an element via text. We can use the text of an element given for that particular element HTML tag. This text can be either button name or label name or any other text visible on a web page.
Let’s refer to the above screenshot as an example to locate “Mac” on top-bar, given the DOM structure as :
<span class=”ac-gn-link-text”>Mac</span>
following would be the XPath:
- //span[text()=’Mac’]
- //span[contains(text(),’Ma’)]
The first XPath, we have only used the text of the “Mac” button on the top-bar with “span” as HTML tag name.
In the second XPath, we have just used the partial value of the “Mac” button that is “Ma”. As we have covered in the previous point about the contains method, it can be used to locate an element with only the partial text or partial attribute value.
5) Index Value – In this we specify the index value in our XPath of an element we wish to locate. This index value is similar to the indexing of an array. In the same screenshot above of https://apple.com we see that there is a top-bar of unordered lists which has an HTML tag <ul>. For this unordered list we have list items given in DOM with HTML tag <li>. Please refer to the above attached screenshot to see the full DOM structure, you would be able to checkout the list items such as Apple Logo, Mac, iPad, iPhone, Watch etc.
Following would be the valid XPath to locate these elements using their index value given in square brackets:
- To locate “Mac” – //ul[@class=’ac-gn-list’]/li[2]
- To locate “iPad” – //ul[@class=’ac-gn-list’]/li[3]
6) Chained XPath – As the name suggests, the Chained XPath is nothing but the combination of XPath merged in a chain. In the previous example of Index Value, suppose we have n number of list items and getting the index value for a particular item would be a challenging task. In such case, you can merge the different XPath having different HTML tags or/and different attributes and values.
Below XPath would help locating “Mac” and “iPad” with chained XPath created using <ul> and <li> HTML tags given in DOM structure:
- To locate “Mac” – //ul[@class=’ac-gn-list’]//li[@class=’ac-gn-item ac-gn-item-menu ac-gn-mac’]
- To locate “iPad” – //ul[@class=’ac-gn-list’]//li[@class=’ac-gn-item ac-gn-item-menu ac-gn-ipad’]
Now, we will have a look at XPath Axes that can be used for handling complex and dynamic XPath in Selenium by traversing through parent, child, siblings, Ancestor and Descendant of the context node. The context node is the node where the XPath is currently pointing at. Using XPath Axes is more useful when we do not have a direct way to locate the desired node and hence, complex traversing to our desired node with XPath Axes is required.
7) Ancestor – Ancestor can be used to select grandparent and parent node of the context node depending upon the ancestor HTML tag defined.
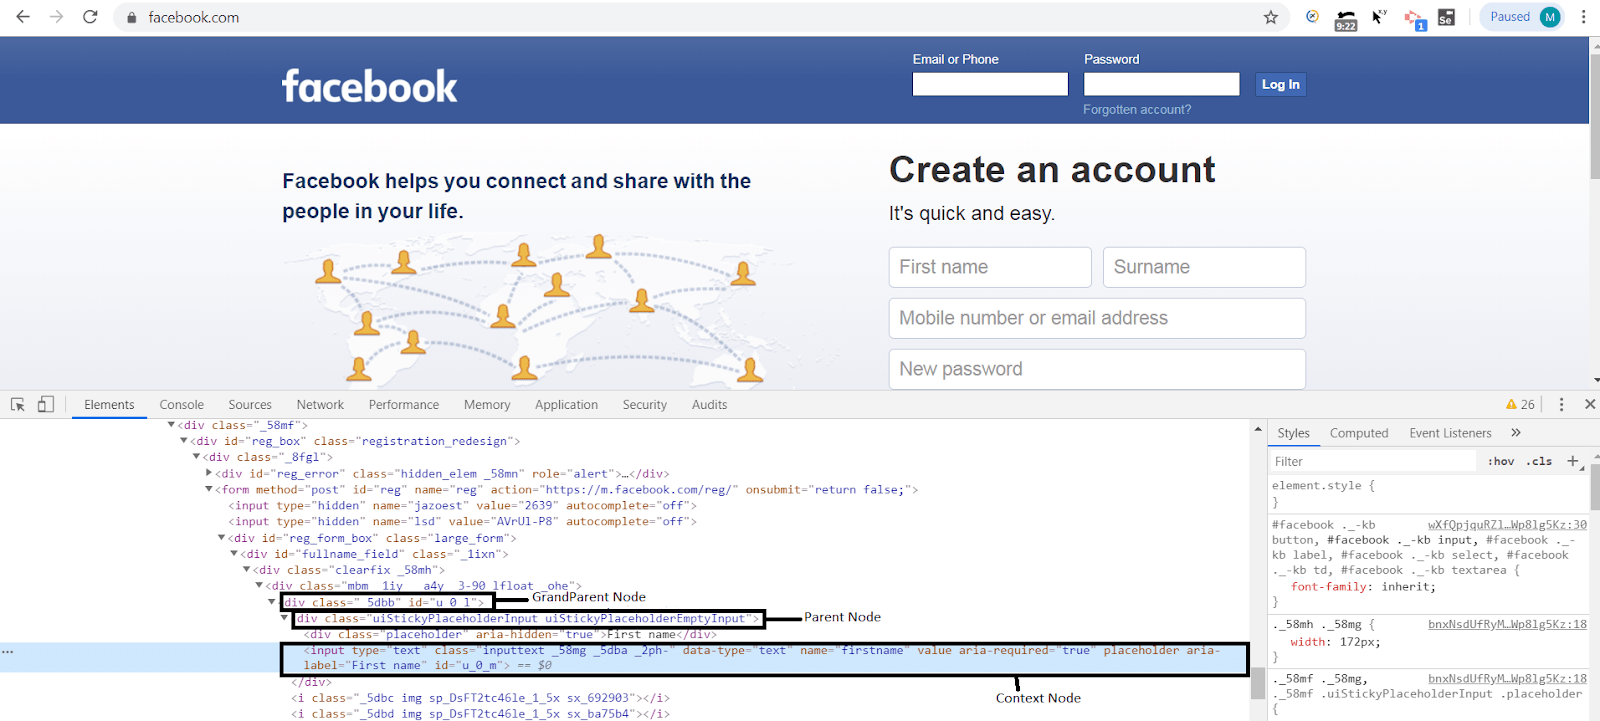
Suppose, we want to get only “div” ancestor of Create Account-First Name field, we would have the following XPath:
- //input[@name=’firstname’]//ancestor::div
- //input[@name=’firstname’]//ancestor::div[1]
The first XPath gives you all the HTML “div” tagname ancestor of name=’firstname’. However, the second XPath will only give the first ancestor of name=’firstname’ and that can be even a grandparent of grandparent depending on the DOM structure.
8) Descendant – Descendant is opposite to ancestor, it is used to select the children and sub-children of the context node. Here is the screenshot of https://facebook.com
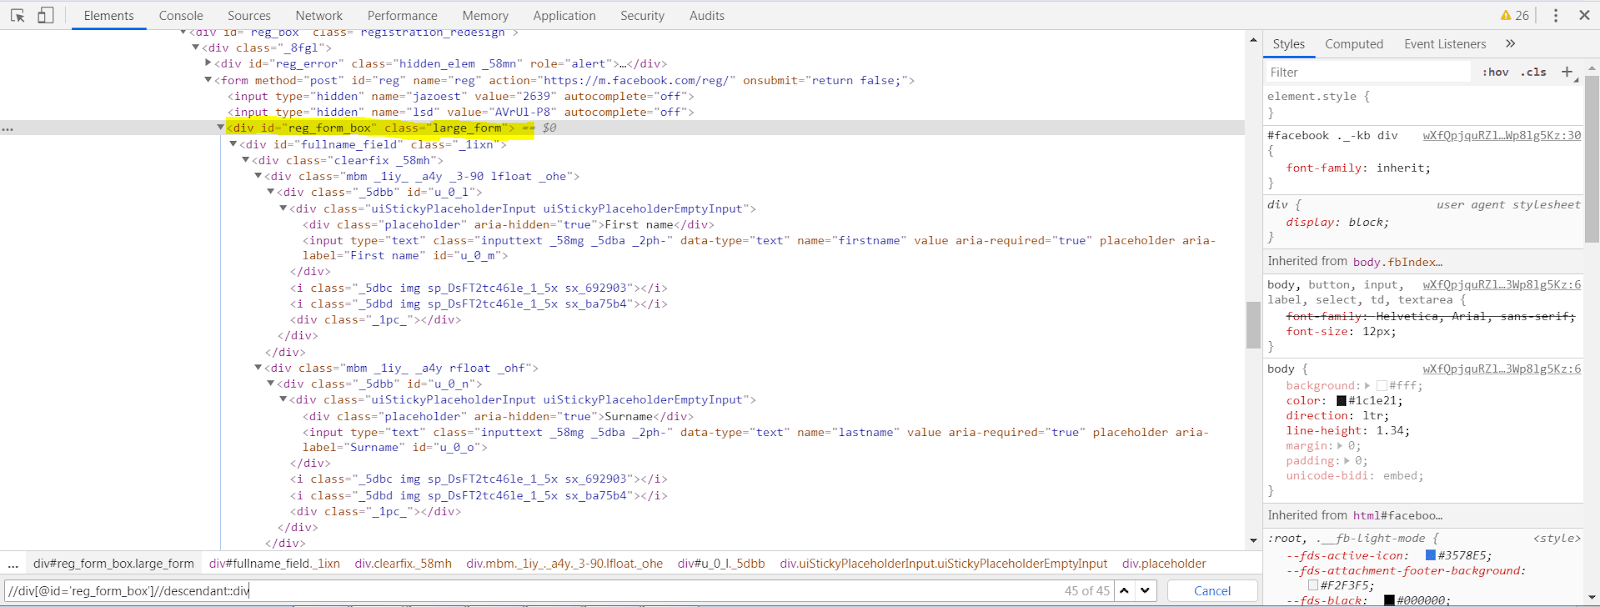
The XPath : “//div[@id=’reg_form_box’]//descendant::div” created according to the yellow highlighted context node would select all the children and sub-children of the context node.
9) Parent – Using the “parent” keyword in XPath would be helpful for selecting only the Parent node of the Context node. Let’s refer to the same instance of Ancestor method given above, we get the Parent node through its child node using the XPath:
//input[@name=’firstname’]//parent::div
In this case, the context node is the child node which is being used to select it’s Parent node.
10) Child – Using the “child” keyword in XPath would be helpful for selecting only the Child node of the Context node. Here the Context node would be the Parent node. Child will only select the immediate descendants of the context node, but doesn’t go deeper like the descendant method.
11) Following – This approach can be used to locate elements following the current/context node.
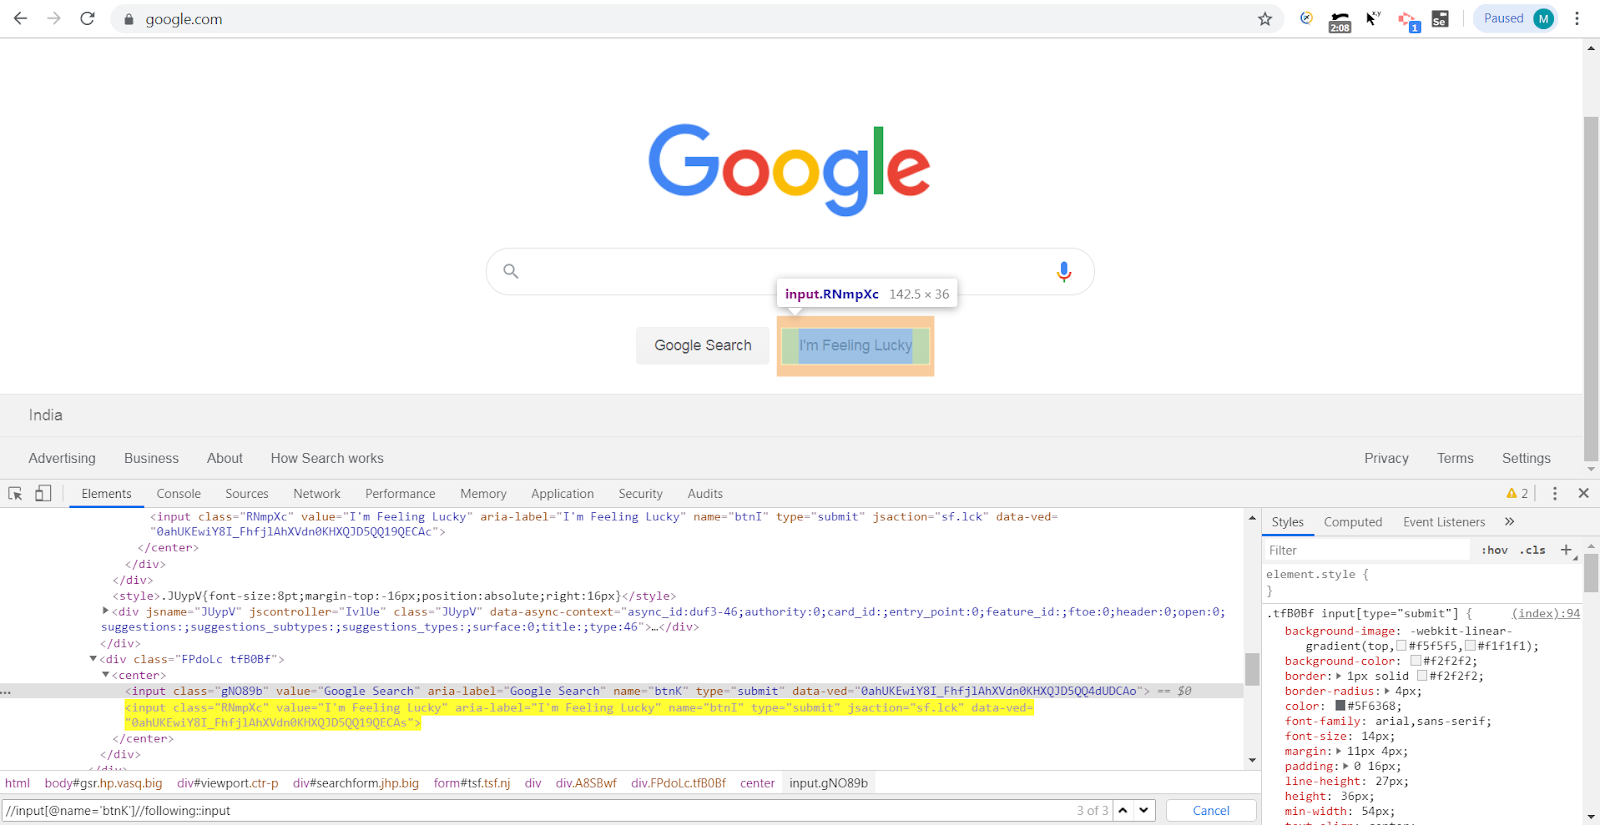
Here is the above screenshot of https://google.com where we will be locating the “I’m Feeling Lucky” button with the help of the “Google Search” button.
As we can see in the DOM, the element “I’m Feeling Lucky” button is following the “Google Search” button. Below would be the XPath for this:
//input[@name=’btnK’]//following::center//input[2]
12) Preceding – This approach can be used to locate elements that lie before the current/context node or in other words we can say, it can be used to locate the preceding element from the current/context node.
In the Google screenshot above, now let’s try to locate the “Google Search” button with the help of the “I’m Feeling Lucky” button. Below would be the XPath for this:
//input[@name=’btnI’]//preceding::center//input[1]
13) Following-sibling – Before proceeding with this method, you must be clear about the usage of the “Following” XPath axes method. In this case, all the following nodes of context nodes are selected depending on the following-sibling tagname no matter even if they are under or children of the context node, however, they would be having the same parent.
In the Google screenshot attached above, we would be using the div class attribute as the context node which has “Google Search” button and “I’m Feeling Lucky” button as their siblings, below is the valid XPath for the same:
//div[@class=’FPdoLc tfB0Bf’]//following-sibling::input
You might be getting confused between child and sibling now. You don’t have to get confused, keep in mind that all siblings are referred to as the child of the parent node. Following-sibling can also be used to traverse between different children of parent nodes.
14) Preceding-sibling – This is totally opposite to Following-sibling. In this case, you can traverse to sibling nodes before the context node. Let’s refer to the same screenshot of Google where we would be locating the “Google Search” button using it’s sibling “I’m Feeling Lucky” button. Here is the XPath for this:
//input[@name=’btnI’]//preceding-sibling::input[1]
Please make sure that you are giving the right index value otherwise you may get located on some other web element which may lead to failure of your automated test case.
Confused, which XPath method is more feasible?
When automating functional tests with Selenium, it is often not clear which locator and what strategy is to be used to locate a desired element. Choosing a good locator plays a vital role in our automation framework as it defines how reliable, maintainable and durable our automation scripts would be.
Since we have covered different XPath methods above, you might be thinking which method would be more feasible. There are actually few set of things that need to be noticed before choosing any method like:
Scope: It is always important to not to be dependent on page design choices while choosing the locator method. Instead, the choices must be created on the basis of durability and reliability which actually defines the long term scope of each locator method. For instance, it is good to use relative XPath technique rather than absolute Xpath technique since the absolute path may break your script if any element structure gets changed from root.
Technology: It is said, not be dependent on UI implementation technology to automate UI test cases. For example, in case of an AngularJS application, try not to use angular attributes like ng-binding or ng-scope while creating a XPath with any of the methods.
HTML Structure: It is always good to fetch a locator path from the minimum area of HTML structure of a page. The more elements you add in a path to locate the desired element, the higher is the chance that even a minor change in UI would break your locator. Hence, trying to include a minimum number of elements or attributes to form a XPath is said to be a good practise.
Adopting SelectorsHub to generate XPath in Selenium
As the name suggests, SelectorsHub is the hub of selectors supported by Selenium. It is a browser extension and free to use plugin that auto-suggests XPath based on multiple XPath methods. It not only suggests XPath but also suggests all possible combinations of CSS selector.
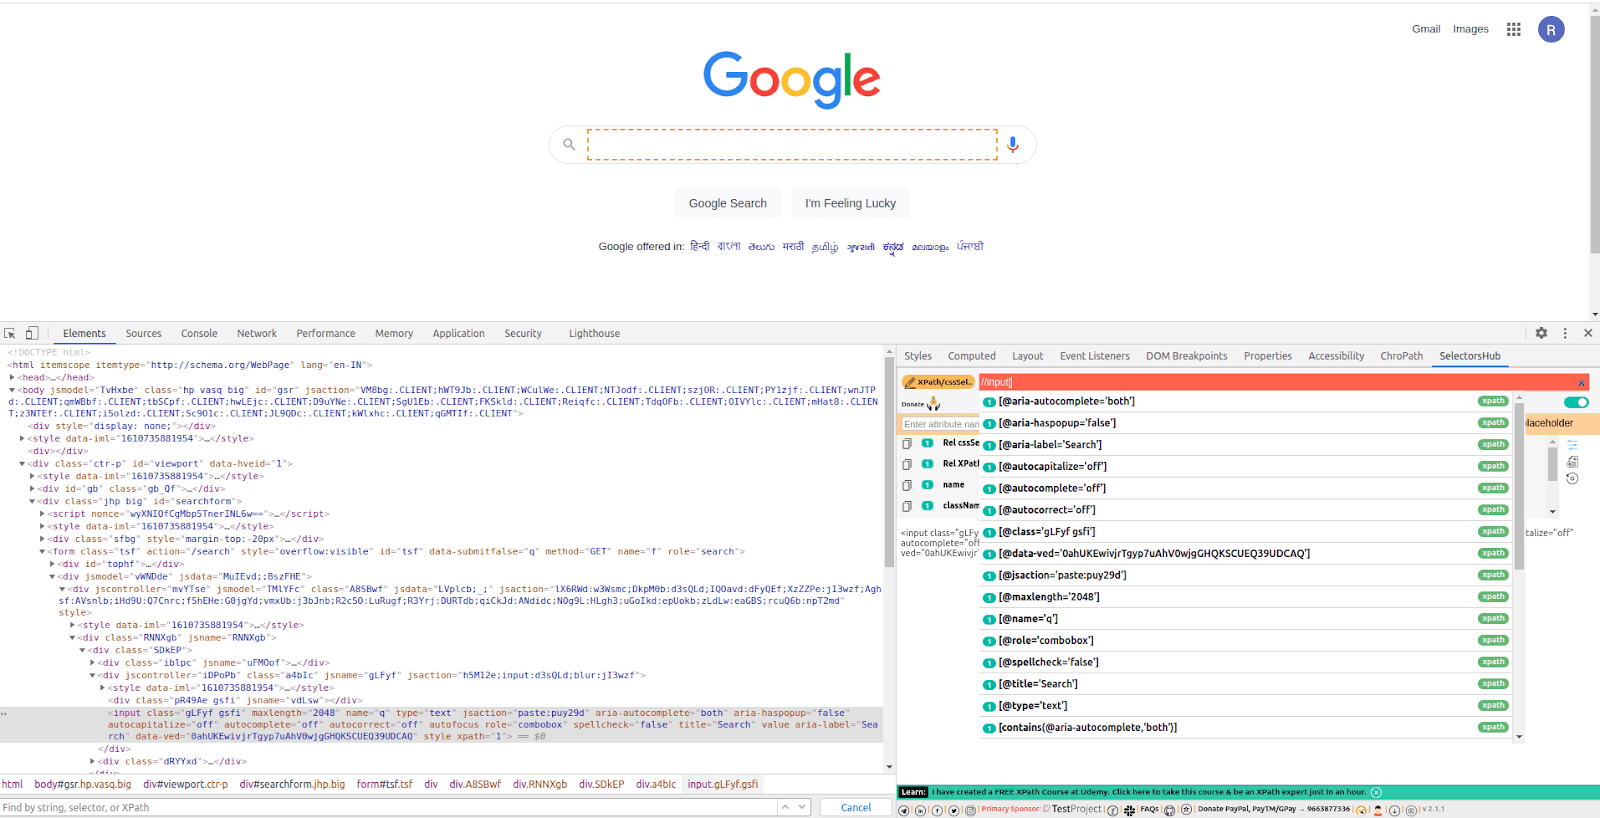
Going back to the history, before developing the SelectorsHub plugin, the creator of SelectorsHub did a short survey and got to know that 79% of automation developers love to create their own XPath instead of directly copying from browser dev tools. So basically, SelectorsHub was released with a motive to enhance XPath creating skills and selecting the robust locator among multiple combinations.
Key features of SelectorsHub:
- Auto-Suggestion of XPath and CSS Selector
- Secure and free to use plugin
- Support for iFrame
- Support for Shadow DOM elements
- Support for SVG elements
To know more about this innovation, please have a look at this amazing SelectorsHub tutorial.
Published on Java Code Geeks with permission by Balamurugan, partner at our JCG program. See the original article here: A Comprehensive Guide To Deal With XPath In Selenium Opinions expressed by Java Code Geeks contributors are their own. |
