In this post we’ll take a look at the Provider pattern in Flutter. Provider pattern is recommended by the flutter team at Google. They also covered it at Google I/O 2019 in Pragmatic State Management in Flutter.
Some other patterns such as BLoC Architecture use provider pattern internally. But the provider pattern is far easier to learn and has much less boilerplate code.
In this post, we’ll take the default Counter app provided by flutter and refactor it to use Provider Pattern.
Note: If you want to learn BLoC Architecture, check it out here.
Getting Started
Create a new flutter project and name it whatever you want.
First we need to remove all the comments so that we have a clean slate to work with.
01 02 03 04 05 06 07 08 09 10 11 12 13 14 15 16 17 18 19 20 21 22 23 24 25 26 27 28 29 30 31 32 33 34 35 36 37 38 39 40 41 42 43 44 45 46 47 48 49 50 51 52 53 54 55 56 57 58 59 60 61 62 63 64 65 66 67 | import 'package:flutter/material.dart';void main() { runApp(MyApp());}class MyApp extends StatelessWidget { // This widget is the root of your application. @override Widget build(BuildContext context) { return MaterialApp( title: 'Flutter Demo', theme: ThemeData( primarySwatch: Colors.blue, visualDensity: VisualDensity.adaptivePlatformDensity, ), home: MyHomePage(title: 'Flutter Demo Home Page'), ); }}class MyHomePage extends StatefulWidget { MyHomePage({Key key, this.title}) : super(key: key); final String title; @override _MyHomePageState createState() => _MyHomePageState();}class _MyHomePageState extends State<MyHomePage> { int _counter = 0; void _incrementCounter() { setState(() { _counter++; }); } @override Widget build(BuildContext context) { return Scaffold( appBar: AppBar( title: Text(widget.title), ), body: Center( child: Column( mainAxisAlignment: MainAxisAlignment.center, children: <Widget>[ Text( 'You have pushed the button this many times:', ), Text( '$_counter', style: Theme.of(context).textTheme.headline4, ), ], ), ), floatingActionButton: FloatingActionButton( onPressed: _incrementCounter, tooltip: 'Increment', child: Icon(Icons.add), ), ); }} |
Now add the dependency for Provider in pubspec.yaml file. At the time of writing this, the latest version is 4.1.2 Here’s how your pubspec.yaml would look like:
01 02 03 04 05 06 07 08 09 10 11 12 13 14 15 16 17 18 19 20 21 22 23 | name: provider_pattern_explaineddescription: A new Flutter project.publish_to: 'none'version: 1.0.0+1environment: sdk: ">=2.7.0 <3.0.0"dependencies: flutter: sdk: flutter provider: ^4.1.2 cupertino_icons: ^0.1.3dev_dependencies: flutter_test: sdk: flutterflutter: uses-material-design: true |
The default app is basically a stateful widget which rebuilds every time you click the FloatingActionButton (which calls setState() ).
However, we’re going to convert it into a stateless widget!
Creating the Provider
Let’s go ahead and create our provider. This will be the single source of truth for our app. This is the place that we’ll store our state, which in this case is the current count.
So create a class named Counter and add the count variable.
1 2 3 4 5 | import 'package:flutter/material.dart';class Counter { var _count = 0;} |
To convert it into a provider class extend it from ChangeNotifier from material.dart package. This provides us with notifyListeners() method. This will notify all the listeners whenever we change a value.
Since all we do here is increment the counter, add a method to increment the counter.
1 2 3 4 5 6 7 8 | import 'package:flutter/material.dart';class Counter extends ChangeNotifier { var _count = 0; void incrementCounter() { _count += 1; }} |
At the end of this method we’ll call notifyListeners(). This will trigger a change all over the app to whichever widget is listening to it. This is the beauty of the provider pattern in flutter. You don’t have to care about manually dispatching to streams.
Also create a getter to return the counter value. We’ll use this to display the latest value.
01 02 03 04 05 06 07 08 09 10 11 12 13 | import 'package:flutter/material.dart';class Counter extends ChangeNotifier { var _count = 0; int get getCounter { return _count; } void incrementCounter() { _count += 1; notifyListeners(); }} |
Listening to button clicks
Now that we have the provider setup, we can go ahead and use it in our main widget.
First, let convert the MyHomePage widget to a stateless widget instead of stateful. We’ll have to remove the setState() call since that’s only available in a StatefulWidget.
01 02 03 04 05 06 07 08 09 10 11 12 13 14 15 16 17 18 19 20 21 22 23 24 25 26 27 28 29 30 31 32 33 34 35 36 37 38 39 40 41 42 43 44 45 46 47 48 49 50 51 52 53 | import 'package:flutter/material.dart';void main() { runApp(MyApp());}class MyApp extends StatelessWidget { @override Widget build(BuildContext context) { return MaterialApp( title: 'Flutter Demo', theme: ThemeData( primarySwatch: Colors.blue, visualDensity: VisualDensity.adaptivePlatformDensity, ), home: MyHomePage(title: 'Flutter Demo Home Page'), ); }}class MyHomePage extends StatelessWidget { int _counter = 0; final String title; MyHomePage({this.title}); void _incrementCounter() {} @override Widget build(BuildContext context) { return Scaffold( appBar: AppBar( title: Text(title), ), body: Center( child: Column( mainAxisAlignment: MainAxisAlignment.center, children: <Widget>[ Text( 'You have pushed the button this many times:', ), Text( '$_counter', style: Theme.of(context).textTheme.headline4, ), ], ), ), floatingActionButton: FloatingActionButton( onPressed: _incrementCounter, tooltip: 'Increment', child: Icon(Icons.add), ), ); }} |
With this done, now we can use the provider pattern in flutter to set and get the counter value. On button click we need to increment the counter value by 1.
So, in the _incrementCounter method (which is called when button is pressed) add this line:
1 | Provider.of<Counter>(context, listen: false).incrementCounter(); |
What’s happening here is that you’ve asked Flutter to go up in the Widget Tree and find the first place where Counter is provided (I’ll tell you how to provide it in the next section). This is what Provider.of() does.
The generics (value inside <> brackets) tell flutter what is the type of Provider to look for. Then flutter goes up and above the widget tree till it finds the Provided value. If the value isn’t provided anywhere then an exception is thrown.
Finally, once you’ve got the provider, you can call any method on it. Here we call our incrementCounter method. But we also need a context, so we accept the context as an argument and alter the onPressed method to pass the context as well:
1 2 3 | void _incrementCounter(BuildContext context) { Provider.of<Counter>(context, listen: false).incrementCounter();} |
Note: We’ve set listen: false because we don’t need to listen to any values here. We’re just dispatching an action to be performed.
Providing the Provider
The provider pattern in flutter will look for the latest value provided. The diagram below will help you better understand.
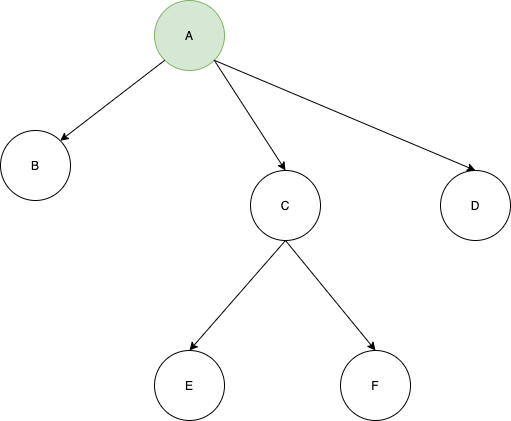
In this diagram the GREEN object A will be available to the rest of the element below it i.e B,C,D,E,F.
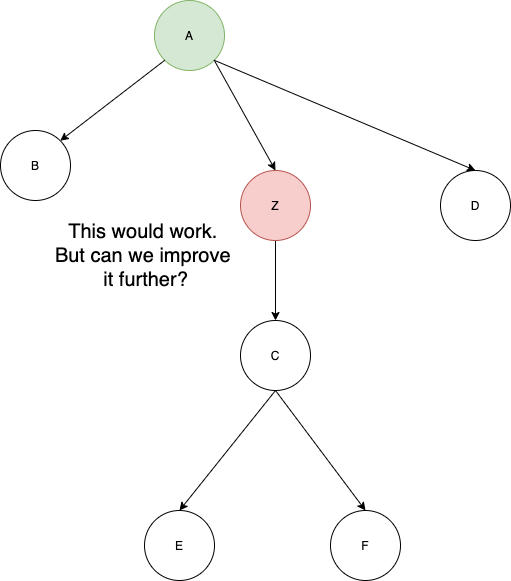
Now suppose we want to add some functionality to the app and we create another provider Z. Z is required by E and F. So what is the best place to add that ?
We can add it to the root ie. above A. This would work.

But this is not very efficient. Flutter will go through all the widgets above and then finally go to the root. If you have very long widget trees (which you definitely will in a production app) then it’s not a good idea to put everything at the root.
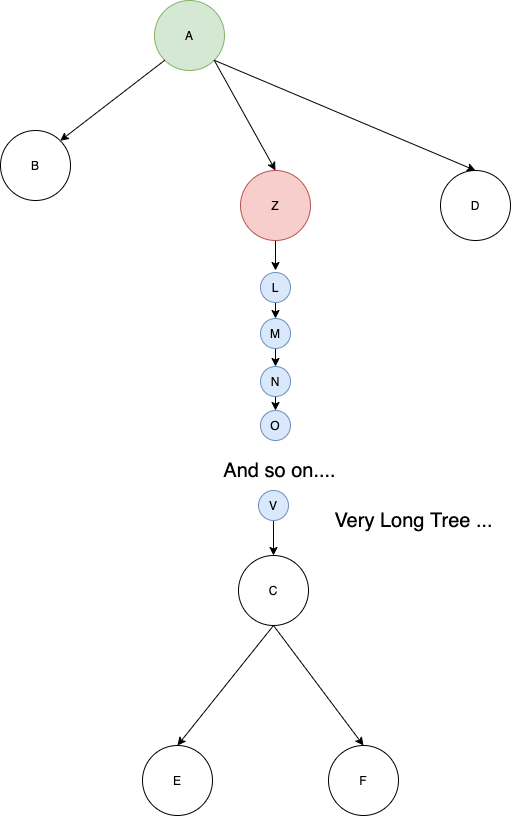
Instead, we can look at what’s the common denominator of E and F? That is C. So if we put Z just above E and F, it would work.
But what if we want to add another object X required by E and F? We’ll again do the same. Notice how the tree keeps growing.
There’s a better way to manage that. What if we provide all the objects at one level?
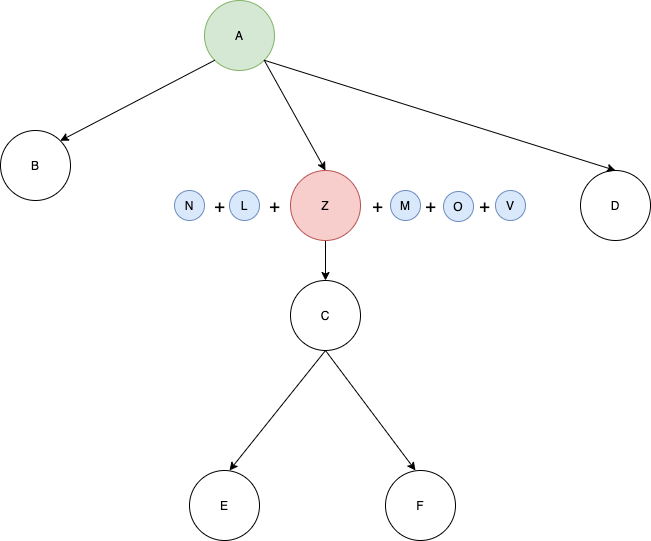
This is perfect. This is how we’ll eventually implement our provider pattern in flutter. We’ll make use of something called MultiProvider which let’s us declare multiple providers at one level!
We’ll get MultiProvider to wrap the MaterialApp widget:
01 02 03 04 05 06 07 08 09 10 11 12 13 14 15 16 17 18 19 20 | class MyApp extends StatelessWidget { @override Widget build(BuildContext context) { return MultiProvider( providers: [ ChangeNotifierProvider.value( value: Counter(), ), ], child: MaterialApp( title: 'Flutter Demo', theme: ThemeData( primarySwatch: Colors.blue, visualDensity: VisualDensity.adaptivePlatformDensity, ), home: MyHomePage(title: "AndroidVille Provider Pattern"), ), ); }} |
With this, we’ve provided the provider to our widget tree and can use it anywhere below this level in the tree.
There’s just one more thing left. We need to update the value displayed. Let’s do that.
Updating the text
To update the text, get the provider in the build function of your MyHomePage widget. We’ll use the getter we created to get the latest value.
Then just add this value to the text widget below. And we’re done! This is how your final main.dart file would look like:
01 02 03 04 05 06 07 08 09 10 11 12 13 14 15 16 17 18 19 20 21 22 23 24 25 26 27 28 29 30 31 32 33 34 35 36 37 38 39 40 41 42 43 44 45 46 47 48 49 50 51 52 53 54 55 56 57 58 59 60 61 62 63 64 65 | import 'package:flutter/material.dart';import 'package:provider/provider.dart';import 'package:provider_pattern_explained/counter.dart';void main() { runApp(MyApp());}class MyApp extends StatelessWidget { @override Widget build(BuildContext context) { return MultiProvider( providers: [ ChangeNotifierProvider.value( value: Counter(), ), ], child: MaterialApp( title: 'Flutter Demo', theme: ThemeData( primarySwatch: Colors.blue, visualDensity: VisualDensity.adaptivePlatformDensity, ), home: MyHomePage(title: "AndroidVille Provider Pattern"), ), ); }}class MyHomePage extends StatelessWidget { final String title; MyHomePage({this.title}); void _incrementCounter(BuildContext context) { Provider.of<Counter>(context, listen: false).incrementCounter(); } @override Widget build(BuildContext context) { var counter = Provider.of<Counter>(context).getCounter; return Scaffold( appBar: AppBar( title: Text(title), ), body: Center( child: Column( mainAxisAlignment: MainAxisAlignment.center, children: <Widget>[ Text( 'You have pushed the button this many times:', ), Text( '$counter', style: Theme.of(context).textTheme.headline4, ), ], ), ), floatingActionButton: FloatingActionButton( onPressed: () => _incrementCounter(context), tooltip: 'Increment', child: Icon(Icons.add), ), ); }} |
Note: We haven’t set listen:false in this case because we want to listen to any updates in the count value.
Conclusion
I’ve also hosted this project on GitHub if you want to have a look: https://github.com/Ayusch/Flutter-Provider-Pattern. Let me know if you face any issues in the comments section below.
Published on Java Code Geeks with permission by Ayusch Jain, partner at our JCG program. See the original article here: Flutter Provider Pattern Explained Opinions expressed by Java Code Geeks contributors are their own. |
