Hello Friends,
In this tutorial,we will see how we can deploy a Spring Boot application over an AWS EC2 instance.
Here are the steps we are going to perform.
1. Create a Spring Boot Project with Spring Boot Initialiser.
2. Create a Rest end Point,which we can access after deployment
3. Launch an EC2 instance
4. Copy our Spring Boot project from our local machine to EC2 instance
5. Connect to EC2 instance using SSH
6. Remove JDK 7 and install JDK 8 over EC2 instance
7. Execute the spring boot jar on EC2 instance
8. Make sure your Security group allows the inbound traffic from internet over port 8080 and using TCP protocol
9. Test the Application by hitting the endpoint URL from browser .
So,Let us see step by step….
1. Create a Spring Boot Project with Spring Boot Initialiser
You can follow one of my previous tutorials where in I explained step by step how you can create a spring boot project using Spring Initialiser.Here is the link.
How to create a Spring Boot Project with Spring Initialiser
For this example ,I have given name “springbootproject” to the project,so you can give the same name,as name will be used in further steps.
2. Create a Rest end Point,which we can access after deployment
Add following Rest endpoint in the project.We are adding this very basic endpoint,so that we can later test the application by hitting this endpoint after deployment.
01 02 03 04 05 06 07 08 09 10 11 12 13 14 15 16 17 18 19 | package com.blogspot.javasolutionsguide.springbootproject;import org.springframework.web.bind.annotation.GetMapping;import org.springframework.web.bind.annotation.RequestMapping;import org.springframework.web.bind.annotation.RestController;/** * @author JavaSolutionsGuide * */@RestController@RequestMapping(value = "/api")public class Hello {@GetMapping(value = "/v1/data")public String sayHelloWorld() { return "Hello JavaSolutionsGuide Readers";}} |
3. Launch an EC2 instance
I have written a detailed step by step tutorial which explains how to Launch an EC2 instance in AWS.
Here is the Link. How to Launch an EC2 instance on AWS
4. Copy our Spring Boot project from our local machine to EC2 instance
As we want to deploy our spring boot project on EC2,the code has to move to EC2 instance.So for
copying code from your local machine to EC2 instance ,executing following command from the directory where your code is lying.
scp -i /Users/Aakarsh/downloads/
EC2Keypair.pem /Users/Aakarsh/Downloads/springbootproject/target/springbootproject-0.0.1-SNAPSHOT.jar ec2-user@ec2-54-242-53-241.compute-1.amazonaws.com:~
Syntax of scp looks like following
scp -i <path to pem file on local machine> <path to spring boot project or your deliverables> user@remote host name : ~
scp
You can read more on SCP at following link Secure Copy Protocol
.pem File
When you launch an EC2 instance in AWS,you specify the key pair.You can specify an existing key pair or a new key pair that you create at the launch.At EC2 boot time,the public key content is placed on the instance in an entry within ~/.ssh/authorized keys.To log into your instance,you must specify the private key(.pem file) when you connect to the instance.
ec2-user
please note that each Linux instance launches with a default Linux system user account.The default user name is determined by the API that user specified when you launched the instance.For Amazon Linux 2 or Amazon Linux API,the user name is ec2-user.
Tilde sign(~)
~ represents the home directory of the remote EC2 system.
5. Connect to EC2 instance using SSH
For connecting to EC2 instance ,you need to follow following instructions.
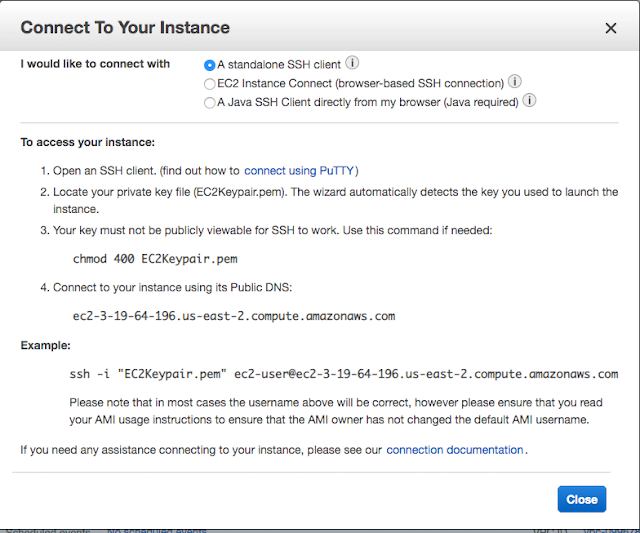
These instructions you will get once you click on instances and then Connect button from following screen.
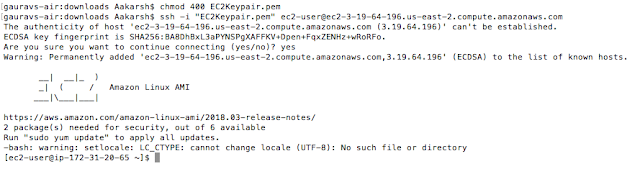
This is how it looks like when you execute commands from your terminal and gets connected to ec2 instance.
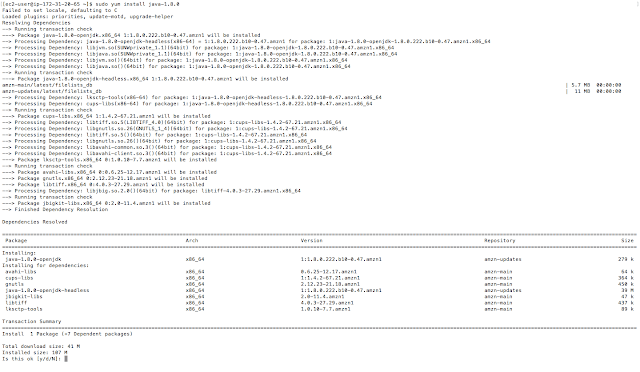
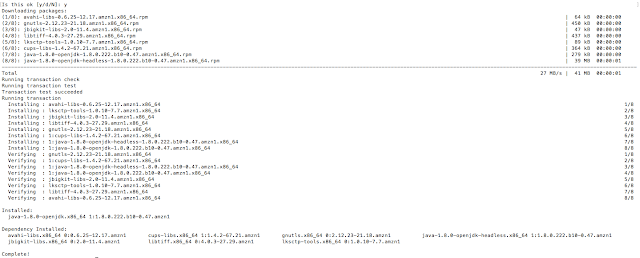
6. Remove JDK 7 and install JDK 8 over EC2 instance
EC2 instance that I got from AMI has open jdk 7 by default.
We can go ahead with JDK 7 as well ,but as I am using JDK most of the times now and compiled my project with jdk 8 only,so I removed JDK 7 and installed JDK 8.
Command to remove JDK 7
sudo yum remove java-1.7.0-openjdk
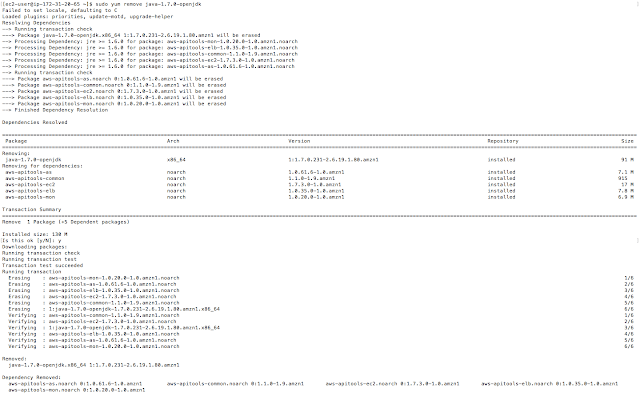
Command to Install JDK 8
sudo yum install java-1.8.0
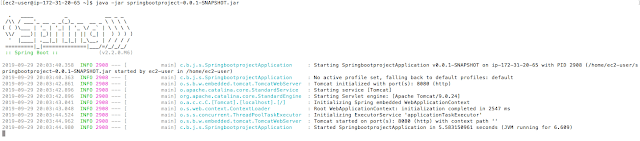
7. Execute the spring boot jar on EC2 instance
Execute following command
java -jar springbootproject-0.0.1-SNAPSHOT.jar
8. Make sure your Security group allows the inbound traffic from internet over port 8080 and using TCP protocol
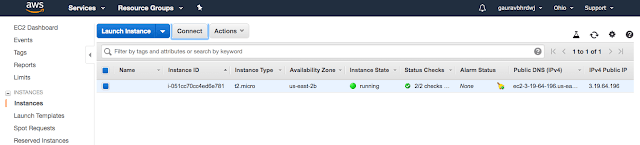
Click on the instance in AWS console and check the security group associated with your instance
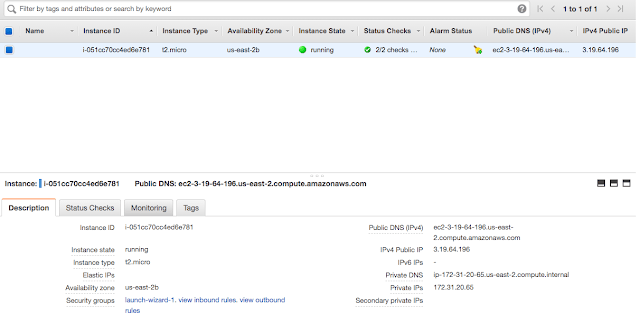
As we can see in above screenshot ,the security group attached with this EC2 instance is launch-wizard-1
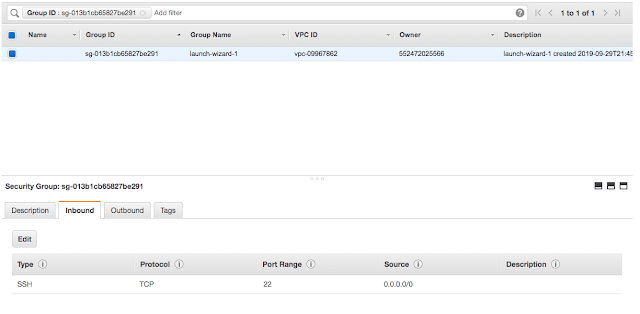
Now,as we open this security group,I have following entry,which as you can see that allows traffic from internet over port 22 only using SSH.Acatually this was the reason we were able to connect using SSH from our machine to this EC2 instance.If we remove this rule from here,SSh will not work
But now as we want to test our endpoint from browser(internet) using http protocol and our application needs to be accessed over port 8080.so there should be rule corresponding to that in security group.
So,Let us go ahead and add a security group inbound rule
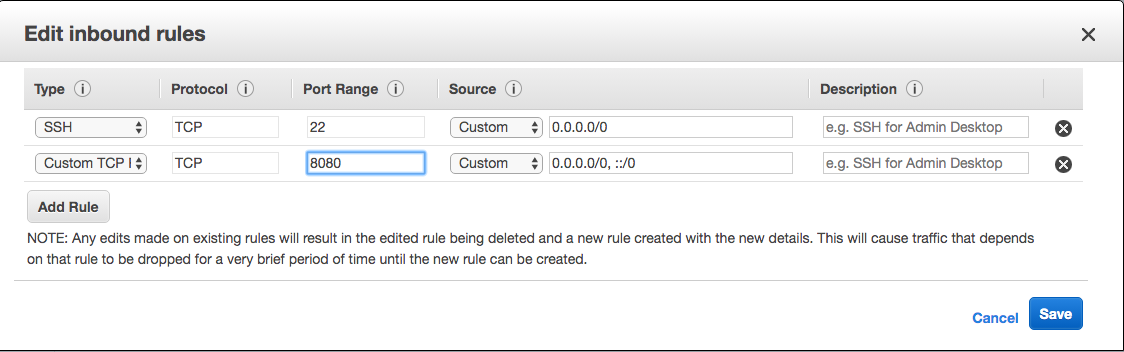
Click on save and your new rule will be saved.Also you don’t need to restart your instance to take this security group rule effect.It will take effect immediately,once you save the rule.
9. Test the Application by hitting the endpoint URL from browser
Hit the following URL from your browser
http://ec2-3-19-64-196.us-east-2.compute.amazonaws.com:8080/api/v1/data
Here ec2-3-19-64-196.us-east-2.compute.amazonaws.com is the public DNS of the EC2 instance.
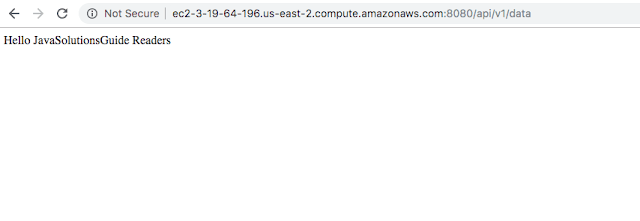
So,as you can see we are able to see the response from our endpoint Successfully,which means springbootproject is deployed successfully and is executing as expected.
That’s all for this tutorial.Thanks for reading .Also I am going to write more such tutorial on AWS in coming days.If you find this tutorial useful,don’t forget to subscribe to blog to not miss the update on latest blogs.
Published on Java Code Geeks with permission by Gaurav Bhardwaj, partner at our JCG program. See the original article here: How to deploy a Spring Boot Application on AWS EC2 instance Opinions expressed by Java Code Geeks contributors are their own. |

Thank you very much this post helped me
java -jar myapp.jar , application is getting terminated once SSH session terminated, is there any other way to run application in the background…
You could use something like Tmux
use like this:
nohup java -jar myapp.jar &
the & symbol means the program should run in background
and how to stop “nohup java -jar myapp.jar &” ????
and in my case it was working without “&” .
thank you in advance.
get process id using command “ps aux | grep myapp” then use command “kill -9 process_id” to kill the process
I want to make this spring file up all the time how it is possible