Hello Friends,
If you have used Spring framework previously, you must be aware that it takes some genuine effort to even get started with basic Spring functionality.With Spring Boot, that initial hassle is gone and you can get started in minutes.
Welcome to the world of Spring Boot!!!

In this tutorial, we will see various ways in which we can create a Spring Boot Project.
Basically, there are following four ways in which we can create Spring Boot Project :
1. Using Spring.io initializer
2. Using Eclipse or any similar IDE and Maven simple project
3. Using Spring Tool Suite
4. Using CLI
This tutorial will focus on creating Spring Boot project using Spring.io initializer.
1. Spring Boot Project using Spring.io initializer
Steps :
Step 1:
Open URL: http://start.spring.io/
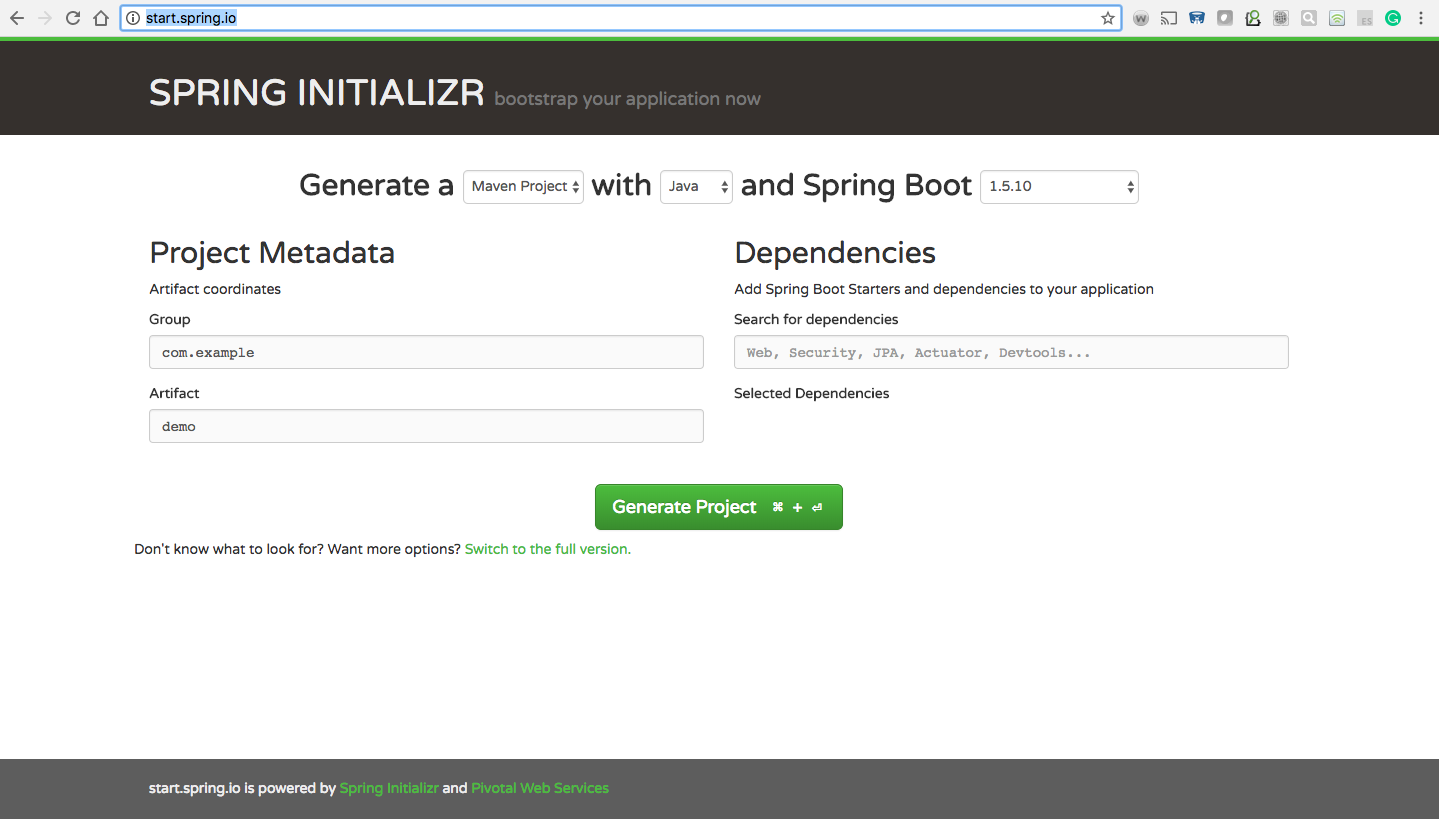
As we can see in above screenshot(you can refer extracted part below) screenshot that by default, it says that Generate a <Maven Project> With <Java> and Spring Boot <1.5.0>

But there are options to Generate a <Gradle Project> with <Kotlin>/<Groovy> and Sprig Boot<Lower versions> as well as per our requirements.
In this tutorial, we will focus on Maven with Java and Spring Boot 1.5.10.
Step 2:
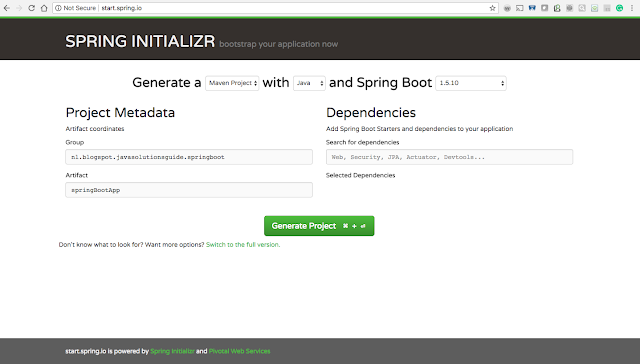
As we are creating a Maven project and we know that every Maven project has group and artifact id, so this interface provides us with placeholders where we can enter group and artifact id.
We will enter the following as group and artifact id :
group : nl.blogspot.javasolutionsguide.springboot
artifact Id : springBootApp
Step 3:
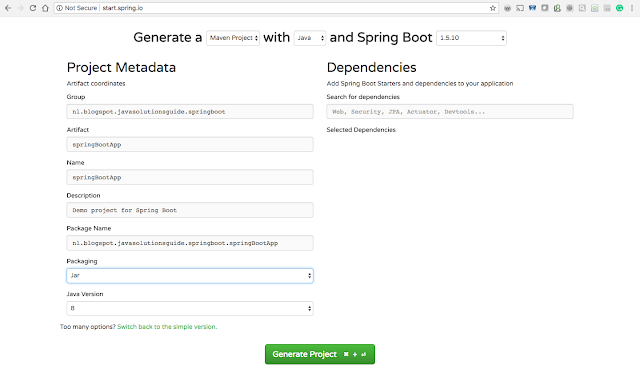
Click on the “switch to the full version” hyperlink, which is just below Generate Project button.

Step 4:
You will notice following additional fields :
Description: This is simply the description of the project.You can change it as suitable but it does not make difference from the technical front.
Package Name: This is a name of the package that will be created by Spring by default when Spring boot project will be created using this GUI of start.spring.io.
Packaging: This represents how the project will be bundled as a deliverable.Here we have two options :
Jar – Java Archive
War – Web Archive
We are going with Jar option first.We will see War as well later in this tutorial.
Java Version :
As of writing this tutorial, we have three options 7,8 and 9.I will go with the default which is Java 8.
Step 5:
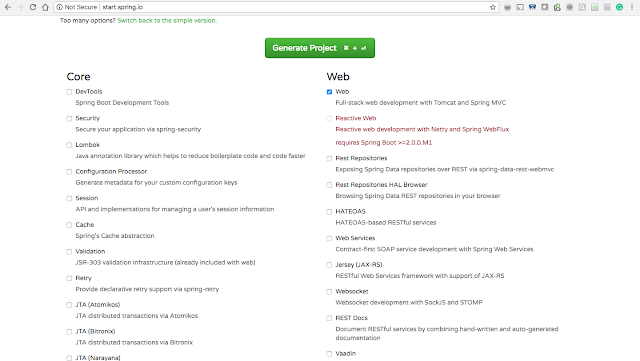
Scroll down on the start.spring.io web page and you will find below a list of dependencies which you can add in your application depending upon the requirements.Here we will add only Web dependency.For that, you just need to tick that dependency and once you will click on Generate Project, this dependency will be added to the generated project.
Step 6:
Click on Generate Project and you will see that project will be downloaded and Zip on your hard drive with the name which you would have given in Artifact text box.
![]()
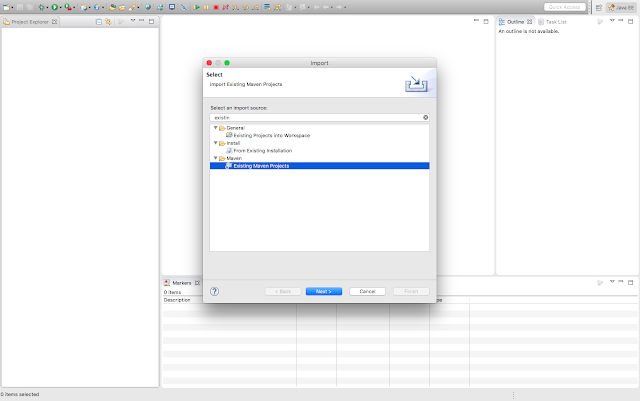
Step 7:
Extract project using WinZip and import in Eclipse as Maven Project by right clicking in Package Explorer and then select import… -> Existing Maven project ->Next -> Chose extracted project from the hard drive -> Click Finish.
Step 8:
You will see a java project as per Maven standard is there in eclipse.And with this, you have already set up a Spring Boot project in Eclipse.Easy…. right.

Step 9:
Let’s explore the project that has been created.
– Open Pom.xml and you will find that Pom is created with the following project co-ordinates as we defined in GUI
<groupId>nl.blogspot.javasolutionsguide.springboot</groupId>
 <artifactId>springBootApp</artifactId>
 <version>0.0.1-SNAPSHOT</version>

 <packaging>jar</packaging>

 <name>springBootApp</name>

 <description>Demo project for Spring Boot</description>
– Following parent has also been added automagically(note the word, it is Spring Boot’s magic :)).
<parent>
   <groupId>org.springframework.boot</groupId>
   <artifactId>spring-boot-starter-parent</artifactId>
   <version>1.5.10.RELEASE</version>
   <relativePath/> <!-- lookup parent from repository -->

</parent>
It will make sure that following Maven dependencies are added to the project.You can try removing spring-boot-starter-parent from pom.xml and save the project and you will notice that all your following dependencies will be gone.
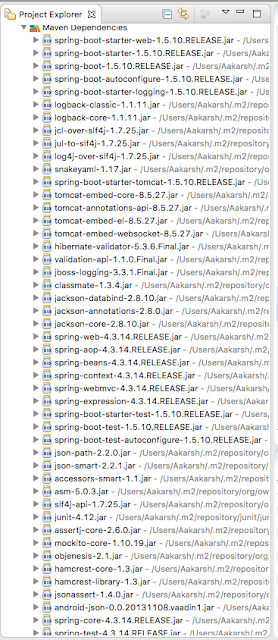
– In above list of dependencies, you must have noticed that spring boot has also added dependencies for embedded Tomcat so that you need not to install or configure tomcat in your eclipse explicitly.

– Also, you will find following properties, dependencies and plugin added automagically.Remember that as we selected Web in start.spring.io GUI,dependency spring-boot-starter-web has been added in POM file.
<properties>
    <project.build.sourceEncoding>UTF-8</project.build.sourceEncoding>
    <project.reporting.outputEncoding>UTF-8</project.reporting.outputEncoding>
    <java.version>1.8</java.version>
 </properties>

  <dependencies>

  <dependency>
   <groupId>org.springframework.boot</groupId>
   <artifactId>spring-boot-starter-web</artifactId>
  </dependency>

  <dependency>
   <groupId>org.springframework.boot</groupId>
   <artifactId>spring-boot-starter-test</artifactId>
   <scope>test</scope>
  </dependency>
  </dependencies>

  <build>
     <plugins>
 <plugin>
    <groupId>org.springframework.boot</groupId>
     <artifactId>spring-boot-maven-plugin</artifactId>
         </plugin>
     </plugins>
  </build>
– If you open src/main/java, you will see that package which we mentioned in start.spring.io GUI has been created, which is “nl.blogspot.javasolutionsguide.springboot.springBootApp”
– Within the above-mentioned package, you will find a class SpringBootAppApplication.So basically a class with the name as <Name of your Project> with “Application” word appended to it is created in the specified package.
@SpringBootApplication
public class SpringBootAppApplication {

 public static void main(String[] args) {
  SpringApplication.run(SpringBootAppApplication.class, args);
 }

}
– The @SpringBootApplication annotation used at the class level above is basically equivalent to combined following three annotations :
@Configuration
@EnableAutoConfiguration
@ComponentScan
We will discuss more on these annotations in subsequent tutorials.
– From the main method of SpringBootAppApplication ,SpringApplicaiton class’s run method is called.This method makes sure that Spring application’s applicationContext(the Spring Container) is initialized.Spring boot uses AnnotaionConfigApplicationContext.
public static void main(String[] args) {
  SpringApplication.run(SpringBootAppApplication.class, args);

 }
Step 10:
Run the main method of SpringBootAppApplication and you will notice that jar is automatically deployed to embedded Tomcat server and Tomcat server has been started at port 8080.
Check Console log of eclipse:

Step 11:
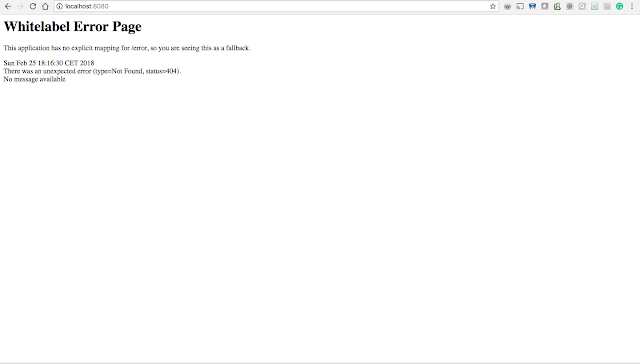
Now as our code is deployed on Tomcat and Tomcat is up and running, Let us try to hit 8080.
oh…Error Page and it says that “This application has no explicit mapping for /error, so you are seeing this as a fallback.”
Step 12:
Let us go ahead and add mapping for /error by creating ErrorHandlerController under new package
nl.blogspot.javasolutionsguide.springboot.controller.
@RestController
public class ErrorHandlerController implements ErrorController{

 private static final String PATH = "/error";

 @RequestMapping(value=PATH)
 public String error() {
  return "Error Handling";
 }

 @Override
 public String getErrorPath() {
  return PATH;
 }


}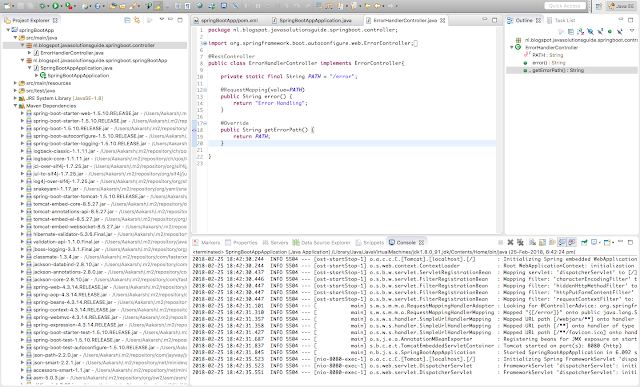
Please note that this controller needs to implement ErrorController interface which is provided by Spring Boot and we need to implement it’s getErrorPath() method.
Also as I told earlier @SpringBootApplication already include @EnableAutoConfiguration, that means that we don’t need to do all configurations which otherwise we would have to do to handle request via Rest controller like configuring DispatcherServlet.
Also note that ,as we have created this controller in new Package and by default Spring is going to check only nl.blogspot.javasolutionsguide.springboot.springbootapp package,we need to tell spring that this new package should also be scanned.For that we need to add following in the SpriingBootAppApplication class at the class level:
@ComponentScan({"nl.blogspot.javasolutionsguide.springboot.springBootApp","nl.blogspot.javasolutionsguide.springboot.controller"})

So SpringBootAppApplicaiton class will look like below now :

@ComponentScan({"nl.blogspot.javasolutionsguide.springboot.springBootApp","nl.blogspot.javasolutionsguide.springboot.controller"})
@SpringBootApplication
public class SpringBootAppApplication {

 public static void main(String[] args) {
  SpringApplication.run(SpringBootAppApplication.class, args);
 }

}
Step 13:
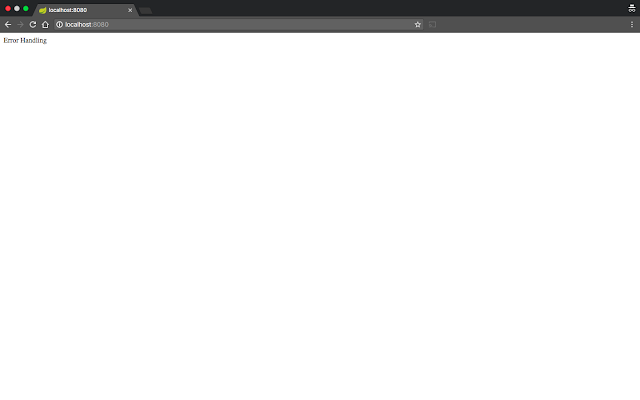
Now run the SpringBootApplication class again and now if we hit 8080, we will get “Error Handling” on Web page as below :
Similarly, we can have n number of controllers as per our requirements in our project and can handle the request and send valid responses back to a web page.
That’s all Friends on How to create Spring Boot project with Spring Initializer.In subsequent tutorials, we will go through other ways to create Spring boot project.Subscribe for getting next tutorials right in your mailbox.
Thanks for reading.If you liked it ,support me by liking our Facebook page and sharing this post.
| Published on Java Code Geeks with permission by Gaurav Bhardwaj, partner at our JCG program. See the original article here: How to Create Spring Boot Project With Spring initializer Opinions expressed by Java Code Geeks contributors are their own. |

Nice article. Thanks
Nice informative post…Thanks for sharing..
Nice Post Your content is very inspiring and appriciating I really like it please visit my site for