Continuously build, test and monitor your Microservices for optimal performance.

Summary
There are many ways to instrument Docker containers with AppDynamics agents. Here are some best practices that work well in large Docker environments.
In this blog I will show some best practices for instrumenting Docker containers, using docker-compose with a few popular AppDynamics application agent types. The goal here is to avoid rebuilding your application containers in the event of an agent upgrade, or having to hard-code AppDynamics configuration into your container images.
In my role as a DevOps engineer working on AppDynamics’ production environments, I use these techniques to simplify our instrumented container deployments. I’ll cover the install of binary agents like the Java agent, as well as agents installed via a repository such as Node.js or Python.
Before getting into the best practices, let’s review the most common deployment pattern—which isn’t a best practice at all.
Common (but not best-practice) Pattern: Install Agent During Container Image Build
The first approach we’ll cover is installing the agent via Dockerfile as part of the application container build. This has the advantage of following the conventional practice of easily copying in your source files and providing transparency of the build in your Dockerfile, making adoption simpler and more intuitive. AppDynamics does not recommend this approach, however, as it requires a fresh copy of your application image to be rebuilt every time an agent needs an upgrade. This is inefficient and unnecessary because the agent is not a central part of your application code. Additionally, hard-coding the agent install in this manner may prove more difficult when you automate your builds and deployments.
Java Example
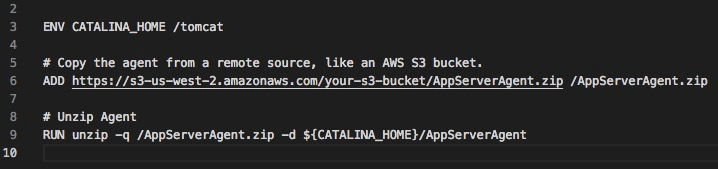
In this Dockerfile example for installing the Java agent, we have the binary stored in AWS S3 and simply copy over the agent during build time of the application image.
Dockerfile snippet: Copy from S3
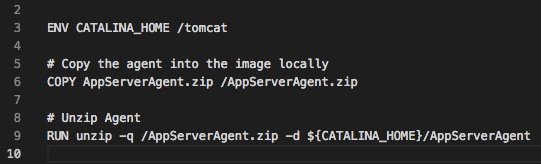
Here is a similar step where we copy the agent locally.
Dockerfile snippet: Copy locally
Node.js Example
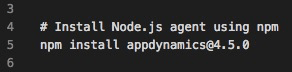
In this example, we use npm to install a specific Node.js agent version during build time.
Dockerfile snippet
Python Example
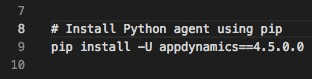
In this example, we use pip to install a specific Python agent version during build time.
Dockerfile snippet
Best Practices Pattern: Install Agents at Runtime Using Environment Variables and Sidecar Container
The below examples cover two different patterns, depending on agent type. For Java and similarly packaged agents, we’ll use something called a “sidecar container” to install the agent at container runtime. For repository-installed agents like Node.js and Python, we’ll use environment variables and a startup script that will install the agent at container runtime.
Java Example
For the sidecar container pattern, we build a container image with the agent binary that we want to install. We then volume-mount the directory that contains the agent, so our application container can copy the agent during container runtime, and then install. This can be simplified by unpackaging the agent in the sidecar container, volume-mounting the newly unpackaged agent directory, and then having the application container point to the volume-mounted directory and using it as its agent directory. We’ll cover both examples below, starting with how we create the sidecar container or “agent-repo.”
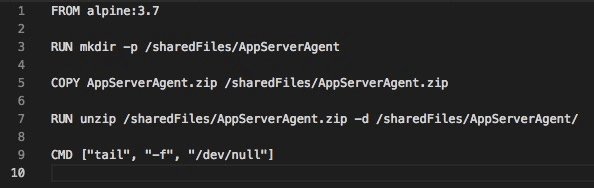
In the Dockerfile example for the Java agent, we store the binary in AWS S3 (in an agent version-specific bucket) and simply copy the agent during build-time. We then unzip the agent, allowing us to either copy the agent to the application container and then unzipping, or simply pointing to the unzipped agent directory. Notice we use a build ARG, which allows for a more automated build using a build script.
Agent Repo Dockerfile: Copy from S3

Here’s the same example as above, but one where we copy the agent locally without using a build ARG.
Agent Repo Dockerfile: Copy locally
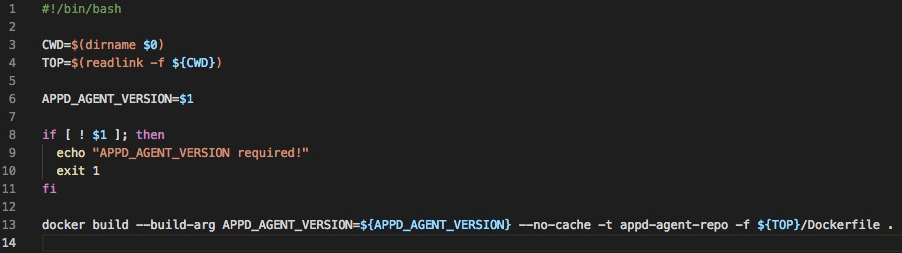
The build script utilizes a build ARG. If you’re using the S3 pattern above, this allows you to pass in the agent version you like.
build.sh
Now that we have built our sidecar container image, let’s cover how to build the Java agent container image to utilize this agent deployment pattern.
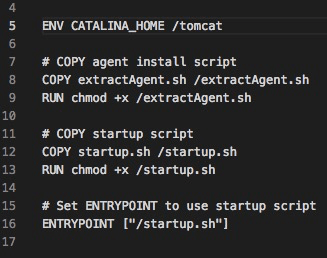
In the Docker snippet below, we copy in two new scripts, extractAgent.sh and startup.sh. The extractAgent.sh script copies and extracts the agent from the volume-mounted directory, /sharedFiles/, to the application container. The startup.sh script is used as our ENTRYPOINT. This script will call extractAgent.sh and start the application.
Java Dockerfile snippet
extractAgent.sh
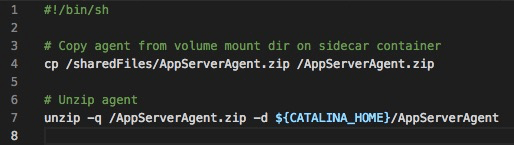
The startup.sh script (below) calls extractAgent.sh, which copies and unzips the agent into the $CATALINA_HOME directory. We then pass in that directory as part of our Java options in the application-startup command.
startup.sh snippet

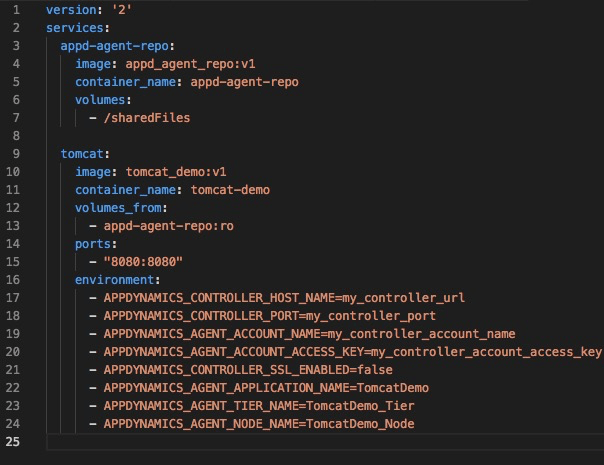
In the docker-compose.yml, we simply add the agent-repo container with volume mount. Our Tomcat container references the agent-repo container and volume, but also uses agent-dependent environment variables so that we don’t have to edit any configuration files. This makes the deployment much more automated and portable/reusable.
docker-compose.yml
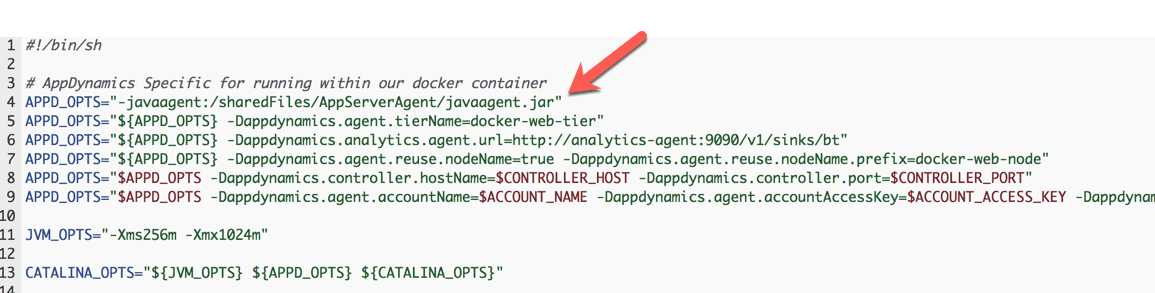
In the example below, we show another way to do this. We skip the entire process of adding the extractAgent.sh and startup.sh scripts, electing instead to copy a customized catalina.sh script and using that as our CMD. This pattern still uses the agent-repo sidecar container, but points to the volume-mounted, unzipped agent directory as part of the $CATALINA_OPTS.
Java Dockerfile snippet
![]()
catalina.sh snippet
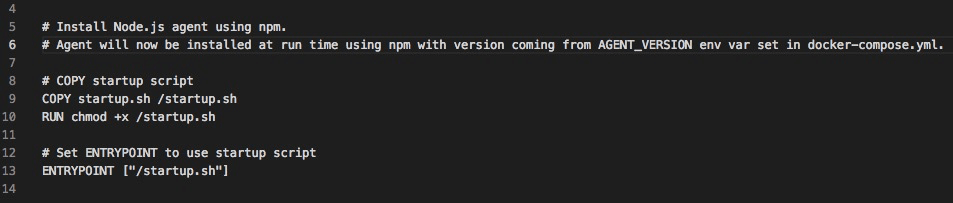
OK, that covers the sidecar container agent deployment pattern. So what about agents that utilize a repository to install an agent? How do we automate that process so we don’t have to rebuild our application container image every time we want to upgrade our agents to a specific version? The answer is quite simple and similar to the examples above. We add a startup.sh script, which is used as our ENTRYPOINT, and then use environment variables set in the docker-compose.yml to install the specific version of our agent.
Node.js Example
Dockerfile snippet
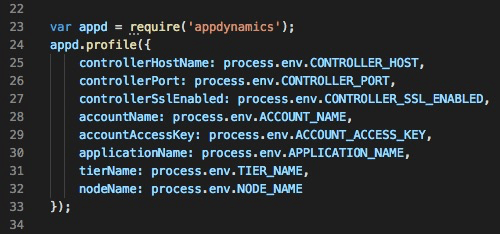
In our index.js that is copied in (not shown in the above Dockerfile snippet), we reference our agent-dependent environment variables, which are set in the docker-compose.yml.
index.js snippet
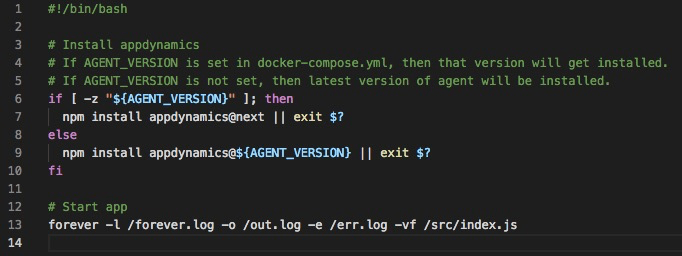
In the startup.sh script, we use npm to install the agent. The version installed will depend on whether we specifically set the $AGENT_VERSION variable in the docker-compose.yml. If set, the version set in the variable will get installed. If not, the latest version will be installed.
startup.sh
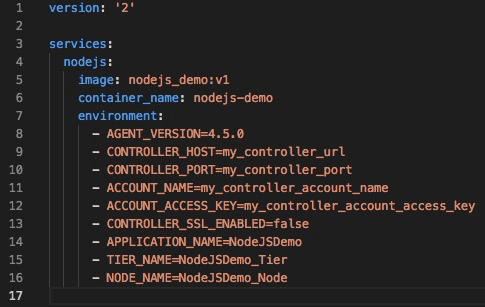
In the docker-compose.yml, we set the $AGENT_VERSION to the agent version we want npm to install. We also set our agent-dependent environment variables, allowing us to avoid hard-coding these values. This makes the deployment much more automated and portable/reusable.
docker-compose.yml
Python Example
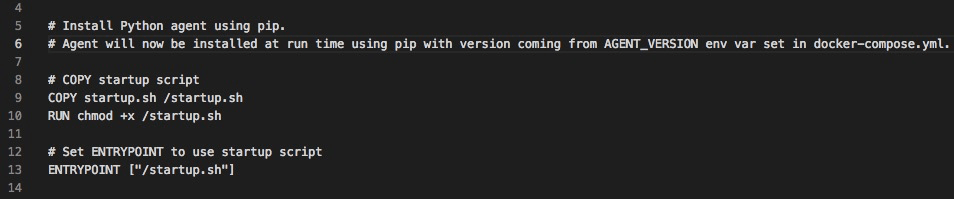
This example is very similar to the Node.js example, except that we are using pip to install our agent.
Dockerfile snippet
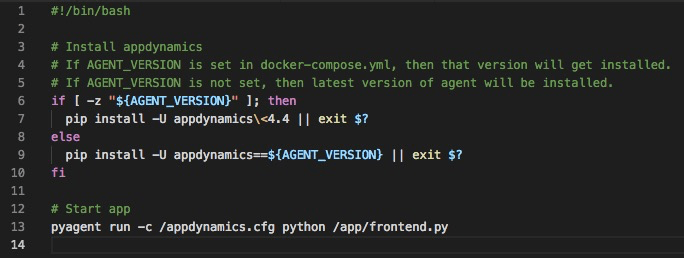
In the startup.sh script, we use pip to install the agent. The version installed will depend on whether we specifically set the $AGENT_VERSION variable in the docker-compose.yml. If set, the version set in the variable will get installed. If not, the latest version will be installed.
startup.sh
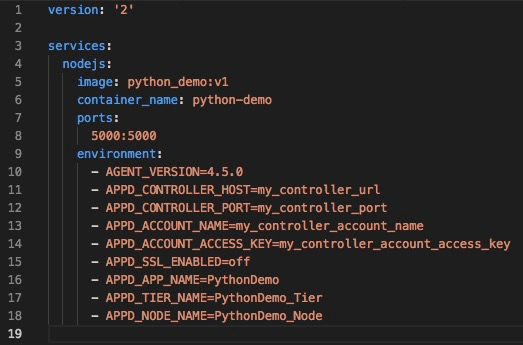
In the docker-compose.yml, we set the $AGENT_VERSION to the agent version we want pip to install. We also set our agent-dependent environment variables, allowing us to avoid hard-coding these values. This makes the deployment much more automated and portable/reusable.
docker-compose.yml
Pick the Best Pattern
There are many ways to instrument your Docker containers with AppDynamics agents. We have covered a few patterns and shown what works well for my team when managing a large Docker environment.
In the Common Pattern (but not best-practice) example, I showed how you must rebuild your application container every time you want to upgrade the agent version—not an ideal approach.
But with the Best Practices Pattern, you decouple the agent specifics from the application container images, and direct that responsibility to the sidecar container and the docker-compose environment variables.
Automation, whenever possible, is always a worthy goal. Following the Best Practices Pattern will allow you to improve script deployments, leverage version control and configuration management, and plug them all into CI/CD pipelines.
For in-depth information on related techniques, read these AppDynamics blogs:
- Deploying AppDynamics Agents to OpenShift Using Init Containers
- The AppD Approach: Composing Docker Containers for Monitoring
- The AppD Approach: Leveraging Docker Store Images with Built-In AppDynamics
Continuously build, test and monitor your Microservices for optimal performance.
