Hello Friends,
In this tutorial, you will learn the following :
1. Configuring Spring Rest, Spring Data JPA and H2 in Spring Boot
2. Example of Spring Rest, Spring Data JPA, and H2 to create restful services endpoints with Spring Boot
3. Using Swagger to test the Restful endpoints
1. Configuring Spring Rest, Spring Data JPA and H2 in Spring Boot
Go to https://start.spring.io/ and create a project with name springRestAndDataJpaWithSpringBoot and with following dependencies :
– Web
– JPA
– H2

Note: If you are not familiar with creating Spring Boot project with Spring Initializer, I would recommend following one of my previous posts, How to Create Spring Boot Project with Spring Initializer where I have explained in detail,how we can create a Spring Boot project using Spring Initializer.
2. Example of Spring Rest, Spring Data JPA, and H2 to create restful services endpoints with Spring Boot
In this example, We are going to create Rest endpoints to:
– Create Employee resource
– Retrieve List of Employees
– Retrieve Employee
– Update Employee resource
– Delete Employee resource
Following is the FINAL directory structure of the project :

Let us see the various classes and interfaces that we need to create.
Step 1
Export project springRestAndDataJpaWithSpringBoot (that you created via Spring Initializer)from your directory to Eclipse.
Step 2
Open Pom.xml.It should have all the dependencies that you added from spring initializer website along with some default dependencies.
Also, I have manually added dependencies to enable Swagger. Swagger is basically used to test rest endpoints.
<?xml version="1.0" encoding="UTF-8"?>

<project xmlns="http://maven.apache.org/POM/4.0.0" xmlns:xsi="http://www.w3.org/2001/XMLSchema-instance"
xsi:schemaLocation="http://maven.apache.org/POM/4.0.0 http://maven.apache.org/xsd/maven-4.0.0.xsd">

<modelVersion>4.0.0</modelVersion>
<groupId>nl.blogspot.javasolutionsguide</groupId>
<artifactId>springRestAndDataJpaWithSpringBoot</artifactId>
<version>0.0.1-SNAPSHOT</version>
<packaging>jar</packaging>
<name>springRestAndDataJpaWithSpringBoot</name>

<description>Demo project for Spring Boot</description>

<parent>
<groupId>org.springframework.boot</groupId>
<artifactId>spring-boot-starter-parent</artifactId>
<version>2.0.3.RELEASE</version>
<relativePath/> <!-- lookup parent from repository -->
</parent>

<properties>
<project.build.sourceEncoding>UTF-8</project.build.sourceEncoding>
<project.reporting.outputEncoding>UTF-8</project.reporting.outputEncoding>
<java.version>1.8</java.version>
</properties>

<dependencies>

<dependency>
<groupId>org.springframework.boot</groupId>
<artifactId>spring-boot-starter-data-jpa</artifactId>
</dependency>

<dependency>
<groupId>org.springframework.boot</groupId>
<artifactId>spring-boot-starter-data-rest</artifactId>
</dependency>

<dependency>
<groupId>com.h2database</groupId>
<artifactId>h2</artifactId>
<scope>runtime</scope>
</dependency>

<dependency>
<groupId>org.springframework.boot</groupId>
<artifactId>spring-boot-starter-test</artifactId>
<scope>test</scope>
</dependency>

<dependency>
<groupId>io.springfox</groupId>
<artifactId>springfox-swagger2</artifactId>
<version>2.7.0</version>
</dependency>


<dependency>
<groupId>io.springfox</groupId>
<artifactId>springfox-swagger-ui</artifactId>
<version>2.7.0</version>
</dependency>

</dependencies>

<build>

<plugins>
 <plugin>
  <groupId>org.springframework.boot</groupId>
  <artifactId>spring-boot-maven-plugin</artifactId>
 </plugin>
</plugins>

</build>

</project>
Step 3
Spring boot has created a java file with name SpringRestAndDataJpaWithSpringBootApplication automatically. This class is used to launch a Spring Boot application. We need to do following in this class :
– Enable swagger
We already added dependencies for Swagger in the Pom.xml.Along with that to enable swagger in Spring boot, we need to put the @EnableSwagger2 annotation on the top of
SpringRestAndDataJpaWithSpringBootApplication class.
– Tell Spring Boot which packages to scan to consider beans to be managed by Spring
We need to use @ComponentScan(basePackages = “nl.blogspot.javasolutionsguide.springRestAndDataJpaWithSpringBoot”) on top of SpringRestAndDataJpaWithSpringBootApplication class.
Step 4
Create Employee entity
package nl.blogspot.javasolutionsguide.springRestAndDataJpaWithSpringBoot.entity;

import javax.persistence.Column;
import javax.persistence.Entity;
import javax.persistence.GeneratedValue;
import javax.persistence.GenerationType;
import javax.persistence.Id;
import javax.persistence.Table;

/**
 * @author JavaSolutionsGuide
 *
 */
@Entity
@Table(name="EMPLOYEE")
public class Employee {

 @Id
 @GeneratedValue(strategy= GenerationType.IDENTITY)
 private Long id;

 @Column(name="EMPLOYEE_NAME")
 private String name;

 @Column(name="EMPLOYEE_SALARY")
 private Integer salary;

 @Column(name="DEPARTMENT")
 private String department;

 public Long getId() {
  return id;
 }

 public void setId(Long id) {
  this.id = id;
 }

 public String getName() {
  return name;
 }

 public void setName(String name) {
  this.name = name;
 }

 public Integer getSalary() {
  return salary;
 }

 public void setSalary(Integer salary) {
  this.salary = salary;
 }

 public String getDepartment() {
  return department;
 }

 public void setDepartment(String department) {
  this.department = department;
 }
}
Step 5
Create Rest Controller with all operations.
package nl.blogspot.javasolutionsguide.springRestAndDataJpaWithSpringBoot.controller;

import java.util.List;
import org.springframework.beans.factory.annotation.Autowired;
import org.springframework.web.bind.annotation.DeleteMapping;
import org.springframework.web.bind.annotation.GetMapping;
import org.springframework.web.bind.annotation.PathVariable;
import org.springframework.web.bind.annotation.PostMapping;
import org.springframework.web.bind.annotation.PutMapping;
import org.springframework.web.bind.annotation.RequestBody;
import org.springframework.web.bind.annotation.RestController;
import nl.blogspot.javasolutionsguide.springRestAndDataJpaWithSpringBoot.entity.Employee;
import nl.blogspot.javasolutionsguide.springRestAndDataJpaWithSpringBoot.service.EmployeeService;

/**
 * @author JavaSolutionsGuide
 *
 */
@RestController
public class EmployeeRestController {

 @Autowired
 private EmployeeService employeeService;

 public void setEmployeeService(EmployeeService employeeService) {
  this.employeeService = employeeService;
 }

 @GetMapping("/api/employees")
 public List<Employee> getEmployees() {
  List<Employee> employees = employeeService.retrieveEmployees();
  return employees;
 }

 @GetMapping("/api/employees/{employeeId}")
 public Employee getEmployee(@PathVariable(name="employeeId")Long employeeId) {
  return employeeService.getEmployee(employeeId);
 }

 @PostMapping("/api/employees")
 public void saveEmployee(Employee employee){
  employeeService.saveEmployee(employee);
  System.out.println("Employee Saved Successfully");
 }

 @DeleteMapping("/api/employees/{employeeId}")
 public void deleteEmployee(@PathVariable(name="employeeId")Long employeeId){
  employeeService.deleteEmployee(employeeId);
  System.out.println("Employee Deleted Successfully");
 }

 @PutMapping("/api/employees/{employeeId}")
 public void updateEmployee(@RequestBody Employee employee,
   @PathVariable(name="employeeId")Long employeeId){
  Employee emp = employeeService.getEmployee(employeeId);
  if(emp != null){
   employeeService.updateEmployee(employee);
  }

 }

}
Step 6
Create Service interface with methods required to retrieve the list of employees, one employee, save employee in the database, delete an employee and update and employee.
package nl.blogspot.javasolutionsguide.springRestAndDataJpaWithSpringBoot.service;

import java.util.List;

import nl.blogspot.javasolutionsguide.springRestAndDataJpaWithSpringBoot.entity.Employee;

/**
 * @author JavaSolutionsGuide
 *
 */
public interface EmployeeService {
 public List<Employee> retrieveEmployees();

 public Employee getEmployee(Long employeeId);

 public void saveEmployee(Employee employee);

 public void deleteEmployee(Long employeeId);

 public void updateEmployee(Employee employee);
}
Step 7
Create Implementation class for the interface created in Step 6
package nl.blogspot.javasolutionsguide.springRestAndDataJpaWithSpringBoot.service.impl;

import java.util.List;
import java.util.Optional;
import org.springframework.beans.factory.annotation.Autowired;
import org.springframework.stereotype.Service;
import nl.blogspot.javasolutionsguide.springRestAndDataJpaWithSpringBoot.entity.Employee;
import nl.blogspot.javasolutionsguide.springRestAndDataJpaWithSpringBoot.repository.EmployeeRepository;
import nl.blogspot.javasolutionsguide.springRestAndDataJpaWithSpringBoot.service.EmployeeService;

/**
 * @author JavaSolutionsGuide
 *
 */
@Service
public class EmployeeServiceImpl implements EmployeeService{

 @Autowired
 private EmployeeRepository employeeRepository;

 public void setEmployeeRepository(EmployeeRepository employeeRepository) {
  this.employeeRepository = employeeRepository;
 }

 public List<Employee> retrieveEmployees() {
  List<Employee> employees = employeeRepository.findAll();
  return employees;
 }

 public Employee getEmployee(Long employeeId) {
  Optional<Employee> optEmp = employeeRepository.findById(employeeId);
  return optEmp.get();
 }

 public void saveEmployee(Employee employee){
  employeeRepository.save(employee);
 }

 public void deleteEmployee(Long employeeId){
  employeeRepository.deleteById(employeeId);
 }

 public void updateEmployee(Employee employee) {
  employeeRepository.save(employee);
 }
}
Step 8
Create a repository class, which will extend Spring data JPA JpaRepository and hence will provide the methods to perform CRUD operations out of the box.
package nl.blogspot.javasolutionsguide.springRestAndDataJpaWithSpringBoot.repository;

import org.springframework.data.jpa.repository.JpaRepository;
import org.springframework.stereotype.Repository;

import nl.blogspot.javasolutionsguide.springRestAndDataJpaWithSpringBoot.entity.Employee;

@Repository
public interface EmployeeRepository extends JpaRepository<Employee,Long>{

}
Step 9
Enable the H2 database web console by adding the following lines in the application.properties file
spring.h2.console.enabled=true
spring.h2.console.path=/h2
Spring Boot will automatically take care of the creation of the datasource for H2 database,however we can mnaully configure datasource as well in the application.properties file as following :
spring.datasource.url=jdbc:h2:file:~/test
spring.datasource.username=sa
spring.datasource.password=spring.datasource.driver-class-name=org.h2.Driver
Step 10
With this you are done with creation of your restful API using Spring Rest,spring data JPA with h2 database.
Now you just need to run your SpringRestAndDataJpaWithSpringBootApplication.java class and it will make sure that it will build your code, package your code in the jar and deploy it onto the embedded tomcat server.
Step 11
Open H2 database console by hitting following URL
http://localhost:8080/h2/
It will show you the following screen :
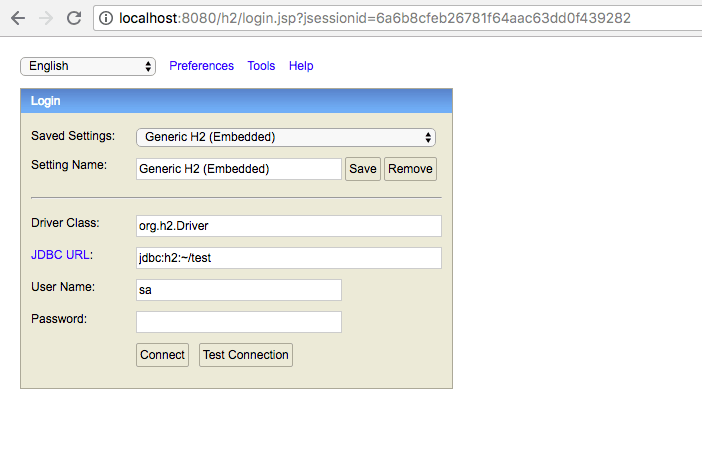
Click on the Connect button and it will connect you to the H2 database. and you can see that the EMPLOYEE table has been created, but there is no data in this table, which is as we expected.

3. Using Swagger to test the Restful endpoints
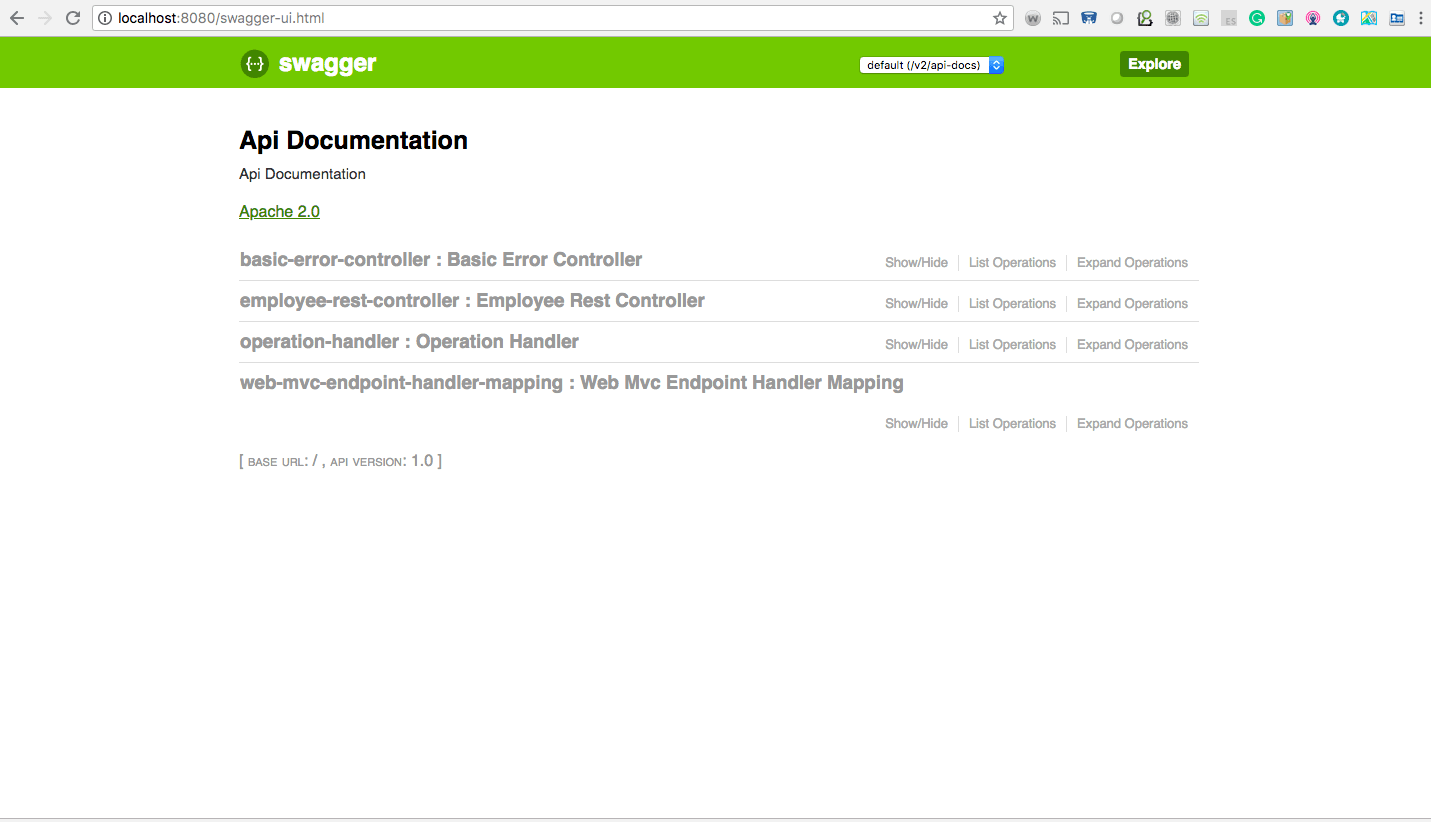
To test your rest endpoints, hit the Swagger URL follows :
http://localhost:8080/swagger-ui.html
It will open the following page
Click on the employee-rest-controller link. It will show you the supported operations by this controller as follows:
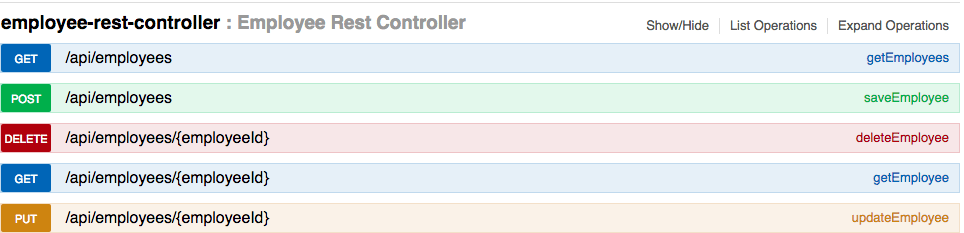
Now we can see five endpoints in the above screenshot. We will test them one by one.
Save Employee – /api/employees
The first thing we need to do is to create a resource in the database.for that we will use POST operation and use /api/employees endpoint.
![]()
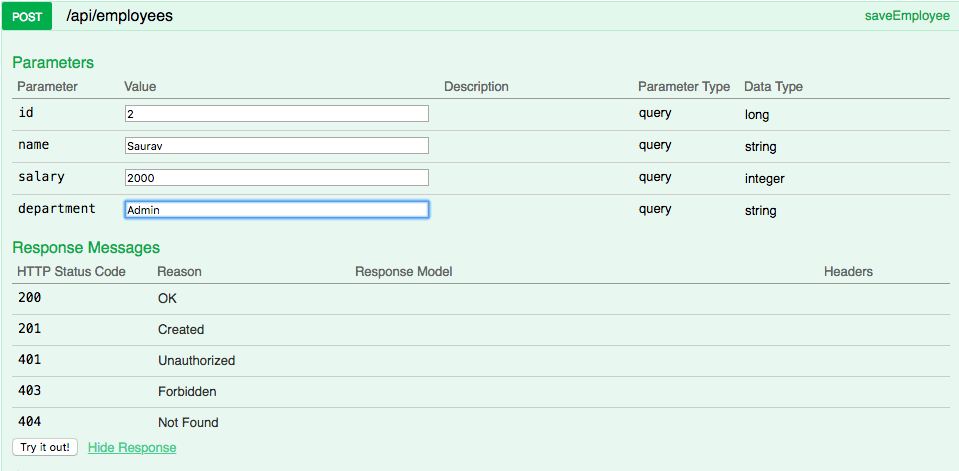
Click on the saveEmployee and fill all the required data that we need to create a resource and then click on “try it out” button.
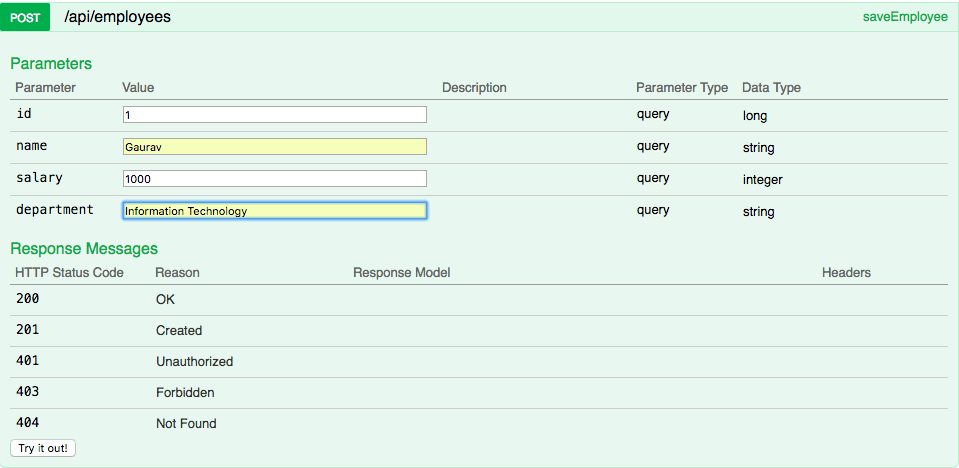
This is how your request and response will look like
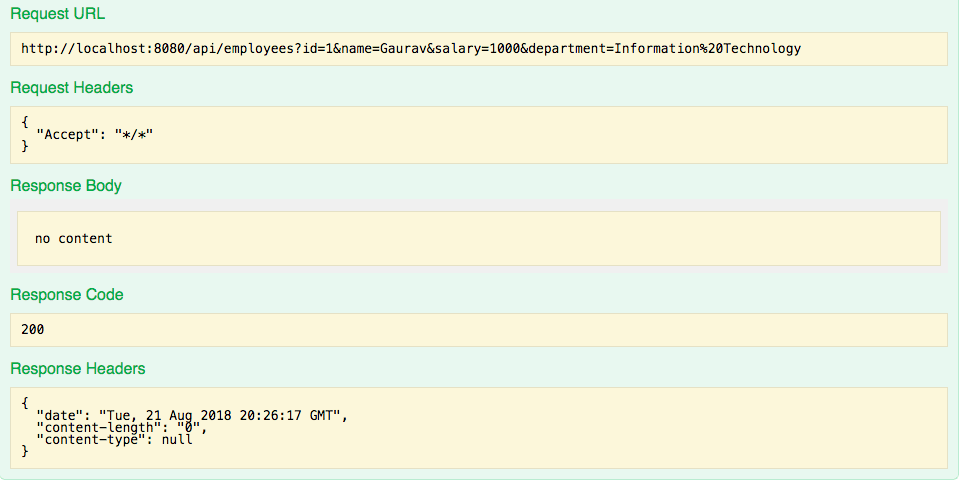
As you can see that the response code is 200, which means SUCCESS and hence our record should have been created in the H2 database.
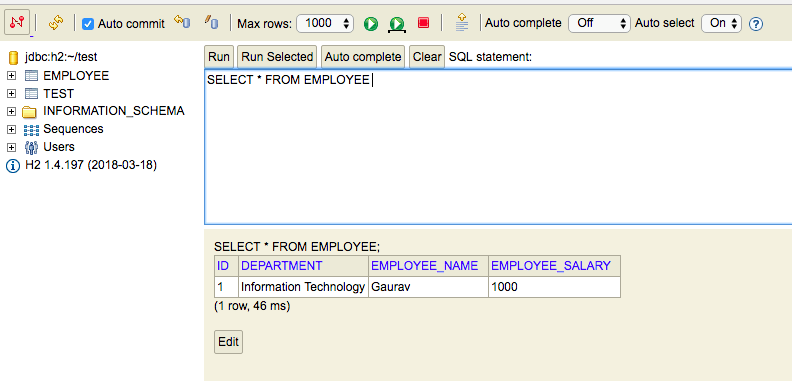
Let us check that.
Open H2 web console and query the EMPLOYEE table and you can see the record that we pushed from Swagger UI.
Similarly, Insert one more employee from Swagger UI with the following data :
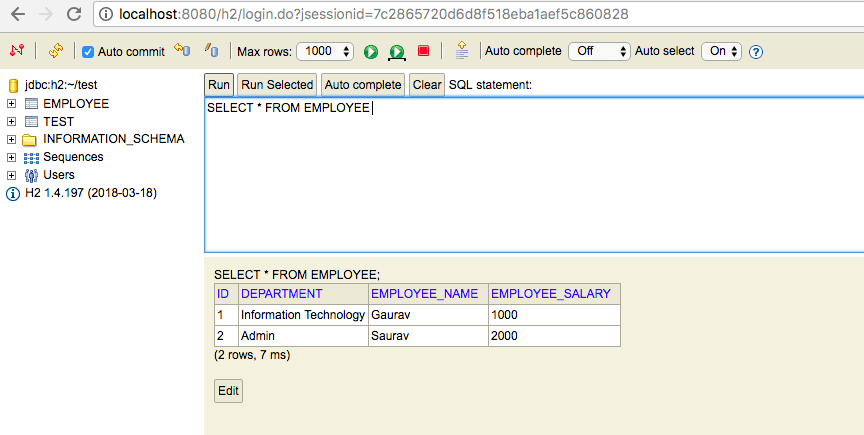
Query database again and you will see two records in the database as follows :
Get Employees -/api/employees
Now as we have already inserted two records in the database, we will try to retrieve these records with the help of GET operation and using /api/employees endpoint as follows :
![]()
Click on the getEmployees and then as we want to retrieve the list of all employees, we need not pass any parameter.
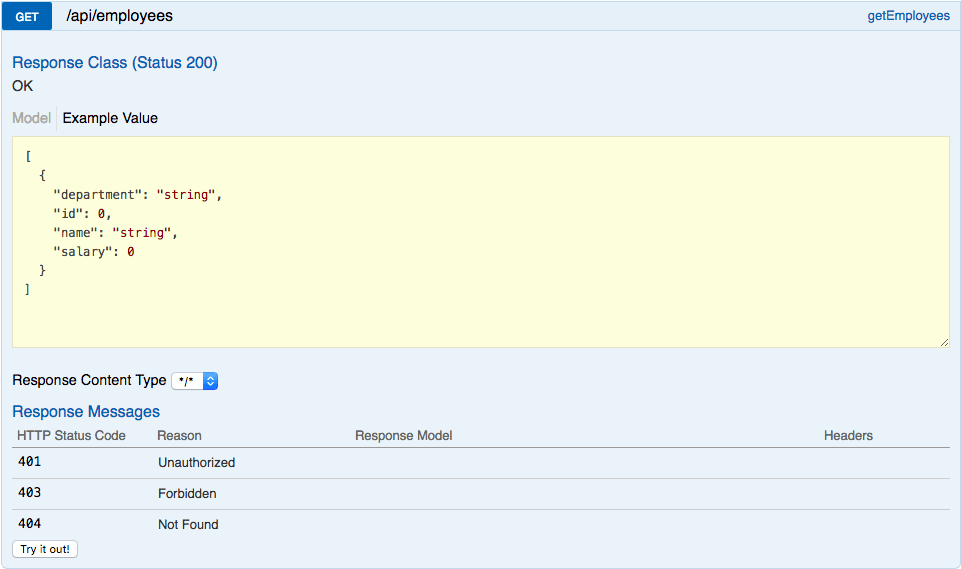
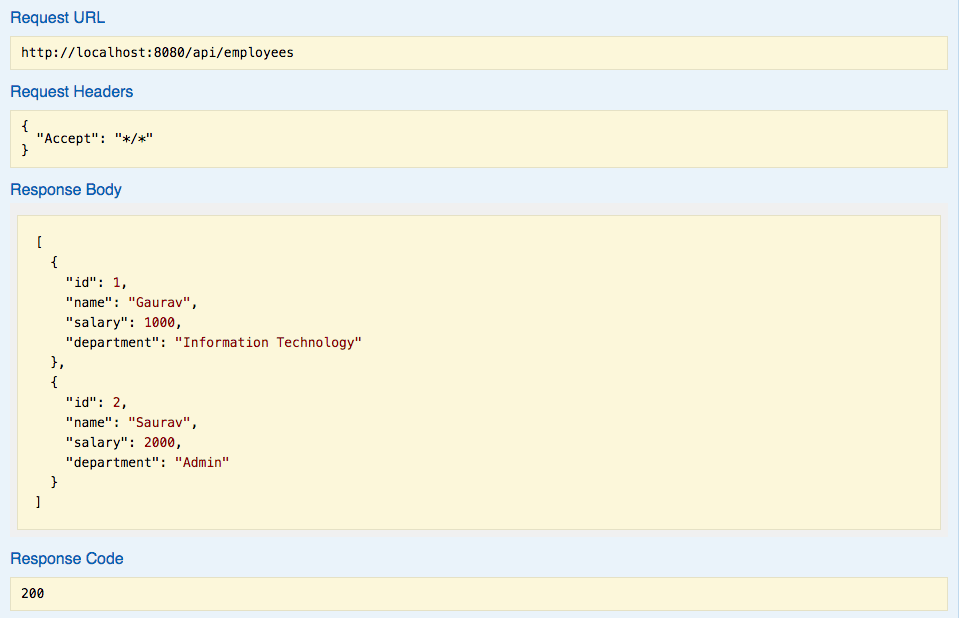
Hence Just click on “try it out” button and you will get a list of employees in the response.
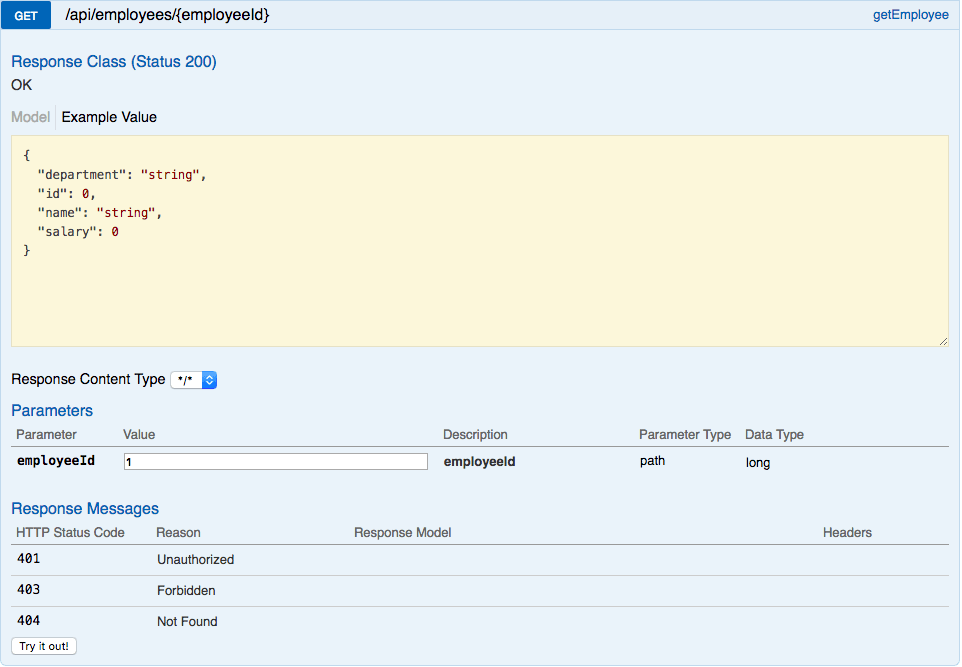
Get Employee – /api/employees/{employeeId}
Next, we will retrieve only one employee on the basis of input employeeId using GET operation. We will pass employeeId to the rest endpoint /api/employees/{employeeId}.
![]()
Click on the getEmployee and fill employeeId as 1, which means that we want to retrieve employee with employeeId 1.
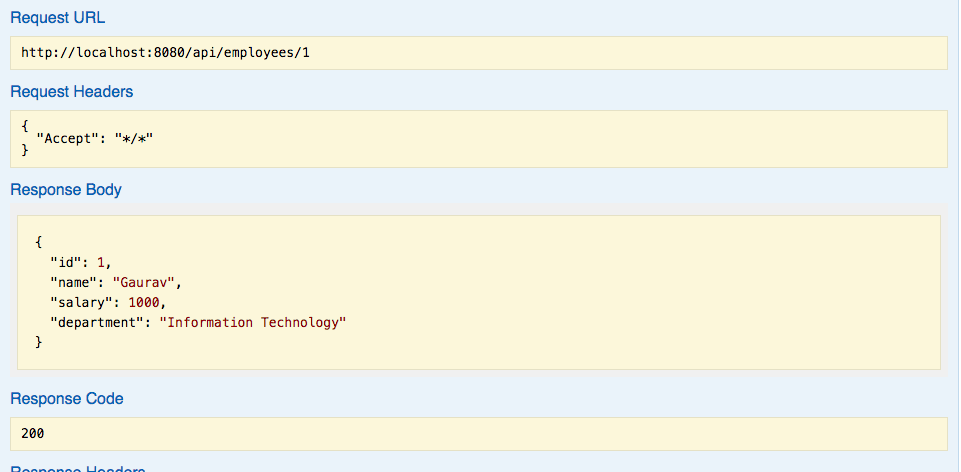
Click on try it out button and you will see data of employee with employeeId 1 in the response as follows :
Update Employee – /api/employees/{employeeId}
Next, we will test the update employee rest endpoint using PUT operation and by using /api/employees/{employeeId} endpoint.
![]()
Click on the updateEmployee link. Paste one of the employee json and put corresponding employeeId as follows :
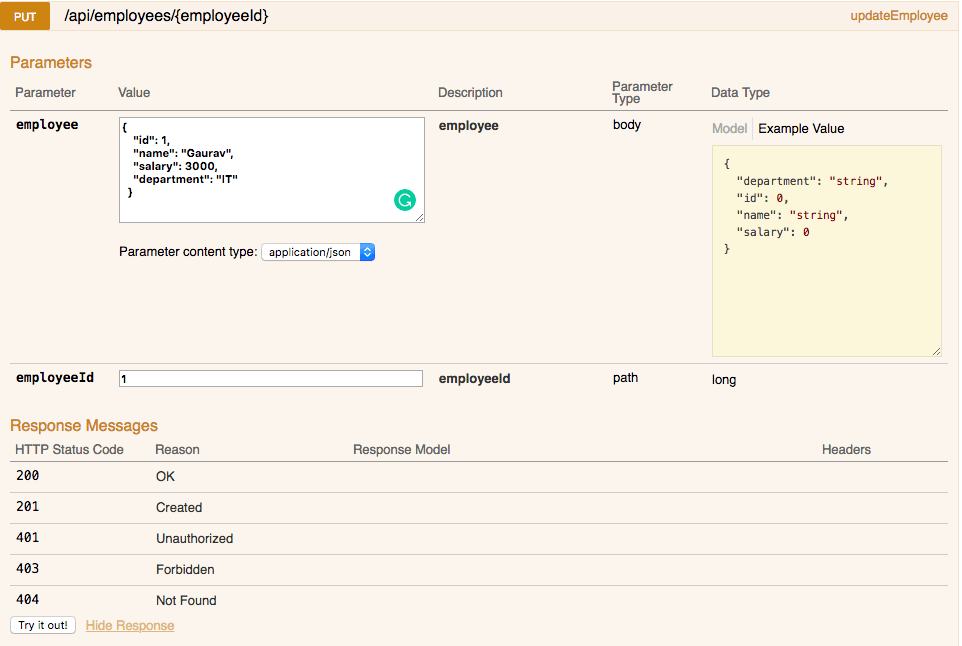
Click on “Try it out” button and you will see following response with response code 200(SUCCESS).
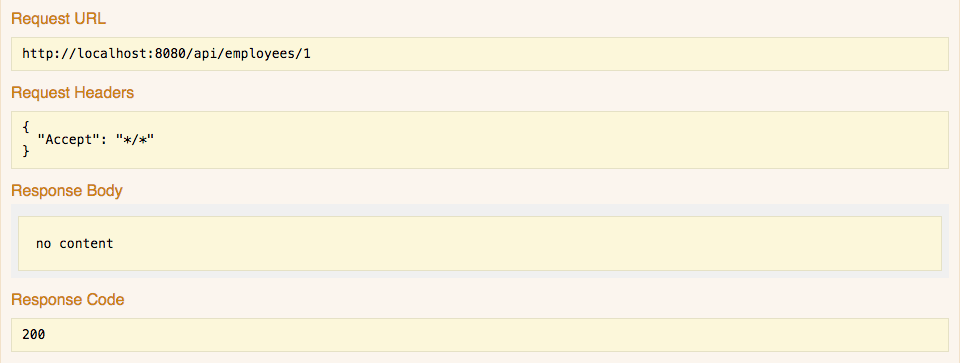
Verify updated record with updated salary to 3000 from 1000 in the EMPLOYEE table in H2 database for employee with employeeId 1.

Delete Employee – – /api/employees/{employeeId}
Next, we will test the delete Employee rest endpoint using DELETE operation and be using /api/employees/{employeeId} endpoint.
![]()
Click on deteleEmployee link and fill employeeId 1, which means that we want to delete employee with employeeId 1.

Click on “try it out” button and you will get response code 200, which means the request is successfully processed.

Let us verify if an employee with employeeId 1 has been successfully deleted from the database by opening H2 console and querying database.
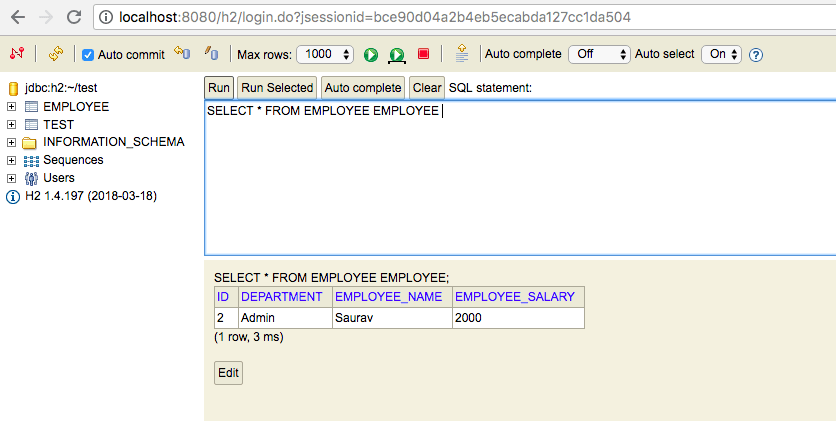
As we can see above that we have the only employee with employeeId 2 in the EMPLOYEE table, hence employee with employeeId 1 has been successfully deleted.
Summary
So in the above post, we saw how we can create restful API using Spring rest, Spring Data JPA and H2 database with Spring Boot.
We need to:
– Create Spring Boot project from spring Initializer with required dependencies.
– Enable swagger support by adding additional dependencies in POM.xml and adding annotation in the spring boot application class.
– Enable the H2 database by adding necessary properties in the application.properties.
– Write Rest Controller, Service, repository and entity to work upon.
– Start Spring boot application, which will be automatically deployed to an embedded server.
– Test the rest endpoints using Swagger UI and verify data in the H2 database using the H2 console.
Thanks for reading. Share it with someone you think it might be helpful.
| Published on Java Code Geeks with permission by Gaurav Bhardwaj, partner at our JCG program. See the original article here: Restful API using Spring Rest + Spring Data JPA + H2 with Spring Boot Example Opinions expressed by Java Code Geeks contributors are their own. |

With the latest version of swagger does one no longer need to fill the Java code with Swagger Annotations?
Hi , I have created same project with all the steps mentioned above
But I am not finding EMPLOYEE table created in h2 and also in swagger i could not get any any apis except errorhandlingapis
Can u help me wat might be wrong . pfa
While connecting to H2 database use JDBC URL – jdbc:h2:mem:testdb instead of default. You should see the tbale
As the service class EmployeeServiceImpl is using all the repository methods, why does not use the repository class directly in the controller ?
yes, you can do that. The example given is considering the best practices and assuming that service will have business logic.
Thanks for the reply. I don’t have much experience with spring so I guess the separation you did is better approach, even if at the beginning there is few logic.
Hi ,Please share source code of same project .
am getting wrong username and password
Wrong user name or password [28000-197] 28000/28000 (Help) please share application.properties file source.
Hi ,Please share source code of same project .
Thanks in advance
Hi ,Please share source code of same project .
Hi ,Please share source code of same project .
You need to have jdbc:h2:mem:testdb declared in your properties file AND in the JDBC url when logging into H2. If you don’t have this you won’t see the employee table in H2 upon log in.
your code has some bug fix.