“I love writing authentication and authorization code.” ~ No Java Developer Ever. Tired of building the same login screens over and over? Try the Okta API for hosted authentication, authorization, and multi-factor auth.
Every developer wants to build faster and more efficiently, to support scale. Building a microservices architecture with Spring can add resilience and elasticity to your architecture that will enable it to fail gracefully and scale infinitely.
With Spring Security and its OAuth 2.0 support you also get everything you need to lock down your API gateway, as well as your backend servers. You can set it up to automatically propagate your access tokens from one app to the other, ensuring that everything stays secure and encrypted along the way.
This tutorial shows you how to use Spring Security with OAuth 2.0 and Okta to lock down your microservices architecture.
Microservices Architectures with Spring Boot + Spring Cloud
This tutorial shows you how to add security to a previous tutorial I wrote, Build a Microservices Architecture for Microbrews with Spring Boot. A basic microservices architecture with Spring Boot and Spring Cloud looks like the graphic below.
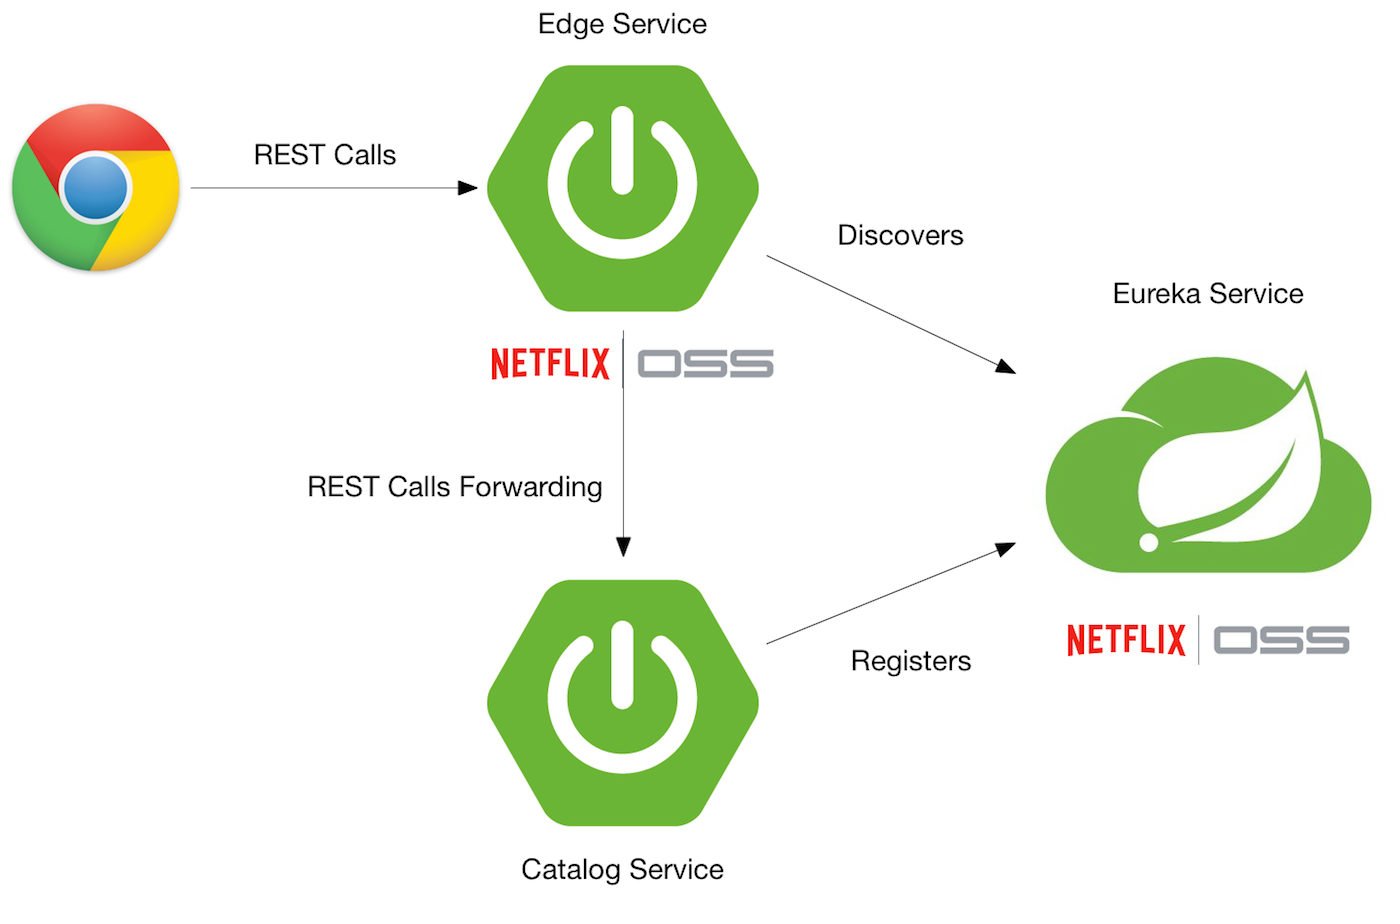
Once you’ve completed this tutorial, you’ll have Spring Security locking things down, and Okta providing authorization with OAuth. Your Edge Service (a.k.a., API Gateway) will have a Feign client that passes along your access token, and Hystrix that handles graceful failover.

To begin, you’ll need to clone the aforementioned article’s completed project.
git clone https://github.com/oktadeveloper/spring-boot-microservices-example.git
Create a Web Application in Okta
If you don’t have one yet, create a forever-free Okta Developer account. After you’ve completed the setup process, log in to your account and navigate to Applications > Add Application. Click Web and Next. On the next page, enter the following values and click Done.
- Application Name:
Spring OAuth - Base URIs:
http://localhost:8081 - Login redirect URIs:
http://localhost:8081/login
Take note of the clientId and client secret values as you’ll need these to configure your Spring Boot apps.
You need to add a roles claim to your ID Token, so your groups in Okta are translated to Spring Security authorities. In your Okta developer console, navigate to API > Authorization Servers, click the Authorization Servers tab and edit the default one. Click the Claims tab and Add Claim. Name it “roles” and include it in the ID Token. Set the value type to “Groups” and set the filter to be a Regex of .*.
Add Spring Security OAuth to the Edge Service Application
The edge-service application handles the communication with the beer-catalog-service, so it’s the best place to start integrating OAuth. In edge-service/pom.xml, add dependencies for Spring Security, its OAuth support, and its JWT support.
<dependency>
    <groupId>org.springframework.boot</groupId>
    <artifactId>spring-boot-starter-security</artifactId>
</dependency>
<dependency>
    <groupId>org.springframework.security.oauth.boot</groupId>
    <artifactId>spring-security-oauth2-autoconfigure</artifactId>
    <version>2.0.1.RELEASE</version>
</dependency>
Add the following Zuul routes to edge-service/src/main/resources/application.properties.
zuul.routes.beer-catalog-service.path=/beers
zuul.routes.beer-catalog-service.url=http://localhost:8080

zuul.routes.home.path=/home
zuul.routes.home.url=http://localhost:8080
Open edge-service/src/main/java/com/example/edgeservice/EdgeServiceApplication.java and add @EnableOAuth2Sso to enable authentication with OAuth.
import org.springframework.boot.autoconfigure.security.oauth2.client.EnableOAuth2Sso;
...
@EnableOAuth2Sso
@SpringBootApplication
public class EdgeServiceApplication {
Adding @EnableOAuth2Sso causes Spring Security to look for a number of properties. Add the following properties to edge-service/src/main/resources/application.properties.
security.oauth2.client.client-id={yourClientId}
security.oauth2.client.client-secret={yourClientSecret}
security.oauth2.client.access-token-uri=https://{yourOktaDomain}.com/oauth2/default/v1/token
security.oauth2.client.user-authorization-uri=https://{yourOktaDomain}.com/oauth2/default/v1/authorize
security.oauth2.client.scope=openid profile email
security.oauth2.resource.user-info-uri=https://{yourOktaDomain}.com/oauth2/default/v1/userinfo
security.oauth2.resource.token-info-uri=https://{yourOktaDomain}.com/oauth2/default/v1/introspect
security.oauth2.resource.prefer-token-info=false
TIP: If you see {yourOktaDomain} in the above code snippet, log in to your Okta account and refresh this page. It will replace this value with your domain.
Add a ResourceServerConfig.java class to the same package as EdgeServiceApplication.
package com.example.edgeservice;

import org.springframework.context.annotation.Configuration;
import org.springframework.security.config.annotation.web.builders.HttpSecurity;
import org.springframework.security.oauth2.config.annotation.web.configuration.EnableResourceServer;
import org.springframework.security.oauth2.config.annotation.web.configuration.ResourceServerConfigurerAdapter;
import org.springframework.security.web.util.matcher.RequestHeaderRequestMatcher;

@Configuration
@EnableResourceServer
public class ResourceServerConfig extends ResourceServerConfigurerAdapter {

    @Override
    public void configure(HttpSecurity http) throws Exception {
        http
            .requestMatcher(new RequestHeaderRequestMatcher("Authorization"))
            .authorizeRequests()
            .antMatchers("/**").authenticated();
    }
}
At this point, you’ve configured enough to sign-in to your Edge Service application, but it won’t be able to communicate with the downstream beer-catalog-service.
Add Spring Security OAuth to the Beer Catalog Service
In beer-catalog-service/pom.xml, add the same dependencies you added to the Edge Service, as well as one for Thymeleaf.
<dependency>
    <groupId>org.springframework.boot</groupId>
    <artifactId>spring-boot-starter-security</artifactId>
</dependency>
<dependency>
    <groupId>org.springframework.security.oauth.boot</groupId>
    <artifactId>spring-security-oauth2-autoconfigure</artifactId>
    <version>2.0.1.RELEASE</version>
</dependency>
<dependency>
    <groupId>org.springframework.boot</groupId>
    <artifactId>spring-boot-starter-thymeleaf</artifactId>
</dependency>
Add the same properties to beer-catalog-service/src/main/resources/application.properties.
security.oauth2.client.client-id={yourClientId}
security.oauth2.client.client-secret={yourClientSecret}
security.oauth2.client.access-token-uri=https://{yourOktaDomain}.com/oauth2/default/v1/token
security.oauth2.client.user-authorization-uri=https://{yourOktaDomain}.com/oauth2/default/v1/authorize
security.oauth2.client.scope=openid profile email
security.oauth2.resource.user-info-uri=https://{yourOktaDomain}.com/oauth2/default/v1/userinfo
security.oauth2.resource.token-info-uri=https://{yourOktaDomain}.com/oauth2/default/v1/introspect
security.oauth2.resource.prefer-token-info=false
TIP: An alternative to adding these properties is to use environment variables. For example, SECURITY_OAUTH2_CLIENT_CLIENT_ID would be the environment variable to specify security.oauth2.client.client-id. Using environment variables would allow you to change the settings for both apps from one location.
Create a HomeController in beer-catalog-service/src/main/java/com/example/beercatalogservice/HomeController.java to render the user’s information so you can verify authentication is working.
package com.example.beercatalogservice;

import org.springframework.security.oauth2.provider.OAuth2Authentication;
import org.springframework.stereotype.Controller;
import org.springframework.ui.Model;
import org.springframework.web.bind.annotation.GetMapping;

import java.security.Principal;
import java.util.Map;

@Controller
public class HomeController {

    @GetMapping("/home")
    @SuppressWarnings("unchecked")
    public String howdy(Model model, Principal principal) {
        OAuth2Authentication authentication = (OAuth2Authentication) principal;
        Map<String, Object> user = (Map<String, Object>) authentication.getUserAuthentication().getDetails();
        model.addAttribute("user", user);
        return "home";
    }
}
Create a home.html template in beer-catalog-service/src/main/resources/templates/home.html and populate it with the following code.
<!DOCTYPE HTML>
<html xmlns:th="http://www.thymeleaf.org">
<head>
    <style>
        th {
            text-align: left;
        }
        td {
            white-space: nowrap;
        }
        td:first-child {
            font-family: "Courier", monospace;
            font-size: 0.9em;
            color: #343434;
        }
    </style>
</head>
<body>
<h1>Hello<span th:if="${user}" th:text="' ' + ${user.name}"> Joe</span>!</h1>
<div th:unless="${user}">
    <a th:href="@{/login}">Login</a>
</div>
<div th:if="${user}">
    <form id="logoutForm" th:action="@{/logout}" method="post">
        <input type="submit" value="Logout"/>
    </form>
</div>

<h2>User Properties</h2>
<table>
    <thead>
    <tr>
        <th>Name</th>
        <th>Value</th>
    </tr>
    </thead>
    <tbody>
    <tr>
        <td>sub</td>
        <td th:text="${user.sub}"></td>
    </tr>
    <tr>
        <td>name</td>
        <td th:text="${user.name}"></td>
    </tr>
    <tr>
        <td>given_name</td>
        <td th:text="${user.given_name}"></td>
    </tr>
    <tr>
        <td>family_name</td>
        <td th:text="${user.family_name}"></td>
    </tr>
    <tr>
        <td>preferred_username</td>
        <td th:text="${user.preferred_username}"></td>
    </tr>
    <tr>
        <td>email</td>
        <td th:text="${user.email}"></td>
    </tr>
    <tr>
        <td>roles</td>
        <td th:text="${user.roles}"></td>
    </tr>
    </tbody>
</table>
</body>
</html>
Create a ResourceServerConfig.java class in the same package as HomeController. This class configures Spring Security, so it secures all endpoints, except those accessed with an Authorization header.
package com.example.beercatalogservice;

import org.springframework.context.annotation.Configuration;
import org.springframework.security.config.annotation.web.builders.HttpSecurity;
import org.springframework.security.oauth2.config.annotation.web.configuration.EnableResourceServer;
import org.springframework.security.oauth2.config.annotation.web.configuration.ResourceServerConfigurerAdapter;
import org.springframework.security.web.util.matcher.RequestHeaderRequestMatcher;

@Configuration
@EnableResourceServer
public class ResourceServerConfig extends ResourceServerConfigurerAdapter {

    @Override
    public void configure(HttpSecurity http) throws Exception {
        http
            .requestMatcher(new RequestHeaderRequestMatcher("Authorization"))
            .authorizeRequests().anyRequest().fullyAuthenticated();
    }
}
Add RequestInterceptor for Feign
The @FeignClient used to talk to beer-catalog-service is not aware of the Authorization header. To make it aware, create a UserFeignClientInterceptor class in the same directory as EdgeServiceApplication.
package com.example.edgeservice;

import feign.RequestInterceptor;
import feign.RequestTemplate;
import org.springframework.security.core.Authentication;
import org.springframework.security.core.context.SecurityContext;
import org.springframework.security.core.context.SecurityContextHolder;
import org.springframework.security.oauth2.provider.authentication.OAuth2AuthenticationDetails;
import org.springframework.stereotype.Component;

@Component
public class UserFeignClientInterceptor implements RequestInterceptor {
    private static final String AUTHORIZATION_HEADER = "Authorization";
    private static final String BEARER_TOKEN_TYPE = "Bearer";

    @Override
    public void apply(RequestTemplate template) {
        SecurityContext securityContext = SecurityContextHolder.getContext();
        Authentication authentication = securityContext.getAuthentication();

        if (authentication != null && authentication.getDetails() instanceof OAuth2AuthenticationDetails) {
            OAuth2AuthenticationDetails details = (OAuth2AuthenticationDetails) authentication.getDetails();
            template.header(AUTHORIZATION_HEADER, String.format("%s %s", BEARER_TOKEN_TYPE, details.getTokenValue()));
        }
    }
}
Register it as a @Bean inside the EdgeServiceApplication class.
import feign.RequestInterceptor;
...
public class EdgeServiceApplication {

    public static void main(String[] args) {
        SpringApplication.run(EdgeServiceApplication.class, args);
    }

    @Bean
    public RequestInterceptor getUserFeignClientInterceptor() {
        return new UserFeignClientInterceptor();
    }
}
In order to get Hystrix aware of the security context, you need to add two properties to edge-service/src/main/resources/application.properties:
feign.hystrix.enabled=true
hystrix.shareSecurityContext=true
Verify Secure Communication
You can verify communication between the edge-service and beer-catalog-service works by starting all the Spring Boot applications. First, start eureka-service:
cd eureka-service
./mvnw spring-boot:run
In a new terminal window, start beer-catalog-service:
cd beer-catalog-service
./mvnw spring-boot:run
In another terminal window, start edge-service:
cd edge-service
./mvnw spring-boot:run
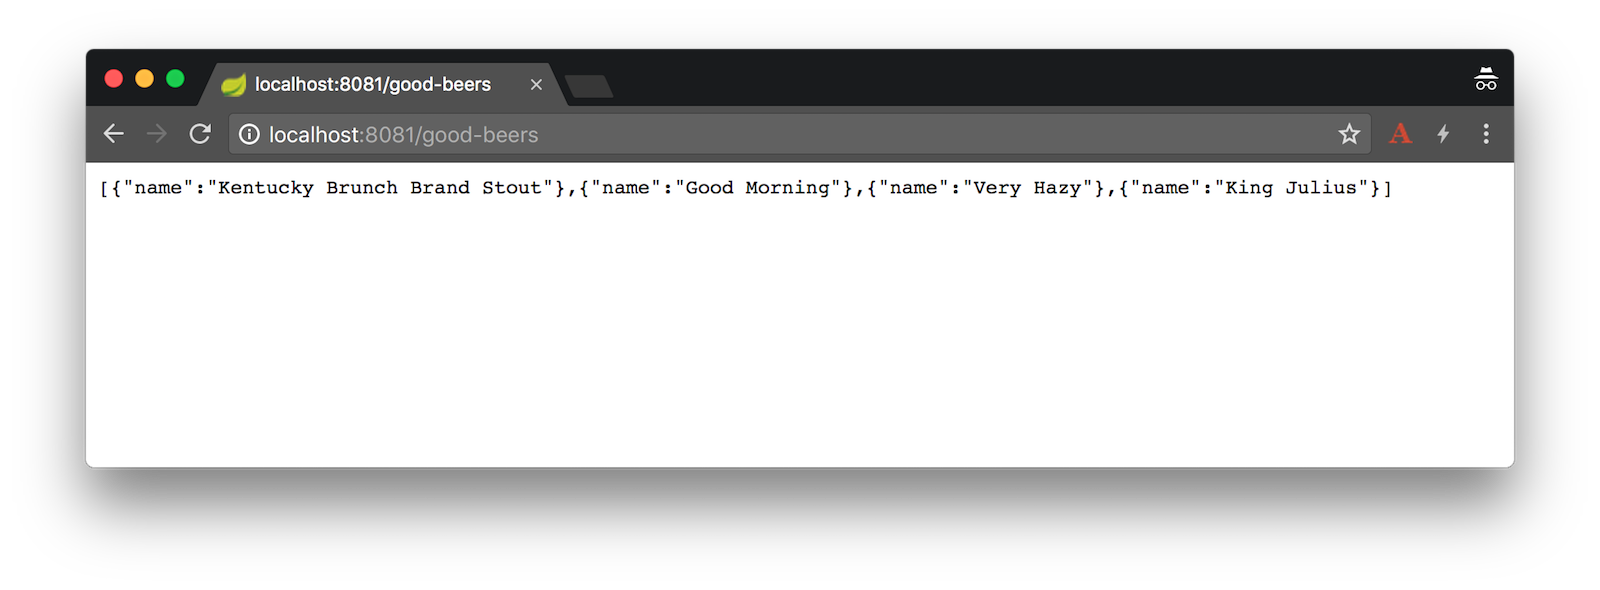
Open your browser and navigate to http://localhost:8081/good-beers. You should be redirected to your Okta domain and see a login page, prompting for your credentials.
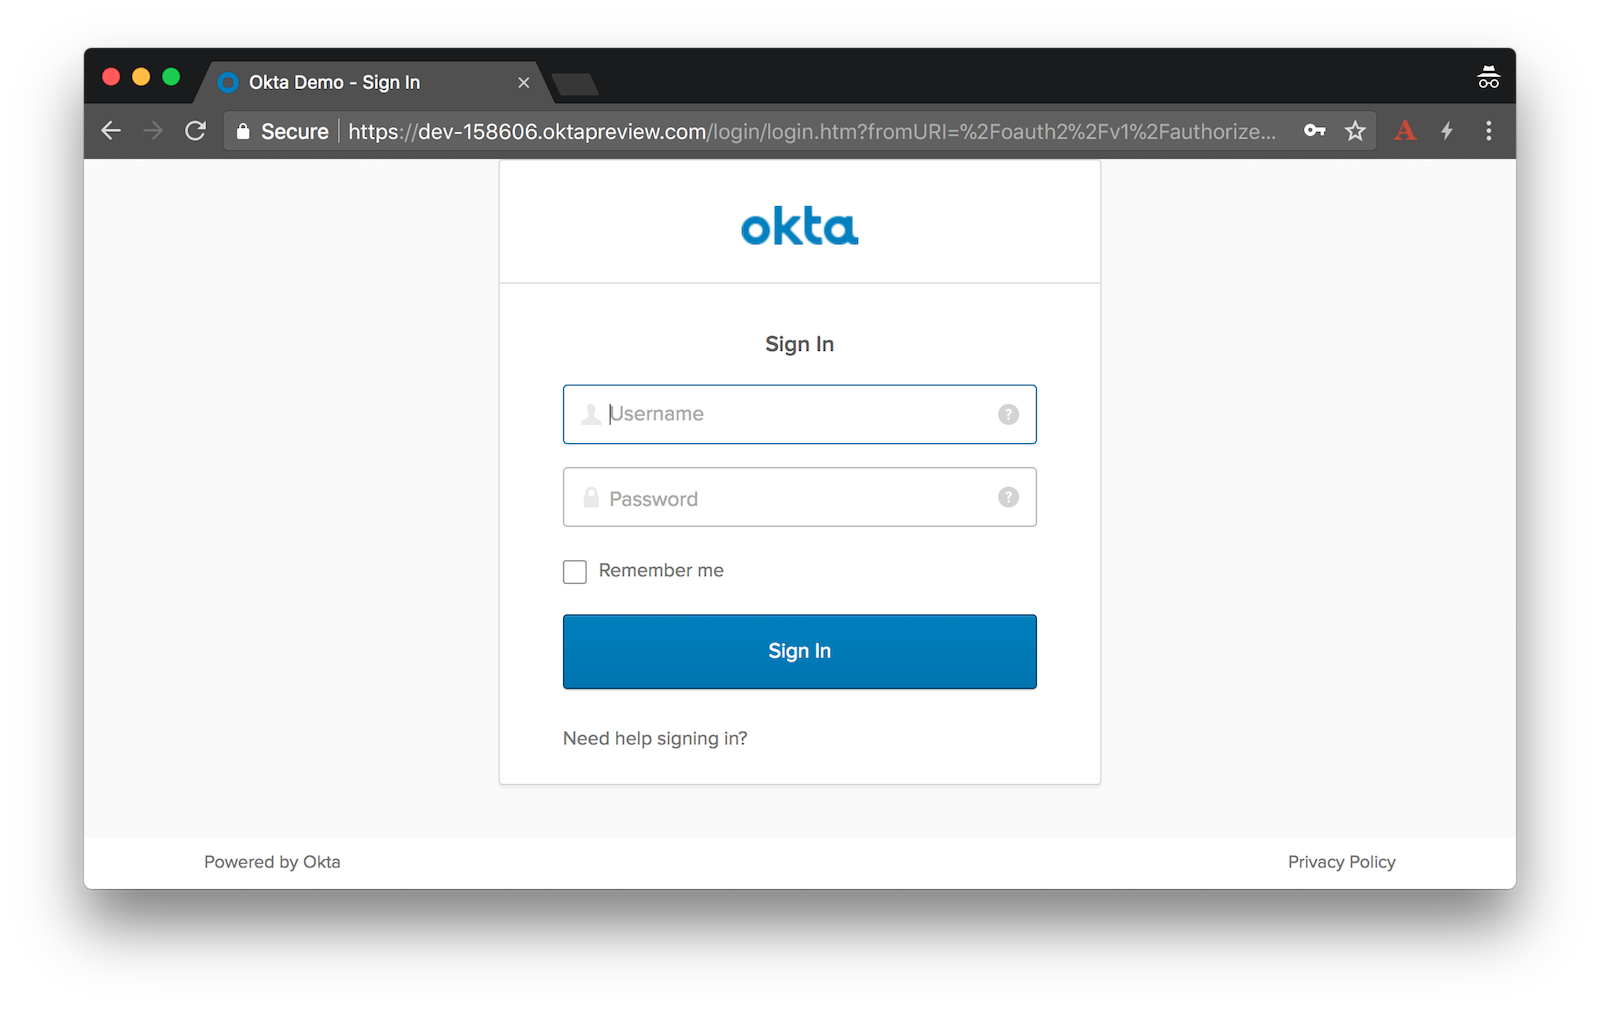
Enter the credentials you created your account with, and you’ll see a list of good beers as a result.
If you try to navigate to http://localhost:8081/home, it won’t work. This is because you need to add Spring Cloud Securityto edge-service/pom.xml to relay the access token for the Zuul proxy.
<dependency>
    <groupId>org.springframework.cloud</groupId>
    <artifactId>spring-cloud-security</artifactId>
</dependency>
Without this dependency, requests to /good-beers will work (because Feign is configured), but /home will not (because Zuul needs Spring Cloud Security).
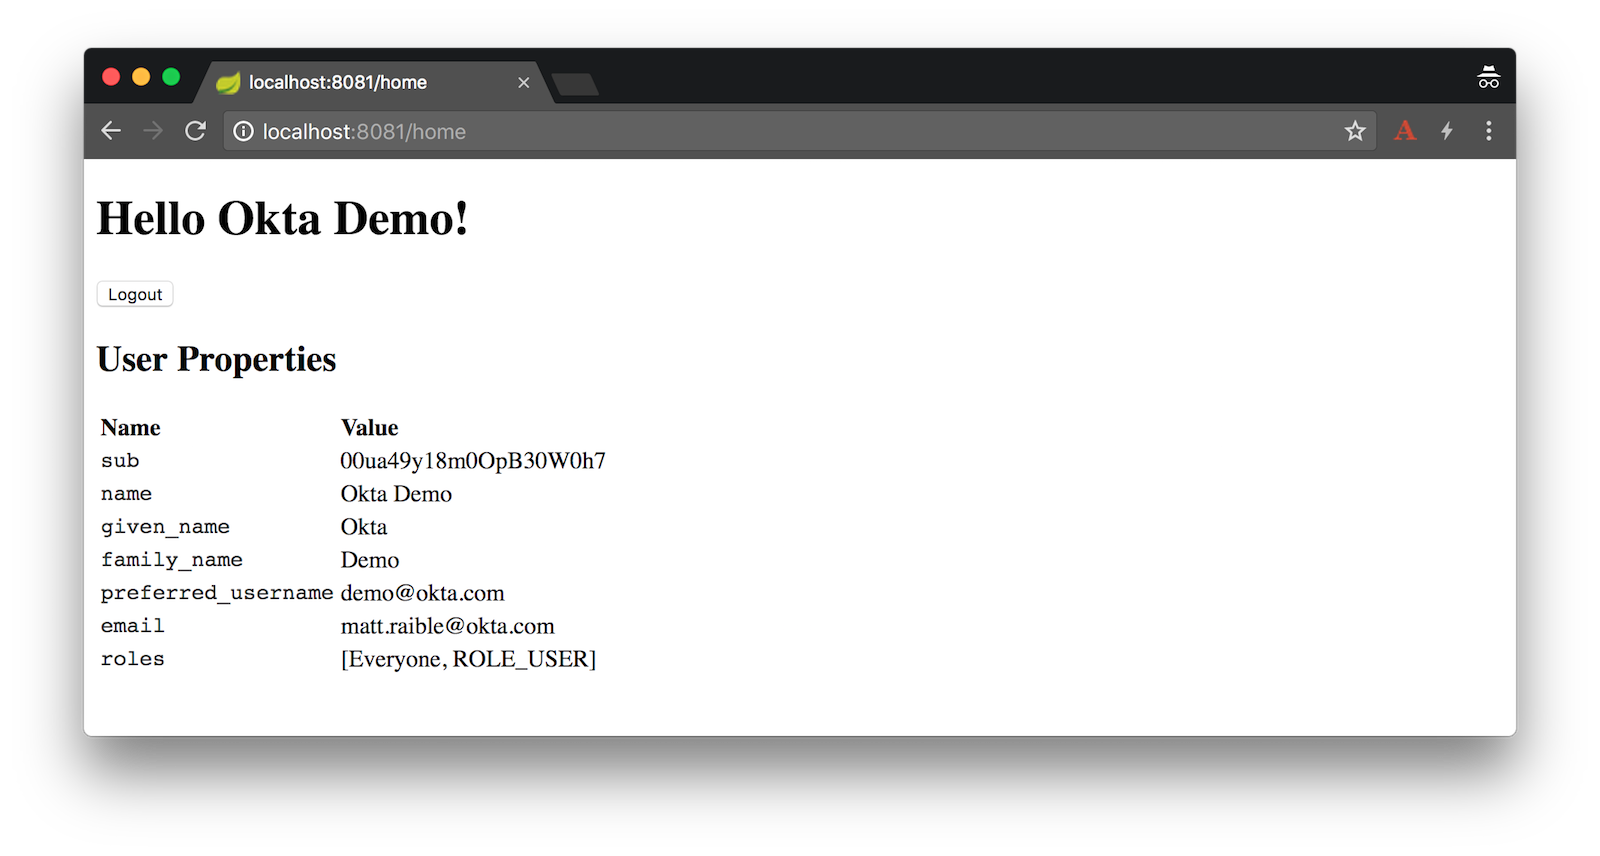
Restart your Edge Server application, navigate to http://localhost:8081/home and you’ll see your user details on the next page.
Protecting Downstream Services in Spring Boot 2.0
With Spring Boot 1.5.x, including Actuator as a dependency would trigger Actuator Security and make it so the http://localhost:8080 is protected. In Spring Boot 2.x, having a WebSecurityConfigurerAdapter causes Actuator security to back off. In the Beer Catalog Service app, the ResourceServerConfig causes this behavior.
To secure Actuator endpoints and make it so you can’t access http://localhost:8080 directly, add the endpoints you want to expose in beer-catalog-service/src/main/resources/application.properties:
management.endpoints.web.exposure.include=beans,mappings
Then create a SecurityConfig class (in the same package as ResourceServerConfig).
package com.example.beercatalogservice;

import org.springframework.boot.actuate.autoconfigure.security.servlet.EndpointRequest;
import org.springframework.context.annotation.Configuration;
import org.springframework.security.config.annotation.web.builders.HttpSecurity;
import org.springframework.security.config.annotation.web.configuration.WebSecurityConfigurerAdapter;

@Configuration
public class SecurityConfig extends WebSecurityConfigurerAdapter {

    @Override
    protected void configure(HttpSecurity http) throws Exception {
        http
            .authorizeRequests()
                .requestMatchers(EndpointRequest.toAnyEndpoint()).hasRole("ADMIN")
                .anyRequest().authenticated()
                .and()
            .httpBasic();
    }
}
After making these changes, restart the beer-catalog-service and witness its protection.

NOTE: I was unable to get the logout button to work due to a 403 error. I tried adding csrf().requireCsrfProtectionMatcher(r -> false) to the ResourceServerConfig in the Edge Service app, but it didn’t help. I sent an email to the Spring Security team asking if they had any advice.
Add Okta’s Sign-In Widget to the Angular Client
To use Okta’s Sign-In Widget, you’ll need to modify your app in Okta to enable the Implicit grant type. Log in to your account, navigate to Applications > Spring OAuth > General tab and click Edit. Enable Implicit (Hybrid) under Allowed grant types and select both checkboxes below it. Add http://localhost:4200 under Login redirect URIs and click Save.
For the Sign-In Widget to make requests to this application, you’ll also need to configure the client URL as a trusted origin. Click API > Trusted Origins > Add Origin. Enter http://localhost:4200 as the Origin URL and select both checkboxes under it.
Open a terminal, navigate to spring-boot-microservices-example/client, and install the client’s dependencies using npm.
cd client
npm install
Install Okta’s Sign-In Widget to make it possible to communicate with the secured server.
npm install @okta/okta-signin-widget --save
Add the widget’s CSS to client/src/styles.css:
@import '~@okta/okta-signin-widget/dist/css/okta-sign-in.min.css';
@import '~@okta/okta-signin-widget/dist/css/okta-theme.css';
Create client/src/app/shared/okta/okta.service.ts and use it to configure the widget to talk to your Okta tenant. Make sure to replace {yourOktaDomain} and {clientId} in the code below..
import { Injectable } from '@angular/core';
import * as OktaSignIn from '@okta/okta-signin-widget';

@Injectable()
export class OktaService {
  widget;

  constructor() {
    this.widget = new OktaSignIn({
      baseUrl: 'https://{yourOktaDomain}.com',
      clientId: '{yourClientId}',
      authParams: {
        issuer: 'default',
        responseType: ['id_token', 'token'],
        scopes: ['openid', 'email', 'profile']
      }
    });
  }

  getWidget() {
    return this.widget;
  }

  getIdToken() {
    return this.widget.tokenManager.get('idToken');
  }

  getAccessToken() {
    return this.widget.tokenManager.get('accessToken');
  }
}
Add OktaService as a provider to client/src/app/app.module.ts.
import { OktaService } from './shared/okta/okta.service';

@NgModule({
  ...
  providers: [OktaService],
  bootstrap: [AppComponent]
})
export class AppModule { }
Modify client/src/app/shared/beer/beer.service.ts to read the access token and set it in an Authorization header when it exists.
import { Injectable } from '@angular/core';
import { HttpClient, HttpHeaders } from '@angular/common/http';
import { Observable } from 'rxjs/Observable';
import { OktaService } from '../okta/okta.service';

@Injectable()
export class BeerService {

  constructor(private http: HttpClient, private oktaService: OktaService) {
  }

  getAll(): Observable {
    let headers: HttpHeaders = new HttpHeaders();
    if (this.oktaService.getAccessToken()) {
      const accessToken = this.oktaService.getAccessToken();
      // headers is immutable, so re-assign
      headers = headers.append('Authorization', accessToken.tokenType + ' ' + accessToken.accessToken);
    }
    return this.http.get('http://localhost:8081/good-beers', {headers: headers});
  }
}
Modify app.component.html to add a placeholder for the widget and a section to show the user’s name and a logout button.
<mat-toolbar color="primary">
  <span>Welcome to {{title}}!</span>
</mat-toolbar>

<!-- Container to inject the Sign-In Widget -->
<div id="okta-signin-container"></div>

<div *ngIf="user">
  <h2>
    Welcome {{user?.name}}!
  </h2>

  <button mat-raised-button (click)="logout()">Logout</button>

  <app-beer-list></app-beer-list>
</div>
You’ll notice the user variable in the HTML. To resolve this, you need to change your client/src/app/app.component.tsso it renders the Sign-In Widget. Angular’s ChangeDetectorRef is used to notify Angular when things have changed and rendering needs to process updated variables.
import { ChangeDetectorRef, Component, OnInit } from '@angular/core';
import { OktaService } from './shared/okta/okta.service';

@Component({
  selector: 'app-root',
  templateUrl: './app.component.html',
  styleUrls: ['./app.component.css']
})
export class AppComponent implements OnInit {
  title = 'app';
  user;
  signIn;

  constructor(private oktaService: OktaService, private changeDetectorRef: ChangeDetectorRef) {
    this.signIn = oktaService.getWidget();
  }

  showLogin() {
    this.signIn.renderEl({el: '#okta-signin-container'}, (response) => {
      if (response.status === 'SUCCESS') {
        response.forEach(token => {
          if (token.idToken) {
            this.signIn.tokenManager.add('idToken', token);
            this.user = this.getUser(token);
          }
          if (token.accessToken) {
            this.signIn.tokenManager.add('accessToken', token);
          }
        });
        this.signIn.remove();
        this.changeDetectorRef.detectChanges();
      }
    });
  }

  getUser(token) {
    return {
      name: token.claims.name,
      email: token.claims.email,
      username: token.claims.preferred_username
    };
  }

  ngOnInit() {
    this.signIn.session.get((response) => {
      if (response.status !== 'INACTIVE') {
        const token = this.oktaService.getIdToken();
        this.user = this.getUser(token);
        this.changeDetectorRef.detectChanges();
      } else {
        this.showLogin();
      }
    });
  }

  logout() {
    this.signIn.signOut(() => {
      this.user = undefined;
      this.changeDetectorRef.detectChanges();
      this.showLogin();
    });
  }
}
In order for the BeerListComponent (at src/app/beer-list/beer-list.component.ts) to detect that you’ve logged in, you need to use add a constructor dependency on ChangeDetectorRef and invoke its detectChanges() method when you set the giphyUrl property on each beer.
import { ChangeDetectorRef, Component, OnInit } from '@angular/core';
import { BeerService, GiphyService } from '../shared';

@Component({
  selector: 'app-beer-list',
  templateUrl: './beer-list.component.html',
  styleUrls: ['./beer-list.component.css'],
  providers: [BeerService, GiphyService]
})
export class BeerListComponent implements OnInit {
  beers: Array<any>;

  constructor(private beerService: BeerService, private giphyService: GiphyService,
              private changeDetectorRef: ChangeDetectorRef) { }

  ngOnInit() {
    this.beerService.getAll().subscribe(
      data => {
        this.beers = data;
        for (const beer of this.beers) {
          this.giphyService.get(beer.name).subscribe(url => {
            beer.giphyUrl = url;
            this.changeDetectorRef.detectChanges();
          });
        }
      },
      error => console.log(error)
    )
  }
}
Verify Authentication Works
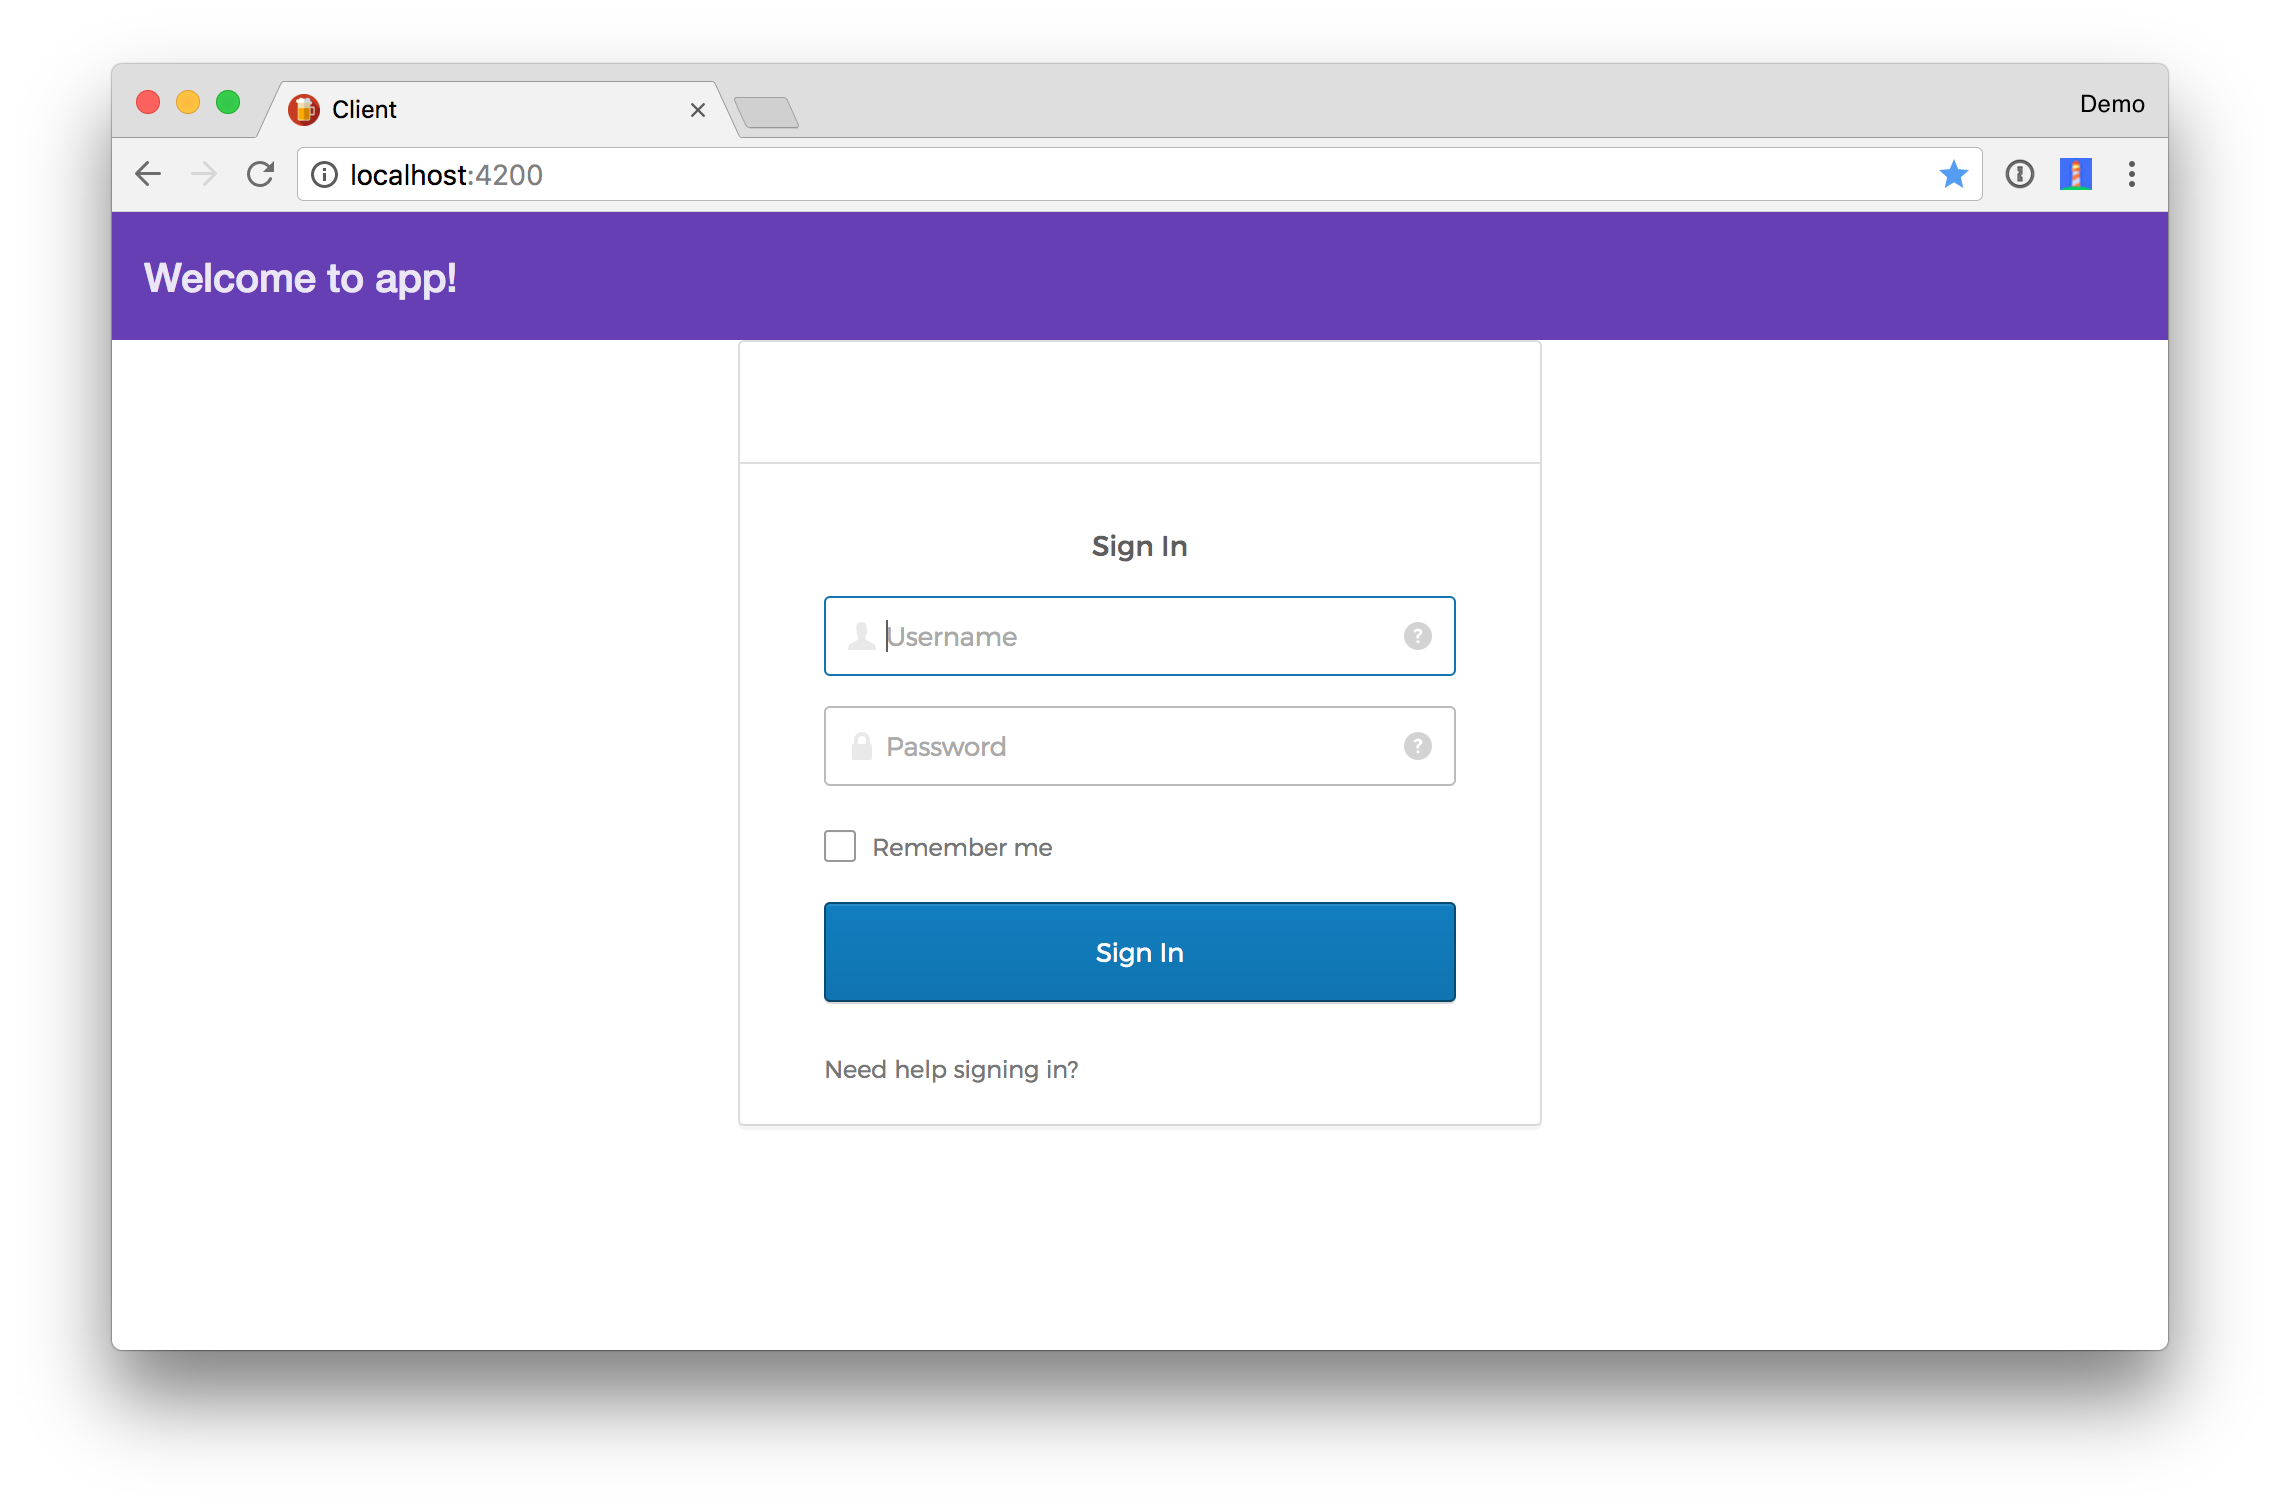
Start the client by opening a terminal, navigating to the client directory, then running npm start. Open your browser to http://localhost:4200, and you should see a login form like the following.
If you want to adjust the style of the form, so it isn’t right up against the top toolbar, add the following to styles.css.
#okta-signin-container {
  margin-top: 25px;
}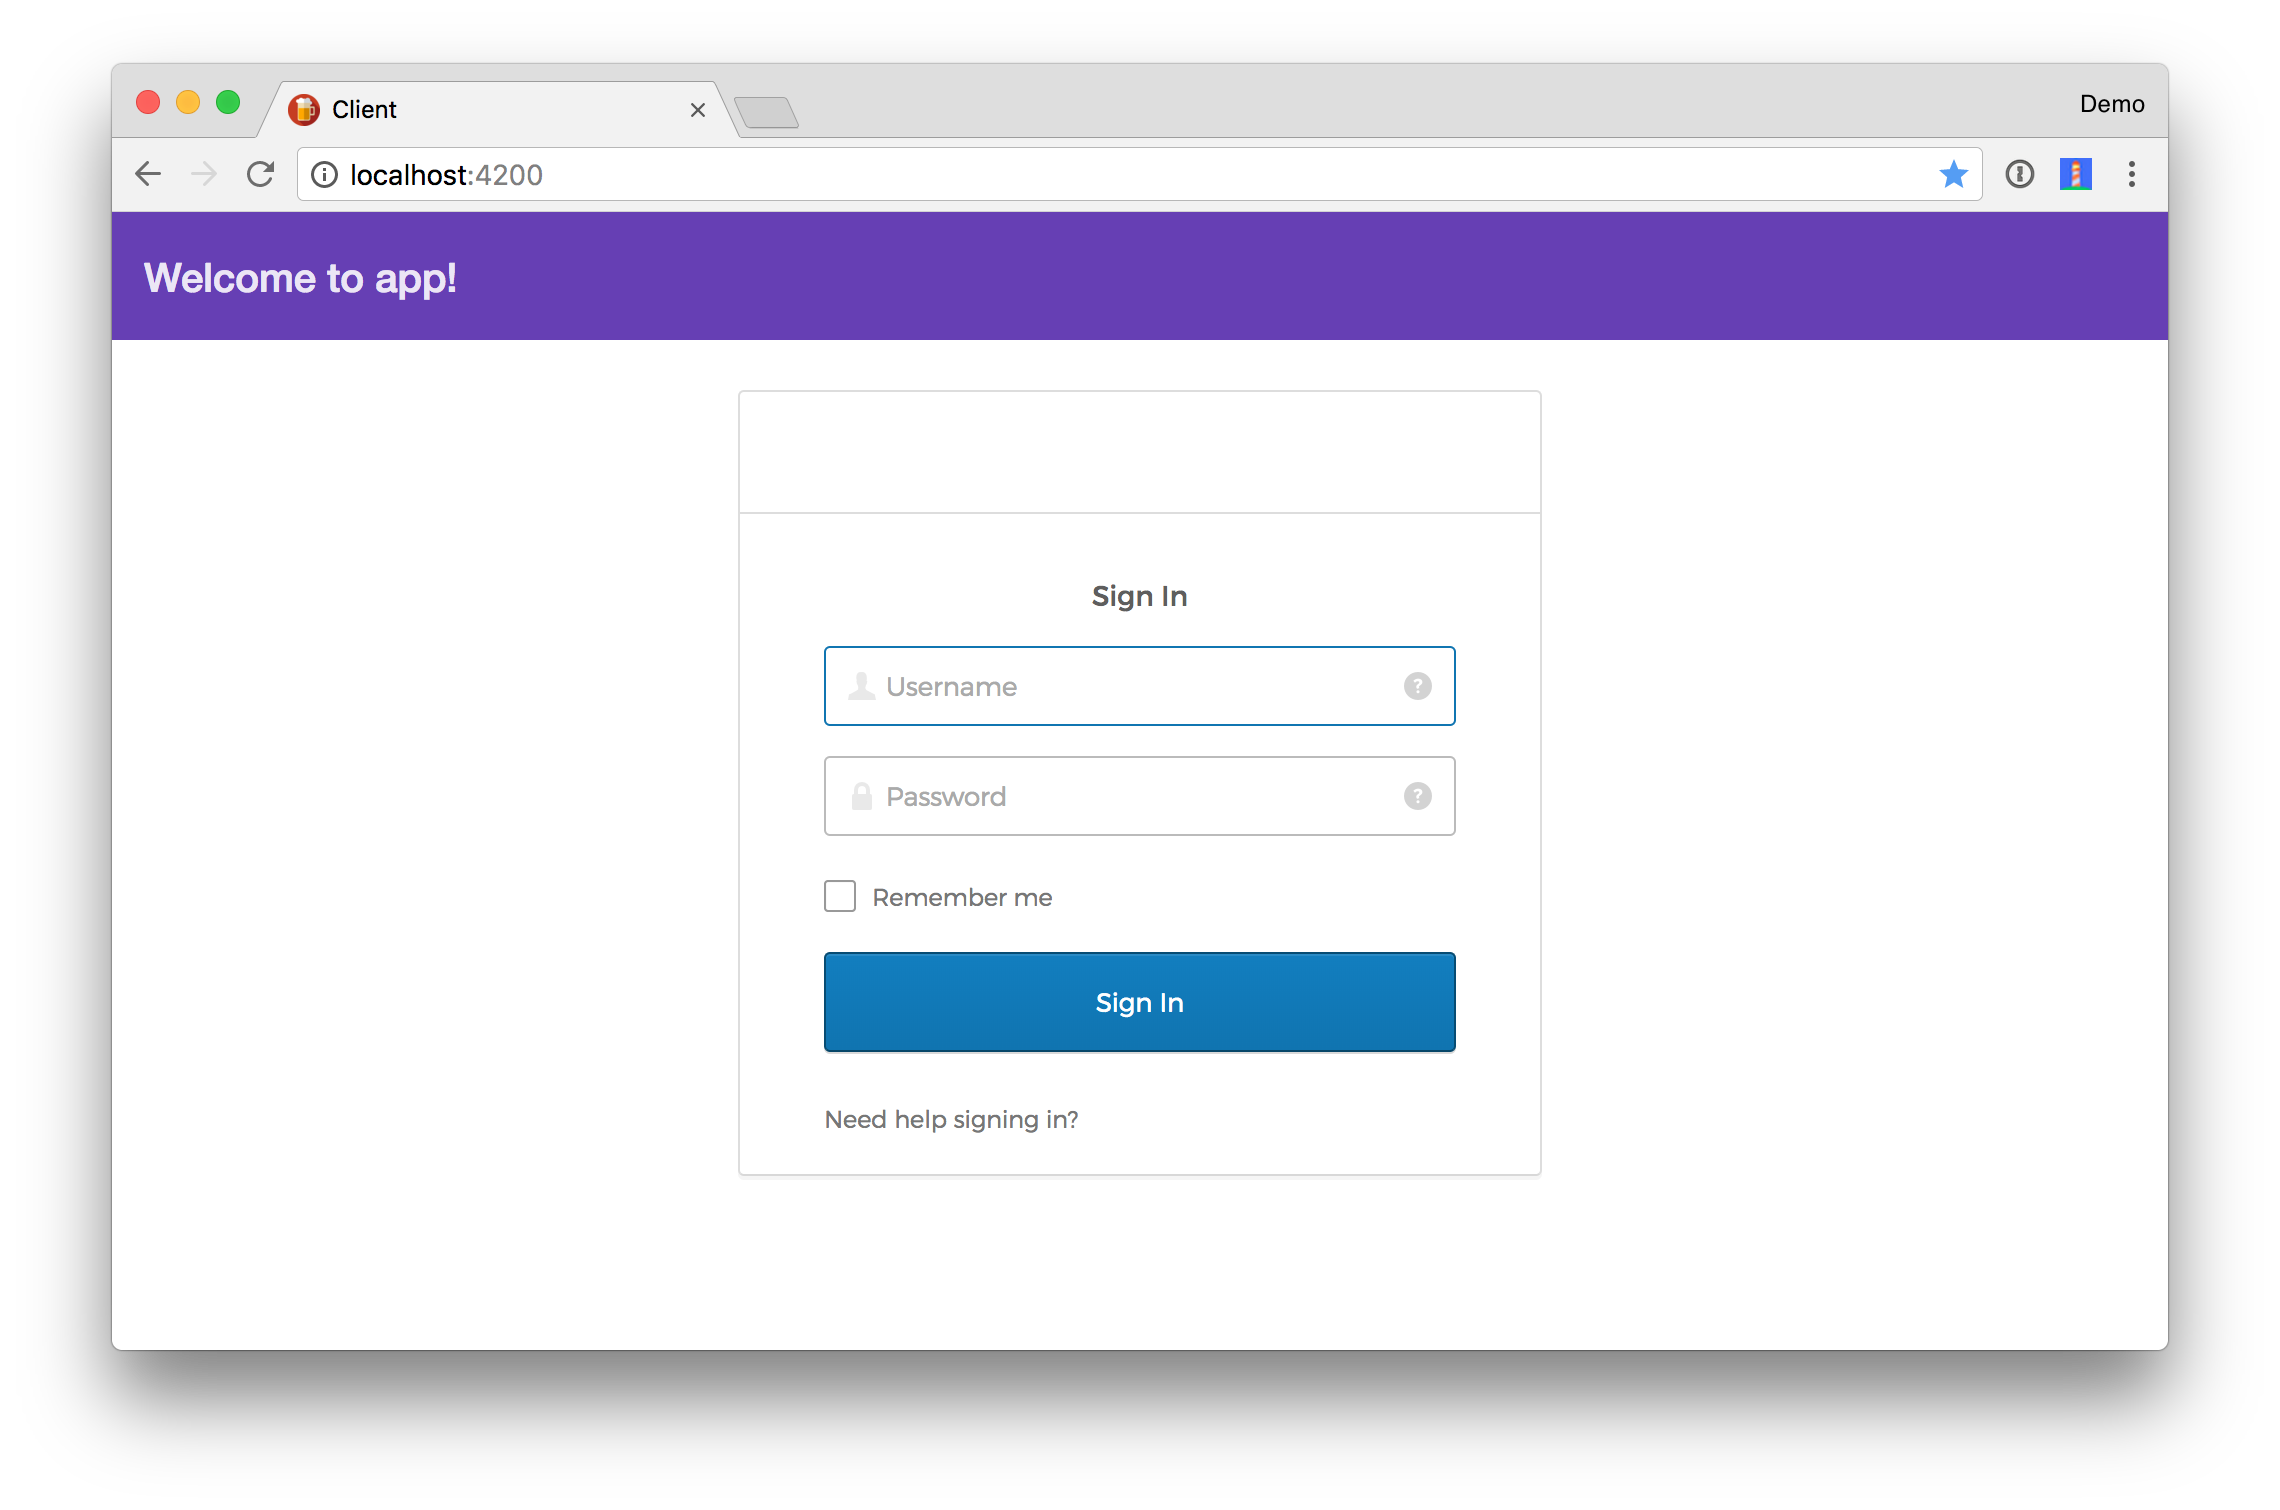
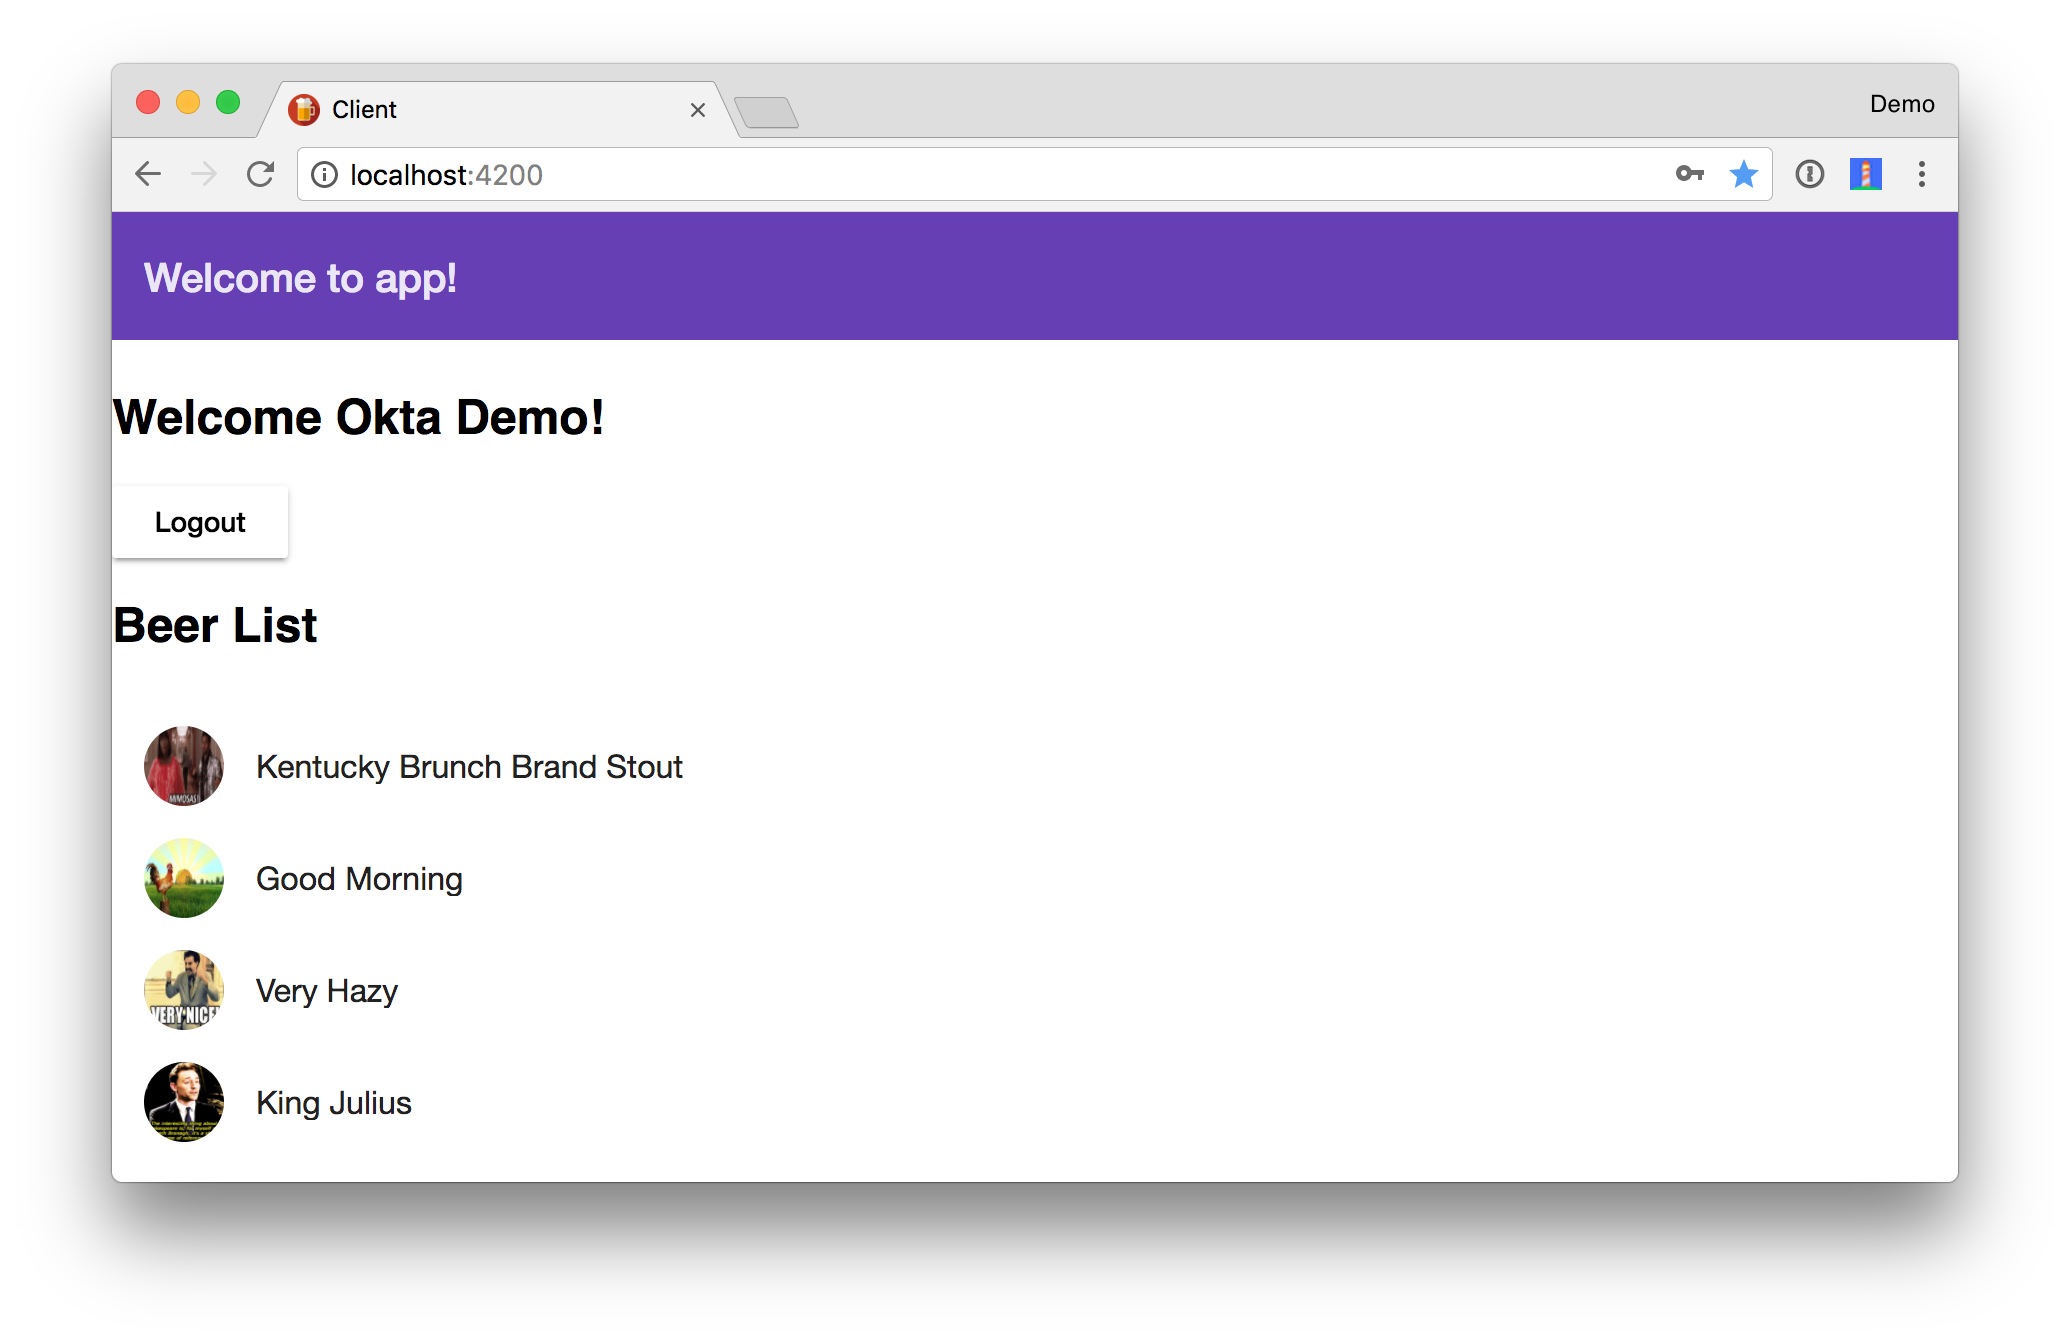
You should be able to log in, see a welcome message, as well as a logout button. However, you won’t see a beer list because of the following error in your console.
Failed to load http://localhost:8081/good-beers: Response for preflight is invalid (redirect)
This happens because Spring Security doesn’t recognize the @CrossOrigin annotation on the /good-beers endpoint. To fix this, add a simpleCorsFilter to EdgeServiceApplication.
import org.springframework.boot.web.servlet.FilterRegistrationBean;
import org.springframework.core.Ordered;
import org.springframework.web.cors.CorsConfiguration;
import org.springframework.web.cors.UrlBasedCorsConfigurationSource;
import org.springframework.web.filter.CorsFilter;

import java.util.Collections;
...
public class EdgeServiceApplication {

    public static void main(String[] args) {
        SpringApplication.run(EdgeServiceApplication.class, args);
    }

    @Bean
    public RequestInterceptor getUserFeignClientInterceptor() {
        return new UserFeignClientInterceptor();
    }

    @Bean
    public FilterRegistrationBean simpleCorsFilter() {
        UrlBasedCorsConfigurationSource source = new UrlBasedCorsConfigurationSource();
        CorsConfiguration config = new CorsConfiguration();
        config.setAllowCredentials(true);
        config.setAllowedOrigins(Collections.singletonList("*"));
        config.setAllowedMethods(Collections.singletonList("*"));
        config.setAllowedHeaders(Collections.singletonList("*"));
        source.registerCorsConfiguration("/**", config);
        FilterRegistrationBean bean = new FilterRegistrationBean(new CorsFilter(source));
        bean.setOrder(Ordered.HIGHEST_PRECEDENCE);
        return bean;
    }
}
Restart the Edge Service application and try again. This time you should have great success!
NOTE: You should change the allowed origins from * to your client’s URLs if you’re using this configuration in production.
Deploy to Cloud Foundry
To deploy everything on Cloud Foundry with Pivotal Web Services, you’ll need to create an account, download/install the Cloud Foundry CLI, and sign-in (using cf login -a api.run.pivotal.io).
There are quite a few steps involved to deploy all the services and the Angular client for production. For that reason, I wrote a deploy.sh script that automates everything.
NOTE: After this script finishes, you’ll have to add the URL for the client to your Okta app as a Login redirect URI. You’ll also need to add it as an origin under API > Trusted Origins.
TIP: If you receive an error stating that you’re using too much memory, you may have to upgrade your Cloud Foundry subscription.
Learn More about Spring Boot, OAuth 2.0, and Microservices
This article showed you how to use Spring Security, OAuth, and Okta secure a microservices architecture. With Zuul, Feign, and Spring Cloud Security, you can ensure your backend services communicate securely.
The source code for this tutorial is available on GitHub, in the “oauth” branch.
git clone https://github.com/oktadeveloper/spring-boot-microservices-example.git
git checkout oauth
This tutorial showed you how to add security to a previous tutorial, Build a Microservices Architecture for Microbrews with Spring Boot.
If you’re interested in learning about the future of Spring Security and OAuth 2.0, see Next Generation OAuth 2.0 Support with Spring Security by our good friend Joe Grandja of the Spring Security Team.
Also, JHipster uses this same setup with its OAuth support. If you’re interested in using Okta with JHipster, I encourage you to check out the following blog posts:
- Develop a Microservices Architecture with OAuth 2.0 and JHipster
- Use Ionic for JHipster to Create Mobile Apps with OIDC Authentication
Learn more about Okta and its APIs at developer.okta.com/product. If you have questions about this tutorial, please leave a comment below or hit me up on Twitter @mraible.
Changelog:
- May 11, 2018: Updated to use Spring Boot 2.0 and Okta Sign-In Widget 2.0.8. See the example app changes in spring-boot-microservices-example#17; changes to this post can be viewed in okta.github.io#2049.
“I love writing authentication and authorization code.” ~ No Java Developer Ever. Tired of building the same login screens over and over? Try the Okta API for hosted authentication, authorization, and multi-factor auth.
Secure a Spring Microservices Architecture with Spring Security and OAuth 2.0 was originally published on the Okta developer blog on February 13, 2018.

Always amazing tutorials from u. Thank u mate