Hello readers! In this tutorial, we will understand and learn the Java Virtual Machine (JVM) and its architecture. This tutorial will help you to correctly answer the below questions:
- What is JVM in Java?
- Different components of JVM
- Difference between JVM, JRE, and JDK
1. Introduction
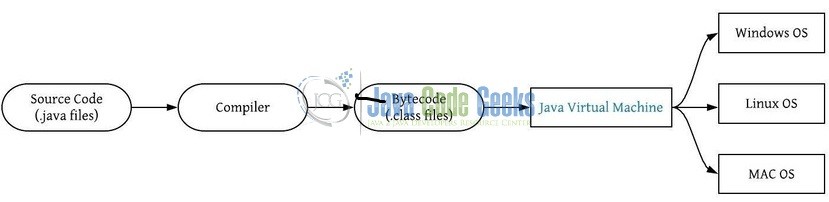
Java Virtual Machine (JVM) is an abstract virtual machine that resides on your computer and provides a runtime execution environment for the Java bytecode to get executed. JVM is available for many hardware and software platforms but few Java developers know that the Java Runtime Environment (JRE) is the enactment of the Java Virtual Machine (JVM). JVM analyze the bytecode, interprets it, and execute the same bytecode to display the output.
The basic function of JVM is to execute the compiled .class files (i.e. the bytecode) and generate an output. Do note, each operating system has a different JVM, but the generated bytecode output is same across all operating systems. This means that the bytecode generated on Windows OS can also run on Linux OS and vice-versa, thus making Java as a platform independent language.
1.1 What JVM does?
Java Virtual machine performs the following operations:
- Loading of the required
.classand jar files - Assigning references and verification of the code
- Execution of the code
- Provides a runtime environment for the Java bytecode
- Garbage collection
- Loading of the required

1.2 Types of Java Virtual Machines
The Java edition has two different implementations of the Java Virtual Machine (JVM) i.e.
- Java Hotspot Client VM: This is the default virtual machine of the JDK 2.0 runtime environment and is tuned for best performance while running the applications in a client environment by reducing the application start-up time and memory footprints
- Java Hotspot Server VM: This virtual machine is designed for enhanced program execution speed for running the applications in a server environment. This virtual machine is invoked by using the server command line option
1.3 Internal architecture of JVM
The diagram shows the key internal components of Java Virtual Machine that conforms to the JVM specification.
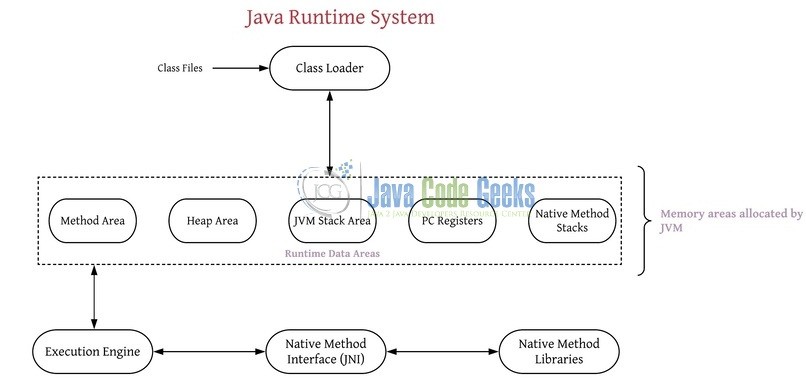
The components that are shown in Fig. 3 are explained below.
1.3.1 Class Loader
The class loader subsystem is used for loading/reading the .class files and saving the bytecode in the JVM method area. This subsystem performs three major functions i.e.:
- Loading: This component handles the loading of the classes
- Linking: This component will verify the generated bytecode and assign references
- Initialization: This component will assign the static variables with their original values and execute the static blocks
1.3.2 Runtime Data Areas
This subsystem is divided into five major components i.e.
- Method Area: This component holds the class level data of each
.classfile such as metadata, constant runtime pool, static variables, the code for the methods etc. There is only one method area per JVM and is shared among all the classes - Heap Area: This component is a part of JVM memory where all the objects and its corresponding instance variables and arrays are stored. There is only one heap area and is shared across multiple threads as the data stored in this area is not thread-safe
- Stack Area: This component is again a part of JVM memory where all the temporary variables are stored. This area has stack frames and allocates one frame for each thread. As the execution of a thread is completed, the corresponding frame also gets destroyed. The stack area is thread-safe as it is not a shared resource and is divided into three sub-entities such as:
- Local variable array
- Operand Stack
- Frame data
This area plays an important role during the method invocation and returns.
- PC (Program Counter) Registers: This component holds the address of the JVM instruction which is currently executing. Each thread in Java has its own PC register to hold the address of the currently executing instruction
- Native Method Stacks: This component is written in a different language and holds the native method information. Every thread in Java has a separate native method stack
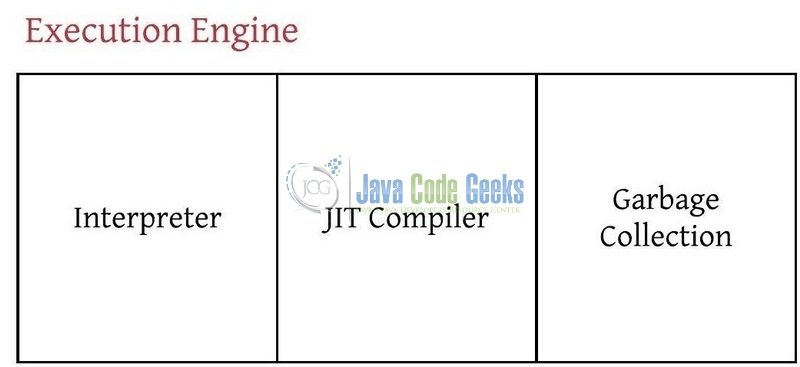
1.3.3 Execution Engine
This component executes the bytecode which is assigned to the runtime data areas and has three major sub-components i.e.:
- Interpreter: This component reads the bytecode instructions and executes them in a sequential manner
- JIT (Just-in-Time) Compiler: This component counterbalances the Interpreter’s disadvantage of slow execution and improves the performance. JIT compiler compiles the similar part of the bytecode at the same time and thus reduces the total time needed for compilation. The compiler in this component refers to a translator which converts the JVM instruction set to the OS-specific instruction set
- Garbage Collection: This component is a part of execution engine which frees up the memory by collecting and removing the unreferenced objects
1.3.4 Native Method Interface (JNI)
This component is a programming framework that allows the Java code to call or be called by the libraries and the native applications (i.e. the programs specific to the hardware and the OS of a system).
1.3.5 Native Method Libraries
This component is a collection of native C, C++ libraries which are required by the execution engine.
1.4 JVM vs. JRE vs. JDK
JDK, JRE, and JVM are the three important keywords of Java programming and many developers’ fails to get the difference between them.
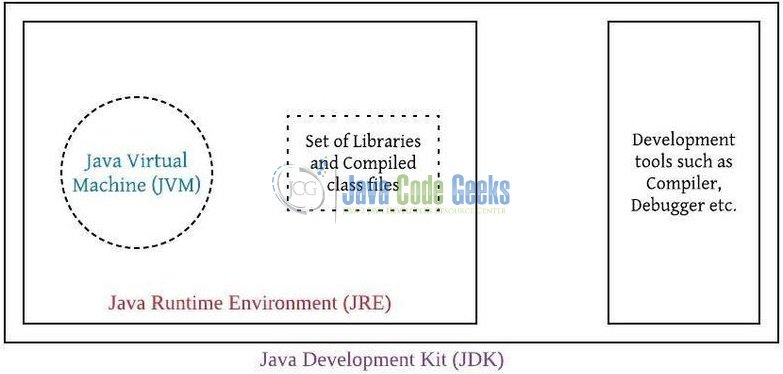
- Java Virtual Machine (JVM): JVM is a virtual machine which provides a runtime environment for executing the Java bytecode
- Java Runtime Environment (JRE): JRE is an environment within which the JVM runs and has class libraries and other files that Java Virtual Machine uses at the time of execution. In other words, JRE = Java Virtual Machine (JVM) + Libraries to run the application
- Java Development Kit (JDK): JDK is the parent set of the JRE and has everything that JRE contains along with the development tools such as a compiler, debugger etc. In other words, JDK = Java Runtime Environment (JRE) + Development tools
Here is the pictorial representation of JVM, JRE, and JDK.
1.5 How to Compile and Execute a Java class?
This section will demonstrate the compilation and execution of a Java class. Let’s understand this process with the help of sample code snippet.
1.5.1 Creating a Java file
Open the operating system command prompt and we will use the ‘notepad’ to create a simple Java class. The following Java command can be used.
> notepad _sample_file_name_with_extension_
The command gives the below output.

1.5.2 Writing the sample Java Code
As shown in Fig. 6, the command will open a notepad and developers can add the sample code to the Welcome.java file that displays a dummy output. The sample code is shown in Fig. 7 and will display a greetings message on successful execution.

1.5.3 Compiling the Java class
After saving the code in Welcome.java file, developers will need to compile it. This compilation will produce the Welcome.class file which in turn will generate a .class file. To compile the file, the following Java command can be used.
> javac _Java_file_name_with_extension_
The command gives the below output.

1.5.4 Executing the Java class
Now, developers will need to execute the generated Welcome.class file to display the output. To execute the file, the following Java command can be used.
> java _Compiled_file_name_with_extension_
The command gives the below output.

That’s all for this post. Happy Learning!
2. Conclusion
In this tutorial, we had an overview of the Java Virtual Machine (JVM) and its core components. This tutorial can be summarized as:
- JVM is the virtual machine that executes the Java code and produces output by converting the Java bytecode into the machine language
- JIT compiler is a sub-component of the JVM and is used to speed up the performance and the execution time
- Java is slow in execution due to:
- Dynamic linking
- Run-time conversion of the bytecode to the native machine code
However, these bottleneck performance issues are addressed to an extent in the new Java Development Kit (JDK) versions. Developers can download the sample code snippet in the Downloads section.
3. Download the Source Code
This was an overview tutorial of Java Virtual Machine (JVM) and its core components.
You can download the source code of this tutorial here: JVM_Example

Good article!
JVM is the virtual machine that executes the Java code and produces output by converting the Java bytecode into the machine language
JVM written using C language, JVM only knows byte codes,