1. What is Git ?
Git is a popular file versioning system used globally by numerous developers for their projects. It is lightweight and swift in its performance as compared to the likes. With a number of UI based tools to assist in Git based versioning, it has become extremely convenient for the developers to use Git Versioning System. Git flaunts features like Cheap local branching, convenient staging areas and multiple workflow configurations.
In this article, we would specifically focus on getting started with using Git and cover up some basic commands that would be needed for a simple project. The article covers every detail of possible situations that might come up during the versioning. However, before beginning with it, it is necessary to have Git Version Control System(VCS) installed onto your system.
2. Git Installation
In order to install Git into your system, follow the steps shown below:
2.1 Installing Git in Windows & MacOS
- Go to the home page of Git VCS
- You should be able to find a download button for the latest Git version available
- Download and install the same
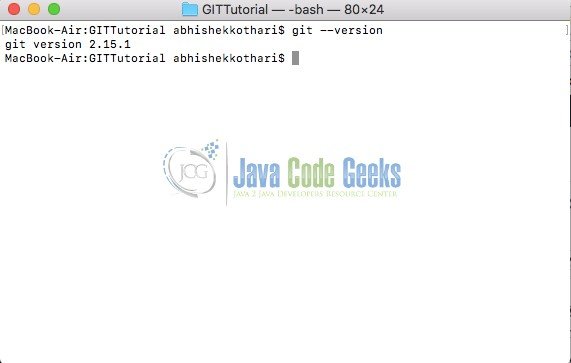
In order to verify the installation, enter the below command in your command prompt(Windows) or Terminal(Mac OS).
$ git --version
An output as shown below should appear if the installation went fine.
2.2 Installing Git Core in Linux
Git does not provide ready to install setup files for Linux. Hence, there is an alternate way to get it installed instead. Execute the below command from the terminal to get the git-core package installed.
$ sudo apt-get install git-core
This will do all the necessary steps and once it is ready, follow the below steps to verify the installation.
Enter the below command in your Terminal window.
$ git --version
An output as shown above should appear if the installation went fine.
3. Starting with the Git versioning
Once the installation is done and verified, we are all set to start with the first project versioning using Git. We would be working with a dummy Java project here to understand file versioning for a project better. You could use any popular IDE to create a Java project and get started. The IDE used here is Eclipse IDE. However, for the execution of commands, we would strictly restrict to the command line tools.
3.1 Creating and initialising a Git Repository
In order to configure a project to use Git based versioning system, all you need to do is initialise the project directory as a GIT repository. Create a Java project in your desired directory using your preferred IDE.
Now, open up your terminal and change the directory to the project directory using the popular cd command.
$ cd /path/to/project
To initialise the Git repository, execute the command git init. The output as shown below should be visible.
$ git init
Initialized empty Git repository in /Users/abhishekkothari/Desktop/JavaCodeGeeks/GitBeginners/GitBeginner/.git/
As it can be seen, a .git directory is created in the project folder. This folder keeps a track of all the changes that take place locally. You can check the directory status by using the command git status. It should provide an output similar to what is shown below. It might vary if you are using a different IDE.
$ git status
On branch master

No commits yet

Untracked files:
  (use "git add ..." to include in what will be committed)

	.classpath
	.project
	.settings/
	bin/
	src/
3.2 Beginning with the file versioning
Now, in the project, create a Java file as shown below.
SayHello.java
package com.javacodegeeks;

public class SayHello {
	public static void main(String[] args) {
		System.out.println("Hello there!");
	}
}
The IDE might show error for the package. Feel free to remove the package declaration if not required. Once the file is created, we need to add the file to the GIT index. This would ascertain that the changes to the files are tracked thereafter. To add the file to the index, execute the command git add /path-to-file/SayHello.java. There would be no feedback to the command. However, you could check the status to ascertain the file is added to the index.
On checking the status, an output similar to the one shown below will be visible.
$ git add src/com/javacodegeeks/SayHello.java
$ git status
On branch master

No commits yet

Changes to be committed:
  (use "git rm --cached ..." to unstage)

	new file:   src/com/javacodegeeks/SayHello.java

Untracked files:
  (use "git add ..." to include in what will be committed)

	.classpath
	.project
	.settings/
	bin/
The next step in the flow is to actually commit the file to the repository. A file being committed means the current version of file in the repository will be overwritten. A file can be committed using the command git commit. It is also possible to add comments describing the changes that are being committed. In order to do so, execute the command as shown below.
$ git commit -m "First File Committed"
This would commit the file mentioning the comment First File Committed in the trace. An output similar to the one shown below should be visible.
$ git commit -m "First File Committed"
[master (root-commit) 9cce524] First File Committed
 1 file changed, 7 insertions(+)
 create mode 100644 src/com/javacodegeeks/SayHello.java
3.3 Working with multiple files
File versioning is generally used when there are multiple files to work with. Hence, certainly there needs to be ways to work easily with multiple files rather than executing the git add file-name for each file to index every time. In order to understand the same, let’s create two more simple java files as shown under.
EvenNumbers.java
package com.javacodegeeks;

public class EvenNumbers {
	public static void printEvenNumber(int i) {
		System.out.println("Even numbers upto "+i);
		for(int x=0;x<i;x=x+2)
			System.out.println(x);
	}
}
OddNumbers.java
package com.javacodegeeks;

public class OddNumbers {
	public static void printOddNumber(int i) {
		System.out.println("Odd numbers upto "+i);
		for(int x=1;x<i;x=x+2)
			System.out.println(x);
	}
}
Now, we need to add these two files to index without executing command for each file. In order to do so, there are two ways. One of them is useful when you specifically wish to add files with a specific extension. For instance,
$ git add *.java
The above command would add all the files with the extension .java to the staging. Staging is an area that holds the file version until it is committed. Another possible way is to add all the files that exist in the project using the below command.
$ git add -A
This command would take care of all the files – New, Modified as well as Deleted. Let’s now modify the file SayHello.java as shown below.
SayHello.java
package com.javacodegeeks;

public class SayHello {
	public static void main(String[] args) {
		System.out.println("Hello there!");
		EvenNumbers.printEvenNumber(11);
		OddNumbers.printOddNumber(12);
	}
}
Now execute either of the above commands to add all the Java files to the staging area and then check the status. The status should be similar to the one shown below:
$ git status
On branch master
Changes to be committed:
  (use "git reset HEAD ..." to unstage)

	new file:   src/com/javacodegeeks/EvenNumbers.java
	new file:   src/com/javacodegeeks/OddNumbers.java
	modified:   src/com/javacodegeeks/SayHello.java

Untracked files:
  (use "git add ..." to include in what will be committed)

	.classpath
	.project
	.settings/
	bin/
In case you used the command git add -A, it would have added all the empty directories to the index too. If this is not as expected, you can easily undo the movement to stage by executing git reset. It will reset the add action that was executed and revert the staging to the previous commit. An output similar to the one shown below will be available.
$ git reset
Unstaged changes after reset:
M	src/com/javacodegeeks/SayHello.java
Once reset, you can add the expected files to the staging and commit once things look fine.

3.4 Connecting to the remote repository
The changes tracked and stored during the above steps are all tracked locally. For now, the files are not available online for other developers to work on. In order to enable other developers to access or clone the code, it is important to connect the local code base to the remote repository. For this, you need to start by creating an online repository on popular Git hosting platforms like GitHub. For this article, I have created a repository GitBeginner on Github. To connect the local files to the repository execute the below command.
$ git remote add origin https://github.com/datsabk/GitBeginner.git
There would be no feedback for the command. However, you could check the successful connection by using below command.
$ git remote show origin
* remote origin
  Fetch URL: https://github.com/datsabk/GitBeginner.git
  Push  URL: https://github.com/datsabk/GitBeginner.git
  HEAD branch: (unknown)
Now that the local files are connected to the remote repository, it’s time to push the files to the repository. To do so, execute the command shown below:
$ git push -u origin master
Counting objects: 6, done.
Delta compression using up to 4 threads.
Compressing objects: 100% (2/2), done.
Writing objects: 100% (6/6), 471 bytes | 157.00 KiB/s, done.
Total 6 (delta 0), reused 0 (delta 0)
To https://github.com/datsabk/GitBeginner.git
 * [new branch]      master -> master
Branch 'master' set up to track remote branch 'master' from 'origin'.
Incase, you did not configure Git for the user details, you would be prompted to enter the credentials for your corresponding hosting account. You can configure your Git user name and password by following steps from this link.
3.5 Git Branching and Merging
In a large project, the developers do not usually work on a common branch. Every developer creates a branch with respect to the feature they are developing or the bug they are trying to resolve. This section covers the process of creating a branch and merging the same into the main branch.
First of all, let’s create a local branch. In order to create a new local branch, execute the command git checkout -b newbranch. This will create a new local branch and switch to it. An output similar to the one shown below will be available.
$ git checkout -b newbranch
M	src/com/javacodegeeks/SayHello.java
Switched to a new branch 'newbranch'
Now, let us change some code in SayHello.java as shown below:
SayHello.java
package com.javacodegeeks;

public class SayHello {
	public static void main(String[] args) {
		System.out.println("Hello there!");
		System.out.println("Printing even numbers");
		EvenNumbers.printEvenNumber(11);
		System.out.println("Printing odd numbers");
		OddNumbers.printOddNumber(12);
	}
}
The developers occasionally need to check the differences between the files at the remote repository. Whenever this is required, simply execute the command git diff to check all the modifications. An output similar to the one shown below will turn up.
$ git diff
diff --git a/bin/com/javacodegeeks/SayHello.class b/bin/com/javacodegeeks/SayHello.class
index 0e9d8e3..6c45444 100644
Binary files a/bin/com/javacodegeeks/SayHello.class and b/bin/com/javacodegeeks/SayHello.class differ
diff --git a/src/com/javacodegeeks/SayHello.java b/src/com/javacodegeeks/SayHello.java
index 815b53a..4276f44 100644
--- a/src/com/javacodegeeks/SayHello.java
+++ b/src/com/javacodegeeks/SayHello.java
@@ -3,7 +3,9 @@ package com.javacodegeeks;
 public class SayHello {
        public static void main(String[] args) {
                System.out.println("Hello there!");
+               System.out.println("Printing Even numbers");
                EvenNumbers.printEvenNumber(11);
+               System.out.println("Printing Odd numbers");
                OddNumbers.printOddNumber(12);
        }
 }
As it can be noticed, there are + signs to indicate that the two lines were added. For the .class files, Git is unable to read them as text since they are binary byte codes. Hence, it merely says that they are different from what was committed earlier. Now, its time to push these changes and merge them to the master branch. The procedure to push the changes to the remote repository remains the same. Execute the commands as shown below:
$ git commit -m "Added two lines"
[newbranch 3f7d0cb] Added two lines
 1 file changed, 2 insertions(+)
MacBook-Air:GitBeginner abhishekkothari$ git push -u origin newbranch
Counting objects: 24, done.
Delta compression using up to 4 threads.
Compressing objects: 100% (18/18), done.
Writing objects: 100% (24/24), 3.09 KiB | 791.00 KiB/s, done.
Total 24 (delta 5), reused 0 (delta 0)
remote: Resolving deltas: 100% (5/5), done.
To https://github.com/datsabk/GitBeginner.git
 * [new branch]      newbranch -> newbranch
Branch 'newbranch' set up to track remote branch 'newbranch' from 'origin'.
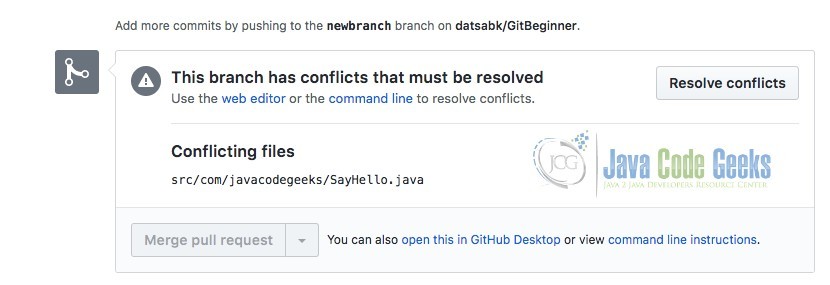
Now the new branch has been created on the remote repository and the changes are pushed to the branch. However, the changes are not yet available in the master branch. In order to pull these changes into the master branch, raise a merge request using the Github UI as shown below.

Once the merge request has been raised, an authorised person can accept the request and pull the changes into the master repository and make it available to others. In a large project, there are frequent chances of having conflicts during merge. Conflicts occur when some other developer already merged the changes in a file that you are trying to merge. In such a case, Git is unable to decide whether the changes should be overwritten or merged.
A conflicting scenario has been generated in the above pull request by editing the SayHello.java file in the master branch as shown below:
SayHello.java
package com.javacodegeeks;

public class SayHello {
	public static void main(String[] args) {
		System.out.println("Hi there!");
	}
}
Once this change has been done, the pull request shows conflict as shown below:
These conflicts can be interactively resolved by clicking the Resolve conflicts and selecting the code that needs to be written to the file once merged. Such conflicts can be challenging at times. Hence, it is advisable to pull the latest changes to the files incrementally to avoid large chunk of conflicting code. The latest changes of any specific branch can be pulled by using the commands shown below:
$ git fetch origin
$ git merge origin/master
The first command will pull the latest changes of the respective branch. The next command does the job of merging the fetched changes into the local files.
3.6 Ignoring certain files
In the previous operations, we sticked to the git add *.java command. However, this is not the case always. There might be a need where we wish to ignore only certain files rather than all. In such a case, below command comes in handy.
$ git rm -r --cached *.class
On executing the above command and then checking the status of the repository, you would find that the class files are now being ignored and the output of git status is similar to the one shown below.
$ git status
On branch newbranch
Your branch is up to date with 'origin/newbranch'.

Changes to be committed:
  (use "git reset HEAD ..." to unstage)

	deleted:    bin/com/javacodegeeks/EvenNumbers.class
	deleted:    bin/com/javacodegeeks/OddNumbers.class
	deleted:    bin/com/javacodegeeks/SayHello.class

Untracked files:
  (use "git add ..." to include in what will be committed)

	bin/
It indicates that the class files are deleted from the tracking list and the bin folder is now not being tracked. Thus, the files are now in the ignored list. This list can be found in .gitignore file located in the project directory.
4. Conclusion
The article has covered in depth the complete process of creating and managing Git repository for a project as a beginner. It captures the basic problems or features that a developer might come across. There would be complex challenges ahead. However, Git being a popular versioning system, there should be sufficient help available for the same.
5. References
- Details of some Basic commands
- GIT GUI clients to make your job easy
- Interactive tutorial for GIT command line
