Android Things GPIO pins are used to interact with external devices. GPIO stands for General Purpose Input Output and it is an interface to read the state of an external device. In this article, we will discover how we can use Android Things GPIO pins to control DC motors building a remote controlled car. At the end of this article, you will build an Android Things car that moves in all the directions and you can control it using your smartphone or your browser.
Android Things provides a set of APIs we can use to interact with two-state devices like buttons or LEDs using Android Things GPIO. Using Android Things GPIO API we can simply read the state of a pin or set its value. In more details, in this article, we will explore how to use Android Things GPIO to control motors. Maybe you already know, there are other ways to use to control motors. Using Android Things GPIO pins we can only turn it on or off but we can not control the motor velocity. GPIO pins have only two states: on or high and off or low. If we want to have more control over the motors applying a proportional control we can use Android Things PWM pins.
Anyway in this context, we want only to control the motors and turn them on or off so we can move our Android Things remote controlled car in all directions. The final result is shown in the picture below:

Android Things GPIO pins
Before describing how to build an Android Things remote car, it is useful to give an overview of how to use GPIO pins. The first step to control an Android Things GPIO pin is getting the reference to the PeripheralManagerService:
PeripheralManagerService service = new PeripheralManagerService();
The next step is opening the connection to the pin:
pin = service.openGpio(pin_name);
To know which pins are GPIO, according to your Android Things board, you can referer to the Android Things pinout. Once the connection is open we can set the value of the pin using this commands:
pin.setDirection(Gpio.DIRECTION_OUT_INITIALLY_LOW);
pin.setValue(true); // High
To know more how to use Android Things GPIO pins you can refer to my book “Android Things Projects“.
Before digging into the project details you should read my other articles about Android Things:
How to control a motor using Android Things
Usually, we connect directly the device to the Android Things board. Anyway, when we use motors this is not possible because a motor may require much more current a GPIO pin can provide. In this case, we have to provide an external source power and use the Android Things GPIO pins to control the motor. Moreover, we want to control the motor rotation direction. For these reasons, it is advisable to use a simple motor driver that simplifies our work.
In this project, we will use L298N a simple driver that can control two motors and their directions:

This driver can control motors using PWM too, anyway in this project we will not use this features. Using two Android Things GPIO pins for each motor, we can control its rotation direction or stop it.
Let us see how to connect to this driver to Android Things board. The schema below shows how to connect the GPIO pins to the L298N and the motors:
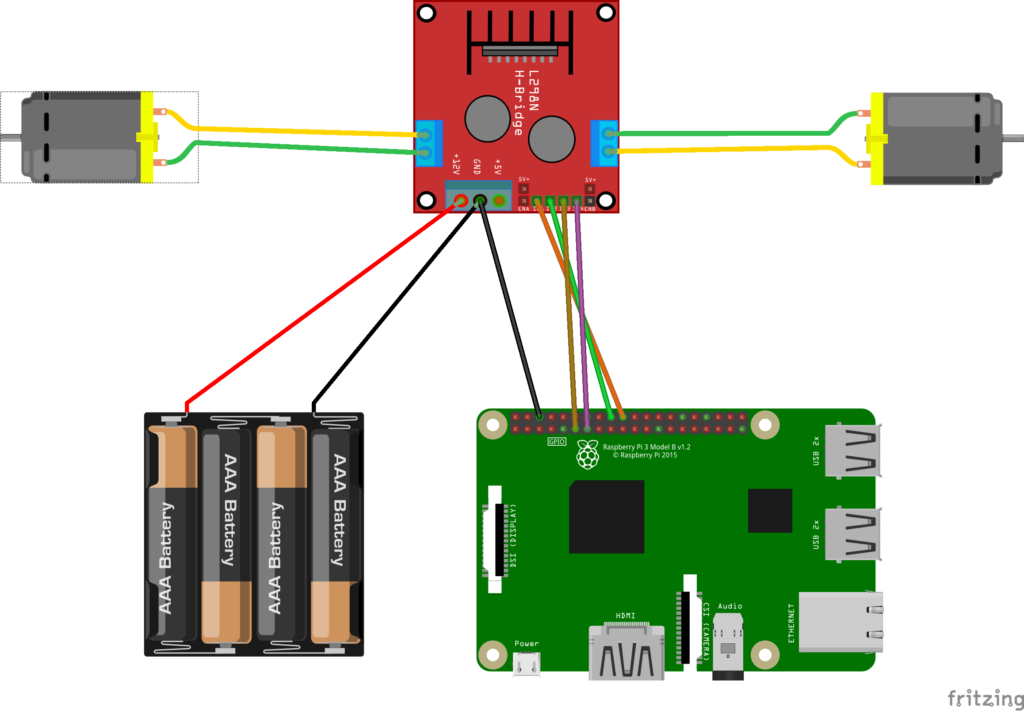
Even if the schema could seem a little bit complex, it is very simples: this project uses four different Android Things GPIO pins:
Right motor:
- BCM17
- BCM27
Left motor:
- BCM23
- BCM24
If you are using a different board than Raspberry Pi3 you have to change the pin names.
At this time, we can create a simple java class that controls the motors:
public class MotorController {

    PeripheralManagerService service = new PeripheralManagerService();
    private Gpio pin1Motor1;
    private Gpio pin2Motor1;

    private Gpio pin1Motor2;
    private Gpio pin2Motor2;

    public MotorController() {
        try {
            // Right
            pin1Motor1 = service.openGpio("BCM17");
            pin2Motor1 = service.openGpio("BCM27");

            // Left
            pin1Motor2 = service.openGpio("BCM23");
            pin2Motor2 = service.openGpio("BCM24");

            pin1Motor1.setDirection(Gpio.DIRECTION_OUT_INITIALLY_LOW);
            pin2Motor1.setDirection(Gpio.DIRECTION_OUT_INITIALLY_LOW);
            pin1Motor2.setDirection(Gpio.DIRECTION_OUT_INITIALLY_LOW);
            pin2Motor2.setDirection(Gpio.DIRECTION_OUT_INITIALLY_LOW);

        } catch (IOException e) {
            e.printStackTrace();
        }
    }


    public void forward() {
        setPinValues(true, false, false, true);
    }

    public void backward() {
        setPinValues(false, true, true, false);
    }

    public void stop(){
        setPinValues(false, false,false,false);
    }

    public void turnLeft() {
        setPinValues(false, false, false, true);
    }

    public void turnRight() {
        setPinValues(true, false, false, false);
    }

    private void setPinValues(boolean p11, boolean p12,
                              boolean p21, boolean p22 ) {

        try {
            pin1Motor1.setValue(p11);
            pin2Motor1.setValue(p12);
            pin1Motor2.setValue(p21);
            pin2Motor2.setValue(p22);
        } catch (IOException e) {
            e.printStackTrace();
        }
    }

}
This class accomplishes these tasks:
- It gets a reference to the PeripheralManagerService
- It opens the GPIO pins
- It set the directions and the initial value
Moreover, it defines four different methods that control how the car will move:
- Forward
- Backward
- Turn left
- Turn right
All these movements can be controlled turning on or off each pin defined above.
That’s all. Now, it is time to implement how we will control the car. There are several options we can implement to this purpose. We could use a simple Web server that has an HTML interface or we can use for example Android Nearby API or even a Bluetooth connection.
In this tutorial, we will use a simple Web Interface.
How to implement an Android Things HTTP interface
As said before, we will implement an HTTP interface so we can use it to control the Android Things remote car. To implement a simple HTTP Web server, we can use NanoHTTPD that is a simple and light-weight HTTP server. To this purpose, it is necessary to modify the build.gradle file adding:
compile 'org.nanohttpd:nanohttpd:2.2.0'
Now let us create a new class called RobotHTTPServer that handles the incoming HTTP requests:
public class RobotHttpServer extends NanoHTTPD {
 public RobotHttpServer(int port,
                        Context context,
                        CommandListener listener) {
        super(port);
        this.context = context;
        this.listener = listener;
        Log.d(TAG, "Starting Server");
        try {
            start();
        } catch (IOException e) {
            e.printStackTrace();
        }
    }

   @Override
    public Response serve(IHTTPSession session) {
        Map<String, String> params = session.getParms();

        String control = params.get("control");
        String action = params.get("btn");

        Log.d(TAG, "Serve - Control ["+control+"] - Action ["+action+"]");

        if (action != null && !"".equals(action))
          listener.onCommand(action);

        return newFixedLengthResponse(readHTMLFile().toString());
    }
..
}
The HTML page is very simple and it is made by 5 buttons that represent the four directions and the stop button.
We will add the HTML page to the assets/ directory. The last part is defining a CommandListener that is the callback function that is invoked everytime the HTTP server receives a command:
public static interface CommandListener { public void onCommand(String command); }Assembling the app to control the Android Things remote car
The last step is assembling everything and gluing these classes so that we can finally build the Android Things remote controlled car. To this purpose, it is necessary to create a MainActivity:
public class MainActivity extends Activity {

    private String TAG = getClass().getName();

    @Override
    protected void onCreate(Bundle savedInstanceState) {
        super.onCreate(savedInstanceState);
        setContentView(R.layout.activity_main);

        Log.d(TAG, "OnCreate...");

        final MotorController mc = new MotorController();
        RobotHttpServer server = new RobotHttpServer(8090, this,
                  new RobotHttpServer.CommandListener() {
            @Override
            public void onCommand(String command) {
                Log.d(TAG, "Command received ["+command+"]");
                if (command.equals("F"))
                    mc.forward();
                else if (command.equals("B"))
                    mc.backward();
                else if (command.equals("S"))
                    mc.stop();
                else if (command.equals("L"))
                    mc.turnLeft();
                else if (command.equals("R"))
                    mc.turnRight();
            }
        });
    }
}
As you can notice, the code is very simple, everytime the CommandListener receives a new command it calls a method of the class that handles motor to control the motors.
This simple project can be further expanded. We could add a set of new feature like Vision, Machine learning and so on. For this reason, we have used Android Things instead of Arduino or an ESP8266.
At the end of this post, you know how to interact with Android Things GPIO pins and how to turn them on or off. Moreover, you learned how to use motors. All these information you have acquired are used to build your first Android Things remote controlled car.
Now you can play with your toy!
| Published on Java Code Geeks with permission by Francesco Azzola, partner at our JCG program. See the original article here: Building a remote controlled car using Android Things GPIO Opinions expressed by Java Code Geeks contributors are their own. |
