In this tutorial, we will cover how to implement an Android Things bot to execute tasks. This is an interesting topic because it mixes two emerging technologies as Internet of Things (IoT) and bots. As you may know, Android Things is the new Google OS built for Internet of things. This OS helps you developing professional IoT projects without knowing much about embedded systems. Android Things is built on Android so you can reuse your Android expertise and get ready to develop IoT projects.
Moreover, you know already what is a bot. Maybe you heard a lot about this technology topic. Anyway, if you are a new to the concept, a bot is an application that executes automated tasks. In other words, it is a piece of software we develop to performs some specific task. These tasks can range from executing queries online to search for something, or answer to some command and retrieve the weather information.
In this article, we approach the bot topic implementing a different service that uses a bot to control remote peripherals. This IoT project integrates IoT and bot providing a service that can be extended and reused in real-life IoT project.
IoT bot project overview
The idea that stands behind this Android Things bot project is controlling a remote peripherals using a bot executing tasks. In this project, the Android Things bot will control two different LEDs parsing incoming commands and turning them on or off.
As stated before, this project can be further extended and applied to real-life use cases. This project uses Telegram as a bot platform that supports third-party app running on the Telegram platform. To interact with the bot we use a chat where we send messages to the bot that are commands.
To build this IoT bot we need to follow this steps:
- Create and configure a bot in Telegram
- Develop an Android Things bot app that interacts with the bot using API
- Transform the command coming as messages to “hardware” command to control remote peripherals.
We will develop this project using Android Things because it is a new OS and it offers great features. Moreover, we can use existing Android libraries in Android Things and there are several Telegram bot Java libraries ready to use.
How to create a bot
The first step is creating a bot in Telegram. To do it we can follow the steps described in this guide. To do it, it is necessary to interact with the BotFather :
We start the conversation with BotFather using /start command and the /newbot command telling to the bot we want to create a new bot. It is necessary to provide some information like:
- the bot name
- the bot username (it must finish with bot)
After these simple steps, the bot is ready. For this IoT bot project, we have created a bot called AndroidThingsBot:
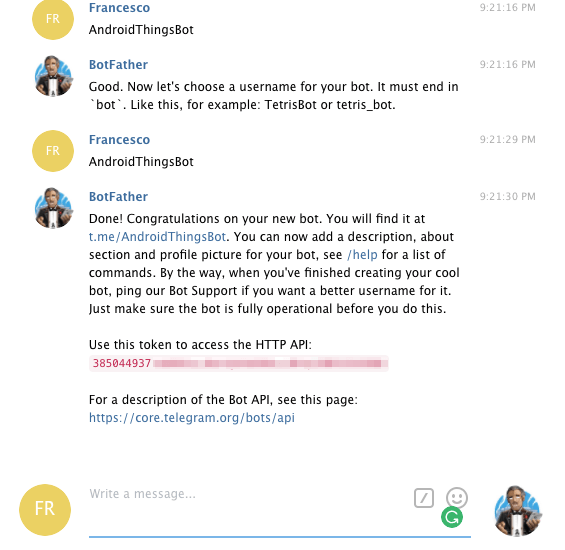
At the end of this process, the telegram bot provides the HTTP API token that we will use in our Android Things IoT bot.
That’s all our bot is ready to receive commands. The next step is implementing the Android Things bot that handles incoming commands and interacts with the peripherals.
Develop an Android Things bot to execute IoT tasks
As first step, it is necessary to create a new Android Things project in Android studio. This tutorial assumes you are familiar with Android Things. If you want to learn how to use Android Things in IoT project, you can read my book published by Packt titled “Android Things projects”.

Once the project is configured we can add the dependencies. This IoT project uses an open source library to interact with Telegram. To this purpose add the following lines to the build.gradle:
dependencies {
    ...
    compile 'com.github.pengrad:java-telegram-bot-api:3.0.1'
    compile 'com.squareup.okhttp3:okhttp:3.8.1'
}
That’ all we are ready to interact with the bot. Our target is receiving the messages from AndroidThingsBot and handle them. To do it we have to initialize the class that handles the communication details using Telegram API:
TelegramBot bot;

@Override
protected void onCreate(Bundle savedInstanceState) {
  super.onCreate(savedInstanceState);
  Log.d(TAG, "onCreate");
  bot = TelegramBotAdapter.build(BOT_TOKEN);
  ...
}
where the BOT_TOKEN is the token we have received during the creation step in the previous paragraph.
There are several strategies we can exploit to receive messages. This library provides a listener to listen to incoming messages:
// start listening for incoming messages
GetUpdates getUpdates = new GetUpdates()
  .limit(100)
  .offset(0)
  .timeout(10);

  bot.setUpdatesListener(new UpdatesListener() {
    @Override
    public int process(List<Update> updates) {
     for (Update update : updates) {
        Message msg = update.message();
       // Bot logic Here
     }
     return UpdatesListener.CONFIRMED_UPDATES_ALL;
  }
});
In this way, as soon as the bot receives a message the Android Things app get notified and handle the command. Finally, the last step, where Android Things app interacts with the peripherals.
How to handle commands
In this section, we cover how Android Things app controls the peripherals, in this case, they are simple LEDs. Of course, you can expand this project and use other kinds of peripherals. The schematic is shown below:
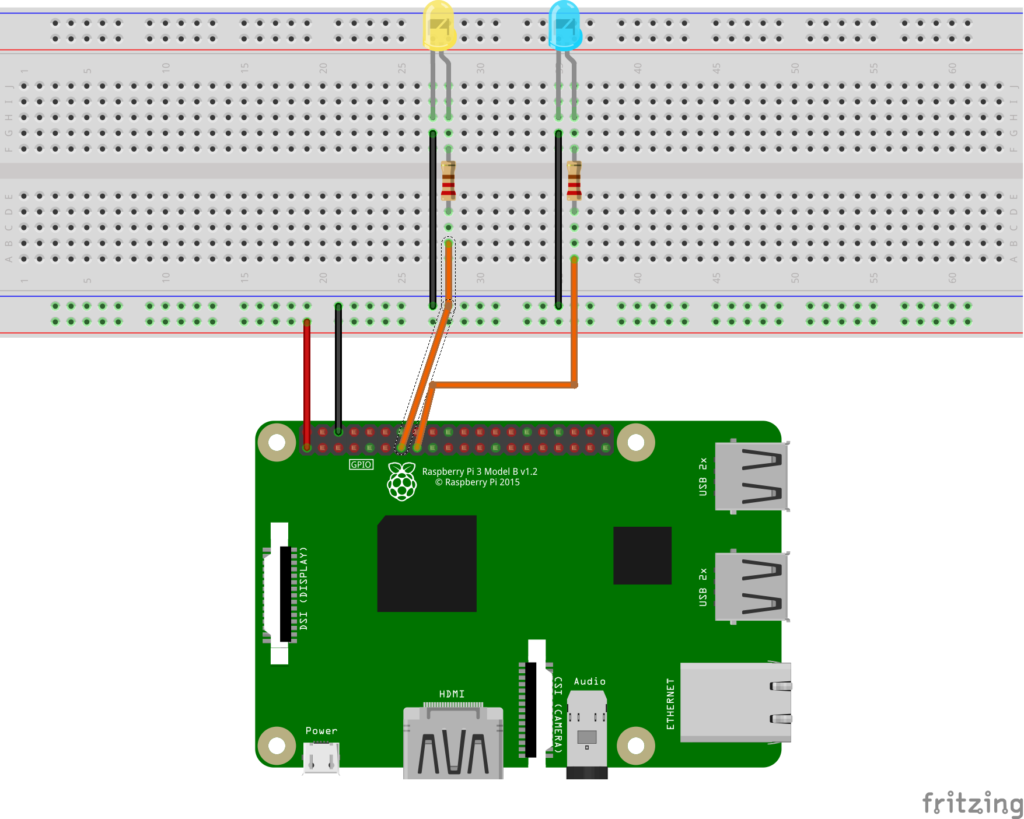
The connections are very simple, the two LEDs are connected to the Raspberry pins using 220Ω resistors to limit the current flowing through the LEDs themselves. Moreover, the LEDS are managed using two GPIO pins in Raspberry:
- Pin 13 -> BCM 27
- Pin 15 -> BCM 22
For more information give a look at Android Things Raspberry Pinout.
Once the connections are ready we can focus our attention on developing the source code. As you may already know, the power of Android Things is abstracting the hardware where it works providing a common way to interact with components and peripherals.
Let us initialize the Peripheral service used to manage the pins, therefore add the following lines to the Android Activity:
private PeripheralManagerService pmService = new PeripheralManagerService();
then it is necessary to initialize the pins:
private void initPins() {
  try {
   bluePin = pmService.openGpio("BCM22");
   yellowPin = pmService.openGpio("BCM27");
   bluePin.setDirection(Gpio.DIRECTION_OUT_INITIALLY_LOW);
   yellowPin.setDirection(Gpio.DIRECTION_OUT_INITIALLY_LOW);
  }
  catch(IOException ioe) {
    ioe.printStackTrace();
  }
}
and invoke it in the MainActivity class. Moreover, it is useful to add another method to manage the pins so that the app can turn on or off the LEDs:
private void setPin(Gpio pin, String state) {
 try {
   pin.setValue(Boolean.parseBoolean(state));
 }
 catch (IOException ioe) {
   ioe.printStackTrace();
 }
}
Finally, the app has to handle the incoming commands from the bot and manage the LEDs, therefore, it is necessary to modify the method that handles the incoming messages:
bot.setUpdatesListener(new UpdatesListener() {
   @Override
   public int process(List<Update> updates) {
     for (Update update : updates) {
       Message msg = update.message();
       if (msg != null) {
         String txt = msg.text();
         if (txt.trim().startsWith("LED")) {
           Log.d(TAG, "LED COMMAND");
           String[] data = txt.split(" ");
           if (data.length < 3) {
             Log.d(TAG, "Command format error");
             return UpdatesListener.CONFIRMED_UPDATES_ALL;
           }
           String value = data[2];
           if (data[1].equalsIgnoreCase("b")) {
             Log.d(TAG, "Blue pin ["+value+"]");
             setPin(bluePin, value);
           }
           else if (data[1].equalsIgnoreCase("y")) {
             setPin(yellowPin, value);
           }
        }
     }
   }
   return UpdatesListener.CONFIRMED_UPDATES_ALL;
  }
});
Now you can test your bot. The command that the bot handles have the format:
LED y|b on|off
Summary
At the end of this post, we have covered an interesting topic that integrates two emerging technologies Android Things and bots. This Android Things IoT bot can be further developed so that it can handle more commands or it can interact with other kinds of peripherals. This is a prototype project but the idea that stands behind it can be exploited and applied to other fields.
| Reference: | Android Things bot: How to Build an IoT bot to execute tasks from our JCG partner Francesco Azzola at the Surviving w/ Android blog. |
