EDITORIAL NOTE: AWS Elastic Beanstalk is an orchestration service offered from Amazon Web Services for deploying infrastructure which orchestrates various AWS services, including EC2, S3, Simple Notification Service (SNS), CloudWatch, autoscaling, and Elastic Load Balancers.
Elastic Beanstalk provides an additional layer of abstraction over the bare server and OS; users instead see a pre-built combination of OS and platform.
Deployment requires a number of components to be defined: an ‘application’ as a logical container for the project, a ‘version’ which is a deployable build of the application executable, a ‘configuration template’ that contains configuration information for both the Beanstalk environment and for the product. (Source: Wikipedia)
Now, we provide a comprehensive guide so that you can develop your own Amazon Elastic Beanstalk based applications. We cover a wide range of topics, from Deployment and Configuration to Java Integration and Command Line Interfacing. With this guide, you will be able to get your own projects up and running in minimum time. Enjoy!
Table Of Contents
1. Introduction
Amazon Elastic Beanstalk is a service that lets you use a set of existing Amazon AWS services to host your application. In contrast to more generic services like EC2, you do not have to provide an image of a machine that is deployed into a cloud, but you only provide a ready to run application that is hosted inside a predefined environment at Amazon AWS.
Amazon lets you choose between different predefined environments and sets up everything necessary to run the application on behalf of you. This service is therefore suitable for you if you want to concentrate on the application itself and not so much on the underlying operating system and server. However, as Elastic Beanstalk uses under the hood existing services like EC2, S3, CodeCommit or Route 53, you have full control over you application.
2. Concepts
Amazon Elastic Beanstalk defines a set of terms that are used throughout the service and therefore must be understood from the beginning on. An Application is a set of components that not only encompasses different versions of your application but also configurations for environments the application is deployed to. An application version is a deployable artifact that is labeled and stored inside an Amazon S3 bucket. It can therefore be restored at a later point in time. An environment is a set of Amazon AWS resources that is used to run a specific version of the application. Different environments can be configured and a version of the application can run in different environments.
Different environments can exist at the same time and can also serve different versions of the same application. An environment consists of two tiers: the web server environment and the worker environment. While the web server environment serves HTTP requests the worker environment reads messages from a queue and processes them. This way applications can use the “worker queue” pattern to decouple business logic from serving HTTP request. An environment configuration encompasses the settings of an environment. Applying this configuration will let Amazon AWS create the corresponding resources. Existing templates can be used to create configurations and are therefore called Configuration Templates.
2.1 Web Server Environment
A “Web Server Environment” provides all resources to run your application. It consists of one ore more web servers on which your application is deployed. These web servers are hosted on EC2 machines running inside Amazon’s AWS cloud. As these machines sit behind a Elastic Load Balancer, they can be reached by a CNAME name like myapp.us-west-2.elasticbeanstalk.com. This CNAME is aliased to an internal load balancing URL using the Route 53 service. This Amazon service provides high availabilty through the usage of the Domain Name System (DNS). The EC2 machines of your environment can be part of an “Auto Scaling” group.
This means that Amazon automatically increases the number of instances if the load increases and on the other hand decreases the number of machines down to at least one machine if the load vanishes. The “Host Manager” running on each machine has the task to deploy your application and to collect metrics and events. It also monitors the application server and rotate log files if necessary. In case one component of the environment needs a patch or update, the “Host Manager” can perform this update on behalf of you. “Security Groups” define firewall rules for a set of instances. The basic security group in the web server environment allows access to port 80 (HTTP) of your application. If you need to use a database, you are free to define further security groups with more fine-grained control.
2.2 Worker Environment
A “Worker Environment” provides all resources to run worker applications that consume message from an Amazon SQS queue. It therefore not only provisions EC2 machines that run your worker application but also a SQS queue that can be used to transfer messages from the “Web Server Environment” to the “Worker Environment” and back. A daemon running on each instance of the “Worker Environment” pulls requests from the queue and delivers them to your application.
2.3 Design Consideration
Before starting an application, one has to carefully think about the design of it. One aspect that is of significant importance is scalability. Basically there are two different ways to handle increasing load on an application. The first way is to increase the available hardware resources for each machine such that it can handle more load. While this way can be used to scope with small increases of load it does not scale to arbitrary demands.
The second way is to increase the number of running services (horizontal scaling), as it allows to add more machines if necessary. This second way is the one followed by Amazon Elastic Beanstalk, as a tight monitoring of the available EC2 instances allows to setup new instances in an auto scaling group if necessary. But it also means that the application is designed and written to be able to scale out. Instead of building a monolithic application that needs more and more hardware, horizontal scaling means to distribute the load over an arbitrary amount of smaller services that are as stateless as possible such that new services can be added at runtime if necessary.
The load balancer in front of the web server environment will distribute the incoming requests among the available services, requiring that each service can process one of them. Another important point when developing an application for AWS Elastic Beanstalk is security. The data transferred into and out of the web server environment can be encrypted using SSL. One must therefore acquire a valid certificate from one of the external certification authorities (like for example VeriSign or Entrust). Note that the SSL encryption ends at the load balancer of the environment and that traffic between it and the web servers is normally not encrypted.
To be able to start and stop additional instances when necessary, your application should not store any data on the local storage of each node as this data will be erased once the instance is shut down and it won’t be there when another instance is started. Hence, one must care about persistent storage. Amazon AWS offers different services that can be used from your application to store state:
- Amazon S3: This service can be used to store arbitrary amounts of data in the cloud.
- Amazon Elastic File System: The EFS can be mounted on your EC2 instance and used like a normal file system.
- Amazon Elastic Block Store: EBS volumes are attached to EC2 instances and can be used to in conjunction with file systems or databases.
- Amazon DynamoDB: This service provides a NoSQL database within the Amazon cloud.
- Amazon Relational Database Service: RDS manages six different relational database engines (Amazon Aurora, PostgreSQL, MySQL, MariaDB, Oracle and Microsoft SQL Server) that can be used by your application.
In case users around the world experience different latency times, you can use Amazon CloudFront to let it automatically distribute your application and storage around the world and route the user to the nearest available site. Last but not least you can let Amazon update and patch your environment, in case this becomes necessary. These updates are performed as “rolling batches”, i.e. Amazon takes the first batch of EC2 instances and terminates them.
After the new instances have come up, the next batch can be processed. The condition whether the next batch should be processed or not can be based either on a timing policy or on the health of the new machines. This procedure allows to keep the site running, while old and new services of your application are running for a short period of time. To make this work, you must of course design your application such that the old versioned services can read the data already written by the new version, for example.
3. Java Web Application
Now that we have learned a lot about the concepts behind Amazon Elastic Beanstalk, we should get our hands dirty and develop a small application that exposes a simple REST interface using Apache Tomcat.
3.1 Simple REST-API
To get started, we create a new maven project with the following command line:
mvn archetype:generate -DgroupId=com.javacodegeeks.ultimate.aws.eb -DartifactId=tomcat-web-service -DarchetypeArtifactId=maven-archetype-webapp -DinteractiveMode=false
Afterwards we have a new directory with the name tomcat-web-service with the following structure:
|-- pom.xml
`-- src
    |-- main
    |   `-- webapp
    |       `-- index.jsp
    |       `-- WEB-INF
    |           `-- web.xml
The archetype has already created a web.xml for us and an index.jsp file. The latter can be used to later simply test the first version in the cloud, hence we do not delete the JSP page yet. The web.xml file needs some editing:
<!DOCTYPE web-app PUBLIC
 "-//Sun Microsystems, Inc.//DTD Web Application 2.3//EN"
 "http://java.sun.com/dtd/web-app_2_3.dtd" >

<web-app>
	<display-name>tutorial-webapp</display-name>

	<servlet>
		<servlet-name>RestServlet</servlet-name>
		<servlet-class>org.glassfish.jersey.servlet.ServletContainer</servlet-class>
		<init-param>
			<param-name>jersey.config.server.provider.packages</param-name>
			<param-value>com.javacodegeeks.ultimate.aws.eb</param-value>
		</init-param>
		<load-on-startup>1</load-on-startup>
	</servlet>
	<servlet-mapping>
		<servlet-name>RestServlet</servlet-name>
		<url-pattern>/tutorial-service/*</url-pattern>
	</servlet-mapping>
</web-app>
With the XML element display-name we define how the application is labeled inside the Apache Tomcat server. The servlet and servlet-mapping elements define the Servlet class that is listening for requests and the URL pattern it should listen for. In our case we using the pattern /tutorial-service/*, i.e. all URLs that look like http://://tutorial-service/* will be processed by this servlet.
The context name is defined through the name of the war archive that we deploy into tomcat. The parameter jersey.config.server.provider.packages tells the JAX-B implementation we are going to use to implement the REST-API which Java packages it should scan for annotations. To make this work, we have to create the following directory structure in our maven project: src/main/java/com/javacodegeeks/ultimate/aws/eb. To tell maven which version of the JAX-B implementation we want to use, we copy the following block of dependency information into your pom.xml file:
<properties>
	<project.build.sourceEncoding>UTF-8</project.build.sourceEncoding>
	<jersey.version>2.26</jersey.version>
	<junit.version>4.12</junit.version>
	<commons-logging>1.1.3</commons-logging>
	<log4j.version>1.2.17</log4j.version>
	<javax-ws-rs-api.version>2.1</javax-ws-rs-api.version>
	<aws-sdk.version>1.11.106</aws-sdk.version>
	<db.dynamodb.local-endpoint>false</db.dynamodb.local-endpoint>
</properties>

<dependencies>
	<dependency>
		<groupId>javax.ws.rs</groupId>
		<artifactId>javax.ws.rs-api</artifactId>
		<version>${javax-ws-rs-api.version}</version>
	</dependency>
	<dependency>
		<groupId>commons-logging</groupId>
		<artifactId>commons-logging</artifactId>
		<version>${commons-logging}</version>
	</dependency>
	<dependency>
		<groupId>log4j</groupId>
		<artifactId>log4j</artifactId>
		<version>${log4j.version}</version>
	</dependency>
	<dependency>
		<groupId>org.glassfish.jersey.containers</groupId>
		<artifactId>jersey-container-servlet</artifactId>
		<version>${jersey.version}</version>
	</dependency>
	<dependency>
		<groupId>org.glassfish.jersey.inject</groupId>
		<artifactId>jersey-hk2</artifactId>
		<version>${jersey.version}</version>
	</dependency>
	<dependency>
		<groupId>junit</groupId>
		<artifactId>junit</artifactId>
		<version>${junit.version}</version>
		<scope>test</scope>
	</dependency>
	<dependency>
		<groupId>org.glassfish.jersey.core</groupId>
		<artifactId>jersey-client</artifactId>
		<version>${jersey.version}</version>
	</dependency>
	<dependency>
		<groupId>org.glassfish.jersey.media</groupId>
		<artifactId>jersey-media-json-jackson</artifactId>
		<version>${jersey.version}</version>
	</dependency>
</dependencies>

<dependencyManagement>
	<dependencies>
		<dependency>
			<groupId>com.amazonaws</groupId>
			<artifactId>aws-java-sdk-bom</artifactId>
			<version>${aws-sdk.version}</version>
			<type>pom</type>
			<scope>import</scope>
		</dependency>
	</dependencies>
</dependencyManagement>
Next to the mere API contract (javax.ws.rs-api), we are defining to use jersey-container-servlet as JAX-B implementation and jersey-hk2 for dependency injection for jersey. As the Amazon SDK is using commons-logging we are doing the same. As logging service we have chosen the classic log4j implementation. The junit and jersey-client dependencies are currently only used for our integration tests.
Having integration tests that can be performed locally eases development much, as we don’t have to upload every time a new version of the application into the AWS cloud. The aws-java-sdk-bom dependency is currently not necessary, but as we are going to use the SDK in on of the next steps, we are already including it here. The build section of the pom.xml is again a little bit lengthy:
<build>
	<finalName>tomcat-web-service</finalName>
	<plugins>
		<plugin>
			<groupId>org.apache.maven.plugins</groupId>
			<artifactId>maven-compiler-plugin</artifactId>
			<version>3.7.0</version>
			<configuration>
				<source>1.8</source>
				<target>1.8</target>
			</configuration>
		</plugin>
		<plugin>
			<groupId>org.apache.maven.plugins</groupId>
			<artifactId>maven-surefire-plugin</artifactId>
			<version>2.12.1</version>
			<configuration>
				<excludes>
					<exclude>**/*IntegrationTest*</exclude>
				</excludes>
			</configuration>
		</plugin>
		<plugin>
			<groupId>org.apache.maven.plugins</groupId>
			<artifactId>maven-failsafe-plugin</artifactId>
			<version>2.12.4</version>
			<configuration>
				<includes>
					<include>**/*IntegrationTest*</include>
				</includes>
			</configuration>
			<executions>
				<execution>
					<goals>
						<goal>integration-test</goal>
						<goal>verify</goal>
					</goals>
				</execution>
			</executions>
		</plugin>
		<plugin>
			<groupId>org.apache.tomcat.maven</groupId>
			<artifactId>tomcat7-maven-plugin</artifactId>
			<version>2.2</version>
			<configuration>
				<url>http://localhost:8080/manager</url>
				<server>localhost</server>
				<path>/${project.build.finalName}</path>
				<contextFile>${project.basedir}/src/test/tomcat7-maven-plugin/context.xml</contextFile>
			</configuration>
			<executions>
				<execution>
					<id>start-tomcat</id>
					<phase>pre-integration-test</phase>
					<goals>
						<goal>run-war</goal>
					</goals>
					<configuration>
						<fork>true</fork>
					</configuration>
				</execution>
				<execution>
					<id>stop-tomcat</id>
					<phase>post-integration-test</phase>
					<goals>
						<goal>shutdown</goal>
					</goals>
				</execution>
			</executions>
		</plugin>
	</plugins>
</build>
The maven-compiler-plugin is used to define source and target version of the build. This is necessary because the provisioned services have a certain Java version installed and we must therefore compile an artifact that can be executed in the target environment. The surefire and failsafe plugin are used to executed the local junit and integration tests. Finally, the tomcat7-maven-plugin allows us to start and stop an embedded Apache Tomcat server in the build in order to execute the integration tests.
This step shortens the round trip between development and testing as we don’t have to start or restart an externally installed server each time. As we are not going to use any Tomcat 8 specific features, the tomcat7-maven-plugin should be sufficient. As the configuration of the tomcat7-maven-plugin already indicates, we need a dedicated context.xml file for the tomcat integration tests. The following content is therefore put into a file located at src/test/tomcat7-maven-plugin/context.xml:
<?xml version='1.0' encoding='utf-8'?>
<Context>
    <WatchedResource>WEB-INF/web.xml</WatchedResource>
</Context>
Having prepared everything as described above, we are ready to develop our first class:
package com.javacodegeeks.ultimate.aws.eb;

import org.apache.commons.logging.Log;
import org.apache.commons.logging.LogFactory;

import javax.ws.rs.GET;
import javax.ws.rs.Path;
import javax.ws.rs.Produces;
import javax.ws.rs.core.Response;
import java.util.ArrayList;
import java.util.List;

@Path("/tutorial")
public class TutorialResource {

    private static final Log LOGGER = LogFactory.getLog(TutorialResource.class);

    @GET
    @Produces("text/json")
    @Path("/list-all-courses")
    public Response listAllCourses() {
        if (LOGGER.isDebugEnabled()) {
            LOGGER.debug("Listing all courses.");
        }
        List tutorials = new ArrayList<>();
        tutorials.add(new Tutorial("Linus Meyer", "Linux"));
        tutorials.add(new Tutorial("Bill Famous", "Microsoft"));
        tutorials.add(new Tutorial("Josh Hotspot", "Java"));
        return Response.status(200).entity(tutorials).build();
    }
}
The class is annotated with @Path to tell the JAX-RS framework that all relative URL paths used in the class itself should be prefixed with /tutorial. For the sake of simplicity we have currently only one method: listAllCourses(). Its part of the URL is denoted with another @Path annotation at method level. That an invocation of this REST resource will return a JSON string is specified with the annotation @Produces and the media type text/json.
Finally, we tell the framework that this method is a GET request by using the dedicated annotation @GET. Currently we do not have any persistent storage, hence we cannot load data from a datasource. Therefore we hard-wire the list of courses and return a list of Tutorial objects. The Tutorial class is a simple value object:
public class Tutorial {

    private String author;
    private String title;

    public Tutorial() {

    }

    public Tutorial(String author, String title) {
        this.author = author;
        this.title = title;
    }

    public String getAuthor() {
        return author;
    }

    public String getTitle() {
        return title;
    }

    public void setAuthor(String author) {
        this.author = author;
    }

    public void setTitle(String title) {
        this.title = title;
    }

    @Override
    public boolean equals(Object o) {
        if (this == o) return true;
        if (o == null || getClass() != o.getClass()) return false;

        Tutorial tutorial = (Tutorial) o;

        if (author != null ? !author.equals(tutorial.author) : tutorial.author != null) return false;
        if (title != null ? !title.equals(tutorial.title) : tutorial.title != null) return false;

        return true;
    }

    @Override
    public int hashCode() {
        int result = author != null ? author.hashCode() : 0;
        result = 31 * result + (title != null ? title.hashCode() : 0);
        return result;
    }

    @Override
    public String toString() {
        return "Tutorial{" +
                "author='" + author + '\'' +
                ", title='" + title + '\'' +
                '}';
    }
}
We need to have a default constructor such that the JSON library can deserialize objects of type Tutorial from a string representation. The getter and setter methods allow the JSON library to set the corresponding attribute values. In this example we also implement the methods equals() and hashCode() as we want to compare instances of Tutorial later on in our integration tests. As mentioned before, building and deploying the application now already to AWS is an option, but it will take some time until the deployment becomes available.
Therefore, we just write an integration test that verifies that our implementation is working as expected to save unnecessary uploads to the AWS cloud (and to save time). In the pom.xml file above we have configured that integration tests are named with IntegrationTest in their class name. Hence, we create a class under src/test/javawith the following content:
public class TutorialIntegrationTest {

    @Test
    public void testListAllCourses() {
        Client client = ClientBuilder.newClient();
        WebTarget target = client.target("http://localhost:8080")
			.path("/tomcat-web-service/tomcat-web-service/tutorial/list-all-courses");
        Response response = target.request().get();
        assertThat(response.getStatus(), is(200));
        List tutorials = response.readEntity(new GenericType>(){});
        assertThat(tutorials.size(), is(3));
        assertThat(tutorials, hasItem(new Tutorial("Linus Meyer", "Linux")));
        assertThat(tutorials, hasItem(new Tutorial("Bill Famous", "Microsoft")));
        assertThat(tutorials, hasItem(new Tutorial("Josh Hotspot", "Java")));
    }
}
The first line of the method testListAllCourses() creates a new REST client while the second line provides host, port and the path on the server. For our local tests localhost is appropriate. Tomcat runs per default on port 8080. The URL consists as first part of the name of our war file that is deployed to Tomcat. We have defined this in the pom.xml file using the XML element finalName.
GET requests are issued using the method get() on the object returned by request(). If everything is OK, the web service should return the status code 200. In this case it is also supposed to return a list of Tutorial objects. The method readEntity() allows us to define this using an instance of GenericType with two generic types. One for List and one inner type for Tutorial. The resulting list should contain exactly three entries, one entry for each course. To test everything locally, we issue the following command on the local terminal:
mvn clean verify
As the verify phase comes after the integration-test phase, this invocation will also run the previously written integration tests:
[INFO] --- tomcat7-maven-plugin:2.2:run-war (start-tomcat) @ tomcat-web-service ---
[INFO] Running war on http://localhost:8080/tomcat-web-service
[INFO] Creating Tomcat server configuration at D:\development\glassfish\glassfish-5.1\awseb\awseb\tomcat-web-service\target\tomcat
[INFO] create webapp with contextPath: /tomcat-web-service
[...]
[INFO]
[INFO] --- maven-failsafe-plugin:2.12.4:integration-test (default) @ tomcat-web-service ---
[INFO] Failsafe report directory: D:\development\glassfish\glassfish-5.1\awseb\awseb\tomcat-web-service\target\failsafe-reports

-------------------------------------------------------
 T E S T S
-------------------------------------------------------
Running com.javacodegeeks.ultimate.aws.eb.TutorialIntegrationTest
Tests run: 1, Failures: 0, Errors: 0, Skipped: 0, Time elapsed: 1.443 sec

Results :

Tests run: 1, Failures: 0, Errors: 0, Skipped: 0

[WARNING] File encoding has not been set, using platform encoding UTF-8, i.e. build is platform dependent!
[INFO]
[INFO] --- tomcat7-maven-plugin:2.2:shutdown (stop-tomcat) @ tomcat-web-service ---
[...]
[INFO]
We can see that the tomcat server is started before and after the integration tests. At the end of the build the file tomcat-web-service.war resides inside the target directory of the our project. This is the application that we are going to upload to Amazon Elastic Beanstalk now.
3.2 Deployment using the Web Interface
If you haven’t created an Amazon AWS account yet, you should do so now by pointing your browser the following URL and clicking on the link labeled “Create an AWS account”. During the following steps you will have to provide the typical personal information plus a valid credit card. The latter is necessary to allow Amazon to bill the resources you have used. When you create a new account, you are eligible for the “Free Tier”.
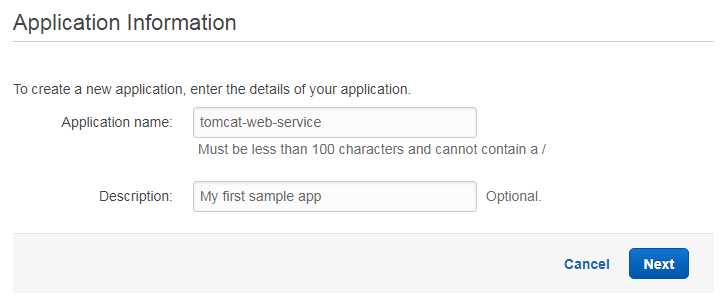
For the first 12 month you can use currently up to 750 hours computing power on EC2, 5 GB standard storage on S3. This is more than sufficient for our tutorial. Once you have setup a working AWS account, you can create your first application. Therefore, point your browser to the following URL and fill out the name of your application as well as the optional description:
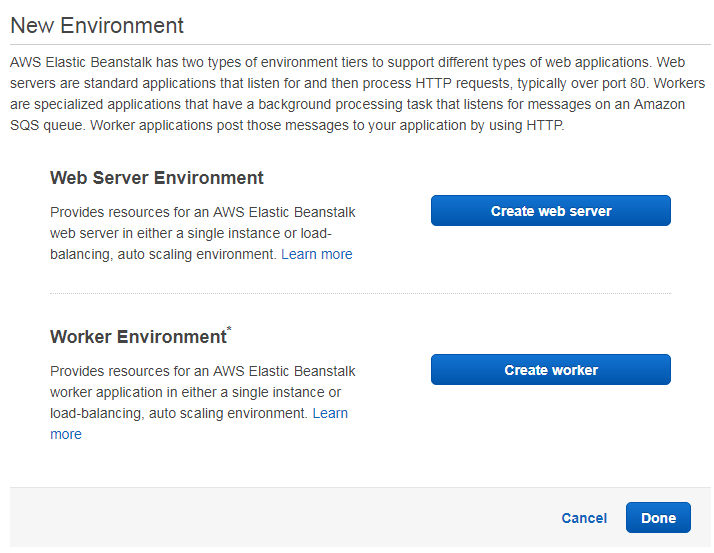
The next page asks us whether we are going to setup a web server environment or a worker environment. Our sample REST application fits best in the first type of environment; hence, we click on “Create web server”.
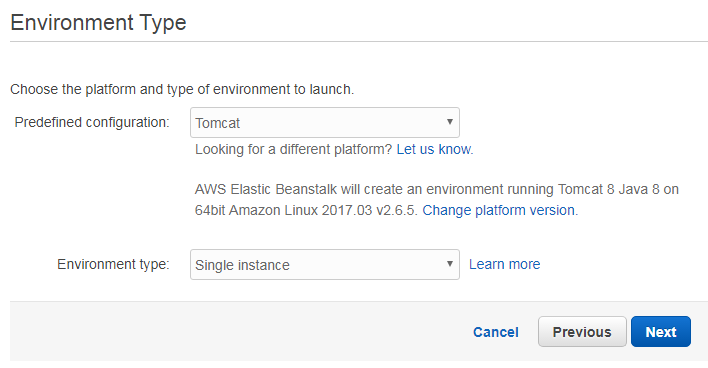
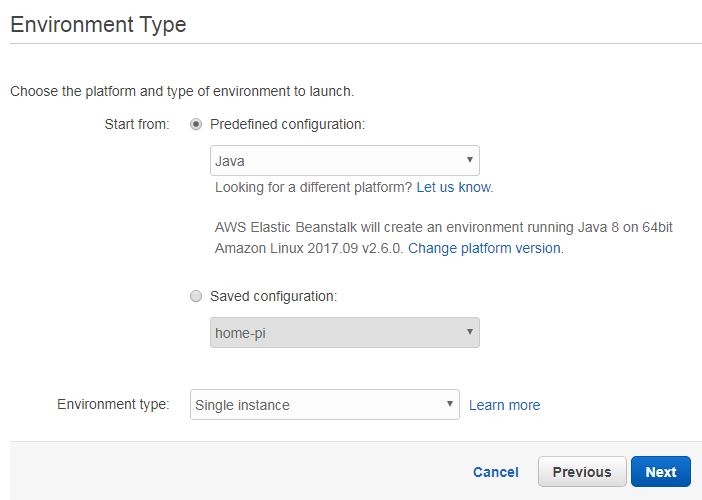
For a web server environment, we must set the configuration and the type. We choose “Tomcat” as predefined configuration and “Single instance” as type. This way Amazon provides us an EC2 instance with installed Apache Tomcat server. We do not choose auto scaling at this point, because for our sample one instance is enough.
The following page requests to specify the application version. We select therefore the second option and choose the war file our maven build has produced before.
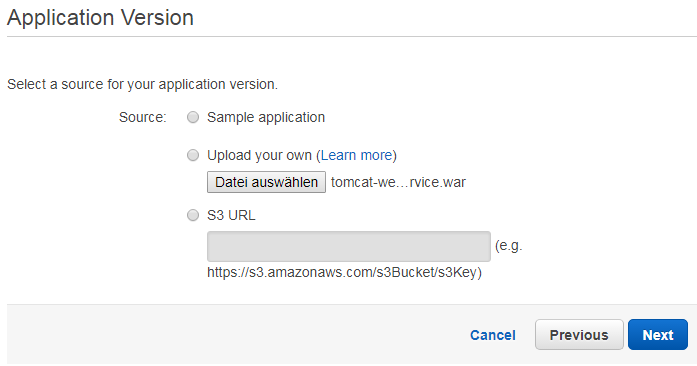
Alternatively, we could also provide a link to an artifact we have uploaded before to Amazon S3 or chose one of Amazon’s sample applications.
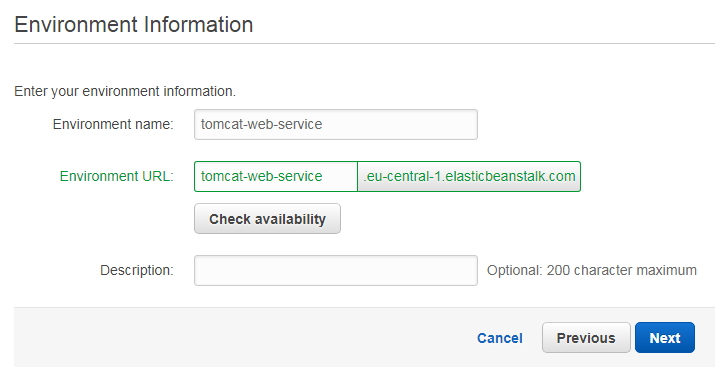
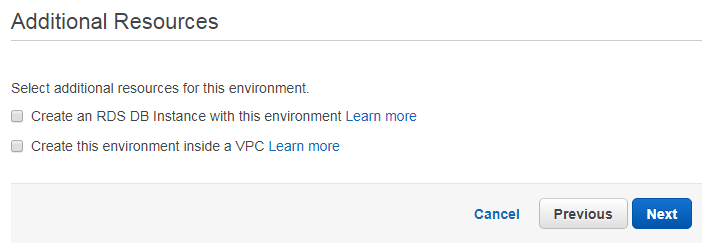
As mentioned before, our application gets its own CNAME. The CNAME can therefore be provided using the following page. “Check availability” allows us to verify that the name is still free. If we would plan to use a relational database or a virtual private cloud network. In our simple example we do not need both resources, hence we just click on “Next”
In the “Configuration Details” sections we can choose a server type. A t2.micro instance is sufficient for our experiments, but if you prefer you can choose a larger instance. The EC2 documentation describes the available instance types in more detail. The remaining input fields can be left as they are, as we do not have any specific requirements for the disc of the instances or the health reporting. A EC2 key pair is also not necessary.
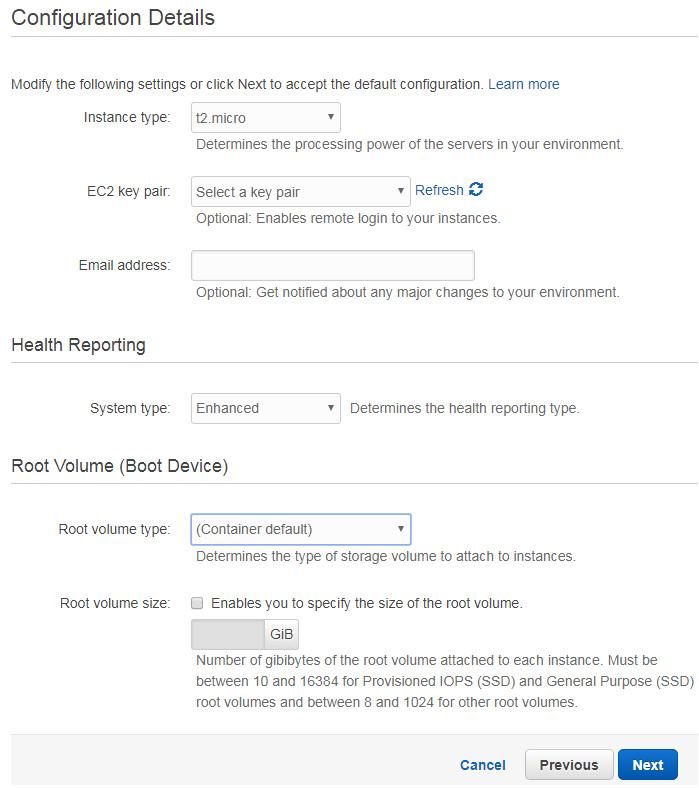
Environment tags can be used to identify environments in cost allocation reports or can be used to in general to manage environments and permissions. For our first sample application, tags are not necessary but you are free to provide them.

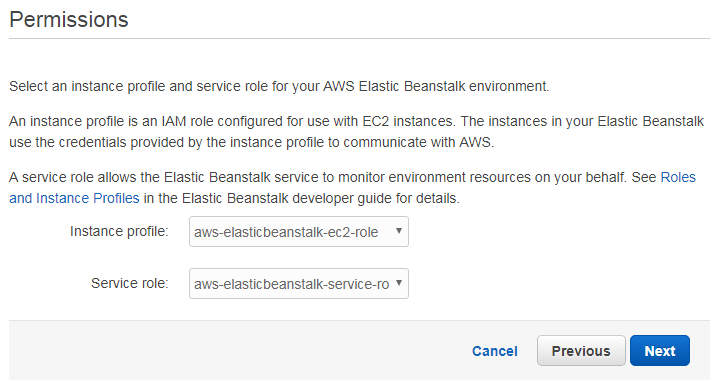
The “Permissions” page allows to define an instance profile and a service role. The instance profile is the IAM role that is used by your application to communicate with other AWS services while the service role is to monitor the environment.
Finally, an overview page presents all information for verification. If you are satisfied with your choices, you can click on “Launch” and let Amazon AWS create all the resources for you. Once the process has finished, you can see a new environment in your console:
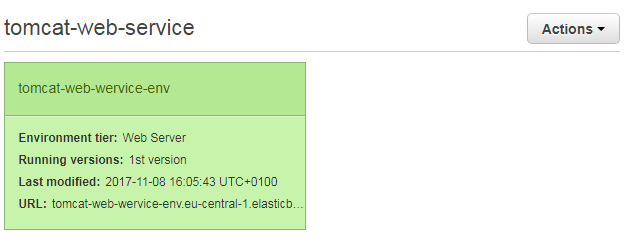
A click on this environment leads to the following dashboard:
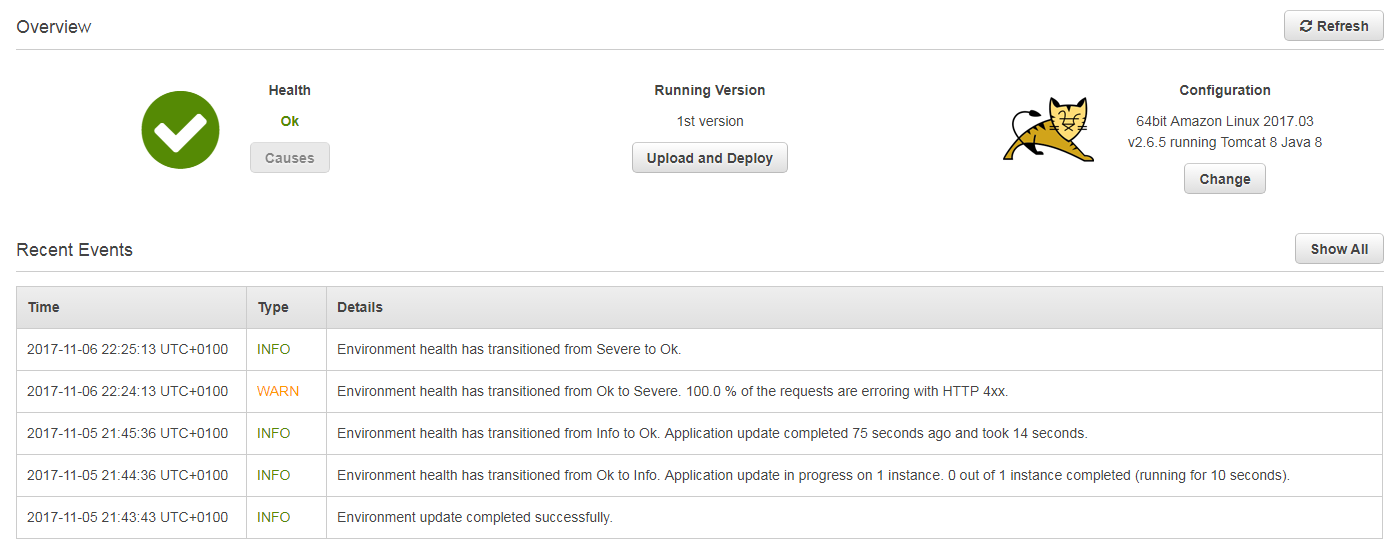
Here you can see all events of your environment, the running version and the configuration. Now that the application is up and running, we can point our browser to the following URL:

As expected the browser displays a JSON array with three Tutorial items.

3.3 Deployment using the CLI
Using the web console is sufficient when you do not have to use it often. In case you are striving for automation, you can use the awccli tool to create environments from the command line interface (CLI). To do so, you first have to install python and pip. Both websites contain information on how to install and configure these two tools for the common operating systems. Once you got python and pip running, you can simply install the awscli using the following command:
pip install awsebcli --upgrade --user
To be able to run the eb command directly, you must include it in your path. On Windows systems you will have to add the following path to the PATH environment variable: %USERPROFILE%\AppData\Roaming\Python \Python36\scripts. On Linux based systems and macOS based systems you do not have to modify any environment variable. The first step is to initialize the default settings by invoking the command eb init within the root folder of you maven project:
~/eb $ eb init
Select a default region
1) us-east-1 : US East (N. Virginia)
2) us-west-1 : US West (N. California)
3) us-west-2 : US West (Oregon)
4) eu-west-1 : EU (Ireland)
5) eu-central-1 : EU (Frankfurt)
6) ap-south-1 : Asia Pacific (Mumbai)
7) ap-southeast-1 : Asia Pacific (Singapore)
8) ap-southeast-2 : Asia Pacific (Sydney)
9) ap-northeast-1 : Asia Pacific (Tokyo)
10) ap-northeast-2 : Asia Pacific (Seoul)
11) sa-east-1 : South America (Sao Paulo)
12) cn-north-1 : China (Beijing)
13) us-east-2 : US East (Columbus)
14) ca-central-1 : Canada (Central)
15) eu-west-2 : EU (London)
(default is 3): 5
Next, you have to provide your AWS credentials:
You have not yet set up your credentials or your credentials are incorrect
You must provide your credentials.
(aws-access-id):
(aws-secret-key):
The next question is about the creation of a new application version, each time you are going to deploy a new version of your software. As we do want to create a new version, we choose 1:
Select an application to use
1) [ Create new Application ]
(default is 1): 1
Now you can enter the name of the application:
Enter Application Name
(default is "eb"): tomcat-web-service
Application eb has been created.
As in the web console, we have to select a preconfigured platform for our application. We choose here Tomcat and not Java(!), otherwise our application would have to open its own port and serve requests.
Select a platform.
1) Node.js
2) PHP
3) Python
4) Ruby
5) Tomcat
6) IIS
7) Docker
8) Multi-container Docker
9) GlassFish
10) Go
11) Java
(default is 1): 5
Finally, you have to say if you want to use SSH to connect to your EC2 instances. In this simple example, we do not want to do this:
Do you want to set up SSH for your instances?
(y/n): n
As the eb tool does not know where our artifact is located, we have to specify it using a YAML file stored under .elasticbeanstalk/config.yml with the following content:
deploy:
  artifact: target/tomcat-web-service.war
Now you can deploy the artifact using the following command:
eb deploy --staged
3.4 Using DynamoDB
Up to now, our sample application does not store any data. As pointed out before, we will lose all state on the local machine once the current machine is shutdown because the auto scaling mechanism no longer needs it. Hence, we must store the state of an application in an external datastore. One option that often comes handy is Amazon’s NoSQL database “DynamoDB”. In DynamoDB data is stored in tables, like in relational databases.
A table is a collection of items, each item consists of one or more attributes. An attribute is a key/value pair. In contrast to relational databases there is no schema, i.e. each item can have different attributes. As an example, you can create a table to store events. Each event is an item, and the data describing a particular event is stored using attributes like its creation time, type of event, etc. Each item has a hash key and optional an additional sort key. The hash key is used to distribute the items in large tables over different partitions. If a table has a sort key, it is used to store the items with the same hash key in a sorted manner.
This eases traversing all items with a certain hash key in a sorted way. Partitioning allows to distribute data over different machines and is therefore a mechanism to scale the application horizontally. Knowing the basics about DynamoDB, we can extend our sample application with another resource that lets us create and remove the tables that are required by our application. We will do this by using Amazon’s AWS SKD; hence, we must define a dependency on the DynamoDB part of it:
com.amazonaws
	aws-java-sdk-dynamodb
The concrete version is deduced from the aws-java-sdk-bom dependency, we have defined in the dependencyManagement at the very beginning of this tutorial. Next, we create a new class DbResource:
@Path("/db")
public class DbResource {

    private static final Log LOGGER = LogFactory.getLog(DbResource.class);

    @GET
    @Produces("text/json")
    @Path("/list-all-tables")
    public Response listAllTables() {
        if (LOGGER.isDebugEnabled()) {
            LOGGER.debug("Listing all tables.");
        }
        AmazonDynamoDB dynamoDB = createClient();
        ListTablesResult listTablesResult = dynamoDB.listTables();
        List tableNames = listTablesResult.getTableNames();
        return Response.status(200).entity(tableNames).build();
    }

    public AmazonDynamoDB createClient() {
        String property = System.getProperty("tutorial.dynamodb.local-endpoint");
        Boolean localEndpoint = Boolean.valueOf(property);
        if (!localEndpoint) {
            return AmazonDynamoDBClientBuilder
                    .standard()
                    .withRegion(Regions.EU_CENTRAL_1)
                    .build();
        } else {
            return AmazonDynamoDBClientBuilder.standard()
                    .withEndpointConfiguration(
                            new AwsClientBuilder.EndpointConfiguration("http://localhost:8000", "eu-central-1"))
                    .withCredentials(new AWSCredentialsProvider() {
                        @Override
                        public AWSCredentials getCredentials() {
                            return new AWSCredentials() {
                                @Override
                                public String getAWSAccessKeyId() {
                                    return "dummy";
                                }

                                @Override
                                public String getAWSSecretKey() {
                                    return "dummy";
                                }
                            };
                        }

                        @Override
                        public void refresh() {

                        }
                    })
                    .build();
        }
    }
}
This class exposes the REST URL /db/list-all-tables that returns a list of all existing tables on our DynamoDB instance. It therefore creates an instance of AmazonDynamoDB, which is returned by the method createClient(). The code of this method queries the system property tutorial.dynamodb.local-endpoint to know whether to use a local running DynamoDB with the given endpoint and dummy credentials or whether to derive this information using the DefaultAWSCredentialsProviderChain. This specific implementation searches for the AWS credentials in the following order:
- Environment Variables: AWS_ACCESS_KEY_ID and AWS_SECRET_ACCESS_KEY
- Java System Properties: aws.accessKeyId and aws.secretKey
- Profile file stored in the user’s home directory
- Credentials provided by the EC2 container
- Credentials provided by the EC2 metadata service
As our web service will be deployed on an EC2 instance, the credentials are provided by the AWS environment and therefore must not be stored inside our application. In case we are using a local endpoint, we can use dummy values and a region of our choice. How to install and run a local DynamoDB instance, is explained here. The system property can be set automatically when the Tomcat server is started by placing the following snippet inside the configuration of the maven plugin tomcat7-maven-plugin:
true
To test the functionality above before deploying it to the cloud, we write the following small integration test:
@Test
public void testListAllTables() {
	Client client = ClientBuilder.newClient();
	WebTarget target = client.target("http://localhost:8080")
		.path("/tomcat-web-service/tomcat-web-service/db/list-all-tables");
	Response response = target.request().get();
	assertThat(response.getStatus(), is(200));
	List tutorials = response.readEntity(new GenericType>(){});
	assertThat(tutorials.size(), is(0));
}
The test code simply invokes the new URL and verifies that an empty list of strings is returned. Similarly, we can write code to create and remove tables:
public Response removeAllTables() {
	if (LOGGER.isDebugEnabled()) {
		LOGGER.debug("Removing all tables.");
	}
	AmazonDynamoDB dynamoDB = createClient();
	ListTablesResult listTablesResult = dynamoDB.listTables();
	List tableNames = listTablesResult.getTableNames();
	for (String table : tableNames) {
		dynamoDB.deleteTable(table);
	}
	return Response.status(200).entity(tableNames).build();
}

@GET
@Produces("text/json")
@Path("/create-all-tables")
public Response createAllTables() {
	if (LOGGER.isDebugEnabled()) {
		LOGGER.debug("Creating all tables.");
	}
	AmazonDynamoDB dynamoDB = createClient();
	List tableNames = new ArrayList();
	createTable(dynamoDB);
	return Response.status(200).entity(tableNames).build();
}

private void createTable(AmazonDynamoDB amazonDynamoDB) {
	List attributeDefinitions = new ArrayList();
	attributeDefinitions.add(new AttributeDefinition().withAttributeName("tutorial").withAttributeType("S"));
	List keySchema = new ArrayList();
	keySchema.add(new KeySchemaElement().withAttributeName("tutorial").withKeyType(KeyType.HASH));
	CreateTableRequest request = new CreateTableRequest()
			.withTableName("tutorials")
			.withKeySchema(keySchema)
			.withAttributeDefinitions(attributeDefinitions)
			.withProvisionedThroughput(
					new ProvisionedThroughput()
							.withReadCapacityUnits(1L)
							.withWriteCapacityUnits(1L));
	DynamoDB dynamoDB = new DynamoDB(amazonDynamoDB);
	Table table = dynamoDB.createTable(request);
	try {
		table.waitForActive();
	} catch (InterruptedException e) {
		LOGGER.error("Failed to wait for table to become active: " + e.getLocalizedMessage(), e);
	}
}
While the code for removing existing tables is more or less self-explanatory, the method createAllTables() defines a table to store tutorials. The attribute tutorial is used as hash key. For our sample application a read and write capacity of 1 capacity unit should be sufficient. For real world applications this might not be adequate. Finally, the code waits for the tables to become ready. Note that we do not have to specify all attributes when the table is created. Now we can modify our existing method listAllCourses() to use the new tutorials table:
@GET
@Produces("text/json")
@Path("/remove-all-tables")
@GET
@Produces("text/json")
@Path("/list-all-courses")
public Response listAllCourses(@QueryParam("author") String authorQuery) {
	if (LOGGER.isDebugEnabled()) {
		LOGGER.debug("Listing all courses.");
	}
	List tutorials = new ArrayList<>();
	AmazonDynamoDB amazonDynamoDB = DbResource.createClient();

	Map expValues = new HashMap<>();
	expValues.put(":a", new AttributeValue(authorQuery));

	QueryRequest queryRequest = new QueryRequest("tutorials");
	queryRequest.setKeyConditionExpression("author = :a");
	queryRequest.setExpressionAttributeValues(expValues);

	QueryResult queryResult = amazonDynamoDB.query(queryRequest);

	List> items = queryResult.getItems();
	for (Map item : items) {
		AttributeValue author = item.get("author");
		AttributeValue title = item.get("title");
		Tutorial tutorial = new Tutorial();
		tutorial.setAuthor(author.getS());
		tutorial.setTitle(title.getS());
		tutorials.add(tutorial);
	}
	return Response.status(200).entity(tutorials).build();
}
First, we obtain a reference to the AmazonDynamoDB client. Its method query() takes an instance of QueryRequest to perform a query on the requested table. In this simple example, we want to search for all tutorial that are provided by a given author. The author is passed as query parameter to the URL. In JAX-RS this means that we specify an argument for the method listAllCourses() that is annotated with @QueryParam("author").
The value passed to the annotation denotes the name of the query parameter in the URL that should be passed as String into the method. The condition for the query is written as follows: author = :a. The string :a is an attribute, for which we must provide a value. This is done by constructing a HashMap and putting a value for the key :a into it. This HashMap is then set on the QueryRequest.
The result of an invocation of queryResult.getItems() is a list that contains map instances. Each map represents an item, its key/value pairs are stored inside the map. Hence, we iterate over this list and convert each item into an instance of our class Tutorial and return the list of tutorials to the caller of the REST method. The conversion of the Java objects into JSON strings is done by the framework. Now we can invoke the following URLs to create the tables and list all authors:
http://.eu-central-1.elasticbeanstalk.com/tomcat-web-service/db/remove-all-tables
http://.eu-central-1.elasticbeanstalk.com/tomcat-web-service/db/create-all-tables
http://.eu-central-1.elasticbeanstalk.com/tomcat-web-service/tutorial/list-all-courses?author=test
Please replace in the URLs above the string <your-app> and the region with the CNAME and region of your application. Removing all tables is of course not necessary, but it does not harm in this case as we only delete tables that exist. Now it is up to you to implement a method that inserts data into the table.
3.5 Using a RDS
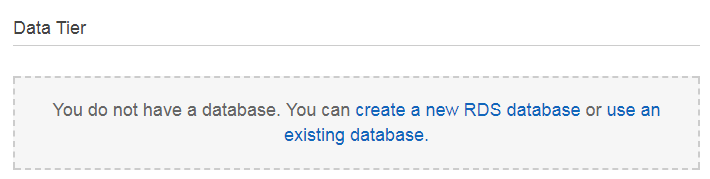
Next to DynamoDB, you can also use a relational database. Therefore, we navigate in the AWS Console to our environment and select the menu item “Configuration”. In the lower part of the configuration page we find a link named “create a new RDS database”:
After clicking on this button, the following page appears
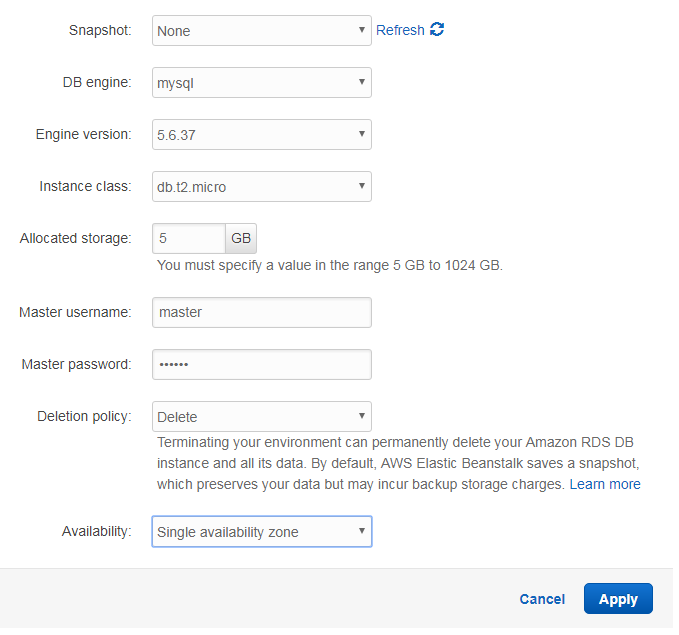
On this page we have to specify the basic configuration details for the RDS instance. As we do not have an existing snapshot, we chose “None” in the corresponding field. As DB engine we chose “MySQL” in version 5.6.37. This DB is supposed to run on a “micro” instance with 5 GB storage. The “deletion policy” determines what should happen if we remove the instance. As this is a tutorial, we do not care about the data and let Amazon delete the instance and all of its data.
Alternatively, you can also specify to create a snapshot of the database. A “single availability zone” is also sufficient for our sample application. After having provided master username and password, we can click on “Apply”. Now it can take up to 10 minutes until the RDS database becomes available. In the meantime, we can adjust the list of maven dependencies in the pom.xml file and add the mysql connector as shown below:
<dependency>
	<groupId>mysql</groupId>
	<artifactId>mysql-connector-java</artifactId>
	<version>5.1.44</version>
</dependency>
Please note that we have to set the scope of this dependency to compile, as the referenced jar file should be placed in the lib folder of our war. Otherwise, the MySQL driver classes would not be available at runtime. Next, we create a new class named RdsResource:
@Path("/rds")
public class RdsResource {

    private static final Log LOGGER = LogFactory.getLog(RdsResource.class);

    @GET
    @Produces("text/json")
    @Path("/list-all-tables")
    public Response listAllTables() {
        if (LOGGER.isDebugEnabled()) {
            LOGGER.debug("Listing all tables.");
        }
        List tableNames = null;
        try {
            tableNames = listAllTablesIntern();
        } catch (SQLException e) {
            return Response.status(500).entity("Listing all tables failed: " + e.getLocalizedMessage()).build();
        }
        return Response.status(200).entity(tableNames).build();
    }

    private List listAllTablesIntern() throws SQLException {
        List tableNames = new ArrayList<>();
        try (Connection connection = createConnection()) {
            if (connection != null) {
                try (Statement stmt = connection.createStatement()) {
                    ResultSet resultSet = stmt.executeQuery("show tables");
                    while (resultSet.next()) {
                        String tableName = resultSet.getString(1);
                        tableNames.add(tableName);
                    }
                }
            }
        }
        return tableNames;
    }
public static Connection createConnection() throws SQLException {
if (System.getProperty("RDS_HOSTNAME") != null) {
try {
Class.forName("com.mysql.jdbc.Driver");
String dbName = System.getProperty("RDS_DB_NAME");
String userName = System.getProperty("RDS_USERNAME");
String password = System.getProperty("RDS_PASSWORD");
String hostname = System.getProperty("RDS_HOSTNAME");
String port = System.getProperty("RDS_PORT");
String jdbcUrl = "jdbc:mysql://" + hostname + ":" + port + "/" + dbName;
if (LOGGER.isDebugEnabled()) {
LOGGER.debug("Connecting to JDBC-URL: " + jdbcUrl);
}
Connection con = DriverManager.getConnection(jdbcUrl, userName, password);
if (LOGGER.isDebugEnabled()) {
LOGGER.debug("Connection to JDBC-URL: " + jdbcUrl + " successful.");
}
return con;
} catch (ClassNotFoundException e) {
LOGGER.error("Could not load driver: " + e.getLocalizedMessage(), e);
}
}
return null;
}
}It will provide a URL that ends with /rds/list-all-tables and returns a list of all available MySQL tables. The method listAllTables() therefore calls the private method listAllTablesIntern and returns a HTTP response with status code 200 if no exception occurred or a status code 500 if listing the tables failed.
The private method listAllTablesIntern() utilizes another private method to obtain a connection to the database: createConnection(). Within a Tomcat based environment, all necessary information is passed to the application through system properties. Querying these predefined system properties allows us to construct a JDBC URL of the following form:
jdbc:mysql://" + hostname + ":" + port + "/" + dbName
In a real world application, this might become a URL of the following form:
jdbc:mysql://aa1im36v00yvfox.cwazv5kmikco.eu-central-1.rds.amazonaws.com:3306/ebdb
With a JDBC connection in our hands, we can issue an SQL statement that lists all existing database tables:
try (Statement stmt = connection.createStatement()) {
	ResultSet resultSet = stmt.executeQuery("show tables");
	while (resultSet.next()) {
		String tableName = resultSet.getString(1);
		tableNames.add(tableName);
	}
}
We return the list of table names in a list that is rendered by the JAX-RS framework into a JSON array. After having updated the version of our sample application in the cloud, we can open the following URL in our browser:
http://.eu-central-1.elasticbeanstalk.com/tomcat-web-service/rds/list-all-tables
Once again: Please replace in the above URLs the string <your-app> and the region with the CNAME and region of your application. This should show up an empty JSON array. Having setup everything as described above, we can now implement methods to create and remove the tables of our application:
@GET
@Produces("text/json")
@Path("/remove-all-tables")
public Response removeAllTables() {
	if (LOGGER.isDebugEnabled()) {
		LOGGER.debug("Removing all tables.");
	}
	List tableNames = new ArrayList<>();
	List tables;
	try {
		tables = listAllTablesIntern();
	} catch (SQLException e) {
		return Response.status(500).entity("Listing all tables failed: " + e.getLocalizedMessage()).build();
	}
	for (String table : tables) {
		try (Connection connection = createConnection()) {
			if (connection != null) {
				try (Statement stmt = connection.createStatement()) {
					stmt.executeUpdate("drop table " + table);
					tableNames.add(table);
				}
			}
		} catch (SQLException e) {
			LOGGER.error("Removing all tables failed: " + e.getLocalizedMessage(), e);
			return Response.status(500).entity("Removing all tables failed: " + e.getLocalizedMessage()).build();
		}
	}
	return Response.status(200).entity(tableNames).build();
}
@GET
@Produces("text/json")
@Path("/create-all-tables")
public Response createAllTables() {
if (LOGGER.isDebugEnabled()) {
LOGGER.debug("Creating all tables.");
}
List tableNames = new ArrayList<>();
try (Connection connection = createConnection()) {
if (connection != null) {
try (Statement stmt = connection.createStatement()) {
stmt.executeUpdate("create table tutorials (" +
"id int not null auto_increment, " +
"author varchar(30) not null," +
"title varchar(30) not null," +
"primary key (id)" +
")");
tableNames.add("tutorials");
}
}
} catch (SQLException e) {
LOGGER.error("Creating tables failed: " + e.getLocalizedMessage(), e);
return Response.status(500).entity("Creating tables failed: " + e.getLocalizedMessage()).build();
}
return Response.status(200).entity(tableNames).build();
}The code above uses the already explained method createConnection() and can therefore be understood easily. The two SQL statements to create and drop the tables are issued over the JDBC API using its executeUpdate() method. We close each statement and connection after its usage to free resources. Please note that in a real world application you might want to pool the connections in order to reuse an existing one for the next request. Modifying the code that inserts and queries tutorials is up to the reader.
4. Java Web Application with Spring Boot
The previous chapter explained how to use the Apache Tomcat environment to run a simple REST API server. The same can be achieved through the popular Spring Boot framework. In this chapter we are therefore going to build a Spring Boot application that runs inside a “Java” environment on AWS and not within a “Tomcat” environment.
Note that we can also build the Spring Boot application to run within the Tomcat environment, but for demonstrating purposes we are running our application in standalone mode. First, we create a new maven project with the following command:
mvn archetype:generate -DgroupId=com.javacodegeeks.ultimate.aws.eb -DartifactId=spring-boot-web -DarchetypeArtifactId=maven-archetype-webapp -DinteractiveMode=false
Next, we let our project inherit from the Spring Boot parent project:
<parent>
	<groupId>org.springframework.boot</groupId>
	<artifactId>spring-boot-starter-parent</artifactId>
	<version>1.5.9.RELEASE</version>
</parent>
This provides us all necessary versions but does not add any dependencies. Hence, we must add them to our pom.xml:
<properties>
	<jersey.version>2.26</jersey.version>
</properties>

<dependencies>
	<dependency>
		<groupId>org.springframework.boot</groupId>
		<artifactId>spring-boot-starter-web</artifactId>
	</dependency>
	<dependency>
		<groupId>org.springframework.boot</groupId>
		<artifactId>spring-boot-test</artifactId>
		<scope>test</scope>
	</dependency>
	<dependency>
		<groupId>org.springframework</groupId>
		<artifactId>spring-test</artifactId>
		<scope>test</scope>
	</dependency>
	<dependency>
		<groupId>junit</groupId>
		<artifactId>junit</artifactId>
		<version>4.12</version>
		<scope>test</scope>
	</dependency>
	<dependency>
		<groupId>org.glassfish.jersey.core</groupId>
		<artifactId>jersey-client</artifactId>
		<version>${jersey.version}</version>
		<scope>test</scope>
	</dependency>
	<dependency>
		<groupId>org.glassfish.jersey.inject</groupId>
		<artifactId>jersey-hk2</artifactId>
		<version>${jersey.version}</version>
		<scope>test</scope>
	</dependency>
</dependencies>

<build>
	<plugins>
		<plugin>
			<groupId>org.springframework.boot</groupId>
			<artifactId>spring-boot-maven-plugin</artifactId>
		</plugin>
	</plugins>
</build>
The main dependency is spring-boot-starter-web. The other ones are used for our integration tests. spring-boot-maven-plugin is a maven plugin that packages the application such that we can start it easily from the command line. Now we can implement the simplest application possible:
@RestController
@EnableAutoConfiguration
public class Example {

    @RequestMapping("/")
    String home() {
        return "Hello World!";
    }

    public static void main(String[] args) throws Exception {
        SpringApplication.run(Example.class, args);
    }

}
The main() method starts the Example class as controller and passes the optional arguments from the command line to the run() method of the SpringApplication. Annotating the class with @RestController turns it into a REST endpoint. The method home() just returns a static string. Its annotation @RequestMapping("/") denotes that it should be called in case the user requests the root URL of our application.
In the Amazon AWS cloud, the proxy server in front of our application will route all incoming traffic to port 5000. This forces us to start our application on this specific port. Hence, we create a file application.properties with the following content and place it under src/main/resources:
server.port=5000
Now we are able to start the application on the command line:
mvn spring-boot:run
This will produce an output similar to the following (shortened) one:
[...]
[INFO] --- spring-boot-maven-plugin:1.5.9.RELEASE:run (default-cli) @ spring-boot-web ---

  .   ____          _            __ _ _
 /\\ / ___'_ __ _ _(_)_ __  __ _ \ \ \ \
( ( )\___ | '_ | '_| | '_ \/ _` | \ \ \ \
 \\/  ___)| |_)| | | | | || (_| |  ) ) ) )
  '  |____| .__|_| |_|_| |_\__, | / / / /
 =========|_|==============|___/=/_/_/_/
 :: Spring Boot ::        (v1.5.9.RELEASE)

[...]
Pressing Ctrl+C will terminate the application. As we do not want to test all the code manually after having it uploaded to the cloud, we write a small integration test like the following one:
@RunWith(SpringRunner.class)
@SpringBootTest(classes = { Example.class },
	webEnvironment = SpringBootTest.WebEnvironment.DEFINED_PORT)
public class ExampleTest {

    @Test
    public void testHelloWorld() {
        Client client = ClientBuilder.newClient();
        WebTarget target = client.target("http://localhost:5000").path("/");
        Response response = target.request().get();
        assertThat(response.getStatus(), is(200));
    }
}
It is a simple junit test that runs with a SpringRunner. The annotation SpringBootTest tells the framework which resource we want to test and the port to use. The actual code of our test is simple and uses a jersey client to invoke the URL http://localhost:5000/.
After we have received the response, we verify its status code. Knowing that everything works as expected locally, we create a new environment on Amazon Beanstalk. The procedure is the same as before, but now we chose the “Java” instead of the “Tomcat” environment:
Once the new environment has been created, we can enter the following URL into our web browser and check that it works:
http://spring-boot-web-env.eu-central-1.elasticbeanstalk.com/
Please replace spring-boot-web-env and eu-central-1 with the CNAME and region of your environment. Now you should see the string “Hello World” in your browser. Note that we use the standard port 80 to invoke the REST API and not the port 5000, as the proxy in front of our application listens on the standard port and only dispatches this to port 5000 of our application.
5. Download the Source Code
This was an Amazon Elastic Beanstalk Tutorial.
You can download the full source codes of this example here:
