Erlang has been around for over 30 years and was built well before multi-core CPUs existed. Yet it’s a language that couldn’t be more relevant today! The underlying architecture of the language lends itself perfectly to the modern CPUs that are on every computer and mobile device.
The computer I’m writing this article on has a 2.2 GHz Intel Core i7 CPU, but more importantly it comes with eight cores. Simply put, it can perform eight tasks at once.
The ability to take advantage of these cores exists in many languages but often feels out of place or fraught with traps and challenges. If you’ve ever had to worry about a mutex, shared mutable state, and code being thread safe, you know that there are at least several pitfalls to be wary of.
In Erlang, and therefor Elixir which leverages the Erlang VM (BEAM), it makes writing and reasoning about concurrent code feel effortless. While Ruby has some great libraries for helping write concurrent code, with Elixir it’s built-in and a first-class citizen.
That isn’t to say that writing highly concurrent or distributed systems is easy. Far from it! But with Elixir, the language is on your side.
Processes, PIDs, and Mailboxes
Before we look at how to go about writing concurrent code in Elixir, it’s a good idea to understand the terms that we’ll be using and the model of concurrency that Elixir employs.
Actor Model
Concurrency in Elixir (and Erlang) is based upon the Actor Model. Actors are single threaded processes which can send and receive messages amongst themselves. The Erlang VM manages their creation, execution, and their communication. Their memory is completely isolated, which makes having to worry about “shared state” a non-issue.
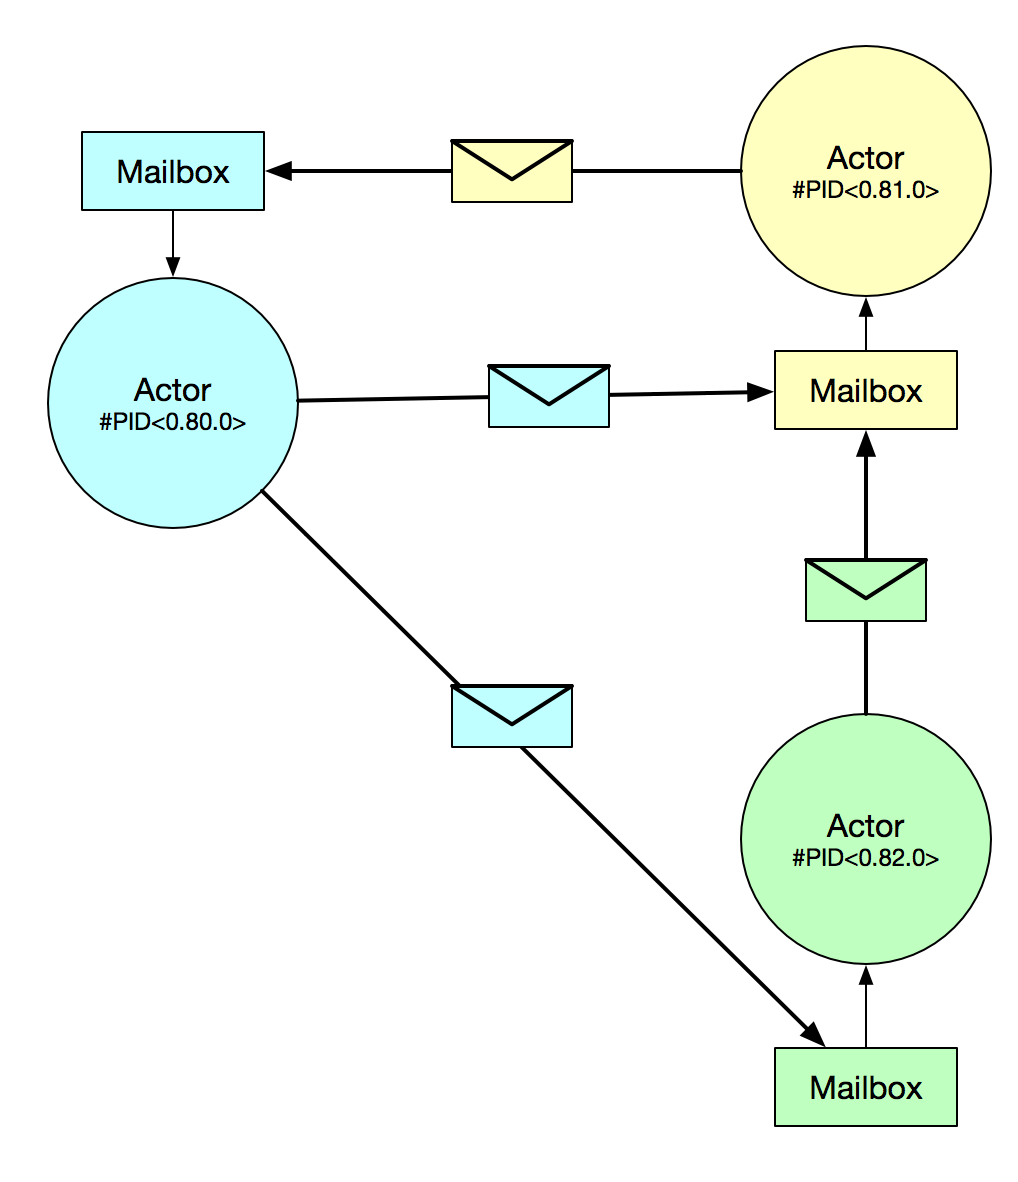
- Process: Similar to an OS level thread, but much more lightweight. This is essentially the unit of concurrency in Elixir. The processes are managed by BEAM (the Erlang runtime), which handles spreading the work out over all the cores of the CPU or even across other BEAM nodes on the network. A system can have millions of these processes at a time, and you shouldn’t be afraid to take liberal advantage of them.
- Process ID (PID): This is a reference to a specific process. Much like an IP address on the internet, a PID is how you tell Elixir which process you want to send a message to.
- Mailbox: For processes to communicate with each other, messages are sent back and forth. When a message is sent to a process, it arrives to that process’ mailbox. It is up to that process to receive the messages sitting in its mailbox.
So to bring it all together, a process in Elixir is the actor. It can communicate with another actor by sending a message to a specific PID. The recipient can receive a message by checking its mailbox for new messages.
Writing Concurrent Code
In this section, we’ll look at how the Actor Model for concurrency is actually used within Elixir.
Creating processes
Creating a new process is done with the spawn or spawn_link functions. This function accepts an anonymous function which will be invoked in a separate process. In response, we are given a process identifier, often referred to as a PID. This is important if we want to communicate with this process going forward or ask the kernel for information about the process.
pid = spawn(fn -> :timer.sleep 15000 end)
#PID<0.89.0>
Everything in Elixir runs within a process. You can find out the PID of your current process by calling the self() function. So even when you are in the iex shell, by calling self() you can see the PID for that iex session, something like #PID<0.80.0>.
We can use this PID to ask Elixir for information about the process. This is done using the Process.info(pid) function.
Process.info(pid)

[current_function: {:timer, :sleep, 1}, initial_call: {:erlang, :apply, 2},
 status: :waiting, message_queue_len: 0, messages: [], links: [],
 dictionary: [], trap_exit: false, error_handler: :error_handler,
 priority: :normal, group_leader: #PID<0.50.0>, total_heap_size: 233,
 heap_size: 233, stack_size: 2, reductions: 43,
 garbage_collection: [max_heap_size: %{error_logger: true, kill: true, size: 0},
  min_bin_vheap_size: 46422, min_heap_size: 233, fullsweep_after: 65535,
  minor_gcs: 0], suspending: []]
It’s interesting what you can find here! For example, in iex if you ask for the info about itself Process.info(self()), you’ll see the history of the commands you’ve typed:
iex(1)> 5 + 5
iex(2)> IO.puts "Hello!"
iex(3)> pid = spawn(fn -> :timer.sleep 15000 end)
iex(4)> Process.info(self())[:dictionary][:iex_history]

%IEx.History.State{queue: {[
  {3, 'pid = spawn(fn -> :timer.sleep 15000 end)\n', #PID<0.84.0>},
  {2, 'IO.puts "Hello!"\n', :ok}],
  [{1, '5 + 5\n', 10}]},
 size: 3, start: 1}
Sending messages
Messages can be sent to a process using the send function. You provide it with the PID of the process you wish to send a message to along with the data being sent. The message is sent to the receiving processes’ mailbox.
Sending is only half the battle though. If the recipient isn’t prepared to receive the message, it will fall on deaf ears. A process can receive messages by using the receive construct, which pattern matches on the messages being received.
In the example below, we spawn a new process which waits to receive a message. Once it has received a message in its mailbox, we’ll simply output it to the screen.
pid = spawn(fn ->
  IO.puts "Waiting for messages"
  receive do
    msg -> IO.puts "Received #{inspect msg}"
  end
end)

send(pid, "Hello Process!")
Keeping our process alive
A process exits when it no longer has any code to execute. In the example above, the process will stay alive until it has received its first message, then exit. So the question then arises: How do we get a long running process?
We can do this by utilizing a loop function that calls itself recursively. This loop will simply receive a message and then call itself to wait for the next one.
defmodule MyLogger do
  def start do
    IO.puts "#{__MODULE__} at your service"
    loop()
  end

  def loop do
    receive do
      msg -> IO.puts msg
    end
    loop()
  end
end

# This time we will spawn a new processes based on the MyLogger module's method `start`.
pid = spawn(MyLogger, :start, [])

send(pid, "First message")
send(pid, "Another message")
Maintaining state
Our current process doesn’t track any state. It simply executes its code without maintaining any extra state or information.
What if we wanted our logger to keep track of some stats, like the number of messages it has logged? Notice the call spawn(MyLogger, :start, []); the last parameter, which is an empty list, is actually a list of args that can be passed to the process. This acts as the “initial state” or what is passed to the entry point function. Our state will simply be a number that tracks the number of messages we’ve logged.
Now, when the init function is called, it will be passed the number 0. It’s up to us to keep track of this number as we do our work, always passing the updated state to the next loop of our process.
Another thing we’ve done is added an additional action our logger can perform. It can now log messages and also print out the stats. To do this, we’ll send our messages as a tuple where the first value is an atom that represents the command we want our process to perform. Pattern matching in the receive construct allows us to differ one message’s intent from another.
defmodule MyLogger do
  def start_link do
    # __MODULE__ refers to the current module
    spawn(__MODULE__, :init, [0])
  end

  def init(count) do
    # Here we could initialize other values if we wanted to
    loop(count)
  end

  def loop(count) do
    new_count = receive do
      {:log, msg} ->
        IO.puts msg
        count + 1
      {:stats} ->
        IO.puts "I've logged #{count} messages"
        count
    end
    loop(new_count)
  end
end

pid = MyLogger.start_link
send(pid, {:log, "First message"})
send(pid, {:log, "Another message"})
send(pid, {:stats})
Refactoring into a client and server
We can refactor our module a little bit to make it more user friendly. Instead of directly using the send function, we can hide the details behind a client module. Its job will be to send messages to the process running the server module and optionally wait for a response for synchronous calls.
defmodule MyLogger.Client do
  def start_link do
    spawn(MyLogger.Server, :init, [0])
  end

  def log(pid, msg) do
    send(pid, {:log, msg})
  end

  def print_stats(pid) do
    send(pid, {:print_stats})
  end

  def return_stats(pid) do
    send(pid, {:return_stats, self()})
    receive do
      {:stats, count} -> count
    end
  end
end
Our server module is quite simple. It consists of an init function which doesn’t do much in this case other than start the loop function looping. The loop function is in charge of receiving messages from the mailbox, performing the requested task and then looping again with the updated state.
defmodule MyLogger.Server do
  def init(count \\ 0) do
    loop(count)
  end

  def loop(count) do
    new_count = receive do
      {:log, msg} ->
        IO.puts msg
        count + 1
      {:print_stats} ->
        IO.puts "I've logged #{count} messages"
        count
      {:return_stats, caller} ->
        send(caller, {:stats, count})
        count
    end
    loop(new_count)
  end
end
If we are to use the code below, we don’t really need to know how the server is implemented. We interact directly with the client, and it in turn sends messages to the server. I’ve aliased the module just to avoid typing MyLogger.Client various times.
alias MyLogger.Client, as: Logger

pid = Logger.start_link
Logger.log(pid, "First message")
Logger.log(pid, "Another message")
Logger.print_stats(pid)
stats = Logger.return_stats(pid)
Refactoring the server
Notice that all of the messages being received by the server are being pattern matched in order to determine how to handle them? We can do better than having a single large function by creating a series of “handler” functions that pattern match on the data being received.
Not only does this clean up our code, it also makes it much easier to test. We can simply call the individual handle_receive functions with the correct arguments to test that they are working correctly.
defmodule MyLogger.Server do
  def init(count \\ 0) do
    loop(count)
  end

  def loop(count) do
    new_count = receive do
      message -> handle_receive(message, count)
    end
    loop(new_count)
  end

  def handle_receive({:log, msg}, count) do
    IO.puts msg
    count + 1
  end

  def handle_receive({:print_stats}, count) do
    IO.puts "I've logged #{count} messages"
    count
  end

  def handle_receive({:return_stats, caller}, count) do
    send(caller, {:stats, count})
    count
  end

  def handle_receive(other, count) do
    IO.puts "Unhandled message of #{inspect other} received by logger"
    count
  end
end
Parallel map
For a final example, let’s take a look at performing a parallel map.
What we’ll be doing is mapping a list of URLs to their returned HTTP status code. If we were to do this without any concurrency, our speed would be the sum of the speed of checking each URL. If we had five and each took oe second, it would take approximately five seconds to finish checking all the URLs. If we could check them in parallel though, the amount of time would be about one second, the time of the slowest URL since they are happening all at once.
Our test implementation looks like this:
defmodule StatusesTest do
  use ExUnit.Case

  test "parallel status map" do
    urls = [
      url1 = "http://www.fakeresponse.com/api/?sleep=2",
      url2 = "http://www.fakeresponse.com/api/?sleep=1",
      url3 = "http://www.fakeresponse.com/api/?status=500",
      url4 = "https://www.leighhalliday.com",
      url5 = "https://www.reddit.com"
    ]
    assert Statuses.map(urls) == [
      {url1, 200},
      {url2, 200},
      {url3, 500},
      {url4, 200},
      {url5, 200}
    ]
  end
end
Now for the implementation of the actual code. I’ve added comments to make it clear what each step is doing.
defmodule Statuses do
  def map(urls) do
    # Put self into variable to send to spawned process
    caller = self()
    urls
      # Map the URLs to a spawns process. Remember a `pid` is returned.
      |> Enum.map(&(spawn(fn -> process(&1, caller) end)))
      # Map the returned pids
      |> Enum.map(fn pid ->
          # Receive the response from this pid
          receive do
            {^pid, url, status} -> {url, status}
          end
        end)
  end

  def process(url, caller) do
    status =
      case HTTPoison.get(url) do
        {:ok, %HTTPoison.Response{status_code: status_code}} ->
          status_code
        {:error, %HTTPoison.Error{reason: reason}} ->
          {:error, reason}
      end
    # Send message back to caller with result
    send(caller, {self(), url, status})
  end
end
When we ran the code, it took 2.2 seconds. This makes sense because one of the URLs is a faker URL service that we told to delay the response by two seconds…so it took approximately the time of the slowest URL.
Where to go from here?
In this article, we covered the basics of spawning a new process, sending that process a message, maintaining state in the process via recursive looping, and receiving messages from other processes. This is a good start, but there is a lot more!
Elixir comes with some very cool modules to help us remove some of the boilerplate involved in what we did today. Agent is a module for maintaining state in a process. Task is a module for running code concurrently and optionally receiving its response. GenServer handles both state and concurrent tasks in a long standing process. I plan on covering these topics in a second article in this series.
Lastly there is the whole topic of linking, monitoring, and responding to errors which may occur in a process. Elixir comes with a Supervisor module for this and is all part of building a dependable fault-tolerant system.
| Reference: | Concurrency in Elixir from our JCG partner Leigh Halliday at the Codeship Blog blog. |
